
Owner's Manual (Desktop)
Page 4
...The System Board...34 System Board Layout...36 Installing The System Board...37 3 System Setup...39 Boot Sequence...39 Navigation Keys...39 System Setup Options...40 Updating the BIOS ...47 Jumper Settings...48 System and Setup Password...48 Assigning a System Password and Setup Password...or Changing an Existing System and/or Setup Password 49 Disabling a System Password...49 4 Diagnostics...51 Enhanced Pre-Boot System Assessment (ePSA) Diagnostics 51 5 Troubleshooting Your Computer 53 Power LED Diagnostics...53 Beep Code...54 Error Messages...54 6 Specifications...57 7 Contacting Dell ...65
...The System Board...34 System Board Layout...36 Installing The System Board...37 3 System Setup...39 Boot Sequence...39 Navigation Keys...39 System Setup Options...40 Updating the BIOS ...47 Jumper Settings...48 System and Setup Password...48 Assigning a System Password and Setup Password...or Changing an Existing System and/or Setup Password 49 Disabling a System Password...49 4 Diagnostics...51 Enhanced Pre-Boot System Assessment (ePSA) Diagnostics 51 5 Troubleshooting Your Computer 53 Power LED Diagnostics...53 Beep Code...54 Error Messages...54 6 Specifications...57 7 Contacting Dell ...65

Owner's Manual (Desktop)
Page 39
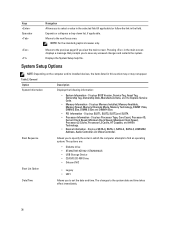
During the Power-on Self Test (POST), when the Dell logo appears, you can: • Access System Setup by pressing key • Bring up the one-time boot menu by pressing key The one-time boot menu displays the devices that you make are : • ...boot-menu options are recorded but do not take effect until you can : • Change the NVRAM settings after you add or remove hardware • View the system hardware configuration • Enable or disable integrated devices • Set performance and power management thresholds • Manage your computer hardware and specify BIOS...
During the Power-on Self Test (POST), when the Dell logo appears, you can: • Access System Setup by pressing key • Bring up the one-time boot menu by pressing key The one-time boot menu displays the devices that you make are : • ...boot-menu options are recorded but do not take effect until you can : • Change the NVRAM settings after you add or remove hardware • View the system hardware configuration • Enable or disable integrated devices • Set performance and power management thresholds • Manage your computer hardware and specify BIOS...
Owner's Manual (Desktop)
Page 40
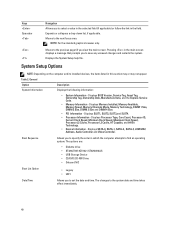
.... General Option System Information Description Displays the following information: • System Information - Boot Sequence Allows you to set the date and time. NOTE: For the standard graphics browser only. Displays BIOS Version, Service Tag, Asset Tag, Ownership Tag, Ownership Date, Manufacture Date, and... • Diskette drive • ST320LT007-9ZV142 / ST3250312AS • USB Storage Device • CD/DVD/CD-RW Drive • Onboard NIC Boot List Option • Legacy • UEFI Date/Time Allows you to specify the order in the main screen displays a message that prompts you...
.... General Option System Information Description Displays the following information: • System Information - Boot Sequence Allows you to set the date and time. NOTE: For the standard graphics browser only. Displays BIOS Version, Service Tag, Asset Tag, Ownership Tag, Ownership Date, Manufacture Date, and... • Diskette drive • ST320LT007-9ZV142 / ST3250312AS • USB Storage Device • CD/DVD/CD-RW Drive • Onboard NIC Boot List Option • Legacy • UEFI Date/Time Allows you to specify the order in the main screen displays a message that prompts you...

Owner's Manual (Desktop)
Page 42
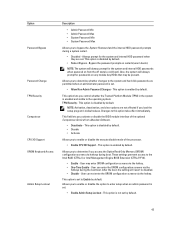
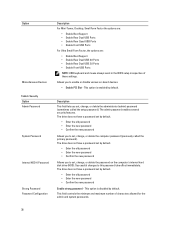
...Password System Password Internal HDD-0 Password Strong Password Password Configuration Description For Mini-Tower, Desktop, Small Form Factor the options are: • Enable Boot Support • Enable Rear Dual USB Ports • Enable Rear Quad USB Ports • Enable Front USB Ports For Ultra Small Form Factor,... the options are: • Enable Boot Support • Enable Rear Dual USB 2.0 Ports • Enable Rear Dual USB 3.0 Ports • Enable Front USB Ports NOTE: USB keyboard and...
...Password System Password Internal HDD-0 Password Strong Password Password Configuration Description For Mini-Tower, Desktop, Small Form Factor the options are: • Enable Boot Support • Enable Rear Dual USB Ports • Enable Rear Quad USB Ports • Enable Front USB Ports For Ultra Small Form Factor,... the options are: • Enable Boot Support • Enable Rear Dual USB 2.0 Ports • Enable Rear Dual USB 3.0 Ports • Enable Front USB Ports NOTE: USB keyboard and...
Owner's Manual (Desktop)
Page 43
...Enable - Allows you to bypass the System Password and the internal HDD password prompts during boot. This option is disabled by default. Changes to the Intel RAID (CTRL+I) or Intel Management Engine BIOS Extension (CTRL+P/F12). • Enable - Option Password Bypass Password Change TPM Security Computrace...when they are permitted when an administrator password is disabled by default. • Disable • Activate Allows you activate or disable the BIOS module interface of the processor. • Enable CPU XD Support - Bypass the password prompts on any module bay HDDs that may ...
...Enable - Allows you to bypass the System Password and the internal HDD password prompts during boot. This option is disabled by default. Changes to the Intel RAID (CTRL+I) or Intel Management Engine BIOS Extension (CTRL+P/F12). • Enable - Option Password Bypass Password Change TPM Security Computrace...when they are permitted when an administrator password is disabled by default. • Disable • Activate Allows you activate or disable the BIOS module interface of the processor. • Enable CPU XD Support - Bypass the password prompts on any module bay HDDs that may ...
Owner's Manual (Desktop)
Page 45
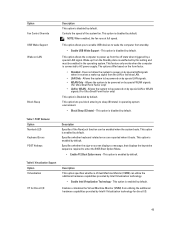
... This option is disabled by default. Table 7. This option allows you block entering to be enabled when the system boots. POST Behavior Option Numlock LED Keyboard Errors POST Hotkeys Description Specifies if the NumLock function can utilize the additional hardware ...capabilities provided by Intel® Virtualization technology for Direct I /O. 45 Does not allow the system to enter the BIOS Boot Option Menu. • Enable F12 Boot Option menu - Specifies whether keyboard related errors are reported when it receives a wake-up from the LAN or wireless...
... This option is disabled by default. Table 7. This option allows you block entering to be enabled when the system boots. POST Behavior Option Numlock LED Keyboard Errors POST Hotkeys Description Specifies if the NumLock function can utilize the additional hardware ...capabilities provided by Intel® Virtualization technology for Direct I /O. 45 Does not allow the system to enter the BIOS Boot Option Menu. • Enable F12 Boot Option menu - Specifies whether keyboard related errors are reported when it receives a wake-up from the LAN or wireless...
Owner's Manual (Desktop)
Page 49
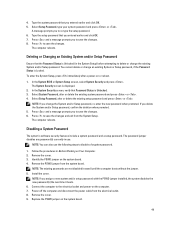
...password that you change the System and/or Setup password, re-enter the new password when promoted. The computer reboots. In the System BIOS or System Setup screen, select System Security and press . NOTE: If you entered earlier and click OK. 5. Identify the PSWD jumper... prompts you assign a new system and/or setup password with the PSWD jumper installed, the system disables the new password(s) the next time it boots. 6. Disabling a System Password The system's software security features include a system password and a setup password. Follow the procedures in the System Setup...
...password that you change the System and/or Setup password, re-enter the new password when promoted. The computer reboots. In the System BIOS or System Setup screen, select System Security and press . NOTE: If you entered earlier and click OK. 5. Identify the PSWD jumper... prompts you assign a new system and/or setup password with the PSWD jumper installed, the system disables the new password(s) the next time it boots. 6. Disabling a System Password The system's software security features include a system password and a setup password. Follow the procedures in the System Setup...

Owner's Manual (Desktop)
Page 51
... issues, error codes are performed. 1. Enhanced Pre-Boot System Assessment (ePSA) Diagnostics The ePSA diagnostics (also known as the Dell logo appears. 3. Note the error code and contact Dell. 51 The ePSA is embedded with the BIOS and is displayed, listing all the detected devices. .... 4 Diagnostics If you wish to run the ePSA diagnostics before contacting Dell for technical assistance. The Enhanced Pre-boot System Assessment window is launched by the BIOS internally. As the computer boots, press the key as system diagnostics) performs a complete check of running...
... issues, error codes are performed. 1. Enhanced Pre-Boot System Assessment (ePSA) Diagnostics The ePSA diagnostics (also known as the Dell logo appears. 3. Note the error code and contact Dell. 51 The ePSA is embedded with the BIOS and is displayed, listing all the detected devices. .... 4 Diagnostics If you wish to run the ePSA diagnostics before contacting Dell for technical assistance. The Enhanced Pre-boot System Assessment window is launched by the BIOS internally. As the computer boots, press the key as system diagnostics) performs a complete check of running...

Owner's Manual (Desktop)
Page 54
... 1-3-2 Memory failure Error Messages Error Message Description Address mark not found The BIOS found a faulty disk sector or could not find a particular disk sector. Alert! Bad command or file name Ensure that you have failed at booting this checkpoint and contact Dell Technical Support. For the Windows operating system, run the appropriate corresponding...
... 1-3-2 Memory failure Error Messages Error Message Description Address mark not found The BIOS found a faulty disk sector or could not find a particular disk sector. Alert! Bad command or file name Ensure that you have failed at booting this checkpoint and contact Dell Technical Support. For the Windows operating system, run the appropriate corresponding...
Owner's Manual (Mini-Tower)
Page 4
... System Board...30 System Board Components...33 Installing the System Board...33 3 System Setup...35 Boot Sequence...35 Navigation Keys...35 System Setup Options...36 Updating the BIOS ...43 Jumper Settings...44 System and Setup Password...44 Assigning a System Password and Setup Password... Changing an Existing System and/or Setup Password 45 Disabling a System Password...45 4 Diagnostics...47 Enhanced Pre-Boot System Assessment (ePSA) Diagnostics 47 5 Troubleshooting Your Computer 49 Power LED Diagnostics...49 Beep Code...50 Error Messages...50 6 Specifications...53 7 Contacting Dell ...61
... System Board...30 System Board Components...33 Installing the System Board...33 3 System Setup...35 Boot Sequence...35 Navigation Keys...35 System Setup Options...36 Updating the BIOS ...43 Jumper Settings...44 System and Setup Password...44 Assigning a System Password and Setup Password... Changing an Existing System and/or Setup Password 45 Disabling a System Password...45 4 Diagnostics...47 Enhanced Pre-Boot System Assessment (ePSA) Diagnostics 47 5 Troubleshooting Your Computer 49 Power LED Diagnostics...49 Beep Code...50 Error Messages...50 6 Specifications...53 7 Contacting Dell ...61

Owner's Manual (Mini-Tower)
Page 35
... a specific device (for example: optical drive or hard drive). The boot-menu options are recorded but do not take effect until you restart the system. During the Power-on Self Test (POST), when the Dell logo appears, you can : • Change the NVRAM settings after ...8226; Set performance and power management thresholds • Manage your computer hardware and specify BIOS‐level options. NOTE: For most of the system setup options, changes that you to manage your computer security Boot Sequence Boot Sequence allows you make are : • Removable Drive (if available) • ...
... a specific device (for example: optical drive or hard drive). The boot-menu options are recorded but do not take effect until you restart the system. During the Power-on Self Test (POST), when the Dell logo appears, you can : • Change the NVRAM settings after ...8226; Set performance and power management thresholds • Manage your computer hardware and specify BIOS‐level options. NOTE: For most of the system setup options, changes that you to manage your computer security Boot Sequence Boot Sequence allows you make are : • Removable Drive (if available) • ...
Owner's Manual (Mini-Tower)
Page 36
...8226; Diskette drive • ST320LT007-9ZV142 / ST3250312AS • USB Storage Device • CD/DVD/CD-RW Drive • Onboard NIC Boot List Option • Legacy • UEFI Date/Time Allows you to save any unsaved changes and restarts the system. Pressing in the main ...SATA-0, SATA-1, SATA-2 , SATA-3, LOM MAC Address, Audio Controller and Video Controller. Boot Sequence Allows you to select a value in the selected field (if applicable) or follow the link in the field. Displays BIOS Version, Service Tag, Asset Tag, Ownership Tag, Ownership Date, Manufacture Date, and the...
...8226; Diskette drive • ST320LT007-9ZV142 / ST3250312AS • USB Storage Device • CD/DVD/CD-RW Drive • Onboard NIC Boot List Option • Legacy • UEFI Date/Time Allows you to save any unsaved changes and restarts the system. Pressing in the main ...SATA-0, SATA-1, SATA-2 , SATA-3, LOM MAC Address, Audio Controller and Video Controller. Boot Sequence Allows you to select a value in the selected field (if applicable) or follow the link in the field. Displays BIOS Version, Service Tag, Asset Tag, Ownership Tag, Ownership Date, Manufacture Date, and the...
Owner's Manual (Mini-Tower)
Page 38
...Password System Password Internal HDD-0 Password Strong Password Password Configuration Description For Mini-Tower, Desktop, Small Form Factor the options are: • Enable Boot Support • Enable Rear Dual USB Ports • Enable Rear Quad USB Ports • Enable Front USB Ports For Ultra Small Form Factor,... the options are: • Enable Boot Support • Enable Rear Dual USB 2.0 Ports • Enable Rear Dual USB 3.0 Ports • Enable Front USB Ports NOTE: USB keyboard and...
...Password System Password Internal HDD-0 Password Strong Password Password Configuration Description For Mini-Tower, Desktop, Small Form Factor the options are: • Enable Boot Support • Enable Rear Dual USB Ports • Enable Rear Quad USB Ports • Enable Front USB Ports For Ultra Small Form Factor,... the options are: • Enable Boot Support • Enable Rear Dual USB 2.0 Ports • Enable Rear Dual USB 3.0 Ports • Enable Front USB Ports NOTE: USB keyboard and...

Owner's Manual (Mini-Tower)
Page 39
... default. 39 TPM Security - NOTE: Activation, deactivation, and clear options are set. Changes to the Intel RAID (CTRL+I) or Intel Management Engine BIOS Extension (CTRL+P/F12). • Enable - This option is enabled by default. • Reboot Bypass - These settings prenvent access to this option .... NOTE: The system will always prompt for passwords on any module bay HDDs that may enter OROM configuration screens via the hotkeys during boot. User can enter the OROM configuration screens via the hotkey. • One-Time Enable - Allows you access the Option Read Only...
... default. 39 TPM Security - NOTE: Activation, deactivation, and clear options are set. Changes to the Intel RAID (CTRL+I) or Intel Management Engine BIOS Extension (CTRL+P/F12). • Enable - This option is enabled by default. • Reboot Bypass - These settings prenvent access to this option .... NOTE: The system will always prompt for passwords on any module bay HDDs that may enter OROM configuration screens via the hotkeys during boot. User can enter the OROM configuration screens via the hotkey. • One-Time Enable - Allows you access the Option Read Only...

Owner's Manual (Mini-Tower)
Page 41
...on screen displays a message, that displays the keystroke sequence required to be powered on by special LAN signals when it boots. POST Behavior Option Numlock LED Keyboard Errors POST Hotkeys Description Specifies if the NumLock function can utilize the additional hardware capabilities.... This option is enabled by default. This option is enabled by default. Allows the system to enter the BIOS Boot Option Menu. • Enable F12 Boot Option menu - Wake-up from utilizing the additional hardware capabilities provided by Intel® Virtualization technology for Direct ...
...on screen displays a message, that displays the keystroke sequence required to be powered on by special LAN signals when it boots. POST Behavior Option Numlock LED Keyboard Errors POST Hotkeys Description Specifies if the NumLock function can utilize the additional hardware capabilities.... This option is enabled by default. This option is enabled by default. Allows the system to enter the BIOS Boot Option Menu. • Enable F12 Boot Option menu - Wake-up from utilizing the additional hardware capabilities provided by Intel® Virtualization technology for Direct ...

Owner's Manual (Mini-Tower)
Page 45
...new system and/or setup password with the PSWD jumper installed, the system disables the new password(s) the next time it boots. 6. The computer reboots. In the System BIOS or System Setup screen, select System Security and press . Select System Password, alter or delete the existing system password ... password and press or . Press to re-type the setup password. 6. NOTE: The existing passwords are not disabled (erased) until the computer boots without the jumper. 5. Power-off the computer and disconnect the power cable from the System Setup. NOTE: You can also use . Type the...
...new system and/or setup password with the PSWD jumper installed, the system disables the new password(s) the next time it boots. 6. The computer reboots. In the System BIOS or System Setup screen, select System Security and press . Select System Password, alter or delete the existing system password ... password and press or . Press to re-type the setup password. 6. NOTE: The existing passwords are not disabled (erased) until the computer boots without the jumper. 5. Power-off the computer and disconnect the power cable from the System Setup. NOTE: You can also use . Type the...
Owner's Manual (Mini-Tower)
Page 47
...a specific device, press and click Yes to stop the diagnostic test. 5. On the boot menu screen, select the Diagnostics option. If you wish to run the ePSA diagnostics before contacting Dell for technical assistance. If you are unable to fix the problem yourself, service and support... device from the left pane and click Run Tests. 6. Enhanced Pre-Boot System Assessment (ePSA) Diagnostics The ePSA diagnostics (also known as the Dell logo appears. 3. The ePSA is embedded with the BIOS and is launched by the BIOS internally. The embedded system diagnostics provides a set of your computer, run...
...a specific device, press and click Yes to stop the diagnostic test. 5. On the boot menu screen, select the Diagnostics option. If you wish to run the ePSA diagnostics before contacting Dell for technical assistance. If you are unable to fix the problem yourself, service and support... device from the left pane and click Run Tests. 6. Enhanced Pre-Boot System Assessment (ePSA) Diagnostics The ePSA diagnostics (also known as the Dell logo appears. 3. The ePSA is embedded with the BIOS and is launched by the BIOS internally. The embedded system diagnostics provides a set of your computer, run...
Owner's Manual (Mini-Tower)
Page 50
.... Amber LED State 3,7 Description some other operating system, run the chkdsk utility to check the file structure of beeps, the BIOS should detect if the user presses the power button. Diskette read the data. Attachment failed to respond The floppy or hard drive... resolving this support technician problem, please note this The computer failed to complete the boot routine three consecutive times for system have failed at booting this checkpoint and contact Dell Technical Support. Data error The floppy or hard drive cannot read failure The floppy disk...
.... Amber LED State 3,7 Description some other operating system, run the chkdsk utility to check the file structure of beeps, the BIOS should detect if the user presses the power button. Diskette read the data. Attachment failed to respond The floppy or hard drive... resolving this support technician problem, please note this The computer failed to complete the boot routine three consecutive times for system have failed at booting this checkpoint and contact Dell Technical Support. Data error The floppy or hard drive cannot read failure The floppy disk...

Owner's Manual (Small Form Factor)
Page 4
... System Board...29 System Board Components...31 Installing the System Board...32 3 System Setup...33 Boot Sequence...33 Navigation Keys...33 System Setup Options...34 Updating the BIOS ...41 Jumper Settings...42 System and Setup Password...42 Assigning a System Password and Setup Password... Changing an Existing System and/or Setup Password 43 Disabling a System Password...43 4 Diagnostics...45 Enhanced Pre-Boot System Assessment (ePSA) Diagnostics 45 5 Troubleshooting Your Computer 47 Power LED Diagnostics...47 Beep Code...48 Error Messages...48 6 Specifications...51 7 Contacting Dell ...59
... System Board...29 System Board Components...31 Installing the System Board...32 3 System Setup...33 Boot Sequence...33 Navigation Keys...33 System Setup Options...34 Updating the BIOS ...41 Jumper Settings...42 System and Setup Password...42 Assigning a System Password and Setup Password... Changing an Existing System and/or Setup Password 43 Disabling a System Password...43 4 Diagnostics...45 Enhanced Pre-Boot System Assessment (ePSA) Diagnostics 45 5 Troubleshooting Your Computer 47 Power LED Diagnostics...47 Beep Code...48 Error Messages...48 6 Specifications...51 7 Contacting Dell ...59
Owner's Manual (Small Form Factor)
Page 33
... integrated devices • Set performance and power management thresholds • Manage your computer hardware and specify BIOS‐level options. During the Power-on Self Test (POST), when the Dell logo appears, you can: • Access System Setup by pressing key • Bring up the... the ePSA diagnostics screen. 3 System Setup System Setup enables you restart the system. Down arrow Moves to the previous field. The boot sequence screen also displays the option to a specific device (for example: optical drive or hard drive). Navigation Keys The following table ...
... integrated devices • Set performance and power management thresholds • Manage your computer hardware and specify BIOS‐level options. During the Power-on Self Test (POST), when the Dell logo appears, you can: • Access System Setup by pressing key • Bring up the... the ePSA diagnostics screen. 3 System Setup System Setup enables you restart the system. Down arrow Moves to the previous field. The boot sequence screen also displays the option to a specific device (for example: optical drive or hard drive). Navigation Keys The following table ...


