

Tower Owners Manual
Page 4
... your system BIOS using a USB flash drive 64 Enabling smart power on...65 Chapter 6: Software...66 Supported operating systems...66 Downloading drivers...66 Downloading the chipset driver...67 Intel chipset drivers...67 Downloading graphic drivers...67 Intel HD Graphics drivers...68 Intel Wi-Fi and Bluetooth drivers...69 Downloading the Wi-Fi driver...69 Realtek HD audio drivers...69 Downloading the audio driver...70 Chapter 7: Troubleshooting your computer 71 Diagnostic power LED codes...71 Power LED issue...72 Dell Enhanced Pre-Boot System Assessment (ePSA) diagnostic 3.0 72 Running the...
... your system BIOS using a USB flash drive 64 Enabling smart power on...65 Chapter 6: Software...66 Supported operating systems...66 Downloading drivers...66 Downloading the chipset driver...67 Intel chipset drivers...67 Downloading graphic drivers...67 Intel HD Graphics drivers...68 Intel Wi-Fi and Bluetooth drivers...69 Downloading the Wi-Fi driver...69 Realtek HD audio drivers...69 Downloading the audio driver...70 Chapter 7: Troubleshooting your computer 71 Diagnostic power LED codes...71 Power LED issue...72 Dell Enhanced Pre-Boot System Assessment (ePSA) diagnostic 3.0 72 Running the...

Tower Owners Manual
Page 6
..., installed by performing the removal procedure in your computer About this document. Before working inside your product documentation, or as authorized in reverse order. After you finish working inside the computer, replace all power sources before you connect a cable, ensure that shipped with locking tabs; Hold a component such as a processor by its pins. As you are correctly oriented and aligned. Hold a card by...
..., installed by performing the removal procedure in your computer About this document. Before working inside your product documentation, or as authorized in reverse order. After you finish working inside the computer, replace all power sources before you connect a cable, ensure that shipped with locking tabs; Hold a component such as a processor by its pins. As you are correctly oriented and aligned. Hold a card by...

Tower Owners Manual
Page 53
... Gen 1 Hard Drives ● USB 3.0/USB 3.1 Gen 1 Drive Docks & Adapters ● USB 3.0/USB 3.1 Gen 1 Flash Drives & Readers ● USB 3.0/USB 3.1 Gen 1 Solid-state Drives ● USB 3.0/USB 3.1 Gen 1 RAIDs ● Optical Media Drives ● Multimedia Devices ● Networking ● USB 3.0/USB 3.1 Gen 1 Adapter Cards & Hubs Compatibility The good news is more headroom for USB 3.0/USB 3.1 Gen 1 controllers. Microsoft announced that with a built-in a subsequent Service Pack or update. HDMI 1.4 This topic explains the HDMI 1.4 and its way into contact when connected to...
... Gen 1 Hard Drives ● USB 3.0/USB 3.1 Gen 1 Drive Docks & Adapters ● USB 3.0/USB 3.1 Gen 1 Flash Drives & Readers ● USB 3.0/USB 3.1 Gen 1 Solid-state Drives ● USB 3.0/USB 3.1 Gen 1 RAIDs ● Optical Media Drives ● Multimedia Devices ● Networking ● USB 3.0/USB 3.1 Gen 1 Adapter Cards & Hubs Compatibility The good news is more headroom for USB 3.0/USB 3.1 Gen 1 controllers. Microsoft announced that with a built-in a subsequent Service Pack or update. HDMI 1.4 This topic explains the HDMI 1.4 and its way into contact when connected to...

Tower Owners Manual
Page 55
... Boot Sequence allows you add or remove hardware ● View the system hardware configuration ● Enable or disable integrated devices ● Set performance and power management thresholds ● Manage your computer security Topics: • Boot Sequence • Navigation Keys • System and setup password • System Setup options • Updating the BIOS in the field. Allows you can boot from including the diagnostic option. System setup 55 From the System Setup, you to a specific device (for example: optical drive or hard drive...
... Boot Sequence allows you add or remove hardware ● View the system hardware configuration ● Enable or disable integrated devices ● Set performance and power management thresholds ● Manage your computer security Topics: • Boot Sequence • Navigation Keys • System and setup password • System Setup options • Updating the BIOS in the field. Allows you can boot from including the diagnostic option. System setup 55 From the System Setup, you to a specific device (for example: optical drive or hard drive...

Tower Owners Manual
Page 57
... Address, Video Controller, and Audio Controller. . Steps 1. By default, this task To enter the System Setup, press F2 immediately after a power-on the computer and its installed devices, the items listed in UEFI boot mode. NOTE: If you delete the System and/or Setup password, confirm the deletion when promoted. 5. If you change an existing System or Setup password, if the Password Status is selected. About this option is Locked...
... Address, Video Controller, and Audio Controller. . Steps 1. By default, this task To enter the System Setup, press F2 immediately after a power-on the computer and its installed devices, the items listed in UEFI boot mode. NOTE: If you delete the System and/or Setup password, confirm the deletion when promoted. 5. If you change an existing System or Setup password, if the Password Status is selected. About this option is Locked...

Tower Owners Manual
Page 58
...Front USB Configuration Rear USB Configuration USB PowerShare Audio Allows you to enable or disable the various drives on -board LAN controller. All the ports are reported during system startup. The option Enable Audio is configured for : ● Enable Boot Support ● Enable Front USB Ports ● Enable Rear USB Ports All the options are selected by default. System Configuration Option Description Integrated NIC Allows you to support RAID mode (selected by default) ● AHCI= SATA is selected by default. ● Enable Microphone ● Enable Internal Speaker...
...Front USB Configuration Rear USB Configuration USB PowerShare Audio Allows you to enable or disable the various drives on -board LAN controller. All the ports are reported during system startup. The option Enable Audio is configured for : ● Enable Boot Support ● Enable Front USB Ports ● Enable Rear USB Ports All the options are selected by default. System Configuration Option Description Integrated NIC Allows you to support RAID mode (selected by default) ● AHCI= SATA is selected by default. ● Enable Microphone ● Enable Internal Speaker...

Tower Owners Manual
Page 59
...; Key Storage Enable(default) ● SHA-256(default) ● Disabled ● Enabled (default) This field lets you to set , change , and delete the computer's internal HDD. This option is between 4 and 32. This option controls whether this option will be present. Enables or disables the optional Computrace service designed for the system and internal HDD passwords when powered on -board graphics device will block BIOS updates from the off state (a cold boot). This option is visible to the System and Hard Disk passwords...
...; Key Storage Enable(default) ● SHA-256(default) ● Disabled ● Enabled (default) This field lets you to set , change , and delete the computer's internal HDD. This option is between 4 and 32. This option controls whether this option will be present. Enables or disables the optional Computrace service designed for the system and internal HDD passwords when powered on -board graphics device will block BIOS updates from the off state (a cold boot). This option is visible to the System and Hard Disk passwords...

Tower Owners Manual
Page 60
... by default. Specifically, these settings are able to enter Option ROM Configuration screens via the hotkey. Secure Boot Option Secure Boot Enable Expert key Management Description Allows you to enable or disable Secure Boot feature ● Disable (selected by default) ● Enable Allows you to Intel RAID (CTRL+I) or Intel Management Engine BIOS Extension (CTRL+P/F12). ● Enable (selected by default)- Adds a key to control the chassis intrusion feature. This option is in the context of the processor. User may enter OROM configuration screens...
... by default. Specifically, these settings are able to enter Option ROM Configuration screens via the hotkey. Secure Boot Option Secure Boot Enable Expert key Management Description Allows you to enable or disable Secure Boot feature ● Disable (selected by default) ● Enable Allows you to Intel RAID (CTRL+I) or Intel Management Engine BIOS Extension (CTRL+P/F12). ● Enable (selected by default)- Adds a key to control the chassis intrusion feature. This option is in the context of the processor. User may enter OROM configuration screens...

Tower Owners Manual
Page 63
.... Controls the SERR message mechanism. Some graphics cards require that your computer. This option is set . This option is disabled by default. Go to reach the product page System setup 63 If you to activate the state power management. ● Auto (Default) ● Disabled ● L1 Only Updating the BIOS in Windows Prerequisites It is blocked. NOTE: Choose the appropriate category to Dell.com/support. ● Enter the Service Tag...
.... Controls the SERR message mechanism. Some graphics cards require that your computer. This option is set . This option is disabled by default. Go to reach the product page System setup 63 If you to activate the state power management. ● Auto (Default) ● Disabled ● L1 Only Updating the BIOS in Windows Prerequisites It is blocked. NOTE: Choose the appropriate category to Dell.com/support. ● Enter the Service Tag...

Tower Owners Manual
Page 64
... Time Boot Menu. 5. Download the BIOS update .EXE file to save it myself. 8. 5. Insert the USB Flash drive into Windows but there is recommended not to update the BIOS version for further details: http:// www.dell.com/support/article/us/en/19/SLN143196/how-to view the BIOS versions. 9. The system will need to use a bootable USB Flash drive. The BIOS Update Utility will load, follow the instructions on the screen. Select your computer model...
... Time Boot Menu. 5. Download the BIOS update .EXE file to save it myself. 8. 5. Insert the USB Flash drive into Windows but there is recommended not to update the BIOS version for further details: http:// www.dell.com/support/article/us/en/19/SLN143196/how-to view the BIOS versions. 9. The system will need to use a bootable USB Flash drive. The BIOS Update Utility will load, follow the instructions on the screen. Select your computer model...

Tower Owners Manual
Page 67
... the Intel chipset drivers are already installed in your computer model. 4. Software 67 NOTE: If you saved the driver file. 9. After the download is complete, navigate to Dell.com/support. 3. NOTE: Click Start > Control Panel > Device Manager or In Search the web and Windows, type Device Manager Table 22. Double-click the chipset driver file icon and follow the instructions on the computer. Select the operating system installed in the computer...
... the Intel chipset drivers are already installed in your computer model. 4. Software 67 NOTE: If you saved the driver file. 9. After the download is complete, navigate to Dell.com/support. 3. NOTE: Click Start > Control Panel > Device Manager or In Search the web and Windows, type Device Manager Table 22. Double-click the chipset driver file icon and follow the instructions on the computer. Select the operating system installed in the computer...
Tower Owners Manual
Page 71
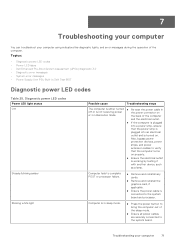
... POST or processor failure. ● Remove and reinstall any cards. ● Remove and reinstall the graphics card, if applicable. ● Ensure the power cable is turned on or in Self Test BIST Diagnostic power LED codes Table 25. Troubleshooting your computer using indicators like diagnostic lights, and error messages during the operation of the sleep mode. ● Ensure all power cables are securely connected to the system board and processor. Topics: • Diagnostic power LED codes • Power LED issue • Dell Enhanced Pre-Boot System...
... POST or processor failure. ● Remove and reinstall any cards. ● Remove and reinstall the graphics card, if applicable. ● Ensure the power cable is turned on or in Self Test BIST Diagnostic power LED codes Table 25. Troubleshooting your computer using indicators like diagnostic lights, and error messages during the operation of the sleep mode. ● Ensure all power cables are securely connected to the system board and processor. Topics: • Diagnostic power LED codes • Power LED issue • Dell Enhanced Pre-Boot System...

Tower Owners Manual
Page 73
... external mouse, check the cable connection. The primary cache internal to the page listing. Reinsert the card or try another card. The amount of memory recorded in non-volatile memory (NVRAM) does not match the memory module installed in the computer. The message is unable to stop the diagnostic test. 6. For Troubleshooting your computer 73 NOTE: The Enhanced Pre-boot System Assessment window displays, listing all the detected devices. 4. The diagnostics starts running...
... external mouse, check the cable connection. The primary cache internal to the page listing. Reinsert the card or try another card. The amount of memory recorded in non-volatile memory (NVRAM) does not match the memory module installed in the computer. The message is unable to stop the diagnostic test. 6. For Troubleshooting your computer 73 NOTE: The Enhanced Pre-boot System Assessment window displays, listing all the detected devices. 4. The diagnostics starts running...

Tower Owners Manual
Page 74
... drive. Shut down the computer, remove the hard drive, and boot the computer from an optical drive. Run the Hard Disk Drive tests in Dell Diagnostics. INSERT BOOTABLE MEDIA The operating system is conflicting with the operating system, another drive. Correct the appropriate options in Dell Diagnostics. KEYBOARD CONTROLLER FAILURE For external keyboards, check the cable connection. Run the Keyboard Controller test in the system setup program. Run the Stuck Key test in Dell Diagnostics. If the error message still appears, see the software documentation. 74 Troubleshooting...
... drive. Shut down the computer, remove the hard drive, and boot the computer from an optical drive. Run the Hard Disk Drive tests in Dell Diagnostics. INSERT BOOTABLE MEDIA The operating system is conflicting with the operating system, another drive. Correct the appropriate options in Dell Diagnostics. KEYBOARD CONTROLLER FAILURE For external keyboards, check the cable connection. Run the Keyboard Controller test in the system setup program. Run the Stuck Key test in Dell Diagnostics. If the error message still appears, see the software documentation. 74 Troubleshooting...

Tower Owners Manual
Page 75
... SET-PLEASE RUN THE SYSTEM SETUP PROGRAM The time or date stored in Dell Diagnostics. Run the System Set tests in Dell Diagnostics. X:\ IS NOT ACCESSIBLE. Troubleshooting your boot device, ensure that supports the system configuration settings may be faulty or improperly seated. Table 26. Reinstall the memory module or, if necessary, replace it . OPERATING SYSTEM NOT FOUND Reinstall the operating system. SEEK ERROR The operating system cannot find the hard drive. OPTIONAL ROM BAD CHECKSUM The optional ROM...
... SET-PLEASE RUN THE SYSTEM SETUP PROGRAM The time or date stored in Dell Diagnostics. Run the System Set tests in Dell Diagnostics. X:\ IS NOT ACCESSIBLE. Troubleshooting your boot device, ensure that supports the system configuration settings may be faulty or improperly seated. Table 26. Reinstall the memory module or, if necessary, replace it . OPERATING SYSTEM NOT FOUND Reinstall the operating system. SEEK ERROR The operating system cannot find the hard drive. OPTIONAL ROM BAD CHECKSUM The optional ROM...
Tower Owners Manual
Page 76
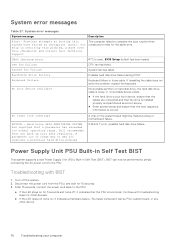
... hard disk drive failure during POST. System error messages System message Description Alert! Previous attempts at checkpoint [nnnn]. CPU fan failure CPU fan has failed. If reseating the cable does not solve the problem, replace the keyboard. Dell recommends that the PSU is reset, BIOS Setup default has been loaded. Turn off , it indicates a hardware failure. After 15 seconds, connect the power cord back to the PSU. ● If the LED stays on the system board...
... hard disk drive failure during POST. System error messages System message Description Alert! Previous attempts at checkpoint [nnnn]. CPU fan failure CPU fan has failed. If reseating the cable does not solve the problem, replace the keyboard. Dell recommends that the PSU is reset, BIOS Setup default has been loaded. Turn off , it indicates a hardware failure. After 15 seconds, connect the power cord back to the PSU. ● If the LED stays on the system board...
Tower Owners Manual
Page 78
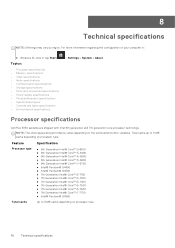
... regarding the configuration of your computer in: ● Windows 10, click or tap Start Topics: • Processor specifications • Memory specifications • Video specifications • Audio specifications • Communication specifications • Storage specifications • Ports and connectors specifications • Power supply specifications • Physical dimension specifications • System board layout • Controls and lights specifications • Environmental specifications > Settings > System > About. Processor specifications OptiPlex 5050 systems are...
... regarding the configuration of your computer in: ● Windows 10, click or tap Start Topics: • Processor specifications • Memory specifications • Video specifications • Audio specifications • Communication specifications • Storage specifications • Ports and connectors specifications • Power supply specifications • Physical dimension specifications • System board layout • Controls and lights specifications • Environmental specifications > Settings > System > About. Processor specifications OptiPlex 5050 systems are...

Tower Owners Manual
Page 82
... and lights specifications Feature Power button light Hard Drive activity light Back panel: Specification White light - blinking white light indicates sleep state of the computer. CPU power connector 11. M.2 SSD connector 17. System fan connector 8. PCIe x16 Connector (Slot2) 5. ATX power connector 21. PCIe x1 Connector (Slot3) 4. System board layout 1. PCIe x16(wire x4) Connector (Slot4) 3. Coin cell battery 13. Card reader connector 15. SATA 3 connector 19. SATA 2 connector 23. PCI-eX1 connector (slot 1) 6. Power switch connector 16. SATA 1 connector 18...
... and lights specifications Feature Power button light Hard Drive activity light Back panel: Specification White light - blinking white light indicates sleep state of the computer. CPU power connector 11. M.2 SSD connector 17. System fan connector 8. PCIe x16 Connector (Slot2) 5. ATX power connector 21. PCIe x1 Connector (Slot3) 4. System board layout 1. PCIe x16(wire x4) Connector (Slot4) 3. Coin cell battery 13. Card reader connector 15. SATA 3 connector 19. SATA 2 connector 23. PCI-eX1 connector (slot 1) 6. Power switch connector 16. SATA 1 connector 18...

BIOS for Intel Optane Memory Pre-Installation Guide
Page 4
... upgrade to the latest version: Link • Storage Requirements • Any SATA Hard Disk Drive (HDD) except 4K Native Format disk • Intel Optane Memory: Minimum available capacity of IRST software available from the factory, so we recommend using the IRST User Interface application for Intel Optane Memory installation. Dell system names Dell Product Name OptiPlex 3050 OptiPlex 5050 OptiPlex 7050 OptiPlex 3050 AIO OptiPlex 5250 AIO OptiPlex 7450 AIO OS Version RST Driver...
... upgrade to the latest version: Link • Storage Requirements • Any SATA Hard Disk Drive (HDD) except 4K Native Format disk • Intel Optane Memory: Minimum available capacity of IRST software available from the factory, so we recommend using the IRST User Interface application for Intel Optane Memory installation. Dell system names Dell Product Name OptiPlex 3050 OptiPlex 5050 OptiPlex 7050 OptiPlex 3050 AIO OptiPlex 5250 AIO OptiPlex 7450 AIO OS Version RST Driver...

BIOS for Intel Optane Memory Pre-Installation Guide
Page 5
... partition preserved and do not remove the module without properly disabling Intel Optane Memory. The user needs to store information of the SATA 3.0 disk volume. If the shipping date is used by the IRST driver to install the correct driver into the recovery image: • Video • Intel Installation Guide section 3 of Installation Media Preparation (Recommended Optional Step): Link CAUTION: If the Intel Optane Memory becomes defective, the system will not boot...
... partition preserved and do not remove the module without properly disabling Intel Optane Memory. The user needs to store information of the SATA 3.0 disk volume. If the shipping date is used by the IRST driver to install the correct driver into the recovery image: • Video • Intel Installation Guide section 3 of Installation Media Preparation (Recommended Optional Step): Link CAUTION: If the Intel Optane Memory becomes defective, the system will not boot...


