Setup and Quick Reference Guide
Page 3
Front View 7 Mini Tower - Back View 8 Mini Tower - Back View 11 Desktop - Back Panel Connectors 9 Desktop - Contents 1 About Your Computer 7 Mini Tower - Back Panel Connectors 12 2 Setting Up Your Computer 13 Quick Setup 13 Installing Your Computer in an Enclosure 18 Connecting to the Internet 20 Setting Up Your Internet Connection 20 Transferring Information to a New Computer 21 Microsoft® Windows Vista® Operating System 21 Microsoft Windows® XP 21 Contents 3 Front View 10 Desktop -
Front View 7 Mini Tower - Back View 8 Mini Tower - Back View 11 Desktop - Back Panel Connectors 9 Desktop - Contents 1 About Your Computer 7 Mini Tower - Back Panel Connectors 12 2 Setting Up Your Computer 13 Quick Setup 13 Installing Your Computer in an Enclosure 18 Connecting to the Internet 20 Setting Up Your Internet Connection 20 Transferring Information to a New Computer 21 Microsoft® Windows Vista® Operating System 21 Microsoft Windows® XP 21 Contents 3 Front View 10 Desktop -
Setup and Quick Reference Guide
Page 4
3 Specifications - Mini Tower Computer 25 4 Specifications - Desktop Computer 31 5 Troubleshooting Tips 37 Using the Hardware Troubleshooter 37 Tips 37 Power Problems 37 Memory Problems 39 Lockups and Software Problems 39 Dell Technical Update Service 41 Dell Support Utility 41 Dell Diagnostics 41 6 Reinstalling Software 43 Drivers 43 Identifying Drivers 43 Reinstalling Drivers and Utilities 43 Restoring Your Operating System 45 Using Microsoft® Windows® System Restore . . . 46 Using Dell Factory Image Restore 46 Using the Operating System Media 47 4 Contents
3 Specifications - Mini Tower Computer 25 4 Specifications - Desktop Computer 31 5 Troubleshooting Tips 37 Using the Hardware Troubleshooter 37 Tips 37 Power Problems 37 Memory Problems 39 Lockups and Software Problems 39 Dell Technical Update Service 41 Dell Support Utility 41 Dell Diagnostics 41 6 Reinstalling Software 43 Drivers 43 Identifying Drivers 43 Reinstalling Drivers and Utilities 43 Restoring Your Operating System 45 Using Microsoft® Windows® System Restore . . . 46 Using Dell Factory Image Restore 46 Using the Operating System Media 47 4 Contents
Setup and Quick Reference Guide
Page 10
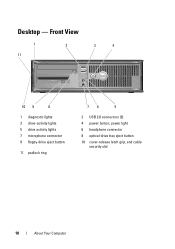
Desktop - Front View 1 11 2 3 4 10 9 8 1 diagnostic lights 3 drive-activity lights 5 drive activity lights 7 microphone connector 9 floppy-drive eject button 11 padlock ring 76 5 2 USB 2.0 connectors (2) 4 power button, power light 6 headphone connector 8 optical-drive tray eject button 10 cover-release latch grip, and cable security slot 10 About Your Computer
Desktop - Front View 1 11 2 3 4 10 9 8 1 diagnostic lights 3 drive-activity lights 5 drive activity lights 7 microphone connector 9 floppy-drive eject button 11 padlock ring 76 5 2 USB 2.0 connectors (2) 4 power button, power light 6 headphone connector 8 optical-drive tray eject button 10 cover-release latch grip, and cable security slot 10 About Your Computer

Setup and Quick Reference Guide
Page 11
Desktop - Back View 1 2 3 4 5 6 1 expansion-card slots (3) 3 power connector 5 padlock ring 2 back-panel connectors 4 voltage selector switch 6 cover-release latch grip, and security cable slot About Your Computer 11
Desktop - Back View 1 2 3 4 5 6 1 expansion-card slots (3) 3 power connector 5 padlock ring 2 back-panel connectors 4 voltage selector switch 6 cover-release latch grip, and security cable slot About Your Computer 11

Setup and Quick Reference Guide
Page 12
Back Panel Connectors 1 2 3 4 9 8 1 parallel (printer) connector 3 network adapter connector 5 line-out connector 7 USB 2.0 connectors (6) 9 serial connector 5 6 7 2 network-activity light 4 link-integrity light 6 line-in (microphone) connector 8 VGA video connector 12 About Your Computer Desktop -
Back Panel Connectors 1 2 3 4 9 8 1 parallel (printer) connector 3 network adapter connector 5 line-out connector 7 USB 2.0 connectors (6) 9 serial connector 5 6 7 2 network-activity light 4 link-integrity light 6 line-in (microphone) connector 8 VGA video connector 12 About Your Computer Desktop -
Setup and Quick Reference Guide
Page 18
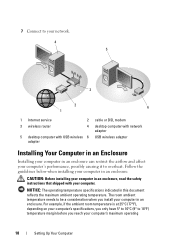
Follow the guidelines below when installing your computer in an enclosure. 7 Connect to your network. 4 5 3 2 6 1 1 Internet service 2 cable or DSL modem 3 wireless router 4 desktop computer with network adapter 5 desktop computer with your computer. NOTICE: The operating temperature specifications indicated in an enclosure. The room ambient temperature needs to be a consideration when you reach...
Follow the guidelines below when installing your computer in an enclosure. 7 Connect to your network. 4 5 3 2 6 1 1 Internet service 2 cable or DSL modem 3 wireless router 4 desktop computer with network adapter 5 desktop computer with your computer. NOTICE: The operating temperature specifications indicated in an enclosure. The room ambient temperature needs to be a consideration when you reach...
Setup and Quick Reference Guide
Page 19
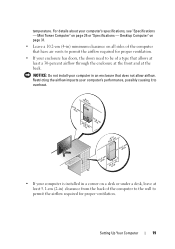
... computer that does not allow airflow. Restricting the airflow impacts your computer's performance, possibly causing it to permit the airflow required for proper ventilation. temperature. Desktop Computer" on page 31. • Leave a 10.2-cm (4-in) minimum clearance on all sides of a type that allows at least a 30-percent airflow through the...
... computer that does not allow airflow. Restricting the airflow impacts your computer's performance, possibly causing it to permit the airflow required for proper ventilation. temperature. Desktop Computer" on page 31. • Leave a 10.2-cm (4-in) minimum clearance on all sides of a type that allows at least a 30-percent airflow through the...
Setup and Quick Reference Guide
Page 20
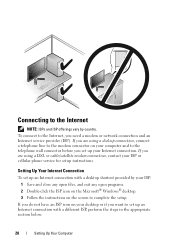
... steps in the appropriate section below. 20 Setting Up Your Computer If you do not have an ISP icon on your desktop or if you set up an Internet connection with a desktop shortcut provided by country. If you need a modem or network connection and an Internet service provider (ISP). Connecting to the... by your ISP: 1 Save and close any open files, and exit any open programs. 2 Double-click the ISP icon on the Microsoft® Windows® desktop. 3 Follow the instructions on the screen to complete the setup.
... steps in the appropriate section below. 20 Setting Up Your Computer If you do not have an ISP icon on your desktop or if you set up an Internet connection with a desktop shortcut provided by country. If you need a modem or network connection and an Internet service provider (ISP). Connecting to the... by your ISP: 1 Save and close any open files, and exit any open programs. 2 Double-click the ISP icon on the Microsoft® Windows® desktop. 3 Follow the instructions on the screen to complete the setup.
Setup and Quick Reference Guide
Page 31
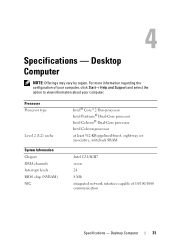
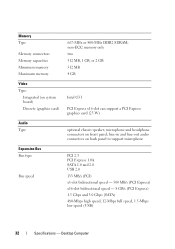
Desktop Computer 31 Processor Processor type Level 2 (L2) cache System Information Chipset DMA channels Interrupt levels BIOS chip (NVRAM) NIC Intel® Core™2 Duo processor ... and Support and select the option to view information about your computer. Specifications - For more information regarding the configuration of 10/100/1000 communication Specifications - Desktop Computer NOTE: Offerings may vary by region.
Desktop Computer 31 Processor Processor type Level 2 (L2) cache System Information Chipset DMA channels Interrupt levels BIOS chip (NVRAM) NIC Intel® Core™2 Duo processor ... and Support and select the option to view information about your computer. Specifications - For more information regarding the configuration of 10/100/1000 communication Specifications - Desktop Computer NOTE: Offerings may vary by region.
Setup and Quick Reference Guide
Page 32
... line-out audio connectors on system board) Discrete (graphics card) Audio Type Expansion Bus Bus type Bus speed 667-MHz or 800-MHz DDR2 SDRAM; Desktop Computer Memory Type Memory connectors Memory capacities Minimum memory Maximum memory Video Type: Integrated (on back panel to support microphone PCI 2.3 PCI Express 1.0A SATA...
... line-out audio connectors on system board) Discrete (graphics card) Audio Type Expansion Bus Bus type Bus speed 667-MHz or 800-MHz DDR2 SDRAM; Desktop Computer Memory Type Memory connectors Memory capacities Minimum memory Maximum memory Video Type: Integrated (on back panel to support microphone PCI 2.3 PCI Express 1.0A SATA...
Setup and Quick Reference Guide
Page 33
... x16 (and one 6.9-in PCIe x16 card) if a PCI riser board is used 124 pins 32 bits one low-profile x16 (with support for x1); Desktop Computer 33 Expansion Bus (continued) PCI connectors connector size connector data width (maximum) PCI Express connector connector size connector data width (maximum) two low-profile...
... x16 (and one 6.9-in PCIe x16 card) if a PCI riser board is used 124 pins 32 bits one low-profile x16 (with support for x1); Desktop Computer 33 Expansion Bus (continued) PCI connectors connector size connector data width (maximum) PCI Express connector connector size connector data width (maximum) two low-profile...

Setup and Quick Reference Guide
Page 34
... 37). 34 Specifications - A solid amber light when the computer does not start indicates that the system board cannot start initialization. Blinking green in sleep state; Desktop Computer Connectors (continued) PS/2 Parallel System board connectors: SATA Floppy drive Processor fan Chassis fan PCI Express x16 Front panel control Front panel USB Front...
... 37). 34 Specifications - A solid amber light when the computer does not start indicates that the system board cannot start initialization. Blinking green in sleep state; Desktop Computer Connectors (continued) PS/2 Parallel System board connectors: SATA Floppy drive Processor fan Chassis fan PCI Express x16 Front panel control Front panel USB Front...

Setup and Quick Reference Guide
Page 35
... exists between the integrated network adapter) network and the computer. The computer is not detecting a physical connection to the SATA hard drive or CD/DVD. Desktop Computer 35 A blinking green light indicates the computer is calculated by using the power supply wattage rating. Voltage (see the safety information that shipped with...
... exists between the integrated network adapter) network and the computer. The computer is not detecting a physical connection to the SATA hard drive or CD/DVD. Desktop Computer 35 A blinking green light indicates the computer is calculated by using the power supply wattage rating. Voltage (see the safety information that shipped with...
Setup and Quick Reference Guide
Page 36
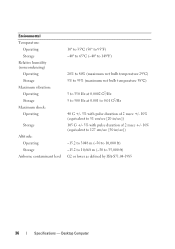
... to 10,000 ft) -15.2 to 10,668 m (-50 to 35,000 ft) G2 or lower as defined by ISA-S71.04-1985 36 Specifications - Desktop Computer
... to 10,000 ft) -15.2 to 10,668 m (-50 to 35,000 ft) G2 or lower as defined by ISA-S71.04-1985 36 Specifications - Desktop Computer
Setup and Quick Reference Guide
Page 39
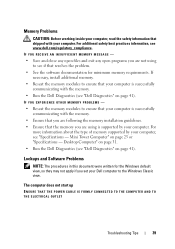
... minimum memory requirements. For more information about the type of memory supported by your computer, see "Dell Diagnostics" on page 31. • Run the Dell Diagnostics (see www.dell.com/regulatory_compliance. Mini Tower Computer" on page 41). Desktop Computer" on page 41). The computer does not start up ENSURE THAT THE POWER CABLE IS...
... minimum memory requirements. For more information about the type of memory supported by your computer, see "Dell Diagnostics" on page 31. • Run the Dell Diagnostics (see www.dell.com/regulatory_compliance. Mini Tower Computer" on page 41). Desktop Computer" on page 41). The computer does not start up ENSURE THAT THE POWER CABLE IS...
Setup and Quick Reference Guide
Page 41
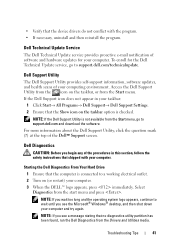
...Before you see the Microsoft® Windows® desktop, and then shut down your computer and try again. Dell Technical Update Service The Dell Technical Update service provides proactive e-mail notification of your computer. Dell Support Utility The Dell Support Utility provides self-support information, software updates,... and the operating system logo appears, continue to a working electrical outlet. 2 Turn on (or restart) your computer. 3 When the DELL™ logo appears, press immediately. NOTE: If you see a message stating that the Show icon on the taskbar, or from the ...
...Before you see the Microsoft® Windows® desktop, and then shut down your computer and try again. Dell Technical Update Service The Dell Technical Update service provides proactive e-mail notification of your computer. Dell Support Utility The Dell Support Utility provides self-support information, software updates,... and the operating system logo appears, continue to a working electrical outlet. 2 Turn on (or restart) your computer. 3 When the DELL™ logo appears, press immediately. NOTE: If you see a message stating that the Show icon on the taskbar, or from the ...

Setup and Quick Reference Guide
Page 42
...too long and the operating system logo appears, continue to proceed. 6 Select Run the 32 Bit Dell Diagnostics from the numbered list. NOTE: The next steps change the boot sequence for your computer. 7 When the Dell Diagnostics Main Menu appears, select the test that appears and press . 5 Type 1 to start... the CD menu and press to wait until you want to start the Dell Diagnostics from the menu that you see the Microsoft® Windows® desktop; On the next start-up, the computer starts according to the devices specified in the system setup program. 3...
...too long and the operating system logo appears, continue to proceed. 6 Select Run the 32 Bit Dell Diagnostics from the numbered list. NOTE: The next steps change the boot sequence for your computer. 7 When the Dell Diagnostics Main Menu appears, select the test that appears and press . 5 Type 1 to start... the CD menu and press to wait until you want to start the Dell Diagnostics from the menu that you see the Microsoft® Windows® desktop; On the next start-up, the computer starts according to the devices specified in the system setup program. 3...
Setup and Quick Reference Guide
Page 44
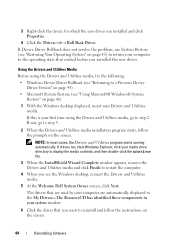
... in your system window. 6 Click the driver that you want to reinstall and follow the prompts on page 46) 1 With the Windows desktop displayed, insert your computer to the operating state that existed before you see "Using Microsoft® Windows® System Restore" on the screen...media, go to a Previous Device Driver Version" on page 43) • Microsoft System Restore (see the Windows desktop, reinsert the Drivers and Utilities media. 5 At the Welcome Dell System Owner screen, click Next. NOTE: In most cases, the Drivers and Utilities program starts running automatically. If ...
... in your system window. 6 Click the driver that you want to reinstall and follow the prompts on page 46) 1 With the Windows desktop displayed, insert your computer to the operating state that existed before you see "Using Microsoft® Windows® System Restore" on the screen...media, go to a Previous Device Driver Version" on page 43) • Microsoft System Restore (see the Windows desktop, reinsert the Drivers and Utilities media. 5 At the Welcome Dell System Owner screen, click Next. NOTE: In most cases, the Drivers and Utilities program starts running automatically. If ...
Setup and Quick Reference Guide
Page 48
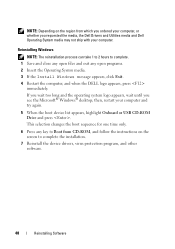
... Insert the Operating System media. 3 If the Install Windows message appears, click Exit. 4 Restart the computer, and when the DELL logo appears, press immediately. then, restart your computer. If you wait too long and the operating system logo appears, wait until... you requested the media, the Dell Drivers and Utilities media and Dell Operating System media may not ship with your computer and try again. 5 When the boot device list... ordered your computer, or whether you see the Microsoft® Windows® desktop;
... Insert the Operating System media. 3 If the Install Windows message appears, click Exit. 4 Restart the computer, and when the DELL logo appears, press immediately. then, restart your computer. If you wait too long and the operating system logo appears, wait until... you requested the media, the Dell Drivers and Utilities media and Dell Operating System media may not ship with your computer and try again. 5 When the boot device list... ordered your computer, or whether you see the Microsoft® Windows® desktop;
Setup and Quick Reference Guide
Page 49
...Some features or media may not be included on your computer. • Use the Service Tag to identify your computer when you use support.dell.com or contact support. • Enter the Express Service Code to your computer. Operating System Media Reinstall your operating system The Operating System ... a CD or • Drivers for technicians or experienced users. Finding Information 49 NOTE: Drivers and documentation updates can be found at support.dell.com. • Desktop System Software (DSS) • Readme files NOTE: Readme files may be available in certain countries.
...Some features or media may not be included on your computer. • Use the Service Tag to identify your computer when you use support.dell.com or contact support. • Enter the Express Service Code to your computer. Operating System Media Reinstall your operating system The Operating System ... a CD or • Drivers for technicians or experienced users. Finding Information 49 NOTE: Drivers and documentation updates can be found at support.dell.com. • Desktop System Software (DSS) • Readme files NOTE: Readme files may be available in certain countries.


