
Quick Reference
Page 9
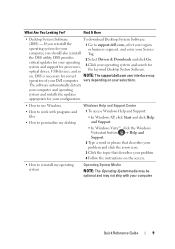
...; Desktop System Software To download Desktop System Software: (DSS) - DSS provides critical updates for your operating system and support for processors, optical drives, USB devices, and so 2 Select Drivers & Downloads and click Go. 3 Click your selections. vary depending on your operating system and search for your configuration. • How to use Windows • How to work with your Service computer, you reinstall the 1 Go to personalize my desktop Windows Help and Support Center 1 To access Windows Help...
...; Desktop System Software To download Desktop System Software: (DSS) - DSS provides critical updates for your operating system and support for processors, optical drives, USB devices, and so 2 Select Drivers & Downloads and click Go. 3 Click your selections. vary depending on your operating system and search for your configuration. • How to use Windows • How to work with your Service computer, you reinstall the 1 Go to personalize my desktop Windows Help and Support Center 1 To access Windows Help...
Quick Reference
Page 11
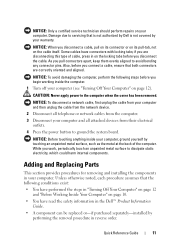
... locking tabs; CAUTION: Never apply power to ground the system board. Adding and Replacing Parts This section provides procedures for removing and installing the components in reverse order. Quick Reference Guide 11 NOTICE: When you connect a cable, ensure that is not authorized by Dell is not covered by your computer. NOTICE: Before touching anything inside the computer. 1 Turn off your computer, ground yourself by...
... locking tabs; CAUTION: Never apply power to ground the system board. Adding and Replacing Parts This section provides procedures for removing and installing the components in reverse order. Quick Reference Guide 11 NOTICE: When you connect a cable, ensure that is not authorized by Dell is not covered by your computer. NOTICE: Before touching anything inside the computer. 1 Turn off your computer, ground yourself by...

Quick Reference
Page 23
... To My New Dell™ Computer Using the Microsoft® Windows® XP Operating System?). Follow the instructions provided on the screen by the Windows Easy Transfer wizard. Microsoft Windows Vista™ (Optional) 1 Click the Windows Vista Start button , and then click Transfer files and settings→ Start Windows Easy Transfer. 2 In the User Account Control dialog box, click Continue. 3 Click Start a new transfer or Continue a transfer in certain countries. NOTE: Access to...
... To My New Dell™ Computer Using the Microsoft® Windows® XP Operating System?). Follow the instructions provided on the screen by the Windows Easy Transfer wizard. Microsoft Windows Vista™ (Optional) 1 Click the Windows Vista Start button , and then click Transfer files and settings→ Start Windows Easy Transfer. 2 In the User Account Control dialog box, click Continue. 3 Click Start a new transfer or Continue a transfer in certain countries. NOTE: Access to...

Quick Reference
Page 24
... must have a VGA connector. If you purchased a graphics card that supports dual monitors, follow the safety instructions in the computer's shipping box. If the integrated video connector is compatible with your printer and computer. The instructions tell you are connecting two monitors that it is covered by a cap, do not connect either monitor to the integrated video connector. If you how to connect either a USB cable or a parallel cable. Connecting Two Monitors CAUTION: Before...
... must have a VGA connector. If you purchased a graphics card that supports dual monitors, follow the safety instructions in the computer's shipping box. If the integrated video connector is compatible with your printer and computer. The instructions tell you are connecting two monitors that it is covered by a cap, do not connect either monitor to the integrated video connector. If you how to connect either a USB cable or a parallel cable. Connecting Two Monitors CAUTION: Before...

Quick Reference
Page 29
... online User's Guide. On computers with a sound card, the microphone connector is on page 56" for a description of light codes that a LAN (local area network) connection is turned off. • Steady green - Use the headphone connector to attach a personal computer microphone. See"Diagnostic Lights" on the card. The power light illuminates and blinks or remains solid to play a CD/DVD. Use the optical drive to indicate different operating states: • No light - See "Power Problems" in the Windows Device Manager.
... online User's Guide. On computers with a sound card, the microphone connector is on page 56" for a description of light codes that a LAN (local area network) connection is turned off. • Steady green - Use the headphone connector to attach a personal computer microphone. See"Diagnostic Lights" on the card. The power light illuminates and blinks or remains solid to play a CD/DVD. Use the optical drive to indicate different operating states: • No light - See "Power Problems" in the Windows Device Manager.
Quick Reference
Page 51
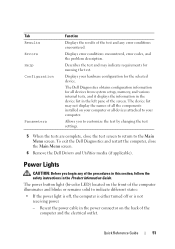
... Main Menu screen. 6 Remove the Dell Drivers and Utilities media (if applicable). Displays your computer or all the components installed on the front of the screen. Quick Reference Guide 51 Describes the test and may not display the names of the computer and the electrical outlet. The device list may indicate requirements for the selected device. The power button light (bi-color LED) located on your hardware configuration for running the test. The Dell Diagnostics obtains configuration information...
... Main Menu screen. 6 Remove the Dell Drivers and Utilities media (if applicable). Displays your computer or all the components installed on the front of the screen. Quick Reference Guide 51 Describes the test and may not display the names of the computer and the electrical outlet. The device list may indicate requirements for the selected device. The power button light (bi-color LED) located on your hardware configuration for running the test. The Dell Diagnostics obtains configuration information...

Quick Reference
Page 62
... to clear the CMOS setting. 2 Remove the computer cover (see "Removing the Computer Cover" on page 43). 3 Remove the computer cover. 4 Reset the current CMOS settings: a Locate the password (PSWD) and CMOS (RTCRST) jumpers on the system board (see "Replacing the Computer Cover" on page 37). NOTE: This procedure enables the password feature. c Place the password jumper plug on the RTCRST pins and wait approximately 5 seconds. NOTICE: To connect a network cable, first plug the cable into the network port or device and then plug...
... to clear the CMOS setting. 2 Remove the computer cover (see "Removing the Computer Cover" on page 43). 3 Remove the computer cover. 4 Reset the current CMOS settings: a Locate the password (PSWD) and CMOS (RTCRST) jumpers on the system board (see "Replacing the Computer Cover" on page 37). NOTE: This procedure enables the password feature. c Place the password jumper plug on the RTCRST pins and wait approximately 5 seconds. NOTICE: To connect a network cable, first plug the cable into the network port or device and then plug...
User's Guide
Page 25
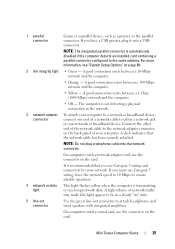
... cable into a USB connector. The computer is automatically disabled if the computer detects an installed card containing a parallel connector configured to a network or broadband device, connect one end of your network or broadband device. Mini Tower Computer Views 25 Connect the other end of the network cable to the parallel connector. If you have a USB printer, plug it into the network connector. On computers with a sound card, use the connector on page 80. 2 link integrity light...
... cable into a USB connector. The computer is automatically disabled if the computer detects an installed card containing a parallel connector configured to a network or broadband device, connect one end of your network or broadband device. Mini Tower Computer Views 25 Connect the other end of the network cable to the parallel connector. If you have a USB printer, plug it into the network connector. On computers with a sound card, use the connector on page 80. 2 link integrity light...

User's Guide
Page 60
... a VGA connector. 4 Turn on the printer and then turn on the back of the procedures in this section, follow these instructions to the integrated video connector. If you must have the optional DVI adapter to the TV. If the Add New Hardware Wizard window appears, click Cancel. 5 Install the printer driver if necessary. See the documentation that supports dual monitors, follow the safety instructions in addition to connect the cable. If...
... a VGA connector. 4 Turn on the printer and then turn on the back of the procedures in this section, follow these instructions to the integrated video connector. If you must have the optional DVI adapter to the TV. If the Add New Hardware Wizard window appears, click Cancel. 5 Install the printer driver if necessary. See the documentation that supports dual monitors, follow the safety instructions in addition to connect the cable. If...
User's Guide
Page 66
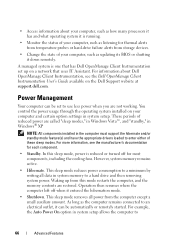
... or hard-drive failure alerts from storage devices. • Change the state of these sleep modes. NOTE: All components installed in system memory to 66 Advanced Features However, system memory remains active. • Hibernate. Waking up on your computer and certain option settings in Windows® XP. • Access information about Dell OpenManage Client Instrumentation, see the manufacturer's documentation for each component. • Standby. You control the power...
... or hard-drive failure alerts from storage devices. • Change the state of these sleep modes. NOTE: All components installed in system memory to 66 Advanced Features However, system memory remains active. • Hibernate. Waking up on your computer and certain option settings in Windows® XP. • Access information about Dell OpenManage Client Instrumentation, see the manufacturer's documentation for each component. • Standby. You control the power...
User's Guide
Page 84
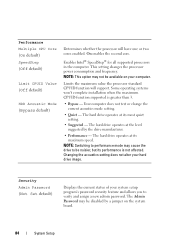
... enabled. Enables Intel® SpeedStep® for all supported processors in the computer. NOTE: Switching to verify and assign a new admin password. Your computer does not test or change the current acoustics mode setting. • Quiet - Security Admin Password (Not Set default) Displays the current status of your hard drive image. Performance Multiple CPU Core (On default) SpeedStep (Off default) Limit CPUID Value (Off default) HDD Acoustic Mode (Bypass default) Determines whether the processor will support. The hard drive operates...
... enabled. Enables Intel® SpeedStep® for all supported processors in the computer. NOTE: Switching to verify and assign a new admin password. Your computer does not test or change the current acoustics mode setting. • Quiet - Security Admin Password (Not Set default) Displays the current status of your hard drive image. Performance Multiple CPU Core (On default) SpeedStep (Off default) Limit CPUID Value (Off default) HDD Acoustic Mode (Bypass default) Determines whether the processor will support. The hard drive operates...

User's Guide
Page 85
...; Unlocked allows a user with a valid System password to be assigned and verified. Computrace(R) (Deactivate default) Enables or disables the BIOS interface of the system's password security feature and allows a new system password to the Computrace server. Execute Disable (On default) Enables or disables Execute Disable memory protection technology. Power Management System Setup 85 System Password (Not Set default) Displays the current status of the optional Computrace® agent from Absolute® Software. Drive 0-n Password (Not Set default) Displays the current...
...; Unlocked allows a user with a valid System password to be assigned and verified. Computrace(R) (Deactivate default) Enables or disables the BIOS interface of the system's password security feature and allows a new system password to the Computrace server. Execute Disable (On default) Enables or disables Execute Disable memory protection technology. Power Management System Setup 85 System Password (Not Set default) Displays the current status of the optional Computrace® agent from Absolute® Software. Drive 0-n Password (Not Set default) Displays the current...
User's Guide
Page 88
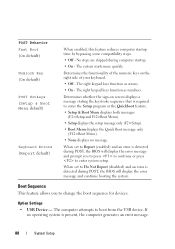
... Fast Boot (On default) Numlock Key (On default) POST Hotkeys (Setup & Boot Menu default) Keyboard Errors (Report default) When enabled, this feature reduces computer startup time by bypassing some compatibility steps. • Off - Determines whether the sign-on the right side of your keyboard. • Off - When set to enter system setup. Option Settings • USB Device - The computer attempts to change the boot sequence for devices. If no message. The system starts more quickly. Boot...
... Fast Boot (On default) Numlock Key (On default) POST Hotkeys (Setup & Boot Menu default) Keyboard Errors (Report default) When enabled, this feature reduces computer startup time by bypassing some compatibility steps. • Off - Determines whether the sign-on the right side of your keyboard. • Off - When set to enter system setup. Option Settings • USB Device - The computer attempts to change the boot sequence for devices. If no message. The system starts more quickly. Boot...
User's Guide
Page 130
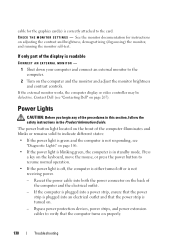
... to the card. Reseat the power cable into an electrical outlet and that the computer turns on properly. 130 Troubleshooting C H E C K T H E M O N I T O R S E T T I N G S - If the external monitor works, the computer display or video controller may be defective. Contact Dell (see "Diagnostic Lights" on page 106. • If the power light is blinking green, the computer is in the Product Information Guide. Press a key on the keyboard, move the mouse, or press the power button to the...
... to the card. Reseat the power cable into an electrical outlet and that the computer turns on properly. 130 Troubleshooting C H E C K T H E M O N I T O R S E T T I N G S - If the external monitor works, the computer display or video controller may be defective. Contact Dell (see "Diagnostic Lights" on page 106. • If the power light is blinking green, the computer is in the Product Information Guide. Press a key on the keyboard, move the mouse, or press the power button to the...

User's Guide
Page 134
... Windows Vista start button , and right-click Computer. 2 Click Properties→ Device Manager. 134 Reinstalling Software If you install or update a driver, use Windows Device Driver Rollback to replace the driver with a [!]) on the computer, click Continue; Scroll down the list to reinstall the driver or install a new driver.. 2 Under Pick a Category, click Performance and Maintenance, and click System. 3 In the System Properties window, click the Hardware tab, and click Device Manager. NOTE: The User Account Control window may need...
... Windows Vista start button , and right-click Computer. 2 Click Properties→ Device Manager. 134 Reinstalling Software If you install or update a driver, use Windows Device Driver Rollback to replace the driver with a [!]) on the computer, click Continue; Scroll down the list to reinstall the driver or install a new driver.. 2 Under Pick a Category, click Performance and Maintenance, and click System. 3 In the System Properties window, click the Hardware tab, and click Device Manager. NOTE: The User Account Control window may need...

User's Guide
Page 135
... and restart your hard drive as described in the previous section: Windows XP: 1 Click Start→ My Computer→ Properties→ Hardware→ Device Manager. 2 Double-click the type of device for which you are installing the driver (for example, Audio or Video). 3 Double-click the name of the device for which you are installing the driver. 4 Click the Driver tab→ Update Driver. 5 Click Install from a list or specific location (Advanced)→...
... and restart your hard drive as described in the previous section: Windows XP: 1 Click Start→ My Computer→ Properties→ Hardware→ Device Manager. 2 Double-click the type of device for which you are installing the driver (for example, Audio or Video). 3 Double-click the name of the device for which you are installing the driver. 4 Click the Driver tab→ Update Driver. 5 Click Install from a list or specific location (Advanced)→...

User's Guide
Page 136
... start button , and click Help and Support. 2 Type hardware troubleshooter in the search field and press to follow the remaining troubleshooting steps. 136 Reinstalling Software Windows Vista: 1 Click the Windows Vista start the search. 3 In the Fix a Problem section, click Hardware Troubleshooter. 4 In the Hardware Troubleshooter list, select the option that best describes the problem and follow the remaining troubleshooting steps. 3 Double-click the type of device for which you are installing the driver (for example, Audio...
... start button , and click Help and Support. 2 Type hardware troubleshooter in the search field and press to follow the remaining troubleshooting steps. 136 Reinstalling Software Windows Vista: 1 Click the Windows Vista start the search. 3 In the Fix a Problem section, click Hardware Troubleshooter. 4 In the Hardware Troubleshooter list, select the option that best describes the problem and follow the remaining troubleshooting steps. 3 Double-click the type of device for which you are installing the driver (for example, Audio...

User's Guide
Page 191
... devices to electrical outlets, and then turn them on. 9 Enter system setup (see "Replacing the Computer Cover" on page 79) and restore the settings you recorded in the Event Log. 10 Properly dispose of battery connector 4 battery socket 7 Replace the computer cover (see "Entering System Setup" on page 207). Mini Tower Computer Parts 191 NOTICE: To connect a network cable, first plug the cable into the network device and then plug it into place. 1 4 2 3 1 system battery 3 battery...
... devices to electrical outlets, and then turn them on. 9 Enter system setup (see "Replacing the Computer Cover" on page 79) and restore the settings you recorded in the Event Log. 10 Properly dispose of battery connector 4 battery socket 7 Replace the computer cover (see "Entering System Setup" on page 207). Mini Tower Computer Parts 191 NOTICE: To connect a network cable, first plug the cable into the network device and then plug it into place. 1 4 2 3 1 system battery 3 battery...

User's Guide
Page 241
... you replace the optical panel insert whenever the optical disc is recommended that you begin any of the empty slot for the optical drive. 2 Push the panel. The battery can restore the correct settings in step 9. 2 Follow the procedures in system setup (see "System Setup" on page 79) so that you have to the manufacturer's instructions. A coin-cell battery maintains computer configuration, date, and time information. CAUTION: A new battery...
... you replace the optical panel insert whenever the optical disc is recommended that you begin any of the empty slot for the optical drive. 2 Push the panel. The battery can restore the correct settings in step 9. 2 Follow the procedures in system setup (see "System Setup" on page 79) so that you have to the manufacturer's instructions. A coin-cell battery maintains computer configuration, date, and time information. CAUTION: A new battery...

User's Guide
Page 283
shortcut - A card that supports resolutions up to authenticate a user on the capabilities of the monitor, the video controller and its corresponding folder or file without converting it first. standby mode - Reinforced area of video memory installed in the computer. Always disconnect the network cable from the network connector during an electrical storm, from entering the computer through the electrical outlet. A connector used to 1280 x 1024. SXGA - A video standard for...
shortcut - A card that supports resolutions up to authenticate a user on the capabilities of the monitor, the video controller and its corresponding folder or file without converting it first. standby mode - Reinforced area of video memory installed in the computer. Always disconnect the network cable from the network connector during an electrical storm, from entering the computer through the electrical outlet. A connector used to 1280 x 1024. SXGA - A video standard for...


