Service Manual
Page 13
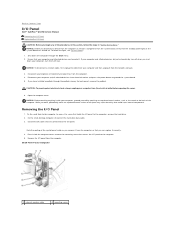
...the steps in "Safety Instructions." Small Form-Factor Computer 1 internal speaker cable 4 mounting screw Back to Contents Page I/O Panel Dell™ OptiPlex™ GX270 Service Manual Removing the I/O Panel Replacing the I/O Panel CAUTION: Before you begin any of the computer. Open the computer ...the I /O panel to the computer. 5. Ensure that holds the I /O panel. Removing the I /O panel to the computer, remove the hard drive. 2. To locate the light, see "System Board." 1. Disconnect all attached devices from the computer. 4. NOTICE: Before touching anything inside the ...
...the steps in "Safety Instructions." Small Form-Factor Computer 1 internal speaker cable 4 mounting screw Back to Contents Page I/O Panel Dell™ OptiPlex™ GX270 Service Manual Removing the I/O Panel Replacing the I/O Panel CAUTION: Before you begin any of the computer. Open the computer ...the I /O panel to the computer. 5. Ensure that holds the I /O panel. Removing the I /O panel to the computer, remove the hard drive. 2. To locate the light, see "System Board." 1. Disconnect all attached devices from the computer. 4. NOTICE: Before touching anything inside the ...
Service Manual
Page 18
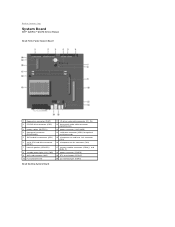
Back to Contents Page System Board Dell™ OptiPlex™ GX270 Service Manual Small Form-Factor System Board 1 floppy-drive connector (DSKT) 2 CD/DVD drive connector (IDE2) 3 battery socket (BATTERY) 4 front-panel connector (FRONTPANEL) 5 IDE hard-drive connector (IDE1) 6 serial ATA hard-drive connector (SATA1) 7 internal speaker (SPEAKER) 8 standby power light (AUX_PWR) 9 AGP card connector (AGP) 10 PCI card connector...
Back to Contents Page System Board Dell™ OptiPlex™ GX270 Service Manual Small Form-Factor System Board 1 floppy-drive connector (DSKT) 2 CD/DVD drive connector (IDE2) 3 battery socket (BATTERY) 4 front-panel connector (FRONTPANEL) 5 IDE hard-drive connector (IDE1) 6 serial ATA hard-drive connector (SATA1) 7 internal speaker (SPEAKER) 8 standby power light (AUX_PWR) 9 AGP card connector (AGP) 10 PCI card connector...

