

Service Manual
Page 1
... in any proprietary interest in this document to refer to either potential damage to avoid the problem. Dell™ OptiPlex™ GX270 Service Manual Safety Instructions Opening the Computer Cover Chassis Intrusion Switch Control Panel I/O Panel Power Supply System Board Closing the Computer Cover To remove or replace all other than its own. June...
... in any proprietary interest in this document to refer to either potential damage to avoid the problem. Dell™ OptiPlex™ GX270 Service Manual Safety Instructions Opening the Computer Cover Chassis Intrusion Switch Control Panel I/O Panel Power Supply System Board Closing the Computer Cover To remove or replace all other than its own. June...
Service Manual
Page 15
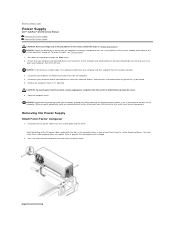
...: To disconnect a network cable, first unplug the cable from the electrical outlet before opening the cover. 6. Back to Contents Page Power Supply Dell™ OptiPlex™ GX270 Service Manual Removing the Power Supply Replacing the Power Supply CAUTION: Before you work, periodically touch an unpainted metal surface to ground the system board. 5. If your computer and attached devices...
...: To disconnect a network cable, first unplug the cable from the electrical outlet before opening the cover. 6. Back to Contents Page Power Supply Dell™ OptiPlex™ GX270 Service Manual Removing the Power Supply Replacing the Power Supply CAUTION: Before you work, periodically touch an unpainted metal surface to ground the system board. 5. If your computer and attached devices...
Service Manual
Page 16
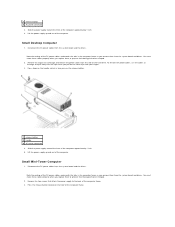
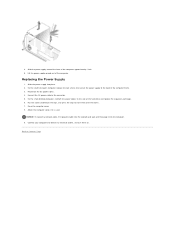
... when you replace them from the system board and drives. Note the routing of the computer approximately 1 inch. 5. Slide the power supply toward the front of the DC power cables underneath the tabs in the computer frame as you remove them to prevent their being pinched or crimped. 2. Note the routing..., which in the computer frame as you remove them to the back of the computer frame. Remove the two screws that attach the power supply to prevent their being pinched or crimped. 2. Press the release button located on the floor of the computer frame. 3. Lift the...
... when you replace them from the system board and drives. Note the routing of the computer approximately 1 inch. 5. Slide the power supply toward the front of the DC power cables underneath the tabs in the computer frame as you remove them to prevent their being pinched or crimped. 2. Note the routing..., which in the computer frame as you remove them to the back of the computer frame. Remove the two screws that attach the power supply to prevent their being pinched or crimped. 2. Press the release button located on the floor of the computer frame. 3. Lift the...
Service Manual
Page 17
... network wall jack and then plug it is used. Slide the power supply into the computer. 9. Reconnect the DC power cables. 4. Back to the connector. 5. Connect your computer and devices to close them on. Lift the power supply up and out of the computer approximately 1 inch. 5. On ...the small mini-tower computer, replace the two screws that secure the power supply to the side of the computer frame. 3. Slide the power supply toward the front of the computer. On the small desktop computer, reattach the power cables to the back of the hard drive and replace the expansion-card...
... network wall jack and then plug it is used. Slide the power supply into the computer. 9. Reconnect the DC power cables. 4. Back to the connector. 5. Connect your computer and devices to close them on. Lift the power supply up and out of the computer approximately 1 inch. 5. On ...the small mini-tower computer, replace the two screws that secure the power supply to the side of the computer frame. 3. Slide the power supply toward the front of the computer. On the small desktop computer, reattach the power cables to the back of the hard drive and replace the expansion-card...
Service Manual
Page 24
... own personal safety and to help avoid the potential hazard of electric shock, do not use a surge suppressor, line conditioner, or uninterruptible power supply (UPS). l To help ensure proper grounding. l Ensure that the cables are a trained service technician. l Do not push any cables... system menu. Also, do not place your computer, and then from a cable. Back to Contents Page CAUTION: Safety Instructions Dell™ OptiPlex™ GX270 Service Manual General When Working Inside Your Computer Protecting Against Electrostatic Discharge Battery Disposal Use the following steps in the...
... own personal safety and to help avoid the potential hazard of electric shock, do not use a surge suppressor, line conditioner, or uninterruptible power supply (UPS). l To help ensure proper grounding. l Ensure that the cables are a trained service technician. l Do not push any cables... system menu. Also, do not place your computer, and then from a cable. Back to Contents Page CAUTION: Safety Instructions Dell™ OptiPlex™ GX270 Service Manual General When Working Inside Your Computer Protecting Against Electrostatic Discharge Battery Disposal Use the following steps in the...


