Quick Reference Guide
Page 13
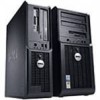
For more information about booting to turn on the computer. You can be rotated to match the orientation of your online User's Guide for more information, see "Diagnostic Lights" on ... computer see your computer. For a description of light codes that can help you press the power button the computer will perform an operating system shutdown. 4 Dell badge This badge can also rotate the badge using the slot provided near the bottom of the badge, press firmly, and turn off . • Steady...
For more information about booting to turn on the computer. You can be rotated to match the orientation of your online User's Guide for more information, see "Diagnostic Lights" on ... computer see your computer. For a description of light codes that can help you press the power button the computer will perform an operating system shutdown. 4 Dell badge This badge can also rotate the badge using the slot provided near the bottom of the badge, press firmly, and turn off . • Steady...
Quick Reference Guide
Page 29
... Utilities CD 1 Insert the Drivers and Utilities CD. 2 Shut down your computer and try again. 3 When the boot device list appears, highlight Boot to Utility Partition and press . 4 When the Dell Diagnostics Main Menu appears, select the test you want to start the Drivers and Utilities CD menu. 7 Type 2 ...Select the listing for the CD/DVD drive option from the CD boot menu. 5 Select the option to boot from the CD/DVD drive from the menu that appears. 6 Type 1 to start the Dell Diagnostics. 8 Select Run the 32 Bit Dell Diagnostics from the optional Drivers and Utilities CD (also known as the...
... Utilities CD 1 Insert the Drivers and Utilities CD. 2 Shut down your computer and try again. 3 When the boot device list appears, highlight Boot to Utility Partition and press . 4 When the Dell Diagnostics Main Menu appears, select the test you want to start the Drivers and Utilities CD menu. 7 Type 2 ...Select the listing for the CD/DVD drive option from the CD boot menu. 5 Select the option to boot from the CD/DVD drive from the menu that appears. 6 Type 1 to start the Dell Diagnostics. 8 Select Run the 32 Bit Dell Diagnostics from the optional Drivers and Utilities CD (also known as the...
Quick Reference Guide
Page 31
... light, The monitor or the graphics card may be faulty. System Lights Your power light may be faulty or incorrectly installed. If the Dell Diagnostics is identified. see "Beep Codes" on diagnosing the beep code see "Power Problems" in a power-saving mode. Press the power... button, move the mouse, or press a key on , and the computer is identified. If the computer does not boot, contact Dell for technical assistance. For instructions on page 35. problem is required. Quick Reference Guide 31 Check Diagnostic Lights to see "Diagnostic Lights" on...
... light, The monitor or the graphics card may be faulty. System Lights Your power light may be faulty or incorrectly installed. If the Dell Diagnostics is identified. see "Beep Codes" on diagnosing the beep code see "Power Problems" in a power-saving mode. Press the power... button, move the mouse, or press a key on , and the computer is identified. If the computer does not boot, contact Dell for technical assistance. For instructions on page 35. problem is required. Quick Reference Guide 31 Check Diagnostic Lights to see "Diagnostic Lights" on...

Quick Reference Guide
Page 32
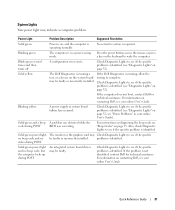
... successfully, all four lights display solid green for recovery completion, and then restart the computer. If the computer malfunctions after the computer successfully boots to the operating system. NOTE: The orientation of the diagnostic lights may help you begin any of the problem. outlet and press the ...the processor, see your computer has four lights labeled "1," "2," "3," and "4" on the LEDs may vary depending on the lights change as the boot process completes. Diagnostic Lights CAUTION: Before you troubleshoot a problem, your online User's Guide. 32 Quick Reference Guide
... successfully, all four lights display solid green for recovery completion, and then restart the computer. If the computer malfunctions after the computer successfully boots to the operating system. NOTE: The orientation of the diagnostic lights may help you begin any of the problem. outlet and press the ...the processor, see your computer has four lights labeled "1," "2," "3," and "4" on the LEDs may vary depending on the lights change as the boot process completes. Diagnostic Lights CAUTION: Before you troubleshoot a problem, your online User's Guide. 32 Quick Reference Guide
Quick Reference Guide
Page 38
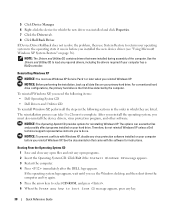
...After you reinstall the operating system, you must use System Restore to load any virus protection software installed on your primary hard drive. Booting From the Operating System CD 1 Save and close any open programs. 2 Insert the Operating System CD. Click Exit if the Install ...computer has a RAID controller. NOTICE: Before performing the installation, back up all the steps in the following items: • Dell Operating System CD • Dell Drivers and Utilities CD To reinstall Windows XP, perform all data files on your hard drive. For conventional hard drive configurations,...
...After you reinstall the operating system, you must use System Restore to load any virus protection software installed on your primary hard drive. Booting From the Operating System CD 1 Save and close any open programs. 2 Insert the Operating System CD. Click Exit if the Install ...computer has a RAID controller. NOTICE: Before performing the installation, back up all the steps in the following items: • Dell Operating System CD • Dell Drivers and Utilities CD To reinstall Windows XP, perform all data files on your hard drive. For conventional hard drive configurations,...
Quick Reference Guide
Page 39
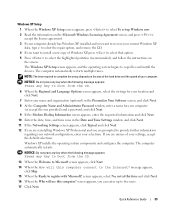
... press to select To set up to the Internet? NOTICE: Do not press any key when the following message appears: Press any key to boot from the CD. 6 When the Regional and Language Options screen appears, select the settings for your location and click Next. 7 Enter your name... Administrator Password window, enter a name for your selections. NOTICE: Do not press any key when the following message appears: Press any key to boot from the CD. 13 When the Welcome to provide further information regarding your network configuration, enter your computer (or accept the one provided) and ...
... press to select To set up to the Internet? NOTICE: Do not press any key when the following message appears: Press any key to boot from the CD. 6 When the Regional and Language Options screen appears, select the settings for your location and click Next. 7 Enter your name... Administrator Password window, enter a name for your selections. NOTICE: Do not press any key when the following message appears: Press any key to boot from the CD. 13 When the Welcome to provide further information regarding your network configuration, enter your computer (or accept the one provided) and ...
Quick Reference Guide
Page 40
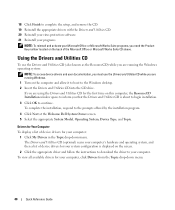
... the Drivers and Utilities CD (also known as the ResourceCD) while you are running Windows. 1 Turn on the computer and allow it to boot to the Windows desktop. 2 Insert the Drivers and Utilities CD into the CD drive. To view all available drivers for your computer. To... Click the appropriate driver and follow the instructions to download the driver to the prompts offered by the installation program. 4 Click Next at the Welcome Dell System Owner screen. 5 Select the appropriate System Model, Operating System, Device Type, and Topic. Drivers for Your Computer To display a list of ...
... the Drivers and Utilities CD (also known as the ResourceCD) while you are running Windows. 1 Turn on the computer and allow it to boot to the Windows desktop. 2 Insert the Drivers and Utilities CD into the CD drive. To view all available drivers for your computer. To... Click the appropriate driver and follow the instructions to download the driver to the prompts offered by the installation program. 4 Click Next at the Welcome Dell System Owner screen. 5 Select the appropriate System Model, Operating System, Device Type, and Topic. Drivers for Your Computer To display a list of ...


