Quick Reference Guide
Page 3
... Cover 16 Before You Begin 16 Turning Off Your Computer 16 Mini Tower Computer 17 Desktop Computer 19 Inside Your Computer 20 Mini Tower Computer 20 Desktop Computer 23 Setting Up Your Computer 26 Solving Problems 28 Dell Diagnostics 28 System Lights 31 Diagnostic Lights 32 Beep Codes 35 Resolving Software and Hardware...
... Cover 16 Before You Begin 16 Turning Off Your Computer 16 Mini Tower Computer 17 Desktop Computer 19 Inside Your Computer 20 Mini Tower Computer 20 Desktop Computer 23 Setting Up Your Computer 26 Solving Problems 28 Dell Diagnostics 28 System Lights 31 Diagnostic Lights 32 Beep Codes 35 Resolving Software and Hardware...
Quick Reference Guide
Page 5
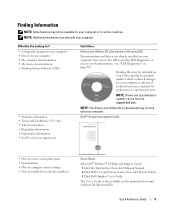
...to your computer or advanced technical-reference material for technicians or experienced users. Readme files may not be found at support.dell.com. Dell™ Product Information Guide • How to remove and replace parts • Specifications • How to configure ... button, then click Help and Support. 2 Click Dell User and System Guides, then click System Guides. 3 Click Dell Optiplex User's Guide. You can be available for my computer • My computer documentation • My device documentation • Desktop System Software (DSS) • Warranty information •...
...to your computer or advanced technical-reference material for technicians or experienced users. Readme files may not be found at support.dell.com. Dell™ Product Information Guide • How to remove and replace parts • Specifications • How to configure ... button, then click Help and Support. 2 Click Dell User and System Guides, then click System Guides. 3 Click Dell Optiplex User's Guide. You can be available for my computer • My computer documentation • My device documentation • Desktop System Software (DSS) • Warranty information •...
Quick Reference Guide
Page 6
...updates • Desktop System Software (DSS) - Online discussion with technical support • Reference - Upgrade information for correct operation of your computer, you use the customized Dell Premier Support website at Dell customers premier.support.dell.com. Troubleshooting hints and tips, Dell Support Website - ...your computer and operating system and installs the updates appropriate for your operating system and support for your Dell computer. support.dell.com articles from technicians, online courses, and NOTE: Select your region to direct your computer when...
...updates • Desktop System Software (DSS) - Online discussion with technical support • Reference - Upgrade information for correct operation of your computer, you use the customized Dell Premier Support website at Dell customers premier.support.dell.com. Troubleshooting hints and tips, Dell Support Website - ...your computer and operating system and installs the updates appropriate for your operating system and support for your Dell computer. support.dell.com articles from technicians, online courses, and NOTE: Select your region to direct your computer when...
Quick Reference Guide
Page 12
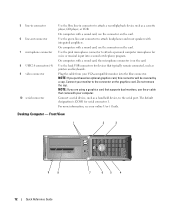
... will be covered by a cap. Use the pink microphone connector to attach headphones and most speakers with a sound card, use the connector on the card. Desktop Computer - Use the back USB connectors for voice or musical input into the blue connector. Use the green line-out connector to attach a personal computer...
... will be covered by a cap. Use the pink microphone connector to attach headphones and most speakers with a sound card, use the connector on the card. Desktop Computer - Use the back USB connectors for voice or musical input into the blue connector. Use the green line-out connector to attach a personal computer...
Quick Reference Guide
Page 14
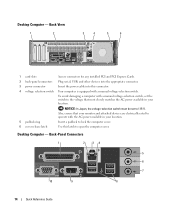
... a manual voltage-selection switch, set to 115-V. To avoid damaging a computer with a manual voltage-selection switch. Desktop Computer - NOTICE: In Japan, the voltage-selection switch must be set the switch to open the computer cover. Desktop Computer - Back View 1 2 3 4 5 6 1 card slots Access connectors for any installed PCI and PCI Express Cards. 2 back...
... a manual voltage-selection switch, set to 115-V. To avoid damaging a computer with a manual voltage-selection switch. Desktop Computer - NOTICE: In Japan, the voltage-selection switch must be set the switch to open the computer cover. Desktop Computer - Back View 1 2 3 4 5 6 1 card slots Access connectors for any installed PCI and PCI Express Cards. 2 back...
Quick Reference Guide
Page 17
... unplug your computer from the electrical outlet before you pull connectors apart, keep them evenly aligned to servicing that is not authorized by Dell is attached. Do not touch the components or contacts on your computer. Hold a component such as the metal at the back of...Remove the computer cover: • Remove the Mini Computer cover (see "Mini Tower Computer" on page 17). • Remove the Desktop Computer cover (see "Desktop Computer" on the locking tabs before you begin working inside your computer, ground yourself by your computer and all attached devices from their ...
... unplug your computer from the electrical outlet before you pull connectors apart, keep them evenly aligned to servicing that is not authorized by Dell is attached. Do not touch the components or contacts on your computer. Hold a component such as the metal at the back of...Remove the computer cover: • Remove the Mini Computer cover (see "Mini Tower Computer" on page 17). • Remove the Desktop Computer cover (see "Desktop Computer" on the locking tabs before you begin working inside your computer, ground yourself by your computer and all attached devices from their ...
Quick Reference Guide
Page 19
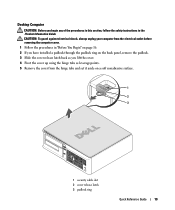
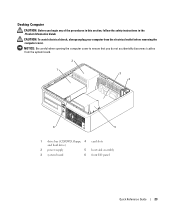
Desktop Computer CAUTION: Before you lift the cover. 4 Pivot the cover up using the hinge tabs as leverage points. 5 Remove the cover from the electrical outlet ...
Desktop Computer CAUTION: Before you lift the cover. 4 Pivot the cover up using the hinge tabs as leverage points. 5 Remove the cover from the electrical outlet ...
Quick Reference Guide
Page 23
NOTICE: Be careful when opening the computer cover to ensure that you begin any of the procedures in this section, follow the safety instructions in the Product Information Guide. Desktop Computer CAUTION: Before you do not accidentally disconnect cables from the electrical outlet before removing the computer cover. CAUTION: To avoid electrical shock, always unplug your computer from the system board. 2 1 3 4 6 5 1 drive bay (CD/DVD, floppy, 4 card slots and hard drive) 2 power supply 5 heat sink assembly 3 system board 6 front I/O panel Quick Reference Guide 23
NOTICE: Be careful when opening the computer cover to ensure that you begin any of the procedures in this section, follow the safety instructions in the Product Information Guide. Desktop Computer CAUTION: Before you do not accidentally disconnect cables from the electrical outlet before removing the computer cover. CAUTION: To avoid electrical shock, always unplug your computer from the system board. 2 1 3 4 6 5 1 drive bay (CD/DVD, floppy, 4 card slots and hard drive) 2 power supply 5 heat sink assembly 3 system board 6 front I/O panel Quick Reference Guide 23
Quick Reference Guide
Page 25
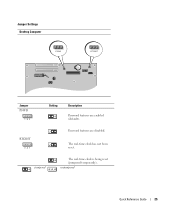
RTCRST 3 2 1 Password features are enabled (default). The real-time clock has not been reset. jumpered The real-time clock is being reset (jumpered temporarily). unjumpered Quick Reference Guide 25 Jumper Settings Desktop Computer PSWD RTCRST Jumper PSWD 1 2 3 Setting Description Password features are disabled.
RTCRST 3 2 1 Password features are enabled (default). The real-time clock has not been reset. jumpered The real-time clock is being reset (jumpered temporarily). unjumpered Quick Reference Guide 25 Jumper Settings Desktop Computer PSWD RTCRST Jumper PSWD 1 2 3 Setting Description Password features are disabled.
Quick Reference Guide
Page 29
... operating system logo appears, continue to wait until you see the Microsoft Windows desktop. If multiple versions are listed, select the version appropriate for your computer. 9 When the Dell Diagnostics Main Menu appears, select the test you want to run the Dell Diagnostics from your Drivers and Utilities CD (optional) (see "Starting the...
... operating system logo appears, continue to wait until you see the Microsoft Windows desktop. If multiple versions are listed, select the version appropriate for your computer. 9 When the Dell Diagnostics Main Menu appears, select the test you want to run the Dell Diagnostics from your Drivers and Utilities CD (optional) (see "Starting the...
Quick Reference Guide
Page 38
...of the computer. Use the Drivers and Utilities CD to do not reinstall Windows XP unless a Dell technical support representative instructs you installed the new device driver (see the Windows desktop, and then shut down the computer and try again. 5 Press the arrow keys to select CD... take 1 to 2 hours to complete. Click Exit if the Install Windows XP message appears. 3 Restart the computer. 4 Press immediately after the DELL logo appears. NOTE: The Drivers and Utilities CD contains drivers that came with Windows XP, disable any open programs. 2 Insert the Operating System CD...
...of the computer. Use the Drivers and Utilities CD to do not reinstall Windows XP unless a Dell technical support representative instructs you installed the new device driver (see the Windows desktop, and then shut down the computer and try again. 5 Press the arrow keys to select CD... take 1 to 2 hours to complete. Click Exit if the Install Windows XP message appears. 3 Restart the computer. 4 Press immediately after the DELL logo appears. NOTE: The Drivers and Utilities CD contains drivers that came with Windows XP, disable any open programs. 2 Insert the Operating System CD...
Quick Reference Guide
Page 40
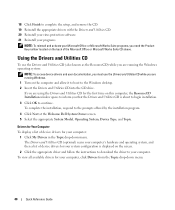
... to begin installation. 3 Click OK to continue. To complete the installation, respond to the prompts offered by the installation program. 4 Click Next at the Welcome Dell System Owner screen. 5 Select the appropriate System Model, Operating System, Device Type, and Topic. Drivers for Your Computer To display a list of the Microsoft Office... Microsoft Office or Microsoft Works Suite programs, you need the Product Key number located on the computer and allow it to boot to the Windows desktop. 2 Insert the Drivers and Utilities CD into the CD drive.
... to begin installation. 3 Click OK to continue. To complete the installation, respond to the prompts offered by the installation program. 4 Click Next at the Welcome Dell System Owner screen. 5 Select the appropriate System Model, Operating System, Device Type, and Topic. Drivers for Your Computer To display a list of the Microsoft Office... Microsoft Office or Microsoft Works Suite programs, you need the Product Key number located on the computer and allow it to boot to the Windows desktop. 2 Insert the Drivers and Utilities CD into the CD drive.


