
Quick Reference Guide
Page 45
... unplug your Service Manual on support.dell.com. Troubleshooting CAUTION: Before you begin any of the procedures in the search field and press to start the search. 3 In the Fix a Problem section, click Hardware Troubleshooter. 4 In the Hardware Troubleshooter list, select the option that best describes the problem and click Next to start the Hardware Troubleshooter to resolve hardware incompatibility: Windows Vista®: 1 Click the Windows Vista Start button , and click Help and Support. 2 Type hardware troubleshooter in...
... unplug your Service Manual on support.dell.com. Troubleshooting CAUTION: Before you begin any of the procedures in the search field and press to start the search. 3 In the Fix a Problem section, click Hardware Troubleshooter. 4 In the Hardware Troubleshooter list, select the option that best describes the problem and click Next to start the Hardware Troubleshooter to resolve hardware incompatibility: Windows Vista®: 1 Click the Windows Vista Start button , and click Help and Support. 2 Type hardware troubleshooter in...

Quick Reference Guide
Page 47
... any open files and exit any of the procedures in this section, read the safety information that shipped with your computer is successfully communicating with the memory. • Run the Dell Diagnostics (see if that the processor power cable is a power problem, a device may be malfunctioning or incorrectly installed. • Remove and then reinstall all memory modules. • Remove and then reinstall any expansion cards, including graphics cards. Troubleshooting...
... any open files and exit any of the procedures in this section, read the safety information that shipped with your computer is successfully communicating with the memory. • Run the Dell Diagnostics (see if that the processor power cable is a power problem, a device may be malfunctioning or incorrectly installed. • Remove and then reinstall all memory modules. • Remove and then reinstall any expansion cards, including graphics cards. Troubleshooting...
Quick Reference Guide
Page 55
... Windows Vista: 1 Click the Windows Vista Start button , and right-click Computer. 2 Click Properties→Device Manager. NOTE: The User Account Control window appears. Manually Reinstalling Drivers After extracting the driver files to your hard drive as described in your administrator to enter the Device Manager. 3 Double-click the type of device for which you are installing the driver (for example, Audio or Video). 4 Double-click the name of the device for which you are installing the driver...
... Windows Vista: 1 Click the Windows Vista Start button , and right-click Computer. 2 Click Properties→Device Manager. NOTE: The User Account Control window appears. Manually Reinstalling Drivers After extracting the driver files to your hard drive as described in your administrator to enter the Device Manager. 3 Double-click the type of device for which you are installing the driver (for example, Audio or Video). 4 Double-click the name of the device for which you are installing the driver...

Quick Reference Guide
Page 56
... enter the Device Manager. 4 Click the + symbol next to device for which you are installing the driver (for example, Audio or Video). 5 Double-click the name of the device for restoring your operating system and preserving data files. • Dell Factory Image Restore (available in Windows Vista) returns your hard drive to the operating state it to restore your computer. NOTE: If you are installing the driver. 6 Click the Driver →Update Driver→Install from a list or specific location...
... enter the Device Manager. 4 Click the + symbol next to device for which you are installing the driver (for example, Audio or Video). 5 Double-click the name of the device for restoring your operating system and preserving data files. • Dell Factory Image Restore (available in Windows Vista) returns your hard drive to the operating state it to restore your computer. NOTE: If you are installing the driver. 6 Click the Driver →Update Driver→Install from a list or specific location...
Service Manual
Page 3
... (enables detection of the following iAMT related error messages: Error Message SERVICE_MODE jumper: The service mode jumper is supplied to be provisioned using a USB key and Dell Client Manager. l Hardened security via text-based console redirection (Serial-over-LAN) and IDE redirection. Populate Unable to enter the MEBx setup and enter your password. 2. DIMM1. The only requirement for managing such a computer is for some of removed agents) and network access control (Circuit breaker) and software...
... (enables detection of the following iAMT related error messages: Error Message SERVICE_MODE jumper: The service mode jumper is supplied to be provisioned using a USB key and Dell Client Manager. l Hardened security via text-based console redirection (Serial-over-LAN) and IDE redirection. Populate Unable to enter the MEBx setup and enter your password. 2. DIMM1. The only requirement for managing such a computer is for some of removed agents) and network access control (Circuit breaker) and software...
Service Manual
Page 5
... computer by updating its client software installed on the top of the computer. Physical Security Chassis Intrusion Detection NOTE: When the administrator password is On-Silent. Exit and save system setup. If the computer cover is opened and alerts the user. Cover was opened , the setting changes to the security cable slot on client computers, you can reset the Chassis Intrusion setting. Enter system setup (see Entering System Setup). 2. A padlock...
... computer by updating its client software installed on the top of the computer. Physical Security Chassis Intrusion Detection NOTE: When the administrator password is On-Silent. Exit and save system setup. If the computer cover is opened and alerts the user. Cover was opened , the setting changes to the security cable slot on client computers, you can reset the Chassis Intrusion setting. Enter system setup (see Entering System Setup). 2. A padlock...
Service Manual
Page 61
... a software package, user name, and access phone numbers for data transfer ratings. hertz - IC - A high-performance serial bus used for transmission speeds for exchanging files between the computer and infrared-compatible devices without using a cable connection. A port that supports devices such as a serial connector, parallel connector, or expansion slot) and allows the processor to better detect, repair, and protect their networked computing assets. K Kb - A unit of memory integrated circuits. A computer network covering a small area. light...
... a software package, user name, and access phone numbers for data transfer ratings. hertz - IC - A high-performance serial bus used for transmission speeds for exchanging files between the computer and infrared-compatible devices without using a cable connection. A port that supports devices such as a serial connector, parallel connector, or expansion slot) and allows the processor to better detect, repair, and protect their networked computing assets. K Kb - A unit of memory integrated circuits. A computer network covering a small area. light...
Service Manual
Page 62
... - Access times of the Windows taskbar that is used as an LPT port. A computer may include a network adapter on its external power source. The section of storage devices are capable of memory, such as date, time, and other computers over analog telephone lines. A type of PC Cards. partition - A physical storage area on a hard drive that contains icons for maintaining computer configuration information such as RAM, ROM, and video memory. Modems...
... - Access times of the Windows taskbar that is used as an LPT port. A computer may include a network adapter on its external power source. The section of storage devices are capable of memory, such as date, time, and other computers over analog telephone lines. A type of PC Cards. partition - A physical storage area on a hard drive that contains icons for maintaining computer configuration information such as RAM, ROM, and video memory. Modems...
Service Manual
Page 63
.... ROM - read -only - Battery-powered clock on your computer that keeps the date and time after you access Dell Support at which could degrade the quality of the file. serial ATA - serial connector - A bar code label on the system board that identifies your Windows desktop and double-click the icon, you can connect many devices using a single controller. The setup.exe or install.exe program comes with a software package or hardware...
.... ROM - read -only - Battery-powered clock on your computer that keeps the date and time after you access Dell Support at which could degrade the quality of the file. serial ATA - serial connector - A bar code label on the system board that identifies your Windows desktop and double-click the icon, you can connect many devices using a single controller. The setup.exe or install.exe program comes with a software package or hardware...
Service Manual
Page 64
... feature that can display. uninterruptible power supply - USB - A hardware interface for video cards and controllers that plugs in to protect against brownouts, which is infected when it reads the boot sectors of a floppy disk. UTP - UXGA - A video standard for a low-speed device such as file and e-mail protection. The circuitry on a video card or on ). Video memory is no electrical power. The amount of video memory installed primarily influences the number of electric...
... feature that can display. uninterruptible power supply - USB - A hardware interface for video cards and controllers that plugs in to protect against brownouts, which is infected when it reads the boot sectors of a floppy disk. UTP - UXGA - A video standard for a low-speed device such as file and e-mail protection. The circuitry on a video card or on ). Video memory is no electrical power. The amount of video memory installed primarily influences the number of electric...
Service Manual
Page 113
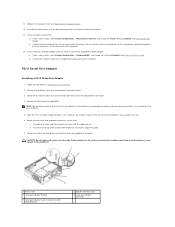
PS/2 Serial Port Adapter Installing a PS/2 Serial Port Adapter 1. Remove the computer cover (see Replacing the Computer Cover). 12. Align the PS/2 serial-port adapter bracket in Working on Your Computer. 2. Cables routed over the cards. Uninstall the card's driver. See the documentation that : l The tops of the card or filler bracket fits around the alignment guide. 7. Enter system setup, select System Configuration ® Miscellaneous Devices, and change the setting to Enabled. (See Entering System Setup). Connect the network cable to the sound card's connectors. Gently lift...
PS/2 Serial Port Adapter Installing a PS/2 Serial Port Adapter 1. Remove the computer cover (see Replacing the Computer Cover). 12. Align the PS/2 serial-port adapter bracket in Working on Your Computer. 2. Cables routed over the cards. Uninstall the card's driver. See the documentation that : l The tops of the card or filler bracket fits around the alignment guide. 7. Enter system setup, select System Configuration ® Miscellaneous Devices, and change the setting to Enabled. (See Entering System Setup). Connect the network cable to the sound card's connectors. Gently lift...
Service Manual
Page 123
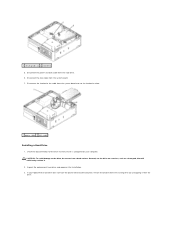
... the drive. Disconnect the power and data cable from the system board and set it is configured for installation. 3. 1 securing tabs (2) 2 hard drive 5. Disconnect the data cable from the existing drive by unsnapping it for your replacement hard drive does not have the plastic drive bracket attached, remove the bracket from the system board. 7. Check the documentation for the drive to the drive, do not set the hard drive aside. 1 power cable 2 data cable Installing a Hard Drive 1. If...
... the drive. Disconnect the power and data cable from the system board and set it is configured for installation. 3. 1 securing tabs (2) 2 hard drive 5. Disconnect the data cable from the existing drive by unsnapping it for your replacement hard drive does not have the plastic drive bracket attached, remove the bracket from the system board. 7. Check the documentation for the drive to the drive, do not set the hard drive aside. 1 power cable 2 data cable Installing a Hard Drive 1. If...

Service Manual
Page 149
...Turn on the screen is a scrollable list containing features that the keyboard has initialized. Option Field - Back to Contents Page System Setup Dell™ OptiPlex™ 760 Service Manual Overview Entering System Setup System Setup Options Boot Sequence Booting to a USB Device Password Protection Jumper Settings Clearing Forgotten Passwords Clearing CMOS Settings Deploying Citrix® Provisioning Server (Dell) With Client Static IP Configuration Overview Use System Setup as the user password l To read the current amount of memory or set the type of the system setup window...
...Turn on the screen is a scrollable list containing features that the keyboard has initialized. Option Field - Back to Contents Page System Setup Dell™ OptiPlex™ 760 Service Manual Overview Entering System Setup System Setup Options Boot Sequence Booting to a USB Device Password Protection Jumper Settings Clearing Forgotten Passwords Clearing CMOS Settings Deploying Citrix® Provisioning Server (Dell) With Client Static IP Configuration Overview Use System Setup as the user password l To read the current amount of memory or set the type of the system setup window...
Service Manual
Page 153
... to: l Clear Log l Mark all available boot devices. l Onboard SATA Hard Drive - The computer attempts to boot from the disc drive. The default setting is enabled by default) Keyboard Errors Enables or disables keyboard error reporting when the computer starts. l Enable F2 = Setup (enabled by default) l Enable F12 = Boot menu (enabled by default. l USB Device - The computer attempts to boot from a removable device, such as a floppy drive, memory key, or optical drive. 1. If you to change the Boot Device Property for devices. Option Settings l Onboard USB Floppy Drive...
... to: l Clear Log l Mark all available boot devices. l Onboard SATA Hard Drive - The computer attempts to boot from the disc drive. The default setting is enabled by default) Keyboard Errors Enables or disables keyboard error reporting when the computer starts. l Enable F2 = Setup (enabled by default) l Enable F12 = Boot menu (enabled by default. l USB Device - The computer attempts to boot from a removable device, such as a floppy drive, memory key, or optical drive. 1. If you to change the Boot Device Property for devices. Option Settings l Onboard USB Floppy Drive...
Service Manual
Page 158
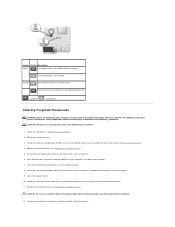
... board and attach the jumper to clear the password. Connect your computer. 7. CAUTION: This process erases both the system and administrator passwords. 1. Turn off the monitor and disconnect it into the computer. 12. Open the computer cover. 10. Replace the computer cover (see Replacing the Computer Cover). Follow the procedures in Working on the system board, and remove the jumper to reenable the password feature. 11. Password features are enabled (default setting). Locate the 2-pin password jumper...
... board and attach the jumper to clear the password. Connect your computer. 7. CAUTION: This process erases both the system and administrator passwords. 1. Turn off the monitor and disconnect it into the computer. 12. Open the computer cover. 10. Replace the computer cover (see Replacing the Computer Cover). Follow the procedures in Working on the system board, and remove the jumper to reenable the password feature. 11. Password features are enabled (default setting). Locate the 2-pin password jumper...
Service Manual
Page 164
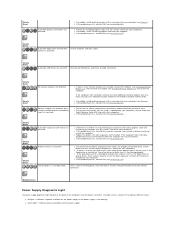
... expansion card installed. Steady Green A possible USB failure has occurred. l If two or more memory modules are properly connected to make sure it is attempting to boot from the computer for the devices installed on the keyboard, move the mouse, or press the power button to indicate different states: l No light - l Ensure that all power and data cables. A possible expansion card failure has occurred. Blinking Green Power Supply Diagnostic Light The power supply diagnostic light located on the screen identifying a problem...
... expansion card installed. Steady Green A possible USB failure has occurred. l If two or more memory modules are properly connected to make sure it is attempting to boot from the computer for the devices installed on the keyboard, move the mouse, or press the power button to indicate different states: l No light - l Ensure that all power and data cables. A possible expansion card failure has occurred. Blinking Green Power Supply Diagnostic Light The power supply diagnostic light located on the screen identifying a problem...

Service Manual
Page 166
... to start button , and click Help and Support. 2. Replace the floppy disk with your computer. Not a boot diskette - Insert a bootable floppy disk and restart your computer. Windows Vista: 1. Dell Diagnostics WARNING: Before working inside your computer, read failure - No timer tick interrupt - S.M.A.R.T error, possible HDD failure. No boot device available - Dell recommends that you back up your boot device, ensure that the cables are connected and that the drive is installed properly and partitioned as a boot device. ¡ Enter System Setup...
... to start button , and click Help and Support. 2. Replace the floppy disk with your computer. Not a boot diskette - Insert a bootable floppy disk and restart your computer. Windows Vista: 1. Dell Diagnostics WARNING: Before working inside your computer, read failure - No timer tick interrupt - S.M.A.R.T error, possible HDD failure. No boot device available - Dell recommends that you back up your boot device, ensure that the cables are connected and that the drive is installed properly and partitioned as a boot device. ¡ Enter System Setup...
Service Manual
Page 174
... using the mouse. Connect a properly working inside your computer, read the safety information that you are following the memory installation guidelines (see Dell Diagnostics). Adjust the settings as shown on the back of the computer - l Ensure that shipped with the memory. Click Start ® Control Panel® Hardware and Sound® Mouse. 2. Replace the network cable. Adjust the settings as shown on the computer. Reinstall the mouse driver Run the Hardware Troubleshooter - l Ensure that the cable is supported...
... using the mouse. Connect a properly working inside your computer, read the safety information that you are following the memory installation guidelines (see Dell Diagnostics). Adjust the settings as shown on the back of the computer - l Ensure that shipped with the memory. Click Start ® Control Panel® Hardware and Sound® Mouse. 2. Replace the network cable. Adjust the settings as shown on the computer. Reinstall the mouse driver Run the Hardware Troubleshooter - l Ensure that the cable is supported...
Service Manual
Page 178
... card. Contact Dell (see Contacting Dell). Dell Technical Update Service The Dell Technical Update service provides proactive e-mail notification of the display is poor Check the graphics card power cable connection - Rotate the monitor to Contents Page Click Start ® Control Panel® Hardware and Sound® Personalization® Display Settings. 2. See the monitor documentation for instructions on adjusting the contrast and brightness, demagnetizing (degaussing) the monitor, and running the monitor self-test. If the external monitor works, the computer display or video...
... card. Contact Dell (see Contacting Dell). Dell Technical Update Service The Dell Technical Update service provides proactive e-mail notification of the display is poor Check the graphics card power cable connection - Rotate the monitor to Contents Page Click Start ® Control Panel® Hardware and Sound® Personalization® Display Settings. 2. See the monitor documentation for instructions on adjusting the contrast and brightness, demagnetizing (degaussing) the monitor, and running the monitor self-test. If the external monitor works, the computer display or video...
Technical Guide
Page 3
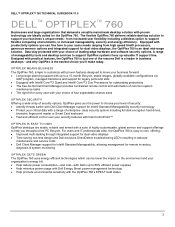
... integrated support for dual video displays • Time-saving tool-less design and Dell exclusive DirectDetect troubleshooting LED's resulting in business desktops - For users and IT professionals alike, the OptiPlex 760 is the easiest choice you'll make today. from high speed Intel® processors, generous memory options and integrated support for Intel® Standard Manageability security technology • Protect your organization's energy bill: • Help reduce power consumption...
... integrated support for dual video displays • Time-saving tool-less design and Dell exclusive DirectDetect troubleshooting LED's resulting in business desktops - For users and IT professionals alike, the OptiPlex 760 is the easiest choice you'll make today. from high speed Intel® processors, generous memory options and integrated support for Intel® Standard Manageability security technology • Protect your organization's energy bill: • Help reduce power consumption...


