
Owners Manual
Page 4
Back View 33 Bottom View 35 4 Using the Keyboard and Touchpad . . . . . 37 Numeric Keypad 37 Key Combinations 37 System Functions 37 Display Functions 37 Battery 37 Power Management 38 Microsoft® Windows® Logo Key Functions . . . 38 Dell™ QuickSet Key Combinations 38 Adjusting Keyboard Settings 38 Touch Pad 39 Customizing the Touch Pad 40 5 Using the Display 41 Adjusting Brightness 41 Switching the Video Image From Your Computer Display To a Projector 41 Setting Display Resolution and Refresh Rate 41 4 Contents
Back View 33 Bottom View 35 4 Using the Keyboard and Touchpad . . . . . 37 Numeric Keypad 37 Key Combinations 37 System Functions 37 Display Functions 37 Battery 37 Power Management 38 Microsoft® Windows® Logo Key Functions . . . 38 Dell™ QuickSet Key Combinations 38 Adjusting Keyboard Settings 38 Touch Pad 39 Customizing the Touch Pad 40 5 Using the Display 41 Adjusting Brightness 41 Switching the Video Image From Your Computer Display To a Projector 41 Setting Display Resolution and Refresh Rate 41 4 Contents
Owners Manual
Page 27
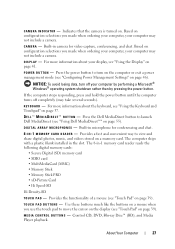
.... About Your Computer 27 Press the power button to move the cursor on the display (see "Using the Keyboard and Touchpad" on page 41. I C A T O R - Provides a fast and convenient way to launch Dell MediaDirect (see "Using the Display" on page 37. The 8-in camera for conferencing and chat. 8 - T O U C H P A D B U ... D I S P L A Y - Based on page 46). Based on configuration selections you made when ordering your computer, your display, see "Using Dell MediaDirect™" on page 39). For more information about the keyboard, see "Touch Pad" on page 55). Press the...
.... About Your Computer 27 Press the power button to move the cursor on the display (see "Using the Keyboard and Touchpad" on page 41. I C A T O R - Provides a fast and convenient way to launch Dell MediaDirect (see "Using the Display" on page 37. The 8-in camera for conferencing and chat. 8 - T O U C H P A D B U ... D I S P L A Y - Based on page 46). Based on configuration selections you made when ordering your computer, your display, see "Using Dell MediaDirect™" on page 39). For more information about the keyboard, see "Touch Pad" on page 55). Press the...
Owners Manual
Page 37
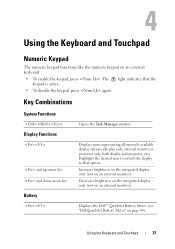
...icon to switch the display to that the keypad is active. • To disable the keypad, press again. Using the Keyboard and Touchpad 37 The 9 light indicates that option. Decreases brightness on the integrated display only (not on an external monitor). and up-arrow key...monitor or projector only, both display and projector, etc). Displays the Dell™ QuickSet Battery Meter (see "Dell QuickSet Battery Meter" on an external keyboard. • To enable the keypad, press . Using the Keyboard and Touchpad Numeric Keypad The numeric keypad functions like the numeric keypad on page ...
...icon to switch the display to that the keypad is active. • To disable the keypad, press again. Using the Keyboard and Touchpad 37 The 9 light indicates that option. Decreases brightness on the integrated display only (not on an external monitor). and up-arrow key...monitor or projector only, both display and projector, etc). Displays the Dell™ QuickSet Battery Meter (see "Dell QuickSet Battery Meter" on an external keyboard. • To enable the keypad, press . Using the Keyboard and Touchpad Numeric Keypad The numeric keypad functions like the numeric keypad on page ...
Owners Manual
Page 38
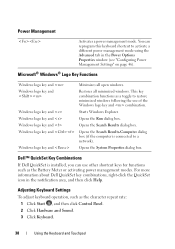
...1 Click Start , and then click Control Panel. 2 Click Hardware and Sound. 3 Click Keyboard. 38 Using the Keyboard and Touchpad For more information about Dell QuickSet key combinations, right-click the QuickSet icon in the Power Options Properties window (see "Configuring Power Management Settings" on page ...logo key and Windows logo key and Windows logo key and Windows logo key and Minimizes all minimized windows. Dell™ QuickSet Key Combinations If Dell QuickSet is connected to activate a different power management mode using the Advanced tab in the notification area, and ...
...1 Click Start , and then click Control Panel. 2 Click Hardware and Sound. 3 Click Keyboard. 38 Using the Keyboard and Touchpad For more information about Dell QuickSet key combinations, right-click the QuickSet icon in the Power Options Properties window (see "Configuring Power Management Settings" on page ...logo key and Windows logo key and Windows logo key and Windows logo key and Minimizes all minimized windows. Dell™ QuickSet Key Combinations If Dell QuickSet is connected to activate a different power management mode using the Advanced tab in the notification area, and ...
Owners Manual
Page 39
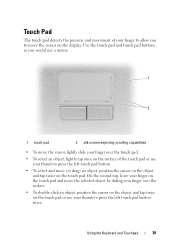
Using the Keyboard and Touchpad 39 Use the touch pad and touch pad buttons as you to press the left touch pad button. • To select and move the selected ...
Using the Keyboard and Touchpad 39 Use the touch pad and touch pad buttons as you to press the left touch pad button. • To select and move the selected ...
Owners Manual
Page 40
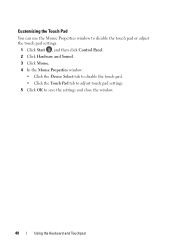
Customizing the Touch Pad You can use the Mouse Properties window to disable the touch pad or adjust the touch pad settings. 1 Click Start , and then click Control Panel. 2 Click Hardware and Sound. 3 Click Mouse. 4 In the Mouse Properties window: • Click the Device Select tab to disable the touch pad. • Click the Touch Pad tab to adjust touch pad settings. 5 Click OK to save the settings and close the window. 40 Using the Keyboard and Touchpad
Customizing the Touch Pad You can use the Mouse Properties window to disable the touch pad or adjust the touch pad settings. 1 Click Start , and then click Control Panel. 2 Click Hardware and Sound. 3 Click Mouse. 4 In the Mouse Properties window: • Click the Device Select tab to disable the touch pad. • Click the Touch Pad tab to adjust touch pad settings. 5 Click OK to save the settings and close the window. 40 Using the Keyboard and Touchpad
Owners Manual
Page 125
... the Keyboard 1 Follow the procedures in "Before You Begin" on page 117. 2 Remove the Hinge Covers and Center Control Cover (see "Using the Keyboard and Touchpad" on page 37. Adding and Replacing Parts 125 NOTICE: The keycaps on the keyboard are fragile, easily dislodged, and timeconsuming to do so could result...
... the Keyboard 1 Follow the procedures in "Before You Begin" on page 117. 2 Remove the Hinge Covers and Center Control Cover (see "Using the Keyboard and Touchpad" on page 37. Adding and Replacing Parts 125 NOTICE: The keycaps on the keyboard are fragile, easily dislodged, and timeconsuming to do so could result...


