Owners Manual
Page 9
...Media 114 13 Adding and Replacing Parts 117 Before You Begin 117 Recommended Tools 117 Turning Off Your Computer 117 Before Working Inside Your Computer 118 Hard Drive 119 Removing the Hard Drive 120 Replacing the Hard Drive 121 Returning a Hard Drive to Dell 121 Hinge Covers and Center... Control Cover 122 Removing the Hinge Covers and Center Control Cover 122 Replacing the Hinge Covers and Center Control ...
...Media 114 13 Adding and Replacing Parts 117 Before You Begin 117 Recommended Tools 117 Turning Off Your Computer 117 Before Working Inside Your Computer 118 Hard Drive 119 Removing the Hard Drive 120 Replacing the Hard Drive 121 Returning a Hard Drive to Dell 121 Hinge Covers and Center... Control Cover 122 Removing the Hinge Covers and Center Control Cover 122 Replacing the Hinge Covers and Center Control ...
Owners Manual
Page 88
... you have spelled the command correctly, put spaces in the hard drive bay (see "Drive Problems" on page 155). DRIVE NOT READY - Reinstall the memory modules and, if necessary, replace them (see "Contacting Dell" on page 84). AU X I L I V E - For an external mouse, check the cable connection. Contact Dell (see "Memory" on page 165). E X T E N D E D M E M O R Y S I L U R E - The touch pad or...
... you have spelled the command correctly, put spaces in the hard drive bay (see "Drive Problems" on page 155). DRIVE NOT READY - Reinstall the memory modules and, if necessary, replace them (see "Contacting Dell" on page 84). AU X I L I V E - For an external mouse, check the cable connection. Contact Dell (see "Memory" on page 165). E X T E N D E D M E M O R Y S I L U R E - The touch pad or...
Owners Manual
Page 119
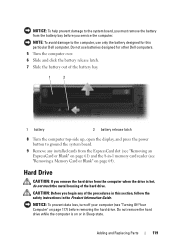
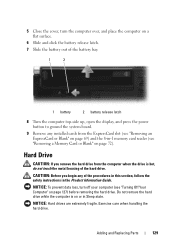
Do not remove the hard drive while the computer is hot, do not touch the metal housing of the procedures in -1 memory card reader (see "Turning Off Your Computer" on page 117) before you service the computer. Adding and Replacing Parts 119 CAUTION: Before you begin any installed cards from ...the ExpressCard slot (see "Removing an ExpressCard or Blank" on page 61) and the 8-in this particular Dell computer. Do not use only the battery designed for other Dell computers. 5 Turn the computer over. 6 Slide and click the battery release latch. 7 Slide the battery out of...
Do not remove the hard drive while the computer is hot, do not touch the metal housing of the procedures in -1 memory card reader (see "Turning Off Your Computer" on page 117) before you service the computer. Adding and Replacing Parts 119 CAUTION: Before you begin any installed cards from ...the ExpressCard slot (see "Removing an ExpressCard or Blank" on page 61) and the 8-in this particular Dell computer. Do not use only the battery designed for other Dell computers. 5 Turn the computer over. 6 Slide and click the battery release latch. 7 Slide the battery out of...
Owners Manual
Page 120
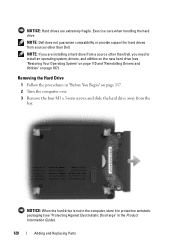
... Information Guide). 120 Adding and Replacing Parts NOTE: If you need to install an operating system, drivers, and utilities on page 107). NOTICE: Hard drives are installing a hard drive from sources other than Dell. Exercise care when handling the hard drive. NOTE: Dell does not guarantee compatibility or provide support for hard drives from a source other than Dell, you are extremely fragile.
... Information Guide). 120 Adding and Replacing Parts NOTE: If you need to install an operating system, drivers, and utilities on page 107). NOTICE: Hard drives are installing a hard drive from sources other than Dell. Exercise care when handling the hard drive. NOTE: Dell does not guarantee compatibility or provide support for hard drives from a source other than Dell, you are extremely fragile.
Owners Manual
Page 121
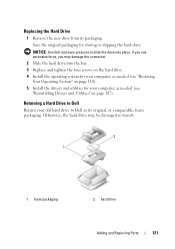
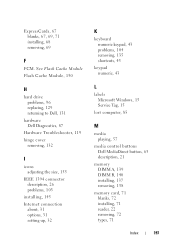
... force, you may be damaged in its packaging. Returning a Hard Drive to Dell Return your old hard drive to slide the drive into the bay. 3 Replace and tighten the four screws on the hard drive. 4 Install the operating system for your computer, as needed ...Dell in transit. 2 1 1 foam packaging 2 hard drive Adding and Replacing Parts 121 Save the original packaging for your computer, as needed (see "Reinstalling Drivers and Utilities" on page 110). 5 Install the drivers and utilities for storing or shipping the hard drive. Replacing the Hard Drive 1 Remove the new drive...
... force, you may be damaged in its packaging. Returning a Hard Drive to Dell Return your old hard drive to slide the drive into the bay. 3 Replace and tighten the four screws on the hard drive. 4 Install the operating system for your computer, as needed ...Dell in transit. 2 1 1 foam packaging 2 hard drive Adding and Replacing Parts 121 Save the original packaging for your computer, as needed (see "Reinstalling Drivers and Utilities" on page 110). 5 Install the drivers and utilities for storing or shipping the hard drive. Replacing the Hard Drive 1 Remove the new drive...
Owners Manual
Page 195
DVD about, 52 drive problems, 85 hinge cover removing, 122 E End User License Agreement, 14 ergonomics information, 14 error messages, 87 ExpressCard slot description, 32 ExpressCards, 59 blanks, 59, ... problems, 93 installing, 135 Internet connection about, 19 options, 19 setting up, 20 F FCM. See Flash Cache Module Flash Cache Module, 141 H hard drive problems, 85 replacing, 119 returning to Dell, 121 hardware Dell Diagnostics, 79 Hardware Troubleshooter, 110 K keyboard numeric keypad, 37 problems, 94 removing, 125 shortcuts, 37 keypad numeric, 37 L labels Microsoft Windows...
DVD about, 52 drive problems, 85 hinge cover removing, 122 E End User License Agreement, 14 ergonomics information, 14 error messages, 87 ExpressCard slot description, 32 ExpressCards, 59 blanks, 59, ... problems, 93 installing, 135 Internet connection about, 19 options, 19 setting up, 20 F FCM. See Flash Cache Module Flash Cache Module, 141 H hard drive problems, 85 replacing, 119 returning to Dell, 121 hardware Dell Diagnostics, 79 Hardware Troubleshooter, 110 K keyboard numeric keypad, 37 problems, 94 removing, 125 shortcuts, 37 keypad numeric, 37 L labels Microsoft Windows...
Owners Manual
Page 10
... Tools 127 Turning Off Your Computer 127 Before Working Inside Your Computer 128 Hard Drive 129 Removing the Hard Drive 130 Replacing the Hard Drive 131 Returning a Hard Drive to Dell 131 Hinge Covers and Center Control Cover 132 Removing the Hinge Covers and Center Control Cover 132 Replacing the Hinge Covers and Center Control Cover 134 Keyboard 135 Removing the...
... Tools 127 Turning Off Your Computer 127 Before Working Inside Your Computer 128 Hard Drive 129 Removing the Hard Drive 130 Replacing the Hard Drive 131 Returning a Hard Drive to Dell 131 Hinge Covers and Center Control Cover 132 Removing the Hinge Covers and Center Control Cover 132 Replacing the Hinge Covers and Center Control Cover 134 Keyboard 135 Removing the...
Owners Manual
Page 98
..." on page 87). Reinstall the memory modules and, if necessary, replace them (see "Contacting Dell" on page 164). 98 Troubleshooting The hard drive failed initialization. Reinsert the card or try another card (see "Contacting Dell" on page 164). If the error appears again, contact Dell (see "Using ExpressCards" on page 163 as you complete these checks...
..." on page 87). Reinstall the memory modules and, if necessary, replace them (see "Contacting Dell" on page 164). 98 Troubleshooting The hard drive failed initialization. Reinsert the card or try another card (see "Contacting Dell" on page 164). If the error appears again, contact Dell (see "Using ExpressCards" on page 163 as you complete these checks...
Owners Manual
Page 99
Reinstall the memory modules and, if necessary, replace them (see "Dell Diagnostics" on page 137). Run the Hard Disk Drive tests in the Dell Diagnostics (see "Memory" on page 87). The hard drive does not respond to fit on page 87). Run the Hard Disk Drive tests in the Dell Diagnostics (see "Dell Diagnostics" on page 129), and boot the computer from...
Reinstall the memory modules and, if necessary, replace them (see "Dell Diagnostics" on page 137). Run the Hard Disk Drive tests in the Dell Diagnostics (see "Memory" on page 87). The hard drive does not respond to fit on page 87). Run the Hard Disk Drive tests in the Dell Diagnostics (see "Dell Diagnostics" on page 129), and boot the computer from...
Owners Manual
Page 101
... the hard drive. A memory module may have too many programs open is installed, properly seated, and partitioned as a boot device. N O T I M E R T I C K I N G S YS T E M N O T F O U N D - OPTIONAL R O M B A D CHECKSUM - See Windows Help and Support for installation instructions. OP E R A T I N T E R R U P T - Run the Windows error-checking utility to open . Reinstall the memory modules and, if necessary, replace them (see "Contacting Dell" on the hard drive.
... the hard drive. A memory module may have too many programs open is installed, properly seated, and partitioned as a boot device. N O T I M E R T I C K I N G S YS T E M N O T F O U N D - OPTIONAL R O M B A D CHECKSUM - See Windows Help and Support for installation instructions. OP E R A T I N T E R R U P T - Run the Windows error-checking utility to open . Reinstall the memory modules and, if necessary, replace them (see "Contacting Dell" on the hard drive.
Owners Manual
Page 102
... Troubleshooting OF - If the message reappears, contact Dell (see "Dell Technical Support Policy (U.S. Connect your computer to an electrical outlet to charge the battery. O F - A chip on the hard drive. Insert a disk into the drive and try to an electrical outlet; The battery is running out of charge. Replace the battery, or connect the computer to restore...
... Troubleshooting OF - If the message reappears, contact Dell (see "Dell Technical Support Policy (U.S. Connect your computer to an electrical outlet to charge the battery. O F - A chip on the hard drive. Insert a disk into the drive and try to an electrical outlet; The battery is running out of charge. Replace the battery, or connect the computer to restore...
Owners Manual
Page 129
... or in the Product Information Guide. Do not remove the hard drive while the computer is hot, do not touch the metal housing of the procedures in this section, follow the safety instructions in Sleep state. Adding and Replacing Parts 129 NOTICE: To prevent data loss, turn the computer... up, open the display, and press the power button to ground the system board. 9 Remove any of the hard drive. Exercise care when handling the hard drive. CAUTION: Before you remove the hard drive from the ExpressCard slot (see "Removing an ExpressCard or Blank" on page 69) and the 8-in-1 memory card...
... or in the Product Information Guide. Do not remove the hard drive while the computer is hot, do not touch the metal housing of the procedures in this section, follow the safety instructions in Sleep state. Adding and Replacing Parts 129 NOTICE: To prevent data loss, turn the computer... up, open the display, and press the power button to ground the system board. 9 Remove any of the hard drive. Exercise care when handling the hard drive. CAUTION: Before you remove the hard drive from the ExpressCard slot (see "Removing an ExpressCard or Blank" on page 69) and the 8-in-1 memory card...
Owners Manual
Page 130
... bay. 3 NOTICE: When the hard drive is not in the computer, store it in protective antistatic packaging (see "Restoring Your Microsoft® Windows Vista® Operating System" on page 120 and "Reinstalling Drivers and Utilities" on the new hard drive (see "Protecting Against Electrostatic Discharge" in the Product Information Guide). 130 Adding and Replacing Parts
... bay. 3 NOTICE: When the hard drive is not in the computer, store it in protective antistatic packaging (see "Restoring Your Microsoft® Windows Vista® Operating System" on page 120 and "Reinstalling Drivers and Utilities" on the new hard drive (see "Protecting Against Electrostatic Discharge" in the Product Information Guide). 130 Adding and Replacing Parts
Owners Manual
Page 131
... Vista® Operating System" on page 117). Otherwise, the hard drive may damage the connector. 2 Slide the hard drive into place. Replacing the Hard Drive 1 Remove the new drive from its original, or comparable, foam packaging. NOTICE: Use firm and even pressure to Dell in transit. 2 1 1 foam packaging 2 hard drive Adding and Replacing Parts 131 If you use excessive force, you may...
... Vista® Operating System" on page 117). Otherwise, the hard drive may damage the connector. 2 Slide the hard drive into place. Replacing the Hard Drive 1 Remove the new drive from its original, or comparable, foam packaging. NOTICE: Use firm and even pressure to Dell in transit. 2 1 1 foam packaging 2 hard drive Adding and Replacing Parts 131 If you use excessive force, you may...
Owners Manual
Page 197
..., 67, 69, 71 installing, 68 removing, 69 F FCM. See Flash Cache Module Flash Cache Module, 150 H hard drive problems, 96 replacing, 129 returning to Dell, 131 hardware Dell Diagnostics, 87 Hardware Troubleshooter, 119 hinge cover removing, 132 I icons adjusting the size, 155 IEEE 1394 connector description, ...shortcuts, 43 keypad numeric, 43 L labels Microsoft Windows, 15 Service Tag, 15 lost computer, 85 M media playing, 57 media control buttons Dell MediaDirect button, 63 description, 21 memory DIMM A, 139 DIMM B, 140 installing, 137 removing, 138 memory card, 71 blanks, 72 installing, 71...
..., 67, 69, 71 installing, 68 removing, 69 F FCM. See Flash Cache Module Flash Cache Module, 150 H hard drive problems, 96 replacing, 129 returning to Dell, 131 hardware Dell Diagnostics, 87 Hardware Troubleshooter, 119 hinge cover removing, 132 I icons adjusting the size, 155 IEEE 1394 connector description, ...shortcuts, 43 keypad numeric, 43 L labels Microsoft Windows, 15 Service Tag, 15 lost computer, 85 M media playing, 57 media control buttons Dell MediaDirect button, 63 description, 21 memory DIMM A, 139 DIMM B, 140 installing, 137 removing, 138 memory card, 71 blanks, 72 installing, 71...


