Owners Manual
Page 4
Back View 33 Bottom View 35 4 Using the Keyboard and Touchpad . . . . . 37 Numeric Keypad 37 Key Combinations 37 System Functions 37 Display Functions 37 Battery 37 Power Management 38 Microsoft® Windows® Logo Key Functions . . . 38 Dell™ QuickSet Key Combinations 38 Adjusting Keyboard Settings 38 Touch Pad 39 Customizing the Touch Pad 40 5 Using the Display 41 Adjusting Brightness 41 Switching the Video Image From Your Computer Display To a Projector 41 Setting Display Resolution and Refresh Rate 41 4 Contents
Back View 33 Bottom View 35 4 Using the Keyboard and Touchpad . . . . . 37 Numeric Keypad 37 Key Combinations 37 System Functions 37 Display Functions 37 Battery 37 Power Management 38 Microsoft® Windows® Logo Key Functions . . . 38 Dell™ QuickSet Key Combinations 38 Adjusting Keyboard Settings 38 Touch Pad 39 Customizing the Touch Pad 40 5 Using the Display 41 Adjusting Brightness 41 Switching the Video Image From Your Computer Display To a Projector 41 Setting Display Resolution and Refresh Rate 41 4 Contents
Owners Manual
Page 27
... page 39). C A M E R A I N D I C R O P H O N E S - For more information about your computer may take several seconds). Press the power button to move the cursor on the display (see "Using Dell MediaDirect™" on page 41. D I G I T A L A R R A Y M I C A T O R - I A C O N T R O L B U T T O N S - M E D I N - 1 M E M O R Y C A R D R E A D E R - Control CD, DVD, Blu-ray Disc™ (BD), and Media Player playback. K E Y... and Touchpad" on a mouse when you use the touch pad to turn off completely (may not include a camera. Based on a ...
... page 39). C A M E R A I N D I C R O P H O N E S - For more information about your computer may take several seconds). Press the power button to move the cursor on the display (see "Using Dell MediaDirect™" on page 41. D I G I T A L A R R A Y M I C A T O R - I A C O N T R O L B U T T O N S - M E D I N - 1 M E M O R Y C A R D R E A D E R - Control CD, DVD, Blu-ray Disc™ (BD), and Media Player playback. K E Y... and Touchpad" on a mouse when you use the touch pad to turn off completely (may not include a camera. Based on a ...
Owners Manual
Page 37
... currently available display options (display only, external monitor or projector only, both display and projector, etc). Displays the Dell™ QuickSet Battery Meter (see "Dell QuickSet Battery Meter" on an external monitor). Key Combinations System Functions Display Functions Opens the Task Manager window. Highlight ... integrated display only (not on an external keyboard. • To enable the keypad, press . Using the Keyboard and Touchpad 37 Using the Keyboard and Touchpad Numeric Keypad The numeric keypad functions like the numeric keypad on an external monitor).
... currently available display options (display only, external monitor or projector only, both display and projector, etc). Displays the Dell™ QuickSet Battery Meter (see "Dell QuickSet Battery Meter" on an external monitor). Key Combinations System Functions Display Functions Opens the Task Manager window. Highlight ... integrated display only (not on an external keyboard. • To enable the keypad, press . Using the Keyboard and Touchpad 37 Using the Keyboard and Touchpad Numeric Keypad The numeric keypad functions like the numeric keypad on an external monitor).
Owners Manual
Page 38
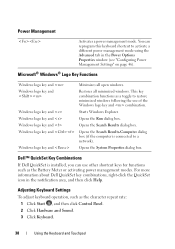
... activate a different power management mode using the Advanced tab in the notification area, and then click Help. For more information about Dell QuickSet key combinations, right-click the QuickSet icon in the Power Options Properties window (see "Configuring Power Management Settings" on page 46...repeat rate: 1 Click Start , and then click Control Panel. 2 Click Hardware and Sound. 3 Click Keyboard. 38 Using the Keyboard and Touchpad Power Management Activates a power management mode. You can use of the Windows logo key and combination. Microsoft® Windows® Logo Key Functions...
... activate a different power management mode using the Advanced tab in the notification area, and then click Help. For more information about Dell QuickSet key combinations, right-click the QuickSet icon in the Power Options Properties window (see "Configuring Power Management Settings" on page 46...repeat rate: 1 Click Start , and then click Control Panel. 2 Click Hardware and Sound. 3 Click Keyboard. 38 Using the Keyboard and Touchpad Power Management Activates a power management mode. You can use of the Windows logo key and combination. Microsoft® Windows® Logo Key Functions...
Owners Manual
Page 39
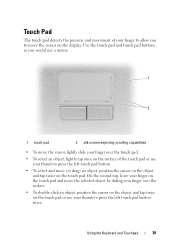
... the surface. • To double-click an object, position the cursor on the object and tap twice on the touch pad. Using the Keyboard and Touchpad 39 Use the touch pad and touch pad buttons as you to press the left touch pad button twice. On the second tap, leave your...
... the surface. • To double-click an object, position the cursor on the object and tap twice on the touch pad. Using the Keyboard and Touchpad 39 Use the touch pad and touch pad buttons as you to press the left touch pad button twice. On the second tap, leave your...
Owners Manual
Page 40
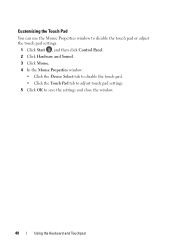
Customizing the Touch Pad You can use the Mouse Properties window to disable the touch pad or adjust the touch pad settings. 1 Click Start , and then click Control Panel. 2 Click Hardware and Sound. 3 Click Mouse. 4 In the Mouse Properties window: • Click the Device Select tab to disable the touch pad. • Click the Touch Pad tab to adjust touch pad settings. 5 Click OK to save the settings and close the window. 40 Using the Keyboard and Touchpad
Customizing the Touch Pad You can use the Mouse Properties window to disable the touch pad or adjust the touch pad settings. 1 Click Start , and then click Control Panel. 2 Click Hardware and Sound. 3 Click Mouse. 4 In the Mouse Properties window: • Click the Device Select tab to disable the touch pad. • Click the Touch Pad tab to adjust touch pad settings. 5 Click OK to save the settings and close the window. 40 Using the Keyboard and Touchpad
Owners Manual
Page 125
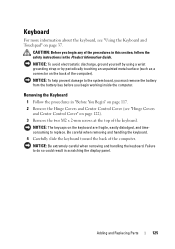
... the Keyboard 1 Follow the procedures in "Before You Begin" on page 117. 2 Remove the Hinge Covers and Center Control Cover (see "Using the Keyboard and Touchpad" on page 37. NOTICE: To help prevent damage to the system board, you must remove the battery from the battery bay before you begin working...
... the Keyboard 1 Follow the procedures in "Before You Begin" on page 117. 2 Remove the Hinge Covers and Center Control Cover (see "Using the Keyboard and Touchpad" on page 37. NOTICE: To help prevent damage to the system board, you must remove the battery from the battery bay before you begin working...


