
User Guide
Page 3
Contents 1 Your Dell Projector 6 About Your Projector 8 2 Connecting Your Projector 10 Connecting to a Computer 11 Connecting a Computer Using a VGA Cable . . . . 11 Connecting a Computer by USB Cable 12 Connecting a Computer Using Wireless Dongle (Optional 13 Connecting a DVD Player 14 Connecting a DVD Player Using a A/V to RCA Cable 14 Connecting a DVD Player Using a HDMI Cable . . 15 Connecting to Multi-Media 16 Connecting...
Contents 1 Your Dell Projector 6 About Your Projector 8 2 Connecting Your Projector 10 Connecting to a Computer 11 Connecting a Computer Using a VGA Cable . . . . 11 Connecting a Computer by USB Cable 12 Connecting a Computer Using Wireless Dongle (Optional 13 Connecting a DVD Player 14 Connecting a DVD Player Using a A/V to RCA Cable 14 Connecting a DVD Player Using a HDMI Cable . . 15 Connecting to Multi-Media 16 Connecting...

User Guide
Page 6
Package Contents Power cable Universal 24-pin to VGA cable CD User's Guide and Documentation Carrying case Informacion Importante DellTM M110/QMu1i1c0kHSDetPurpojGecutiodre DOCOMENTATION DellTM M110/M110HD Projector oduct IDneflol TrM PmroajteicotnorGs uide AC adapter 6 Your Dell Projector Ensure that you have all the items shown below. 1 Your Dell Projector Your projector comes with all the items, and contact Dell™ if anything is missing.
Package Contents Power cable Universal 24-pin to VGA cable CD User's Guide and Documentation Carrying case Informacion Importante DellTM M110/QMu1i1c0kHSDetPurpojGecutiodre DOCOMENTATION DellTM M110/M110HD Projector oduct IDneflol TrM PmroajteicotnorGs uide AC adapter 6 Your Dell Projector Ensure that you have all the items shown below. 1 Your Dell Projector Your projector comes with all the items, and contact Dell™ if anything is missing.

User Guide
Page 10
...-media playback input and Audio output (Video/Audio/Photo), USB memory storage access (USB flash drive/internal memory), projector firmware upgrade, and supporting optional wireless dongle and mobishow 3 DC input connector 7 Security cable slot 4 Audio/Video input connector CAUTION: Before you begin any of the procedures in this section, follow the Safety...
...-media playback input and Audio output (Video/Audio/Photo), USB memory storage access (USB flash drive/internal memory), projector firmware upgrade, and supporting optional wireless dongle and mobishow 3 DC input connector 7 Security cable slot 4 Audio/Video input connector CAUTION: Before you begin any of the procedures in this section, follow the Safety...

User Guide
Page 11
Connecting to a Computer Connecting a Computer Using a VGA Cable 2 3 1 1 Power cord 2 AC adapter 3 Universal 24-pin to VGA cable NOTE: Only one universal 24-pin to VGA and Audio out cable can be purchased on the Dell website at www.dell.com. Connecting Your Projector 11 An additional universal 24-pin to VGA cable or 24-pin to VGA cable is shipped with your projector.
Connecting to a Computer Connecting a Computer Using a VGA Cable 2 3 1 1 Power cord 2 AC adapter 3 Universal 24-pin to VGA cable NOTE: Only one universal 24-pin to VGA and Audio out cable can be purchased on the Dell website at www.dell.com. Connecting Your Projector 11 An additional universal 24-pin to VGA cable or 24-pin to VGA cable is shipped with your projector.

User Guide
Page 12
You can purchase the USB (USB A to USB-A cable NOTE: Plug and Play. MOLEX MOLEX Connecting a Computer by USB Cable 2 3 1 1 Power cord 2 AC adapter 3 USB-A to A) cable on the Dell website at www.dell.com. 12 Connecting Your Projector The USB (USB A to A) cable is not shipped with your projector.
You can purchase the USB (USB A to USB-A cable NOTE: Plug and Play. MOLEX MOLEX Connecting a Computer by USB Cable 2 3 1 1 Power cord 2 AC adapter 3 USB-A to A) cable on the Dell website at www.dell.com. 12 Connecting Your Projector The USB (USB A to A) cable is not shipped with your projector.
User Guide
Page 14
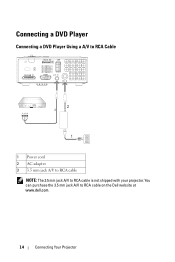
You can purchase the 3.5 mm jack A/V to RCA cable is not shipped with your projector. Connecting a DVD Player Connecting a DVD Player Using a A/V to RCA Cable 2 3 1 1 Power cord 2 AC adapter 3 3.5 mm jack A/V to RCA cable NOTE: The 3.5 mm jack A/V to RCA cable on the Dell website at www.dell.com. 14 Connecting Your Projector
You can purchase the 3.5 mm jack A/V to RCA cable is not shipped with your projector. Connecting a DVD Player Connecting a DVD Player Using a A/V to RCA Cable 2 3 1 1 Power cord 2 AC adapter 3 3.5 mm jack A/V to RCA cable NOTE: The 3.5 mm jack A/V to RCA cable on the Dell website at www.dell.com. 14 Connecting Your Projector

User Guide
Page 15
You can purchase the HDMI cable on the Dell website at www.dell.com. Connecting Your Projector 15 Connecting a DVD Player Using a HDMI Cable 2 3 1 1 Power cord 2 AC adapter 3 HDMI cable NOTE: The HDMI cable is not shipped with your projector.
You can purchase the HDMI cable on the Dell website at www.dell.com. Connecting Your Projector 15 Connecting a DVD Player Using a HDMI Cable 2 3 1 1 Power cord 2 AC adapter 3 HDMI cable NOTE: The HDMI cable is not shipped with your projector.
User Guide
Page 18
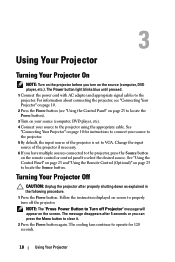
... light blinks blue until pressed. 1 Connect the power cord with AC adapter and appropriate signal cables to locate the Source button. For information about connecting the projector, see "Connecting Your Projector" on page 10. 2 Press the Power button (see "Using the Control Panel" on ...instructions to connect your source to the projector using the appropriate cable. NOTE: The "Press Power Button to select the desired source. Turning Your Projector Off CAUTION: Unplug the projector after 5 seconds or you have multiple sources connected to the projector, press the Source button on page...
... light blinks blue until pressed. 1 Connect the power cord with AC adapter and appropriate signal cables to locate the Source button. For information about connecting the projector, see "Connecting Your Projector" on page 10. 2 Press the Power button (see "Using the Control Panel" on ...instructions to connect your source to the projector using the appropriate cable. NOTE: The "Press Power Button to select the desired source. Turning Your Projector Off CAUTION: Unplug the projector after 5 seconds or you have multiple sources connected to the projector, press the Source button on page...
User Guide
Page 29
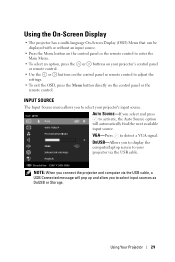
.... INPUT SOURCE The Input Source menu allows you to select your projector via the USB cable, a USB Connected message will automatically find the next available input source. NOTE: When you connect the projector and computer via the USB cable. VGA-Press to adjust the settings. • To exit the... OSD, press the Menu button directly on the control panel or remote control to detect a VGA signal. DOUSB-Allows you select and press to your projector's input source. ...
.... INPUT SOURCE The Input Source menu allows you to select your projector via the USB cable, a USB Connected message will automatically find the next available input source. NOTE: When you connect the projector and computer via the USB cable. VGA-Press to adjust the settings. • To exit the... OSD, press the Menu button directly on the control panel or remote control to detect a VGA signal. DOUSB-Allows you select and press to your projector's input source. ...
User Guide
Page 30
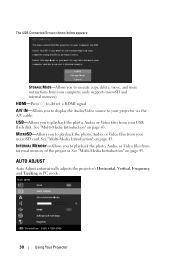
A/V IN-Allows you to playback the photo, Audio, or Video files from your projector via the A/V cable. MICROSD-Allows you to display the Audio/Video source to your microSD card. HDMI-Press to playback the photo, Audio, or Video files from your ...
A/V IN-Allows you to playback the photo, Audio, or Video files from your projector via the A/V cable. MICROSD-Allows you to display the Audio/Video source to your microSD card. HDMI-Press to playback the photo, Audio, or Video files from your ...
User Guide
Page 44
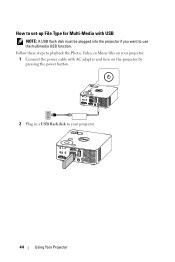
Follow these steps to playback the Photo, Video, or Music files on your projector: 1 Connect the power cable with USB NOTE: A USB flash disk must be plugged into the projector if you want to your projector. 44 Using Your Projector How to set-up File Type for Multi-Media with AC adapter and turn on the projector by pressing the power button. 2 Plug in a USB flash disk to use the multimedia USB function.
Follow these steps to playback the Photo, Video, or Music files on your projector: 1 Connect the power cable with USB NOTE: A USB flash disk must be plugged into the projector if you want to your projector. 44 Using Your Projector How to set-up File Type for Multi-Media with AC adapter and turn on the projector by pressing the power button. 2 Plug in a USB flash disk to use the multimedia USB function.
User Guide
Page 46
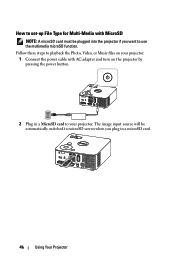
The image input source will be plugged into the projector if you plug in a MicroSD card to your projector: 1 Connect the power cable with AC adapter and turn on your projector. How to set-up File Type for Multi-Media with MicroSD NOTE: A microSD card must be automatically switched to microSD screen when you want to use the multimedia microSD function. Follow these steps to playback the Photo, Video, or Music files on the projector by pressing the power button. 2 Plug in a microSD card. 46 Using Your Projector
The image input source will be plugged into the projector if you plug in a MicroSD card to your projector: 1 Connect the power cable with AC adapter and turn on your projector. How to set-up File Type for Multi-Media with MicroSD NOTE: A microSD card must be automatically switched to microSD screen when you want to use the multimedia microSD function. Follow these steps to playback the Photo, Video, or Music files on the projector by pressing the power button. 2 Plug in a microSD card. 46 Using Your Projector

User Guide
Page 48
The image input source will be automatically switched to playback the Photo, Video, or Music files on the projector by pressing the power button. 2 Access the Input Source menu, select the Internal Memory option and press the button. How to set-up File Type for Multi-Media with AC adapter and turn on your projector: 1 Connect the power cable with Internal Memory Follow these steps to Internal Memory screen when Internal Memory option is selected in this step. 48 Using Your Projector
The image input source will be automatically switched to playback the Photo, Video, or Music files on the projector by pressing the power button. 2 Access the Input Source menu, select the Internal Memory option and press the button. How to set-up File Type for Multi-Media with AC adapter and turn on your projector: 1 Connect the power cable with Internal Memory Follow these steps to Internal Memory screen when Internal Memory option is selected in this step. 48 Using Your Projector

User Guide
Page 53
... the colors of the test pattern are not bent or broken. • Use Test Pattern in the Projector Settings of your respective documentation. For other computers, see Contacting Dell™ on the INPUT SOURCE menu. • Ensure the external graphics port is enabled. Ensure that the...troubleshooting tips. If the problem persists, contact Dell™ (see your computer. Problem No image appears on the screen F8 CRT/LCD Fn Possible Solution • Ensure that the projector is turned on. • Ensure that all the cables are not displayed properly, please upgrade the ...
... the colors of the test pattern are not bent or broken. • Use Test Pattern in the Projector Settings of your respective documentation. For other computers, see Contacting Dell™ on the INPUT SOURCE menu. • Ensure the external graphics port is enabled. Ensure that the...troubleshooting tips. If the problem persists, contact Dell™ (see your computer. Problem No image appears on the screen F8 CRT/LCD Fn Possible Solution • Ensure that the projector is turned on. • Ensure that all the cables are not displayed properly, please upgrade the ...

User Guide
Page 65
...Projected Image 19 Adjusting the Projector Height 19 lower the projector Front tilt adjustment wheel 19 Adjusting the Projector Zoom and Focus 20 Focus ring 20 C Connecting the Projector 3.5 mm jack A/V to RCA cable 14 AC adaptor 11, 12, 15 Connecting with an HDMI Cable 15 HDMI cable 15 Power cord 11, 12... VGA cable 11 USB-A to USB-A cable 12 Connection Ports A/V In connector 10 HDMI connector 10 MicroSD card slot 10 Universal I/O connector for VGA input and Audio input/output 10 USB Type A connector 10 VGA-A output (monitor loop-through) 10 Contact Dell 6, 55 Control Panel 23 D Dell contacting...
...Projected Image 19 Adjusting the Projector Height 19 lower the projector Front tilt adjustment wheel 19 Adjusting the Projector Zoom and Focus 20 Focus ring 20 C Connecting the Projector 3.5 mm jack A/V to RCA cable 14 AC adaptor 11, 12, 15 Connecting with an HDMI Cable 15 HDMI cable 15 Power cord 11, 12... VGA cable 11 USB-A to USB-A cable 12 Connection Ports A/V In connector 10 HDMI connector 10 MicroSD card slot 10 Universal I/O connector for VGA input and Audio input/output 10 USB Type A connector 10 VGA-A output (monitor loop-through) 10 Contact Dell 6, 55 Control Panel 23 D Dell contacting...


