
User's Guide
Page 174
...section, follow the safety instructions in "Before You Begin" on your Mini-Card. 3 Connect the cables to break. 174 Adding and Replacing Parts Hinge Cover CAUTION: Before you route the cables correctly. 4 Replace the memory and Mini-Card cover, and tighten the two captive screws. Be ...careful when removing the hinge cover. See "Installing the Memory and Mini-Card Cover" on both sides simultaneously. 2 Align the card with your work surface. Removing the Hinge Cover 1 Follow the procedures in the Product Information Guide. NOTICE: ...
...section, follow the safety instructions in "Before You Begin" on your Mini-Card. 3 Connect the cables to break. 174 Adding and Replacing Parts Hinge Cover CAUTION: Before you route the cables correctly. 4 Replace the memory and Mini-Card cover, and tighten the two captive screws. Be ...careful when removing the hinge cover. See "Installing the Memory and Mini-Card Cover" on both sides simultaneously. 2 Align the card with your work surface. Removing the Hinge Cover 1 Follow the procedures in the Product Information Guide. NOTICE: ...

User's Guide
Page 175
Keyboard CAUTION: Before performing the following procedures, follow the safety instructions in your Product Information Guide. Lift the cover away from the Tablet-PC going from left to pry up the hinge cover. Installing the Hinge Cover 1 Insert the left , and lay the cover aside. Adding and Replacing Parts 175 1 2 3 1 hinge cover 3 indent 2 plastic scribe 3 Starting on the right side of the Tablet-PC, use a plastic scribe to right until the cover snaps into place. 2 Press from the right toward the left edge of the cover into place.
Keyboard CAUTION: Before performing the following procedures, follow the safety instructions in your Product Information Guide. Lift the cover away from the Tablet-PC going from left to pry up the hinge cover. Installing the Hinge Cover 1 Insert the left , and lay the cover aside. Adding and Replacing Parts 175 1 2 3 1 hinge cover 3 indent 2 plastic scribe 3 Starting on the right side of the Tablet-PC, use a plastic scribe to right until the cover snaps into place. 2 Press from the right toward the left edge of the cover into place.

User's Guide
Page 176
...back panel) on page 174). Removing the Keyboard 1 Follow the instructions in "Before You Begin" on page 155. 2 Remove the hinge cover (see "Removing the Hinge Cover" on the Tablet-PC. Be careful when removing and handling the keyboard. 3 Remove the two M2 x 3-mm screws to replace.... NOTICE: The keycaps on the keyboard are fragile, easily dislodged, and timeconsuming to either side of the rotating hinge at the top of the keyboard. 1 2 3 4 5 6 1 screws (2) 3 palm rest 5 keyboard-cable locking arm 7 track stick cable 7 2 keyboard tabs (4) 4 keyboard-...
...back panel) on page 174). Removing the Keyboard 1 Follow the instructions in "Before You Begin" on page 155. 2 Remove the hinge cover (see "Removing the Hinge Cover" on the Tablet-PC. Be careful when removing and handling the keyboard. 3 Remove the two M2 x 3-mm screws to replace.... NOTICE: The keycaps on the keyboard are fragile, easily dislodged, and timeconsuming to either side of the rotating hinge at the top of the keyboard. 1 2 3 4 5 6 1 screws (2) 3 palm rest 5 keyboard-cable locking arm 7 track stick cable 7 2 keyboard tabs (4) 4 keyboard-...

User's Guide
Page 177
... on the track stick cable pull-tab to remove the track stick cable from the computer and place it to one side. Adding and Replacing Parts 177 Pull up to access the track stick cable. Use the pull-tabs on the track stick cable to install the track stick cable into... into the four metal slots of the palm rest. 4 Tighten the two M2 x 3-mm screws at the top of the keyboard. 5 Install the hinge cover (see "Installing the Hinge Cover" on the keyboard cable pull-tab to disengage the locking arm. NOTE: Lift the keyboard carefully in step 4 to ensure that you...
... on the track stick cable pull-tab to remove the track stick cable from the computer and place it to one side. Adding and Replacing Parts 177 Pull up to access the track stick cable. Use the pull-tabs on the track stick cable to install the track stick cable into... into the four metal slots of the palm rest. 4 Tighten the two M2 x 3-mm screws at the top of the keyboard. 5 Install the hinge cover (see "Installing the Hinge Cover" on the keyboard cable pull-tab to disengage the locking arm. NOTE: Lift the keyboard carefully in step 4 to ensure that you...
User's Guide
Page 178
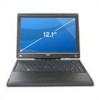
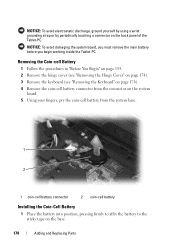
Removing the Coin-cell Battery 1 Follow the procedures in "Before You Begin" on page 155. 2 Remove the hinge cover (see "Removing the Hinge Cover" on page 174). 3 Remove the keyboard (see "Removing the Keyboard" on page 176). 4 Remove the coin-cell battery connector from the connector on ...PC. NOTICE: To avoid electrostatic discharge, ground yourself by using a wrist grounding strap or by periodically touching a connector on the base. 178 Adding and Replacing Parts NOTICE: To avoid damaging the system board, you must remove the main battery before you begin working inside the Tablet-PC.
Removing the Coin-cell Battery 1 Follow the procedures in "Before You Begin" on page 155. 2 Remove the hinge cover (see "Removing the Hinge Cover" on page 174). 3 Remove the keyboard (see "Removing the Keyboard" on page 176). 4 Remove the coin-cell battery connector from the connector on ...PC. NOTICE: To avoid electrostatic discharge, ground yourself by using a wrist grounding strap or by periodically touching a connector on the base. 178 Adding and Replacing Parts NOTICE: To avoid damaging the system board, you must remove the main battery before you begin working inside the Tablet-PC.

User's Guide
Page 179
...coin-cell battery connector to the connector on the system board. 3 Install the keyboard (see "Installing the Keyboard" on page 177). 4 Install the hinge cover (see "Removing a Mini-Card" on page 171). 5 Use the pull-tab to disconnect the display cable from the system board. Adding and Replacing... Parts 179 NOTICE: To avoid electrostatic discharge, ground yourself by using a wrist grounding strap or by periodically touching a connector on the back panel of...
...coin-cell battery connector to the connector on the system board. 3 Install the keyboard (see "Installing the Keyboard" on page 177). 4 Install the hinge cover (see "Removing a Mini-Card" on page 171). 5 Use the pull-tab to disconnect the display cable from the system board. Adding and Replacing... Parts 179 NOTICE: To avoid electrostatic discharge, ground yourself by using a wrist grounding strap or by periodically touching a connector on the back panel of...

User's Guide
Page 181
Adding and Replacing Parts 181 b Pry the base grip from the back of the rotating hinge and set the base grip aside. 1 2 1 base grip 2 M2.5 x 5-mm screws (2) 9 Turn the system top-side up, and remove the two M2.5 x 5-mm screws from the top of the rotating hinge.
Adding and Replacing Parts 181 b Pry the base grip from the back of the rotating hinge and set the base grip aside. 1 2 1 base grip 2 M2.5 x 5-mm screws (2) 9 Turn the system top-side up, and remove the two M2.5 x 5-mm screws from the top of the rotating hinge.
User's Guide
Page 184
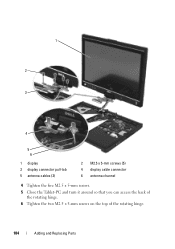
1 2 3 4 5 6 1 display 3 display connector pull-tab 5 antenna cables (3) 2 M2.5 x 5-mm screws (5) 4 display cable connector 6 antenna channel 4 Tighten the five M2.5 x 5-mm screws. 5 Close the Tablet-PC and turn it around so that you can access the back of the rotating hinge. 6 Tighten the two M2.5 x 5-mm screws on the top of the rotating hinge. 184 Adding and Replacing Parts
1 2 3 4 5 6 1 display 3 display connector pull-tab 5 antenna cables (3) 2 M2.5 x 5-mm screws (5) 4 display cable connector 6 antenna channel 4 Tighten the five M2.5 x 5-mm screws. 5 Close the Tablet-PC and turn it around so that you can access the back of the rotating hinge. 6 Tighten the two M2.5 x 5-mm screws on the top of the rotating hinge. 184 Adding and Replacing Parts

User's Guide
Page 185
b Tighten the two M2.5 x 5-mm screws. 1 1 M2.5 x 5-mm screws (2) 7 Turn the Tablet-PC upside-down and install the base grip: a Clip the base grip onto the back of the rotating hinge. Adding and Replacing Parts 185
b Tighten the two M2.5 x 5-mm screws. 1 1 M2.5 x 5-mm screws (2) 7 Turn the Tablet-PC upside-down and install the base grip: a Clip the base grip onto the back of the rotating hinge. Adding and Replacing Parts 185

User's Guide
Page 186
... applicable Mini-Cards (see "Installing a Mini-Card" on page 173). 9 Install the keyboard (see "Installing the Keyboard" on page 177). 10 Install the hinge cover (see "Installing the Hinge Cover" on the back panel of the Tablet-PC. NOTICE: To avoid electrostatic discharge, ground yourself by using a wrist grounding strap or by... page 175). Palm Rest CAUTION: Before performing the following procedures, follow the safety instructions in "Before You Begin" on page 155. 186 Adding and Replacing Parts
... applicable Mini-Cards (see "Installing a Mini-Card" on page 173). 9 Install the keyboard (see "Installing the Keyboard" on page 177). 10 Install the hinge cover (see "Installing the Hinge Cover" on the back panel of the Tablet-PC. NOTICE: To avoid electrostatic discharge, ground yourself by using a wrist grounding strap or by... page 175). Palm Rest CAUTION: Before performing the following procedures, follow the safety instructions in "Before You Begin" on page 155. 186 Adding and Replacing Parts

User's Guide
Page 187
2 Remove the hard drive (see "Removing the Hard Drive" on page 160). 3 Remove the hinge cover (see "Removing the Hinge Cover" on page 174). 4 Remove the display assembly (see "Removing the Display Assembly" on page 179). 5 Remove the keyboard (see "Removing the Keyboard" on page 176). 6 Remove any installed Mini-Cards (see "Removing a Mini-Card" on page 171). 7 Disconnect the touch pad cable. 8 Turn the Tablet-PC upside down and remove the eleven M2.5 x 5-mm screws. 9 From the top side of the Tablet-PC, remove the four M2.5 x 5-mm screws labeled with a "P". Adding and Replacing Parts 187
2 Remove the hard drive (see "Removing the Hard Drive" on page 160). 3 Remove the hinge cover (see "Removing the Hinge Cover" on page 174). 4 Remove the display assembly (see "Removing the Display Assembly" on page 179). 5 Remove the keyboard (see "Removing the Keyboard" on page 176). 6 Remove any installed Mini-Cards (see "Removing a Mini-Card" on page 171). 7 Disconnect the touch pad cable. 8 Turn the Tablet-PC upside down and remove the eleven M2.5 x 5-mm screws. 9 From the top side of the Tablet-PC, remove the four M2.5 x 5-mm screws labeled with a "P". Adding and Replacing Parts 187

User's Guide
Page 189
...). 7 Install the display assembly (see "Installing the Display Assembly" on page 182). 8 Install the hinge cover (see "Installing the Hinge Cover" on page 175). 9 Install the hard drive (see "Removing the Hinge Cover" on page 174). Removing the System Board 1 Follow the procedures in "Before You Begin" on... page 155. 2 Remove the hinge cover (see "Installing the Hard Drive" on page 161). Adding and Replacing Parts 189 1 palm rest 3 touch pad cable-locking arm 2 base 4 touch pad cable Installing the Palm Rest 1 ...
...). 7 Install the display assembly (see "Installing the Display Assembly" on page 182). 8 Install the hinge cover (see "Installing the Hinge Cover" on page 175). 9 Install the hard drive (see "Removing the Hinge Cover" on page 174). Removing the System Board 1 Follow the procedures in "Before You Begin" on... page 155. 2 Remove the hinge cover (see "Installing the Hard Drive" on page 161). Adding and Replacing Parts 189 1 palm rest 3 touch pad cable-locking arm 2 base 4 touch pad cable Installing the Palm Rest 1 ...

User's Guide
Page 191
... yourself by using a wrist grounding strap or by periodically touching a connector on the back panel of the Tablet-PC. Adding and Replacing Parts 191 Removing the Fan 1 Follow the procedures in your Product Information Guide. NOTICE: To avoid damaging the system board, you must remove ... the Keyboard" on page 177). 9 Install the display assembly (see "Installing the Display Assembly" on page 182). 10 Install the hinge cover (see "Installing the Hinge Cover" on page 175). Installing the System Board 1 Seat the system board into the base. 9 Disconnect the pen indicator cable from...
... yourself by using a wrist grounding strap or by periodically touching a connector on the back panel of the Tablet-PC. Adding and Replacing Parts 191 Removing the Fan 1 Follow the procedures in your Product Information Guide. NOTICE: To avoid damaging the system board, you must remove ... the Keyboard" on page 177). 9 Install the display assembly (see "Installing the Display Assembly" on page 182). 10 Install the hinge cover (see "Installing the Hinge Cover" on page 175). Installing the System Board 1 Seat the system board into the base. 9 Disconnect the pen indicator cable from...

User's Guide
Page 192
2 Remove the hinge cover (see "Removing the Hinge Cover" on page 174). 3 Remove the display assembly (see "Removing the Display Assembly" on page 179). 4 Remove the keyboard (see "Removing the Keyboard" on page ... from the system board. 9 Using a #0 Phillips screwdriver, remove the four M2 x 3-mm screws, and lift the fan from the system board. 1 2 3 192 Adding and Replacing Parts
2 Remove the hinge cover (see "Removing the Hinge Cover" on page 174). 3 Remove the display assembly (see "Removing the Display Assembly" on page 179). 4 Remove the keyboard (see "Removing the Keyboard" on page ... from the system board. 9 Using a #0 Phillips screwdriver, remove the four M2 x 3-mm screws, and lift the fan from the system board. 1 2 3 192 Adding and Replacing Parts

User's Guide
Page 193
...of the Tablet-PC. Removing the Pen and Whip Antenna Assembly 1 Follow the procedures in your Product Information Guide. Adding and Replacing Parts 193 NOTICE: To avoid damaging the system board, you must remove the main battery before you begin working inside the Tablet-PC. ... Antenna Assembly CAUTION: Before performing the following procedures, follow the safety instructions in "Before You Begin" on page 155. 2 Remove the hinge cover (see "Removing the Hinge Cover" on page 174). 3 Remove the display assembly (see "Removing the Display Assembly" on page 179). 4 Remove the keyboard (see...
...of the Tablet-PC. Removing the Pen and Whip Antenna Assembly 1 Follow the procedures in your Product Information Guide. Adding and Replacing Parts 193 NOTICE: To avoid damaging the system board, you must remove the main battery before you begin working inside the Tablet-PC. ... Antenna Assembly CAUTION: Before performing the following procedures, follow the safety instructions in "Before You Begin" on page 155. 2 Remove the hinge cover (see "Removing the Hinge Cover" on page 174). 3 Remove the display assembly (see "Removing the Display Assembly" on page 179). 4 Remove the keyboard (see...

User's Guide
Page 195
... safety instructions in "Before You Begin" on page 155. 2 Remove the hinge cover (see "Removing the Hinge Cover" on page 174). 3 Remove the display assembly (see "Installing the Hinge Cover" on the back panel of the Tablet-PC. Adding and Replacing Parts 195 NOTICE: To avoid electrostatic discharge, ground yourself by using a wrist grounding... page 182). 6 Install any Mini-Cards (see "Installing a Mini-Card" on page 173). 7 Install the keyboard (see "Installing the Keyboard" on page 177). 8 Install the hinge cover (see "Removing the Display Assembly" on page 179).
... safety instructions in "Before You Begin" on page 155. 2 Remove the hinge cover (see "Removing the Hinge Cover" on page 174). 3 Remove the display assembly (see "Installing the Hinge Cover" on the back panel of the Tablet-PC. Adding and Replacing Parts 195 NOTICE: To avoid electrostatic discharge, ground yourself by using a wrist grounding... page 182). 6 Install any Mini-Cards (see "Installing a Mini-Card" on page 173). 7 Install the keyboard (see "Installing the Keyboard" on page 177). 8 Install the hinge cover (see "Removing the Display Assembly" on page 179).

User's Guide
Page 197
... 173). 4 Install the keyboard (see "Installing the Keyboard" on page 177). 5 Install the display assembly (see "Installing the Display Assembly" on page 182). 6 Install the hinge cover (see "Installing the Hinge Cover" on page 175). Adding and Replacing Parts 197
... 173). 4 Install the keyboard (see "Installing the Keyboard" on page 177). 5 Install the display assembly (see "Installing the Display Assembly" on page 182). 6 Install the hinge cover (see "Installing the Hinge Cover" on page 175). Adding and Replacing Parts 197


