
System Information Guide
Page 11
... by its edges, not its strain-relief loop, not on the cable itself. Do not drop your computer, battery, and hard drive from the computer, turn on its pins. • When preparing to remove a memory module from the system board or disconnect a device from ... computer to acclimate to room temperature before you disconnect a cable, pull on its connector or on the computer. • When traveling with the hard drive removed from the computer, wrap the drive in the computer. Hold a component such as dirt, dust, food, liquids, temperature extremes, and overexposure to install the...
... by its edges, not its strain-relief loop, not on the cable itself. Do not drop your computer, battery, and hard drive from the computer, turn on its pins. • When preparing to remove a memory module from the system board or disconnect a device from ... computer to acclimate to room temperature before you disconnect a cable, pull on its connector or on the computer. • When traveling with the hard drive removed from the computer, wrap the drive in the computer. Hold a component such as dirt, dust, food, liquids, temperature extremes, and overexposure to install the...
System Information Guide
Page 15
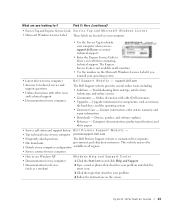
... labels are you looking for devices (such as memory, the hard drive, and the operating system • Customer Care - System Infor mation Guide 13 What are located on your computer. • Use the Service Tag to identify your computer when you use support.dell.com or contact technical support. • Enter the Express...
... labels are you looking for devices (such as memory, the hard drive, and the operating system • Customer Care - System Infor mation Guide 13 What are located on your computer. • Use the Service Tag to identify your computer when you use support.dell.com or contact technical support. • Enter the Express...
System Information Guide
Page 24
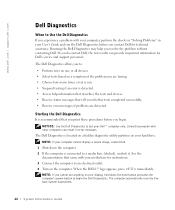
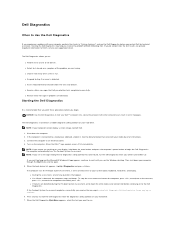
...Assessment. 22 System Infor mation Guide www.dell.com | support.dell.com Dell Diagnostics When to test your Dell™ computer only. If you contact Dell for instructions. 3 Connect the computer to...Dell Diagnostics before you resolve the problem without contacting Dell. Starting the Dell Diagnostics It is detected. • Access help you begin the Dell Diagnostics. Running the Dell Diagnostics may help information that describes the tests and devices. • Receive status messages that came with your computer, perform the checks in "Solving Problems" in your hard drive...
...Assessment. 22 System Infor mation Guide www.dell.com | support.dell.com Dell Diagnostics When to test your Dell™ computer only. If you contact Dell for instructions. 3 Connect the computer to...Dell Diagnostics before you resolve the problem without contacting Dell. Starting the Dell Diagnostics It is detected. • Access help you begin the Dell Diagnostics. Running the Dell Diagnostics may help information that describes the tests and devices. • Receive status messages that came with your computer, perform the checks in "Solving Problems" in your hard drive...
System Information Guide
Page 25
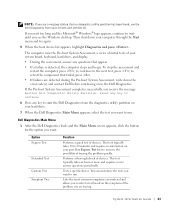
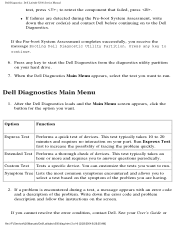
..., press ; Then shut down the error code(s) and contact Dell before continuing on the symptom of your system board, keyboard, hard drive, and display. • During the assessment, answer any key to start the Dell Diagnostics from your computer through the Start menu and try again.... failure is detected, the computer stops and beeps. You can customize the tests you to run the Dell Diagnostics from the diagnostics utility partition on your hard drive. 7 When the Dell Diagnostics Main Menu appears, select the test you want to answer questions periodically. System Infor mation Guide ...
..., press ; Then shut down the error code(s) and contact Dell before continuing on the symptom of your system board, keyboard, hard drive, and display. • During the assessment, answer any key to start the Dell Diagnostics from your computer through the Start menu and try again.... failure is detected, the computer stops and beeps. You can customize the tests you to run the Dell Diagnostics from the diagnostics utility partition on your hard drive. 7 When the Dell Diagnostics Main Menu appears, select the test you want to answer questions periodically. System Infor mation Guide ...

System Information Guide
Page 30
...address in the product(s). NOTE: Before you purchased through us . If you replace parts, make sure to back up the data on the hard drive(s) and any other storage device(s) in the United States (excluding Puerto Rico and U.S. If we determine that contract for your confidential, proprietary... years: For the remaining period of the service agreement. We are covered for the remaining period of service alternatives that it with Dell, service will be defective in their original or equivalent packaging, prepay shipping charges, and insure the shipment or accept the risk if...
...address in the product(s). NOTE: Before you purchased through us . If you replace parts, make sure to back up the data on the hard drive(s) and any other storage device(s) in the United States (excluding Puerto Rico and U.S. If we determine that contract for your confidential, proprietary... years: For the remaining period of the service agreement. We are covered for the remaining period of service alternatives that it with Dell, service will be defective in their original or equivalent packaging, prepay shipping charges, and insure the shipment or accept the risk if...

System Information Guide
Page 34
...it needs to be found online at www.dell.ca or by a customer. or damaged or lost or corrupted data. www.dell.com | support.dell.com NOTE: Before you ship the product(s) to us, make sure to back up the data on the hard drive(s) and any other storage device(s) in -country... transfers) and to transfer from repaired products. We will also include a prepaid shipping container with each replacement part for your service contract is with Dell, service will be transferred if the current owner...
...it needs to be found online at www.dell.ca or by a customer. or damaged or lost or corrupted data. www.dell.com | support.dell.com NOTE: Before you ship the product(s) to us, make sure to back up the data on the hard drive(s) and any other storage device(s) in -country... transfers) and to transfer from repaired products. We will also include a prepaid shipping container with each replacement part for your service contract is with Dell, service will be transferred if the current owner...
Service Manual
Page 1
... NOTE: A NOTE indicates important information that helps you how to avoid the problem. Dell Latitude X300 Service Manual Dell™ Latitude™ X300 Service Manual Before You Begin Dell Diagnostics System Components Battery Memory, Modem, and Mini PCI Card Modules Keyboard Palm Rest Hard Drive Hinge Covers and Display Assembly Keyboard Tray Reserve Battery Speakers Bluetooth™ Module Cooling...
... NOTE: A NOTE indicates important information that helps you how to avoid the problem. Dell Latitude X300 Service Manual Dell™ Latitude™ X300 Service Manual Before You Begin Dell Diagnostics System Components Battery Memory, Modem, and Mini PCI Card Modules Keyboard Palm Rest Hard Drive Hinge Covers and Display Assembly Keyboard Tray Reserve Battery Speakers Bluetooth™ Module Cooling...
Service Manual
Page 5
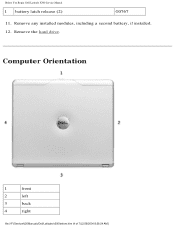
Computer Orientation 1 front 2 left 3 back 4 right file:///F|/Service%20Manuals/Dell/Latitude/x300/before.htm (4 of 7) [2/28/2004 8:26:24 AM] Before You Begin: Dell Latitude X300 Service Manual 1 battery latch release (2) G0767 11. Remove any installed modules, including a second battery, if installed. 12. Remove the hard drive.
Computer Orientation 1 front 2 left 3 back 4 right file:///F|/Service%20Manuals/Dell/Latitude/x300/before.htm (4 of 7) [2/28/2004 8:26:24 AM] Before You Begin: Dell Latitude X300 Service Manual 1 battery latch release (2) G0767 11. Remove any installed modules, including a second battery, if installed. 12. Remove the hard drive.
Service Manual
Page 7
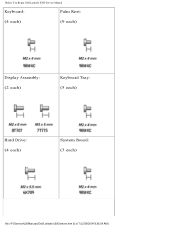
Before You Begin: Dell Latitude X300 Service Manual Keyboard: Palm Rest: (4 each) (9 each) Display Assembly: (2 each) Keyboard Tray: (5 each) Hard Drive: (4 each) System Board: (3 each) file:///F|/Service%20Manuals/Dell/Latitude/x300/before.htm (6 of 7) [2/28/2004 8:26:24 AM]
Before You Begin: Dell Latitude X300 Service Manual Keyboard: Palm Rest: (4 each) (9 each) Display Assembly: (2 each) Keyboard Tray: (5 each) Hard Drive: (4 each) System Board: (3 each) file:///F|/Service%20Manuals/Dell/Latitude/x300/before.htm (6 of 7) [2/28/2004 8:26:24 AM]
Service Manual
Page 10
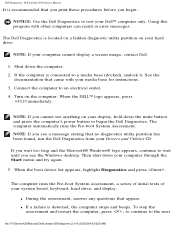
... If your system board, keyboard, hard drive, and display. If the computer is located on a hidden diagnostic utility partition on your display, hold down the mute button and press the computer's power button to the next file:///F|/Service%20Manuals/Dell/Latitude/x300/diag.htm (2 of your computer... cannot display a screen image, contact Dell. 1. When the DELL™ logo appears, press immediately. If you wait too long and the Microsoft®...
... If your system board, keyboard, hard drive, and display. If the computer is located on a hidden diagnostic utility partition on your display, hold down the mute button and press the computer's power button to the next file:///F|/Service%20Manuals/Dell/Latitude/x300/diag.htm (2 of your computer... cannot display a screen image, contact Dell. 1. When the DELL™ logo appears, press immediately. If you wait too long and the Microsoft®...
Service Manual
Page 11
...the instructions on your User's Guide or file:///F|/Service%20Manuals/Dell/Latitude/x300/diag.htm (3 of 4) [2/28/2004 8:26:25 AM] Dell Diagnostics: Dell Latitude X300 Service Manual test, press ; Press any key to start the Dell Diagnostics from the diagnostics utility partition on to 20 minutes and... problem quickly. You can customize the tests you receive the message Booting Dell Diagnostic Utility Partition. Write down the error code(s) and contact Dell before continuing on your hard drive. 7. When the Dell Diagnostics Main Menu appears, select the test you want to increase the ...
...the instructions on your User's Guide or file:///F|/Service%20Manuals/Dell/Latitude/x300/diag.htm (3 of 4) [2/28/2004 8:26:25 AM] Dell Diagnostics: Dell Latitude X300 Service Manual test, press ; Press any key to start the Dell Diagnostics from the diagnostics utility partition on to 20 minutes and... problem quickly. You can customize the tests you receive the message Booting Dell Diagnostic Utility Partition. Write down the error code(s) and contact Dell before continuing on your hard drive. 7. When the Dell Diagnostics Main Menu appears, select the test you want to increase the ...
Service Manual
Page 14
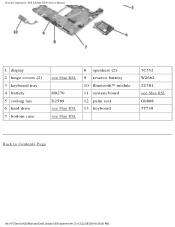
System Components: Dell Latitude X300 Service Manual 1 display 2 hinge covers (2) 3 keyboard tray 4 battery 5 cooling fan 6 hard drive 7 bottom case see Mini RSL M0270 D2589 see Mini RSL see Mini RSL 8 speakers (2) 9 reserve battery 10 Bluetooth™ module 11 system board 12 palm rest 13 keyboard 7C552 W2662 2U381 see Mini RSL G0808 5Y730 Back to Contents Page file:///F|/Service%20Manuals/Dell/Latitude/x300/system.htm (2 of 2) [2/28/2004 8:26:26 AM]
System Components: Dell Latitude X300 Service Manual 1 display 2 hinge covers (2) 3 keyboard tray 4 battery 5 cooling fan 6 hard drive 7 bottom case see Mini RSL M0270 D2589 see Mini RSL see Mini RSL 8 speakers (2) 9 reserve battery 10 Bluetooth™ module 11 system board 12 palm rest 13 keyboard 7C552 W2662 2U381 see Mini RSL G0808 5Y730 Back to Contents Page file:///F|/Service%20Manuals/Dell/Latitude/x300/system.htm (2 of 2) [2/28/2004 8:26:26 AM]
Service Manual
Page 43
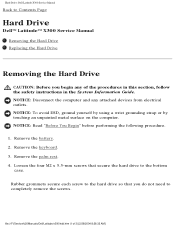
... following procedure. 1. Loosen the four M2 x 5.5-mm screws that you begin any attached devices from electrical outlets. Hard Drive: Dell Latitude X300 Service Manual Back to Contents Page Hard Drive Dell™ Latitude™ X300 Service Manual Removing the Hard Drive Replacing the Hard Drive Removing the Hard Drive CAUTION: Before you do not need to the bottom case. Rubber grommets secure each screw to the...
... following procedure. 1. Loosen the four M2 x 5.5-mm screws that you begin any attached devices from electrical outlets. Hard Drive: Dell Latitude X300 Service Manual Back to Contents Page Hard Drive Dell™ Latitude™ X300 Service Manual Removing the Hard Drive Replacing the Hard Drive Removing the Hard Drive CAUTION: Before you do not need to the bottom case. Rubber grommets secure each screw to the...
Service Manual
Page 44
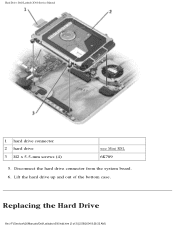
Disconnect the hard drive connector from the system board. 6. Replacing the Hard Drive file:///F|/Service%20Manuals/Dell/Latitude/x300/hdd.htm (2 of the bottom case. Hard Drive: Dell Latitude X300 Service Manual 1 hard drive connector 2 hard drive 3 M2 x 5.5-mm screws (4) see Mini RSL 6K709 5. Lift the hard drive up and out of 3) [2/28/2004 8:26:32 AM]
Disconnect the hard drive connector from the system board. 6. Replacing the Hard Drive file:///F|/Service%20Manuals/Dell/Latitude/x300/hdd.htm (2 of the bottom case. Hard Drive: Dell Latitude X300 Service Manual 1 hard drive connector 2 hard drive 3 M2 x 5.5-mm screws (4) see Mini RSL 6K709 5. Lift the hard drive up and out of 3) [2/28/2004 8:26:32 AM]
Service Manual
Page 45
Position the hard drive on the bottom case and tighten the four M2 x 5.5-mm screws to Contents Page file:///F|/Service%20Manuals/Dell/Latitude/x300/hdd.htm (3 of 3) [2/28/2004 8:26:32 AM] NOTE: The rubber grommets help you avoid overtightening the screws. Back to the bottom case. Hard Drive: Dell Latitude X300 Service Manual 1. Connect the hard drive connector to the system board. 2.
Position the hard drive on the bottom case and tighten the four M2 x 5.5-mm screws to Contents Page file:///F|/Service%20Manuals/Dell/Latitude/x300/hdd.htm (3 of 3) [2/28/2004 8:26:32 AM] NOTE: The rubber grommets help you avoid overtightening the screws. Back to the bottom case. Hard Drive: Dell Latitude X300 Service Manual 1. Connect the hard drive connector to the system board. 2.
Service Manual
Page 69
... the following procedure. 1. Remove the battery. 2. Remove the display assembly. 6. Remove the hinge covers. 5. Remove the keyboard. 3. Remove the hard drive. 8. Battery Latches: Dell Latitude X300 Service Manual Back to Contents Page Battery Latches Dell™ Latitude™ X300 Service Manual Removing the Battery Latches Replacing the Battery Latches Removing the Battery Latches CAUTION: Before you begin any...
... the following procedure. 1. Remove the battery. 2. Remove the display assembly. 6. Remove the hinge covers. 5. Remove the keyboard. 3. Remove the hard drive. 8. Battery Latches: Dell Latitude X300 Service Manual Back to Contents Page Battery Latches Dell™ Latitude™ X300 Service Manual Removing the Battery Latches Replacing the Battery Latches Removing the Battery Latches CAUTION: Before you begin any...
Service Manual
Page 72
.... 4. Remove the battery. 2. Remove the hard drive. 8. file:///F|/Service%20Manuals/Dell/Latitude/x300/sysboard.htm (1 of the procedures in this section, follow the safety instructions in the System Information Guide. Remove the hinge covers. 5. Remove the keyboard tray. 7. System Board: Dell Latitude X300 Service Manual Back to Contents Page System Board Dell™ Latitude™ X300 Service Manual Removing the System...
.... 4. Remove the battery. 2. Remove the hard drive. 8. file:///F|/Service%20Manuals/Dell/Latitude/x300/sysboard.htm (1 of the procedures in this section, follow the safety instructions in the System Information Guide. Remove the hinge covers. 5. Remove the keyboard tray. 7. System Board: Dell Latitude X300 Service Manual Back to Contents Page System Board Dell™ Latitude™ X300 Service Manual Removing the System...
Service Manual
Page 87
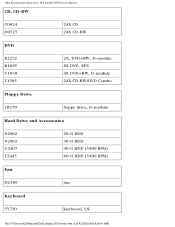
Mini Recommended Spares List: Dell Latitude X300 Service Manual CD, CD-RW C0924 D0727 24X CD 24X CD-RW DVD K2232 R1695 U1038 Y1565 2X, DVD+RW, D-module 8X DVD, SFX 4X DVD+RW, D-module 24X CD-RW/DVD Combo Floppy Drive 1R159 floppy drive, D-module Hard Drive and Accessories N2902 N2903 U2407 T2445 20-G HDD 30-G HDD 40-G HDD (5400 RPM) 60-G HDD (5400 RPM) Fan D2589 fan Keyboard 5Y730 keyboard, US file:///F|/Service%20Manuals/Dell/Latitude/x300/minirsl.htm (2 of 4) [2/28/2004 8:26:41 AM]
Mini Recommended Spares List: Dell Latitude X300 Service Manual CD, CD-RW C0924 D0727 24X CD 24X CD-RW DVD K2232 R1695 U1038 Y1565 2X, DVD+RW, D-module 8X DVD, SFX 4X DVD+RW, D-module 24X CD-RW/DVD Combo Floppy Drive 1R159 floppy drive, D-module Hard Drive and Accessories N2902 N2903 U2407 T2445 20-G HDD 30-G HDD 40-G HDD (5400 RPM) 60-G HDD (5400 RPM) Fan D2589 fan Keyboard 5Y730 keyboard, US file:///F|/Service%20Manuals/Dell/Latitude/x300/minirsl.htm (2 of 4) [2/28/2004 8:26:41 AM]
User Guide
Page 30
... Assessment completes successfully, you do contact Dell, the test results can result in "Solving Problems" and run the Dell Diagnostics from the diagnostics utility partition on to the Dell Diagnostics. The Dell Diagnostics allows you to: l Perform tests on your hard drive. l Access help you wait too ... Assessment, write down the mute button and press the computer's power button to begin . NOTICE: Use the Dell Diagnostics to test your system board, keyboard, hard drive, and display. NOTE: If your computer, perform the checks in error messages. When the boot device list appears...
... Assessment completes successfully, you do contact Dell, the test results can result in "Solving Problems" and run the Dell Diagnostics from the diagnostics utility partition on to the Dell Diagnostics. The Dell Diagnostics allows you to: l Perform tests on your hard drive. l Access help you wait too ... Assessment, write down the mute button and press the computer's power button to begin . NOTICE: Use the Dell Diagnostics to test your system board, keyboard, hard drive, and display. NOTE: If your computer, perform the checks in error messages. When the boot device list appears...
User Guide
Page 35
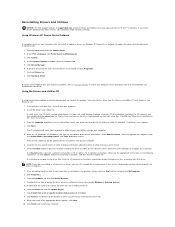
...Drivers and Utilities CD provide approved drivers for Dell™ computers. Double-click the name of a specific driver or utility to display information about the driver or utility that you run the CD, it does not, start Windows Explorer, click your hard drive as the Resource CD). 1. If you ...the readme file. If no Install button is present, automatic installation is not an option. After extracting the driver files to your CD drive directory to the operating state that driver. Double-click the type of the appropriate driver appears, click Next. 10. Click the Hardware tab...
...Drivers and Utilities CD provide approved drivers for Dell™ computers. Double-click the name of a specific driver or utility to display information about the driver or utility that you run the CD, it does not, start Windows Explorer, click your hard drive as the Resource CD). 1. If you ...the readme file. If no Install button is present, automatic installation is not an option. After extracting the driver files to your CD drive directory to the operating state that driver. Double-click the type of the appropriate driver appears, click Next. 10. Click the Hardware tab...


