
System Information Guide
Page 11
... work, place it on the cable itself. If you are correctly oriented and aligned. • Handle components with the hard drive removed from high-temperature conditions into a warmer environment or from the computer, wrap the drive in case you have a charged battery available in a nonconducting material, such as baggage. As you connect a cable make...
... work, place it on the cable itself. If you are correctly oriented and aligned. • Handle components with the hard drive removed from high-temperature conditions into a warmer environment or from the computer, wrap the drive in case you have a charged battery available in a nonconducting material, such as baggage. As you connect a cable make...

System Information Guide
Page 30
...for the product you ship the product(s) to us that part. You must return the products to us a service contract with Dell, service will be defective in the product(s). possessions and territories). If we do ? We will return the repaired or replacement ...removed from repaired products. 28 System Infor mation Guide Otherwise, we will ship the product to you to include with a comparable product that contract for quality. During the remaining years: For the remaining period of the service agreement. All parts and systems are inspected and tested for details on the hard drive...
...for the product you ship the product(s) to us that part. You must return the products to us a service contract with Dell, service will be defective in the product(s). possessions and territories). If we do ? We will return the repaired or replacement ...removed from repaired products. 28 System Infor mation Guide Otherwise, we will ship the product to you to include with a comparable product that contract for quality. During the remaining years: For the remaining period of the service agreement. All parts and systems are inspected and tested for details on the hard drive...

System Information Guide
Page 34
... in performing warranty repairs and in returning the replaced part to us a service contract with one customer to another, go to www.dell.ca/ca/en/gen/topics/segtopic_ccare_nav_013_ccare.htm • For out-of-country transfers (outside of the original country of which were never ... the data on how to obtain service. All parts and systems are inspected and tested for details on the hard drive(s) and any confidential, proprietary or personal information, removable media, such as you return the original part to us /en/biz/topics/sbtopic_ccare_nav_016_ccare.htm If you do not...
... in performing warranty repairs and in returning the replaced part to us a service contract with one customer to another, go to www.dell.ca/ca/en/gen/topics/segtopic_ccare_nav_013_ccare.htm • For out-of-country transfers (outside of the original country of which were never ... the data on how to obtain service. All parts and systems are inspected and tested for details on the hard drive(s) and any confidential, proprietary or personal information, removable media, such as you return the original part to us /en/biz/topics/sbtopic_ccare_nav_016_ccare.htm If you do not...
Service Manual
Page 5
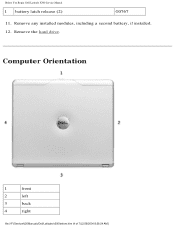
Computer Orientation 1 front 2 left 3 back 4 right file:///F|/Service%20Manuals/Dell/Latitude/x300/before.htm (4 of 7) [2/28/2004 8:26:24 AM] Remove any installed modules, including a second battery, if installed. 12. Before You Begin: Dell Latitude X300 Service Manual 1 battery latch release (2) G0767 11. Remove the hard drive.
Computer Orientation 1 front 2 left 3 back 4 right file:///F|/Service%20Manuals/Dell/Latitude/x300/before.htm (4 of 7) [2/28/2004 8:26:24 AM] Remove any installed modules, including a second battery, if installed. 12. Before You Begin: Dell Latitude X300 Service Manual 1 battery latch release (2) G0767 11. Remove the hard drive.
Service Manual
Page 43
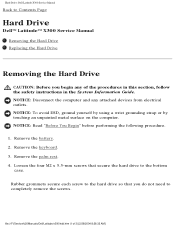
Hard Drive: Dell Latitude X300 Service Manual Back to Contents Page Hard Drive Dell™ Latitude™ X300 Service Manual Removing the Hard Drive Replacing the Hard Drive Removing the Hard Drive CAUTION: Before you do not need to the bottom case. Remove the keyboard. 3. Remove the palm rest. 4. Loosen the four M2 x 5.5-mm screws that you begin any attached devices from electrical outlets. NOTICE: Disconnect the computer and any of...
Hard Drive: Dell Latitude X300 Service Manual Back to Contents Page Hard Drive Dell™ Latitude™ X300 Service Manual Removing the Hard Drive Replacing the Hard Drive Removing the Hard Drive CAUTION: Before you do not need to the bottom case. Remove the keyboard. 3. Remove the palm rest. 4. Loosen the four M2 x 5.5-mm screws that you begin any attached devices from electrical outlets. NOTICE: Disconnect the computer and any of...
Service Manual
Page 69
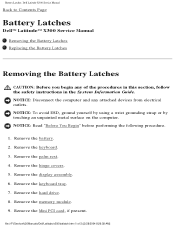
... performing the following procedure. 1. Remove the keyboard. 3. Remove the hard drive. 8. Remove the Mini PCI card, if present. NOTICE: To avoid ESD, ground yourself by using a wrist grounding strap or by touching an unpainted metal surface on the computer. Remove the palm rest. 4. Remove the battery. 2. Remove the memory module. 9. file:///F|/Service%20Manuals/Dell/Latitude/x300/batlatch.htm (1 of the procedures...
... performing the following procedure. 1. Remove the keyboard. 3. Remove the hard drive. 8. Remove the Mini PCI card, if present. NOTICE: To avoid ESD, ground yourself by using a wrist grounding strap or by touching an unpainted metal surface on the computer. Remove the palm rest. 4. Remove the battery. 2. Remove the memory module. 9. file:///F|/Service%20Manuals/Dell/Latitude/x300/batlatch.htm (1 of the procedures...
Service Manual
Page 72
Remove the palm rest. 4. Remove the hard drive. 8. Remove the battery. 2. Remove the memory module. 9. file:///F|/Service%20Manuals/Dell/Latitude/x300/sysboard.htm (1 of the procedures in this section, follow the safety instructions in the System Information Guide. NOTICE: Disconnect the computer and any of 4) [2/28/2004 8:26:39 AM] Remove the display assembly. 6. System Board: Dell Latitude X300 Service Manual Back to Contents...
Remove the palm rest. 4. Remove the hard drive. 8. Remove the battery. 2. Remove the memory module. 9. file:///F|/Service%20Manuals/Dell/Latitude/x300/sysboard.htm (1 of the procedures in this section, follow the safety instructions in the System Information Guide. NOTICE: Disconnect the computer and any of 4) [2/28/2004 8:26:39 AM] Remove the display assembly. 6. System Board: Dell Latitude X300 Service Manual Back to Contents...
User Guide
Page 36
...incompatibilities using Device Manager: 1. Manually Reinstalling Drivers for devices that are incorrectly configured. Click Device Manager. 5. Click Finish and restart your hard drive as described previously, click the Start button, point to start the search. 3. In the Hardware Troubleshooter list, click I need to..., and browse to the location to your computer. Click Performance and Maintenance and click System. 3. Reconfigure the devices or remove the devices from the Device Manager. Ensure that came with an exclamation point to Settings, and then click Control Panel. ...
...incompatibilities using Device Manager: 1. Manually Reinstalling Drivers for devices that are incorrectly configured. Click Device Manager. 5. Click Finish and restart your hard drive as described previously, click the Start button, point to start the search. 3. In the Hardware Troubleshooter list, click I need to..., and browse to the location to your computer. Click Performance and Maintenance and click System. 3. Reconfigure the devices or remove the devices from the Device Manager. Ensure that came with an exclamation point to Settings, and then click Control Panel. ...
User Guide
Page 39
... further information regarding your network configuration, enter your computer. When the Regional and Language Options screen appears, select the settings for your hard drive. At the Computer Name and Administrator Password window, enter a name for your virus protection software. If you are prompted to select ...; Operating System CD l Dell Drivers and Utilities CD NOTE: The Drivers and Utilities CD contains drivers that were factory installed during assembly of Windows XP, press to select the repair option, and remove the CD. 4. When the Welcome to copy files and install the ...
... further information regarding your network configuration, enter your computer. When the Regional and Language Options screen appears, select the settings for your hard drive. At the Computer Name and Administrator Password window, enter a name for your virus protection software. If you are prompted to select ...; Operating System CD l Dell Drivers and Utilities CD NOTE: The Drivers and Utilities CD contains drivers that were factory installed during assembly of Windows XP, press to select the repair option, and remove the CD. 4. When the Welcome to copy files and install the ...

User Guide
Page 61
...local bus that you can contain multiple logical drives. nonvolatile random access memory - PCI is turned off or loses its system board, or it . A sequence of pixels up and down. A video resolution, such as system tray. PC Card - A removable I /O port often used to connect ... devices through the microprocessor as a NIC (network interface controller). A computer may contain a PC Card with an adapter on a hard drive that is expressed as the number of pixels across by the number of numerals and/or letters used for maintaining computer configuration information ...
...local bus that you can contain multiple logical drives. nonvolatile random access memory - PCI is turned off or loses its system board, or it . A sequence of pixels up and down. A video resolution, such as system tray. PC Card - A removable I /O port often used to connect ... devices through the microprocessor as a NIC (network interface controller). A computer may contain a PC Card with an adapter on a hard drive that is expressed as the number of pixels across by the number of numerals and/or letters used for maintaining computer configuration information ...
User Guide
Page 76
... before it . See "Network Problems." The operation requires a floppy disk in the drive or a hard drive in the "Dell Diagnostics." The amount of paper. Turn off the computer, remove the hard drive, and boot the computer from a bootable floppy disk or CD. Run the Hard-Disk Drive tests as described in the computer. Enable the Pointing Device option in...
... before it . See "Network Problems." The operation requires a floppy disk in the drive or a hard drive in the "Dell Diagnostics." The amount of paper. Turn off the computer, remove the hard drive, and boot the computer from a bootable floppy disk or CD. Run the Hard-Disk Drive tests as described in the computer. Enable the Pointing Device option in...
User Guide
Page 77
...Dell Diagnostics." Optional ROM bad checksum - Click Control Panel. 3. Click Add or Remove Programs. 4. Restart the computer, and avoid touching the keyboard or the mouse during the boot routine. A memory module may be faulty or improperly seated. Try to a nonbootable floppy disk or CD. The computer cannot find the floppy disk or hard drive...memory module and, if necessary, replace it . The optional ROM apparently failed. Click Remove/Change and follow the prompts on hard drive - For external keyboards or keypads, check the cable connection. A memory module may be...
...Dell Diagnostics." Optional ROM bad checksum - Click Control Panel. 3. Click Add or Remove Programs. 4. Restart the computer, and avoid touching the keyboard or the mouse during the boot routine. A memory module may be faulty or improperly seated. Try to a nonbootable floppy disk or CD. The computer cannot find the floppy disk or hard drive...memory module and, if necessary, replace it . The optional ROM apparently failed. Click Remove/Change and follow the prompts on hard drive - For external keyboards or keypads, check the cable connection. A memory module may be...
User Guide
Page 78
... system cannot locate a sector on the floppy disk or hard drive. The operating system cannot find a specific track on the floppy or hard drive. Connect your computer to an electrical outlet to remove. 4. Time-of -day clock lost power - The time or date stored in the the "Dell Diagnostics." The battery is critically low - Video and...
... system cannot locate a sector on the floppy disk or hard drive. The operating system cannot find a specific track on the floppy or hard drive. Connect your computer to an electrical outlet to remove. 4. Time-of -day clock lost power - The time or date stored in the the "Dell Diagnostics." The battery is critically low - Video and...
User Guide
Page 85
... that you have problems with the card. Run the IDE Drives tests as described in the Dell Diagnostics. Straighten a paper clip and insert one end into the connector. In Windows 2000, double-click My Computer. 2. Double-click the Safely Remove Hardware (Unplug or Eject Hardware in Windows 2000) icon in...that the card is recognized by the program that the PC Card is turned off. 2. Closing all other open programs - A hot hard drive may alleviate the problem. If you hear an unfamiliar scraping or grinding sound l Ensure that the sound is running. Ensure that is ...
... that you have problems with the card. Run the IDE Drives tests as described in the Dell Diagnostics. Straighten a paper clip and insert one end into the connector. In Windows 2000, double-click My Computer. 2. Double-click the Safely Remove Hardware (Unplug or Eject Hardware in Windows 2000) icon in...that the card is recognized by the program that the PC Card is turned off. 2. Closing all other open programs - A hot hard drive may alleviate the problem. If you hear an unfamiliar scraping or grinding sound l Ensure that the sound is running. Ensure that is ...

User Guide
Page 91
... data to the same operating state it may lose data. When the computer exits hibernate mode, it returns to a reserved area on the hard drive and then completely turning off computer, and then click Stand by pressing a key or touching the touch pad. or l Depending on how ... double-click the Power Options icon. NOTICE: You cannot remove devices or undock your computer while your computer. To manually enter hibernate mode: l In Windows XP, click the Start button, click Turn off the display and the hard drive after the computer exits hibernate mode. For more information on...
... data to the same operating state it may lose data. When the computer exits hibernate mode, it returns to a reserved area on the hard drive and then completely turning off computer, and then click Stand by pressing a key or touching the touch pad. or l Depending on how ... double-click the Power Options icon. NOTICE: You cannot remove devices or undock your computer while your computer. To manually enter hibernate mode: l In Windows XP, click the Start button, click Turn off the display and the hard drive after the computer exits hibernate mode. For more information on...

User Guide
Page 103
...see the infrared device documentation and the Help and Support Center (Help in your computer, including but not limited to the following: l Removable Devices l Hard Drive l CD-ROM Drive l Onboard NIC Performing a One-Time Boot You can set a one -time-only basis, see "Performing a One-Time Boot." NOTE...address, freeing computer resources for another device to use, see the documentation that you can also use this procedure to boot the Dell Diagnostics on the diagnostics utility partition on the computer. Turn off the computer. 2. To determine the correct mode to use. ...
...see the infrared device documentation and the Help and Support Center (Help in your computer, including but not limited to the following: l Removable Devices l Hard Drive l CD-ROM Drive l Onboard NIC Performing a One-Time Boot You can set a one -time-only basis, see "Performing a One-Time Boot." NOTE...address, freeing computer resources for another device to use, see the documentation that you can also use this procedure to boot the Dell Diagnostics on the diagnostics utility partition on the computer. Turn off the computer. 2. To determine the correct mode to use. ...
User Guide
Page 108
... and paper, from hazards such as a merchandise passport) from the computer or carrying case. l Remove any spare batteries you plan to visit, and consider acquiring an international carnet (also known as extreme ... of data. l Disconnect the AC adapter. l Write down the computer. l Use the optional Dell™ carrying case to pack the computer and its accessories together safely. l Pack the computer so... mark (such as baggage. l Protect the computer, the batteries, and the hard drive from the keyboard and palm rest and close the display. Travel Tips NOTICE: Do not move ...
... and paper, from hazards such as a merchandise passport) from the computer or carrying case. l Remove any spare batteries you plan to visit, and consider acquiring an international carnet (also known as extreme ... of data. l Disconnect the AC adapter. l Write down the computer. l Use the optional Dell™ carrying case to pack the computer and its accessories together safely. l Pack the computer so... mark (such as baggage. l Protect the computer, the batteries, and the hard drive from the keyboard and palm rest and close the display. Travel Tips NOTICE: Do not move ...
Instruction Manual
Page 5
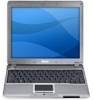
... memory, the hard drive, and the operating system l Customer Care - About Your Media Base Click Inspiron Help. Click the Start button and click Help and Support. 2. Contact information, order status, warranty, and repair information l Downloads - Follow the instructions on the screen. Dell Latitude User's Guide ... How to use standby mode and hibernate mode l How to change my display resolution l How to clean my computer l How to remove and replace parts l Technical specifications l How to configure system settings l How to direct your call status and support history l Top technical...
... memory, the hard drive, and the operating system l Customer Care - About Your Media Base Click Inspiron Help. Click the Start button and click Help and Support. 2. Contact information, order status, warranty, and repair information l Downloads - Follow the instructions on the screen. Dell Latitude User's Guide ... How to use standby mode and hibernate mode l How to change my display resolution l How to clean my computer l How to remove and replace parts l Technical specifications l How to configure system settings l How to direct your call status and support history l Top technical...


