
User Guide
Page 2
... otherwise rendered unusable whether as stolen credit card numbers, the loss of or alteration of Dell Computer Corporation is a registered service mark of Dell Computer Corporation. Copyright Information in virtually any other causes. Trademarks Dell, the DELL logo, and Latitude are registered trademarks of improper use, repairs, defects, battery replacement, use after the specified battery...
... otherwise rendered unusable whether as stolen credit card numbers, the loss of or alteration of Dell Computer Corporation is a registered service mark of Dell Computer Corporation. Copyright Information in virtually any other causes. Trademarks Dell, the DELL logo, and Latitude are registered trademarks of improper use, repairs, defects, battery replacement, use after the specified battery...
User Guide
Page 3
... and used in accordance with the limits for a Class B digital device pursuant to radio communications. Responsible Party: Dell Computer Corporation One Dell Way Round Rock, Texas 512-338-4400 v If this product meets the ENERGY STAR® guidelines for energy efficiency...provide reasonable protection against harmful interference in a residential installation. A shielded I/F cable and included cables with Part 15 of Conformity Dell Latitude LT, PTP Series This device complies with ferrite cores are designed to radio or television reception, which the receiver is connected. ...
... and used in accordance with the limits for a Class B digital device pursuant to radio communications. Responsible Party: Dell Computer Corporation One Dell Way Round Rock, Texas 512-338-4400 v If this product meets the ENERGY STAR® guidelines for energy efficiency...provide reasonable protection against harmful interference in a residential installation. A shielded I/F cable and included cables with Part 15 of Conformity Dell Latitude LT, PTP Series This device complies with ferrite cores are designed to radio or television reception, which the receiver is connected. ...

User Guide
Page 4
... exceed five (5.0). The REN is used on the telephone line may make the necessary modifications in response to file a complaint with this equipment, please contact Dell Computer Corporation for repair and warranty information. About the Modem This equipment complies with Part 68 of the equipment. If requested, this information must be...
... exceed five (5.0). The REN is used on the telephone line may make the necessary modifications in response to file a complaint with this equipment, please contact Dell Computer Corporation for repair and warranty information. About the Modem This equipment complies with Part 68 of the equipment. If requested, this information must be...

User Guide
Page 5
... the top or bottom of each transmitted page or on the first page of the transmission, the date and time it is the intent of Dell Computer Corporation that this information, refer to the manual of the sending machine or such business, other entity or individual. (The telephone number provided may...
... the top or bottom of each transmitted page or on the first page of the transmission, the date and time it is the intent of Dell Computer Corporation that this information, refer to the manual of the sending machine or such business, other entity or individual. (The telephone number provided may...

User Guide
Page 6
In some situations. This precaution may consist of a certified connector assembly (telephone extension cord). Users should ensure for Users in Canada About the Modem The Industry Canada label identifies certified equipment. To prevent overloading, the termination on a loop may be aware that it is used by the user to certified equipment should contact the appropriate electric inspection authority, or electrician, as appropriate. The equipment must also be made by the device. Repairs to this equipment, users should be particularly important in some cases...
In some situations. This precaution may consist of a certified connector assembly (telephone extension cord). Users should ensure for Users in Canada About the Modem The Industry Canada label identifies certified equipment. To prevent overloading, the termination on a loop may be aware that it is used by the user to certified equipment should contact the appropriate electric inspection authority, or electrician, as appropriate. The equipment must also be made by the device. Repairs to this equipment, users should be particularly important in some cases...

User Guide
Page 7
... letter N or coloured black. combination of devices subject only to the requirement that the total Ringer Equivalence Number of this apparatus may require consent, which Dell Computer Corporation is unable to any material may not correspond with the coloured markings identifying the terminals in the mains plug or distribution board.
... letter N or coloured black. combination of devices subject only to the requirement that the total Ringer Equivalence Number of this apparatus may require consent, which Dell Computer Corporation is unable to any material may not correspond with the coloured markings identifying the terminals in the mains plug or distribution board.

User Guide
Page 9
... Information Technology Equipment." "Safety of Information Technology Equipment." • EN 50082-1:1992 - xi This Dell computer system/product is on file at Dell Products Europe BV, Limerick, Ireland. CE Notice Marking by the symbol indicates compliance of this Dell system meets or exceeds the following technical standards: • EN 55022 - A "Declaration of Conformity...
... Information Technology Equipment." "Safety of Information Technology Equipment." • EN 50082-1:1992 - xi This Dell computer system/product is on file at Dell Products Europe BV, Limerick, Ireland. CE Notice Marking by the symbol indicates compliance of this Dell system meets or exceeds the following technical standards: • EN 55022 - A "Declaration of Conformity...

User Guide
Page 11
Replace the power cord immediately if damage is damaged or frayed. • Liquid has been spilled on the computer. • The computer has been dropped or the cabinet has been damaged. xiii Usage • Never push any objects of more than 10°C (18°F) will cause condensation inside the unit, which may damage the data. • Do not block or cover slots or openings on the cabinet to protect the computer from a cold place to a warm place. Location • Do not expose the computer to direct sunlight. • Try to avoid dusty environments. • Keep the computer ...
Replace the power cord immediately if damage is damaged or frayed. • Liquid has been spilled on the computer. • The computer has been dropped or the cabinet has been damaged. xiii Usage • Never push any objects of more than 10°C (18°F) will cause condensation inside the unit, which may damage the data. • Do not block or cover slots or openings on the cabinet to protect the computer from a cold place to a warm place. Location • Do not expose the computer to direct sunlight. • Try to avoid dusty environments. • Keep the computer ...

User Guide
Page 12
• Do not scratch the surface of the LCD screen. • Turn off the computer and disconnect the AC power cord before use the battery pack for any purpose other violent shock. • Do not solder anything to other than powering the computer. Never allow liquids to come in contact with your computer. Charging • Charge the battery pack only with the AC adapter included with the battery pack. • Avoid dropping the pack or subjecting it to the battery terminals. xiv Discharging • Do not use . Storage • Store the battery pack in a fire. • Do ...
• Do not scratch the surface of the LCD screen. • Turn off the computer and disconnect the AC power cord before use the battery pack for any purpose other violent shock. • Do not solder anything to other than powering the computer. Never allow liquids to come in contact with your computer. Charging • Charge the battery pack only with the AC adapter included with the battery pack. • Avoid dropping the pack or subjecting it to the battery terminals. xiv Discharging • Do not use . Storage • Store the battery pack in a fire. • Do ...

User Guide
Page 13
xv Modem Precautions • Never install telephone wiring during a lightning storm. • Never install telephone jacks in the vicinity of electric shock from lightning. • Do not use the telephone to report a gas leak in wet locations unless the jack is specifically designed for wet locations. • Never touch uninsulated telephone wires or terminals unless the telephone line has been disconnected at the network interface. • Use caution when installing or modifying telephone lines. • Avoid using the telephone during a lightning storm. There may be a remote risk ...
xv Modem Precautions • Never install telephone wiring during a lightning storm. • Never install telephone jacks in the vicinity of electric shock from lightning. • Do not use the telephone to report a gas leak in wet locations unless the jack is specifically designed for wet locations. • Never touch uninsulated telephone wires or terminals unless the telephone line has been disconnected at the network interface. • Use caution when installing or modifying telephone lines. • Avoid using the telephone during a lightning storm. There may be a remote risk ...

User Guide
Page 14
Recording Important Information For future reference, please record the following information in the spaces provided below. Model Number: Serial Number: Date of purchase: Dealer's Name: Place of purchase: Password: The serial number is printed on a sticker located on the bottom of the computer. xvi
Recording Important Information For future reference, please record the following information in the spaces provided below. Model Number: Serial Number: Date of purchase: Dealer's Name: Place of purchase: Password: The serial number is printed on a sticker located on the bottom of the computer. xvi

User Guide
Page 15
A caution icon alerts you see on the Keyboard, when referred to in the instructions, are shown in other parts of a special technique or information that may help you type the command: C:\>DIR A: Enter Words/Texts on Screen, such as window titles or possible parameters, are italicized: Double-click this manual are separated by pressing Ctrl+Alt+Delete. When necessary, important key combinations are shown in graphics: Sample Entries are shown in Chapter 5. Key Labels on your computer by a plus (+) sign: Restart your computer. Screens reproduced in this manual may differ ...
A caution icon alerts you see on the Keyboard, when referred to in the instructions, are shown in other parts of a special technique or information that may help you type the command: C:\>DIR A: Enter Words/Texts on Screen, such as window titles or possible parameters, are italicized: Double-click this manual are separated by pressing Ctrl+Alt+Delete. When necessary, important key combinations are shown in graphics: Sample Entries are shown in Chapter 5. Key Labels on your computer by a plus (+) sign: Restart your computer. Screens reproduced in this manual may differ ...

User Guide
Page 17
Front xix Overview of Computer Actual appearance of your computer may be slightly different depending on the model.
Front xix Overview of Computer Actual appearance of your computer may be slightly different depending on the model.

User Guide
Page 21
Table of Contents Quick Setup 1-1 Turning Power On 1-1 Setting Up the Windows Operating System 1-3 Shutting Down the System 1-4 Basic Operations 2-1 Choosing Power Source 2-1 Resetting the System 2-2 Using the Glide Pad 2-3 Using the Keyboard 2-5 Using External Floppy Disk Drive Unit 2-6 Battery and Power Management 3-1 Standard Battery Pack 3-1 Optional External Battery Pack 3-5 Disposing of the Battery 3-7 Power Management 3-8 Peripherals 4-1 Using Peripherals 4-1 PC Card 4-3 Keyboard/Mouse 4-5 Display ...4-6 Audio System 4-8 USB Device 4-9 Printer ...4-9 RS-232C...
Table of Contents Quick Setup 1-1 Turning Power On 1-1 Setting Up the Windows Operating System 1-3 Shutting Down the System 1-4 Basic Operations 2-1 Choosing Power Source 2-1 Resetting the System 2-2 Using the Glide Pad 2-3 Using the Keyboard 2-5 Using External Floppy Disk Drive Unit 2-6 Battery and Power Management 3-1 Standard Battery Pack 3-1 Optional External Battery Pack 3-5 Disposing of the Battery 3-7 Power Management 3-8 Peripherals 4-1 Using Peripherals 4-1 PC Card 4-3 Keyboard/Mouse 4-5 Display ...4-6 Audio System 4-8 USB Device 4-9 Printer ...4-9 RS-232C...

User Guide
Page 22
... Features 6-1 Passwords 6-1 Security Slot 6-4 Setup Utility 7-1 Running the Setup Utility 7-1 Main Menu 7-3 Advanced Menu 7-4 Security Menu 7-5 Power Menu 7-6 Exit Menu 7-7 Getting Help 8-1 Help Tools 8-1 Contacting Dell 8-5 Maintenance and Specifications A-1 Maintenance A-1 Specifications A-3 Options A-4 Troubleshooting B-1 Warranty, Return Policy, and Year 2000 Statement of Compliance for...
... Features 6-1 Passwords 6-1 Security Slot 6-4 Setup Utility 7-1 Running the Setup Utility 7-1 Main Menu 7-3 Advanced Menu 7-4 Security Menu 7-5 Power Menu 7-6 Exit Menu 7-7 Getting Help 8-1 Help Tools 8-1 Contacting Dell 8-5 Maintenance and Specifications A-1 Maintenance A-1 Specifications A-3 Options A-4 Troubleshooting B-1 Warranty, Return Policy, and Year 2000 Statement of Compliance for...

User Guide
Page 23
Read this chapter first. Turning Power On Your computer is designed and pre-configured for the first time, be able to get your computer up and running as quickly as possible. Plug the AC power cord into the computer's AC adapter jack. 3. CHAPTER 1 Quick Setup Your computer is powered with the computer. Before using the battery instead, you cannot turn on the cord. • When using the computer for easy setup and use the AC adapter included with either the rechargeable battery or AC power. Never pull on the computer. 2. If you do not remove the sheet, you may ...
Read this chapter first. Turning Power On Your computer is designed and pre-configured for the first time, be able to get your computer up and running as quickly as possible. Plug the AC power cord into the computer's AC adapter jack. 3. CHAPTER 1 Quick Setup Your computer is powered with the computer. Before using the battery instead, you cannot turn on the cord. • When using the computer for easy setup and use the AC adapter included with either the rechargeable battery or AC power. Never pull on the computer. 2. If you do not remove the sheet, you may ...
User Guide
Page 24
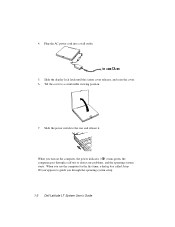
Plug the AC power cord into a wall outlet. 5. When you use the computer for the first time, a dialog box called Setup Wizard appears to detect any problems, and the operating system starts. Slide the display lock latch until the screen cover releases, and raise the cover. 6. Slide the power switch to a comfortable viewing position. 7. When you through a self test to guide you turn on the computer, the power indicator ( ) turns green, the computer goes through the operating system setup. 1-2 Dell Latitude LT System User's Guide Tilt the cover to the rear and release it. 4.
Plug the AC power cord into a wall outlet. 5. When you use the computer for the first time, a dialog box called Setup Wizard appears to detect any problems, and the operating system starts. Slide the display lock latch until the screen cover releases, and raise the cover. 6. Slide the power switch to a comfortable viewing position. 7. When you through a self test to guide you turn on the computer, the power indicator ( ) turns green, the computer goes through the operating system setup. 1-2 Dell Latitude LT System User's Guide Tilt the cover to the rear and release it. 4.

User Guide
Page 25
Among the dialog boxes you cannot set up later. Setting Up the Windows® Operating System The first steps in this manual, you can send commands to complete the entire setup process. See also the operating system manual. It takes approximately 5-10 minutes to the operating system or other application programs. To open the properties dialog boxes, click the Start button, select Settings - If you turn off the computer, you often use are as follows: • Gathering information • Configuring your computer • Restarting your computer To set it up the ...
Among the dialog boxes you cannot set up later. Setting Up the Windows® Operating System The first steps in this manual, you can send commands to complete the entire setup process. See also the operating system manual. It takes approximately 5-10 minutes to the operating system or other application programs. To open the properties dialog boxes, click the Start button, select Settings - If you turn off the computer, you often use are as follows: • Gathering information • Configuring your computer • Restarting your computer To set it up the ...
User Guide
Page 26
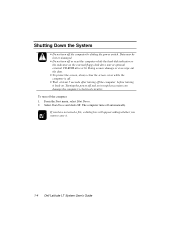
To turn off the computer before turning it . 1-4 Dell Latitude LT System User's Guide If you have not saved a file, a dialog box will appear asking whether you want to save it back on. From the Start ...
To turn off the computer before turning it . 1-4 Dell Latitude LT System User's Guide If you have not saved a file, a dialog box will appear asking whether you want to save it back on. From the Start ...

User Guide
Page 27
rely on Suspend to RAM and Suspend to Disk, see Chapter 3. Indicator Battery Power Light Meaning On (green) Fully charged On (orange) Being charged Blinking (orange) In abnormal state Power On and blinking (red) On (green) Blinking (green) Almost completely discharged. CHAPTER 2 Basic Operations This chapter describes the basic operations of your computer. See Chapter 3 for battery information. The warning beep sounds. Basic Operations 2-1 Choosing Power Source You can use the computer with one of the following indicators show the power status of your computer....
rely on Suspend to RAM and Suspend to Disk, see Chapter 3. Indicator Battery Power Light Meaning On (green) Fully charged On (orange) Being charged Blinking (orange) In abnormal state Power On and blinking (red) On (green) Blinking (green) Almost completely discharged. CHAPTER 2 Basic Operations This chapter describes the basic operations of your computer. See Chapter 3 for battery information. The warning beep sounds. Basic Operations 2-1 Choosing Power Source You can use the computer with one of the following indicators show the power status of your computer....