
Dell Owners Manual
Page 3
... Keyboard...15 Installing the Keyboard...16 Removing the Base Cover...17 Installing the Base Cover...17 Removing the Memory Module...17 Installing the Memory Module...18 Removing the Hard Drive...18 Installing the Hard Drive...19 Removing the Hard-Drive Cage...19 Installing the Hard-Drive Cage...20 Removing the Optical Drive...20 Installing the Optical Drive...21 Removing the WLAN Card...21 Installing the WLAN...
... Keyboard...15 Installing the Keyboard...16 Removing the Base Cover...17 Installing the Base Cover...17 Removing the Memory Module...17 Installing the Memory Module...18 Removing the Hard Drive...18 Installing the Hard Drive...19 Removing the Hard-Drive Cage...19 Installing the Hard-Drive Cage...20 Removing the Optical Drive...20 Installing the Optical Drive...21 Removing the WLAN Card...21 Installing the WLAN...

Dell Owners Manual
Page 9
coin-cell battery 2. Back 1. WLAN card 5. memory modules 3. hard drive 9 2 Removing and Installing Components This section provides detailed information on how to remove or install the components from your computer. Recommended Tools The procedures in this document may require the following tools: • Small flat-blade screwdriver • #0 Phillips screwdriver • #1 Phillips screwdriver • Small plastic scribe System Overview Figure 1. Inside View - optical drive 4.
coin-cell battery 2. Back 1. WLAN card 5. memory modules 3. hard drive 9 2 Removing and Installing Components This section provides detailed information on how to remove or install the components from your computer. Recommended Tools The procedures in this document may require the following tools: • Small flat-blade screwdriver • #0 Phillips screwdriver • #1 Phillips screwdriver • Small plastic scribe System Overview Figure 1. Inside View - optical drive 4.

Dell Owners Manual
Page 18
... the system board. 3. Press the clips to secure the memory module to remove from the hard drive. 18 Removing the Hard Drive 1. b) Remove the hard-drive bracket from its connectors. 4. Installing the Memory Module 1. Perform the following steps: a) Remove the screws that secure the hard drive in place. Install: a) base cover b) battery 4. Follow the procedures in After Working Inside Your Computer. Insert...
... the system board. 3. Press the clips to secure the memory module to remove from the hard drive. 18 Removing the Hard Drive 1. b) Remove the hard-drive bracket from its connectors. 4. Installing the Memory Module 1. Perform the following steps: a) Remove the screws that secure the hard drive in place. Install: a) base cover b) battery 4. Follow the procedures in After Working Inside Your Computer. Insert...

Dell Owners Manual
Page 19
Place the hard drive on the hard drive and tighten the screws to secure the hard-drive bracket to remove from the computer. 19 Installing the Hard Drive 1. Follow the procedures in place. b) Pull the hard-drive cage to the hard drive. 2. Install: a) base cover b) battery 4. Removing the Hard-Drive Cage 1. Perform the following steps: a) Remove the screws that secure the hard-drive cage in Before Working Inside Your Computer...
Place the hard drive on the hard drive and tighten the screws to secure the hard-drive bracket to remove from the computer. 19 Installing the Hard Drive 1. Follow the procedures in place. b) Pull the hard-drive cage to the hard drive. 2. Install: a) base cover b) battery 4. Removing the Hard-Drive Cage 1. Perform the following steps: a) Remove the screws that secure the hard-drive cage in Before Working Inside Your Computer...

Dell Owners Manual
Page 20
Install: a) hard drive b) base cover c) battery 4. Removing the Optical Drive 1. Installing the Hard-Drive Cage 1. After removing the optical-drive bracket, perform the following steps: a) Remove the screw that secure the optical-drive bracket [1]. Follow the procedures in After Working Inside Your Computer. Tighten the screws to remove it from the optical drive [2]. 20 b) Push the optical drive away to secure the hard-drive cage. 3. Place...
Install: a) hard drive b) base cover c) battery 4. Removing the Optical Drive 1. Installing the Hard-Drive Cage 1. After removing the optical-drive bracket, perform the following steps: a) Remove the screw that secure the optical-drive bracket [1]. Follow the procedures in After Working Inside Your Computer. Tighten the screws to remove it from the optical drive [2]. 20 b) Push the optical drive away to secure the hard-drive cage. 3. Place...

Dell Owners Manual
Page 23
... in Before Working Inside Your Computer. 2. Follow the procedures in After Working Inside Your Computer. Remove: a) SD card b) battery c) base cover d) keyboard trim e) keyboard f) memory g) optical drive h) hard drive i) hard-drive cage j) display hinge 3. Install: a) keyboard b) keyboard trim c) base cover d) battery 4. Remove the screws at the front and back of the computer and disconnect: a) power-connector cable...
... in Before Working Inside Your Computer. 2. Follow the procedures in After Working Inside Your Computer. Remove: a) SD card b) battery c) base cover d) keyboard trim e) keyboard f) memory g) optical drive h) hard drive i) hard-drive cage j) display hinge 3. Install: a) keyboard b) keyboard trim c) base cover d) battery 4. Remove the screws at the front and back of the computer and disconnect: a) power-connector cable...
Dell Owners Manual
Page 24
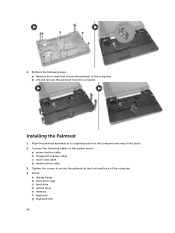
... of the computer. Tighten the screws to its original position in the computer and snap it into place. 2. 4. b) Lift and remove the palmrest from the computer. Install: a) display hinge b) hard-drive cage c) hard drive d) optical drive e) memory f) keyboard g) keyboard trim 24 Installing the Palmrest 1. Perform the following cables to the system board: a) power-button cable b) fingerprint...
... of the computer. Tighten the screws to its original position in the computer and snap it into place. 2. 4. b) Lift and remove the palmrest from the computer. Install: a) display hinge b) hard-drive cage c) hard drive d) optical drive e) memory f) keyboard g) keyboard trim 24 Installing the Palmrest 1. Perform the following cables to the system board: a) power-button cable b) fingerprint...

Dell Owners Manual
Page 26
... computer. Perform the following steps: a) Disconnect the I /O board cable to secure the system fan on the computer. 2. f) battery g) SD card 4. Remove: a) SD card b) battery c) base cover d) keyboard trim e) keyboard f) memory g) optical drive h) hard drive i) hard-drive cage j) display hinge k) palmrest 3. Follow the procedures in Before Working Inside Your Computer. 2. Follow the procedures in After Working Inside...
... computer. Perform the following steps: a) Disconnect the I /O board cable to secure the system fan on the computer. 2. f) battery g) SD card 4. Remove: a) SD card b) battery c) base cover d) keyboard trim e) keyboard f) memory g) optical drive h) hard drive i) hard-drive cage j) display hinge k) palmrest 3. Follow the procedures in Before Working Inside Your Computer. 2. Follow the procedures in After Working Inside...

Dell Owners Manual
Page 27
Disconnect: a) coin-cell battery cable b) power-connector cable c) speaker cable 27 Remove: a) SD card b) battery c) base cover d) keyboard trim e) keyboard f) memory g) optical drive h) hard drive i) hard-drive cage j) WLAN card k) display hinge l) palmrest m) system fan n) ExpressCard cage 3. Follow the procedures in After Working Inside Your Computer. Follow the procedures in Before Working Inside Your Computer. 2. Removing the System Board 1. f) optical drive g) keyboard h) keyboard trim i) base cover j) battery k) SD card 6.
Disconnect: a) coin-cell battery cable b) power-connector cable c) speaker cable 27 Remove: a) SD card b) battery c) base cover d) keyboard trim e) keyboard f) memory g) optical drive h) hard drive i) hard-drive cage j) WLAN card k) display hinge l) palmrest m) system fan n) ExpressCard cage 3. Follow the procedures in After Working Inside Your Computer. Follow the procedures in Before Working Inside Your Computer. 2. Removing the System Board 1. f) optical drive g) keyboard h) keyboard trim i) base cover j) battery k) SD card 6.

Dell Owners Manual
Page 29
... the heatsink in After Working Inside Your Computer. Removing the Heatsink 1. Follow the procedures in place. Follow the procedures in Before Working Inside Your Computer. 2. b) Lift to remove the heatsink from the computer. 29 Remove: a) SD card b) battery c) base cover d) keyboard trim e) keyboard f) memory g) optical drive h) hard drive i) hard-drive cage j) WLAN card k) display hinge l) palmrest m) system fan...
... the heatsink in After Working Inside Your Computer. Removing the Heatsink 1. Follow the procedures in place. Follow the procedures in Before Working Inside Your Computer. 2. b) Lift to remove the heatsink from the computer. 29 Remove: a) SD card b) battery c) base cover d) keyboard trim e) keyboard f) memory g) optical drive h) hard drive i) hard-drive cage j) WLAN card k) display hinge l) palmrest m) system fan...

Dell Owners Manual
Page 30
Installing the Heatsink 1. Follow the procedures in Before Working Inside Your Computer. 2. Remove: a) SD card b) battery c) base cover 30 Install: a) system board b) ExpressCard cage c) system fan d) palmrest e) display hinge f) WLAN card g) hard-drive cage h) hard drive i) optical drive j) memory k) keyboard l) keyboard trim m) base cover n) battery o) SD card 4. Tighten the screws to secure the heatsink to the computer. 3. Place the heatsink on the system board. 2. Removing the I/O Board (Left) 1. Follow the procedures in After Working Inside Your Computer.
Installing the Heatsink 1. Follow the procedures in Before Working Inside Your Computer. 2. Remove: a) SD card b) battery c) base cover 30 Install: a) system board b) ExpressCard cage c) system fan d) palmrest e) display hinge f) WLAN card g) hard-drive cage h) hard drive i) optical drive j) memory k) keyboard l) keyboard trim m) base cover n) battery o) SD card 4. Tighten the screws to secure the heatsink to the computer. 3. Place the heatsink on the system board. 2. Removing the I/O Board (Left) 1. Follow the procedures in After Working Inside Your Computer.

Dell Owners Manual
Page 31
... e) display hinge f) WLAN card g) hard-drive cage h) hard drive i) optical drive j) memory k) keyboard l) keyboard trim m) base cover n) battery 31 b) Lift the I /O Board (Left) 1. Place the I /O board to the computer. 3. Installing the I /O board and remove from the computer. Tighten the screw to secure the I /O board on the computer. d) keyboard trim e) keyboard f) memory g) optical drive h) hard drive i) hard-drive cage j) WLAN card k) display...
... e) display hinge f) WLAN card g) hard-drive cage h) hard drive i) optical drive j) memory k) keyboard l) keyboard trim m) base cover n) battery 31 b) Lift the I /O Board (Left) 1. Place the I /O board to the computer. 3. Installing the I /O board and remove from the computer. Tighten the screw to secure the I /O board on the computer. d) keyboard trim e) keyboard f) memory g) optical drive h) hard drive i) hard-drive cage j) WLAN card k) display...

Dell Owners Manual
Page 32
... cage c) system fan 32 b) Lift the I /O board on the computer. Place the I /O board and remove from the computer. Remove: a) SD card b) battery c) base cover d) keyboard trim e) keyboard f) memory g) optical drive h) hard drive i) hard-drive cage j) WLAN card k) display hinge l) palmrest m) system fan n) ExpressCard cage o) system board 3. Removing the I /O board on the computer. 2. o) SD card 4. Perform the following steps...
... cage c) system fan 32 b) Lift the I /O board on the computer. Place the I /O board and remove from the computer. Remove: a) SD card b) battery c) base cover d) keyboard trim e) keyboard f) memory g) optical drive h) hard drive i) hard-drive cage j) WLAN card k) display hinge l) palmrest m) system fan n) ExpressCard cage o) system board 3. Removing the I /O board on the computer. 2. o) SD card 4. Perform the following steps...

Dell Owners Manual
Page 33
... b) battery c) base cover d) keyboard trim e) keyboard f) memory g) hard drive h) hard-drive cage i) optical drive j) WLAN card k) display hinge l) palmrest m) ExpressCard cage n) system fan o) system board 3. Removing the Power Connector 1. Perform the following steps: a) Remove the power-connector cable from the computer. 33 d) palmrest e) display hinge f) WLAN card g) hard drive h) hard-drive cage i) optical drive j) memory k) keyboard l) keyboard trim m) base cover n) battery o) SD...
... b) battery c) base cover d) keyboard trim e) keyboard f) memory g) hard drive h) hard-drive cage i) optical drive j) WLAN card k) display hinge l) palmrest m) ExpressCard cage n) system fan o) system board 3. Removing the Power Connector 1. Perform the following steps: a) Remove the power-connector cable from the computer. 33 d) palmrest e) display hinge f) WLAN card g) hard drive h) hard-drive cage i) optical drive j) memory k) keyboard l) keyboard trim m) base cover n) battery o) SD...

Dell Owners Manual
Page 34
... fan c) ExpressCard cage d) palmrest e) display hinge f) WLAN card g) hard-drive cage h) hard drive i) optical drive j) memory k) keyboard l) keyboard trim m) base cover n) battery o) SD card 4. Remove: a) SD memory card b) battery c) base cover d) keyboard trim e) keyboard f) memory g) optical drive h) hard drive i) hard-drive cage j) WLAN card k) display hinge l) palmrest m) system fan n) ExpressCard cage o) system board 3. b) Remove the screws that secure the speakers from the...
... fan c) ExpressCard cage d) palmrest e) display hinge f) WLAN card g) hard-drive cage h) hard drive i) optical drive j) memory k) keyboard l) keyboard trim m) base cover n) battery o) SD card 4. Remove: a) SD memory card b) battery c) base cover d) keyboard trim e) keyboard f) memory g) optical drive h) hard drive i) hard-drive cage j) WLAN card k) display hinge l) palmrest m) system fan n) ExpressCard cage o) system board 3. b) Remove the screws that secure the speakers from the...

Dell Owners Manual
Page 35
Installing the Speakers 1. Install: a) system board b) ExpressCard cage c) system fan d) palmrest e) display hinge f) WLAN card g) hard-drive cage h) hard drive i) optical drive j) memory k) keyboard l) keyboard trim m) base cover n) battery o) SD card 5. Removing the Status-Light Board 1. Secure the speaker cable to the computer. 4. Tighten the screws to secure the speakers to the routing channels. 3. Follow the procedures...
Installing the Speakers 1. Install: a) system board b) ExpressCard cage c) system fan d) palmrest e) display hinge f) WLAN card g) hard-drive cage h) hard drive i) optical drive j) memory k) keyboard l) keyboard trim m) base cover n) battery o) SD card 5. Removing the Status-Light Board 1. Secure the speaker cable to the computer. 4. Tighten the screws to secure the speakers to the routing channels. 3. Follow the procedures...

Dell Owners Manual
Page 36
... the status-light board and lift to secure the status-light board on the computer. 4. Install: 36 c) Remove the screw that secures the LED cover. Place the status-light board on its place on the status-light board. 5. h) hard drive i) hard-drive cage j) WLAN card k) display hinge l) palmrest m) system fan n) ExpressCard cage o) system board p) speakers...
... the status-light board and lift to secure the status-light board on the computer. 4. Install: 36 c) Remove the screw that secures the LED cover. Place the status-light board on its place on the status-light board. 5. h) hard drive i) hard-drive cage j) WLAN card k) display hinge l) palmrest m) system fan n) ExpressCard cage o) system board p) speakers...

Dell Owners Manual
Page 39
...screen also displays the option to a specific device (for example: optical drive or hard drive). NOTE: For most of the system setup options, changes that you...table displays the system setup navigation keys. During the Power-on Self Test (POST), when the Dell logo appears, you can: • Access System Setup by pressing key • Bring up the...boot menu displays the devices that you make are : • Removable Drive (if available) • STXXXX Drive NOTE: XXX denotes the SATA drive number. • Optical Drive • Diagnostics NOTE: Choosing Diagnostics, will display the ePSA ...
...screen also displays the option to a specific device (for example: optical drive or hard drive). NOTE: For most of the system setup options, changes that you...table displays the system setup navigation keys. During the Power-on Self Test (POST), when the Dell logo appears, you can: • Access System Setup by pressing key • Bring up the...boot menu displays the devices that you make are : • Removable Drive (if available) • STXXXX Drive NOTE: XXX denotes the SATA drive number. • Optical Drive • Diagnostics NOTE: Choosing Diagnostics, will display the ePSA ...

Statement of Volatility
Page 2
... S0 S1 S3 S4 S5 Dell Latitude™ E5440 X Dell Latitude™ E5540 X X X X X X X The OS does not save any component on the system board, i.e. No data will be valid. In this state the dynamic RAM is no power. There is no system context is removed from the non-volatile storage can...(Action necessary to prevent loss of data) DP hub FW mSATA TPM Controller Hard drive systems use DDR3L (UV4-UV7) for DP No hub FW (1Mbit). Yes ROM/RW/ replaceable DVD/ DVD+RW/ Diskette Drives Low level format/erase CAUTION: All other components on which clears all system...
... S0 S1 S3 S4 S5 Dell Latitude™ E5440 X Dell Latitude™ E5540 X X X X X X X The OS does not save any component on the system board, i.e. No data will be valid. In this state the dynamic RAM is no power. There is no system context is removed from the non-volatile storage can...(Action necessary to prevent loss of data) DP hub FW mSATA TPM Controller Hard drive systems use DDR3L (UV4-UV7) for DP No hub FW (1Mbit). Yes ROM/RW/ replaceable DVD/ DVD+RW/ Diskette Drives Low level format/erase CAUTION: All other components on which clears all system...


