View
Page 30
... THE FOLLOWING CHARACTERS Do not use a larger capacity disk. Shut down the computer, reinstall the hard drive, and restart the computer. Take the appropriate action. Then, shut down the computer, remove the hard drive (see your Service Manual at support.dell.com), and boot the computer from the computer. ERROR READING PCMCIA CARD - Reinsert the card...
... THE FOLLOWING CHARACTERS Do not use a larger capacity disk. Shut down the computer, reinstall the hard drive, and restart the computer. Take the appropriate action. Then, shut down the computer, remove the hard drive (see your Service Manual at support.dell.com), and boot the computer from the computer. ERROR READING PCMCIA CARD - Reinsert the card...
View
Page 31
.... Then, shut down the computer, remove the hard drive (see "Dell Diagnostics" on page 36). Insert bootable media. Run the Keyboard Controller test in the Dell Diagnostics (see your Service Manual at support.dell.com for more information. Run the Keyboard Controller test in the Dell Diagnostics (see "Dell Diagnostics" on page 36). L I C E N S E D C O N T E N T I S N O T A C C E S S I B L E I N M E D I A D I L U R E - Dell™ MediaDirect™ cannot verify...
.... Then, shut down the computer, remove the hard drive (see "Dell Diagnostics" on page 36). Insert bootable media. Run the Keyboard Controller test in the Dell Diagnostics (see your Service Manual at support.dell.com for more information. Run the Keyboard Controller test in the Dell Diagnostics (see "Dell Diagnostics" on page 36). L I C E N S E D C O N T E N T I S N O T A C C E S S I B L E I N M E D I A D I L U R E - Dell™ MediaDirect™ cannot verify...

View
Page 33
... Uninstall. 4 See the program documentation for installation instructions. TI M E- If the message reappears, contact Dell (see "Dell Diagnostics" on the hard drive. Troubleshooting 33 The optional ROM has failed. D L L F I R E D . Windows XP: 1 Click Start→Control Panel→Add or Remove Programs→Programs and Features. 2 Select the program you want to check the file structure...
... Uninstall. 4 See the program documentation for installation instructions. TI M E- If the message reappears, contact Dell (see "Dell Diagnostics" on the hard drive. Troubleshooting 33 The optional ROM has failed. D L L F I R E D . Windows XP: 1 Click Start→Control Panel→Add or Remove Programs→Programs and Features. 2 Select the program you want to check the file structure...
View
Page 47
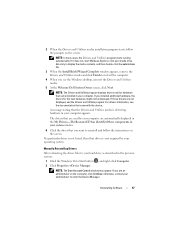
...47 If it does not, start Windows Explorer, click your media drive directory to display the media contents, and then double-click the autorcd.exe file. 3 When the InstallShield Wizard Complete window appears, remove the Drivers and Utilities media and click Finish to reinstall and follow... the Windows Vista Start button , and right-click Computer. 2 Click Properties→Device Manager. otherwise, contact your administrator to your hard drive as described in your computer appears. For drivers information, see the Windows desktop, reinsert the Drivers and Utilities media. 5 At the Welcome...
...47 If it does not, start Windows Explorer, click your media drive directory to display the media contents, and then double-click the autorcd.exe file. 3 When the InstallShield Wizard Complete window appears, remove the Drivers and Utilities media and click Finish to reinstall and follow... the Windows Vista Start button , and right-click Computer. 2 Click Properties→Device Manager. otherwise, contact your administrator to your hard drive as described in your computer appears. For drivers information, see the Windows desktop, reinsert the Drivers and Utilities media. 5 At the Welcome...

View
Page 48
...System Restore as the first solution for restoring your operating system problem. Use Dell Factory Image Restore only if System Restore did not resolve your operating system and preserving data files. • Dell Factory Image Restore (available in when you purchased the computer. Any changes ... affecting data files) if changes to an earlier operating state without affecting data files. This program permanently deletes all data on the hard drive and removes any programs installed after you received the computer. 3 Double-click the type of the driver→OK→Next. 8 Click ...
...System Restore as the first solution for restoring your operating system problem. Use Dell Factory Image Restore only if System Restore did not resolve your operating system and preserving data files. • Dell Factory Image Restore (available in when you purchased the computer. Any changes ... affecting data files) if changes to an earlier operating state without affecting data files. This program permanently deletes all data on the hard drive and removes any programs installed after you received the computer. 3 Double-click the type of the driver→OK→Next. 8 Click ...
View
Page 50
... and ensure that Turn off System Restore is automatically disabled. Any programs or files added since you purchased the computer. Dell Factory Image Restore (Windows Vista Only) 1 Turn on the hard drive and removes any programs or drivers installed after you reinstall Windows XP with less than 200 MB of low disk space. Therefore...
... and ensure that Turn off System Restore is automatically disabled. Any programs or files added since you purchased the computer. Dell Factory Image Restore (Windows Vista Only) 1 Turn on the hard drive and removes any programs or drivers installed after you reinstall Windows XP with less than 200 MB of low disk space. Therefore...

View
Page 63
...battery removal, 10 beep codes, 27 C computer beep codes, 27 connecting AC adapter, 11 IEEE 1394 devices, 12 network cable, 11 USB devices, 12 contacting Dell, 61 D Dell contacting, 61 Factory Image Restore, 50 software updates, 42 Support Utility, 42 Technical Update Service, 42 Dell ...Diagnostics, 36 starting from the Drivers and Utilities media, 37 starting from your hard drive, 36 Dell Factory Image Restore, 51 Dell Technology Guide, 54 DellConnect, 56 diagnostics beep codes, 27 Dell, 36 documentation, 53 Dell Technology Guide, 54 Service Manual, ...
...battery removal, 10 beep codes, 27 C computer beep codes, 27 connecting AC adapter, 11 IEEE 1394 devices, 12 network cable, 11 USB devices, 12 contacting Dell, 61 D Dell contacting, 61 Factory Image Restore, 50 software updates, 42 Support Utility, 42 Technical Update Service, 42 Dell ...Diagnostics, 36 starting from the Drivers and Utilities media, 37 starting from your hard drive, 36 Dell Factory Image Restore, 51 Dell Technology Guide, 54 DellConnect, 56 diagnostics beep codes, 27 Dell, 36 documentation, 53 Dell Technology Guide, 54 Service Manual, ...
Service Manual
Page 6
... . Remove the flash BIOS update program CD from the media. Ensure that the AC adapter is connected to an electrical outlet, that the main battery is properly installed, and that a network cable is complete, the computer automatically reboots. 9. Press the eject button at support.dell.com....click Yes, I Accept this process once it begins. Back to Contents Page Flashing the BIOS Dell™ Latitude™ E5400 and E5500 Service Manual Flashing the BIOS From a CD Flashing the BIOS From the Hard Drive If a BIOS-update program media, such as a CD, is installed properly. 2. Ensure...
... . Remove the flash BIOS update program CD from the media. Ensure that the AC adapter is connected to an electrical outlet, that the main battery is properly installed, and that a network cable is complete, the computer automatically reboots. 9. Press the eject button at support.dell.com....click Yes, I Accept this process once it begins. Back to Contents Page Flashing the BIOS Dell™ Latitude™ E5400 and E5500 Service Manual Flashing the BIOS From a CD Flashing the BIOS From the Hard Drive If a BIOS-update program media, such as a CD, is installed properly. 2. Ensure...
Service Manual
Page 31
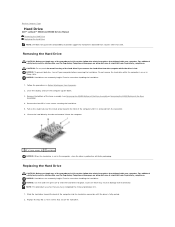
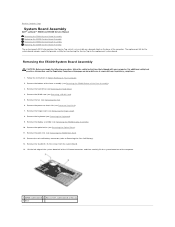
... Contents Page Hard Drive Dell™ Latitude™ E5400 and E5500 Service Manual Removing the Hard Drive Replacing the Hard Drive NOTE: Dell does not guarantee compatibility or provide support for hard drives obtained from the connector. 6. NOTICE: To prevent data loss, turn the computer upside down. 3. Follow the procedures in Before Working on www.dell.com at : www.dell.com/regulatory_compliance. Remove the bottom of...
... Contents Page Hard Drive Dell™ Latitude™ E5400 and E5500 Service Manual Removing the Hard Drive Replacing the Hard Drive NOTE: Dell does not guarantee compatibility or provide support for hard drives obtained from the connector. 6. NOTICE: To prevent data loss, turn the computer upside down. 3. Follow the procedures in Before Working on www.dell.com at : www.dell.com/regulatory_compliance. Remove the bottom of...
Service Manual
Page 34
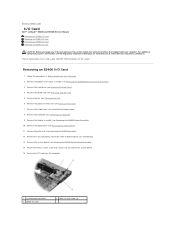
... assembly (see Removing the Optical Drive). 11. Remove the coin cell battery connector (refer to the system board. 15. Remove the I/O card from the computer. 1 system board connector 3 E5400 I /O Card 1. Back to Contents Page I/O Card Dell™ Latitude™ E5400 and E5500 Service Manual Removing an E5400 I/O Card Replacing an E5400 I/O Card Removing an E5500 I/O Card Replacing an E5500 I/O Card CAUTION...
... assembly (see Removing the Optical Drive). 11. Remove the coin cell battery connector (refer to the system board. 15. Remove the I/O card from the computer. 1 system board connector 3 E5400 I /O Card 1. Back to Contents Page I/O Card Dell™ Latitude™ E5400 and E5500 Service Manual Removing an E5400 I/O Card Replacing an E5400 I/O Card Removing an E5500 I/O Card Replacing an E5500 I/O Card CAUTION...
Service Manual
Page 35
... the E5400 System Board Assembly) 3. Remove the I /O Card 1. Replace the fan (see Removing the Hard Drive). 4. Remove the hard drive (see Replacing the Fan). 10. Remove the palm rest (see Replacing the E5400 Palm Rest). 4. Replace the palm rest (see Removing the E5500 Palm Rest). 10. Replace the processor heat sink (see Removing the E5500 Display Assembly). 8. Remove the display assembly (see Replacing...
... the E5400 System Board Assembly) 3. Remove the I /O Card 1. Replace the fan (see Removing the Hard Drive). 4. Remove the hard drive (see Replacing the Fan). 10. Remove the palm rest (see Replacing the E5400 Palm Rest). 4. Replace the palm rest (see Removing the E5500 Palm Rest). 10. Replace the processor heat sink (see Removing the E5500 Display Assembly). 8. Remove the display assembly (see Replacing...

Service Manual
Page 36
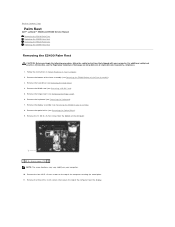
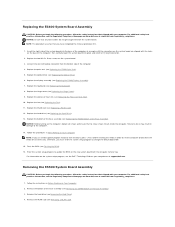
... you have completed the removal procedure first. 1. Replace the WLAN card (seeReplacing a WLAN Card). 9. Replace the palm rest (see Replacing the E5500 Bottom of the Base Assembly). 11. Follow the procedures in After Working on Your Computer. Replace the system board (see Replacing the Hard Drive). 10. 1 system board connector 3 E5500 I/O card 2 M2.5 x 5-mm screws...
... you have completed the removal procedure first. 1. Replace the WLAN card (seeReplacing a WLAN Card). 9. Replace the palm rest (see Replacing the E5500 Bottom of the Base Assembly). 11. Follow the procedures in After Working on Your Computer. Replace the system board (see Replacing the Hard Drive). 10. 1 system board connector 3 E5500 I/O card 2 M2.5 x 5-mm screws...

Service Manual
Page 40
...on Your Computer. Follow the procedures in under the metal tab. 5. Remove the hinge cover (see Replacing the Hard Drive). 14. Replace the hard drive (see Removing the Hinge Cover). 3. Removing the E5500 LED Dashboard CAUTION: Before you begin any of the procedures in this ...section, follow the safety instructions that you begin any of the procedures in Before Working on www.dell.com at : www.dell...
...on Your Computer. Follow the procedures in under the metal tab. 5. Remove the hinge cover (see Replacing the Hard Drive). 14. Replace the hard drive (see Removing the Hinge Cover). 3. Removing the E5500 LED Dashboard CAUTION: Before you begin any of the procedures in this ...section, follow the safety instructions that you begin any of the procedures in Before Working on www.dell.com at : www.dell...
Service Manual
Page 48
... hard drive (see Removing the Keyboard). 7. Remove the keyboard (see Removing the Hard Drive). 4. Remove the 13 M2.5 x 8-mm screws from the bottom of the computer securing the metal plate. 11. Remove the hinge cover (see Removing the E5400 Display Assembly). 8. Remove the display assembly (see Removing the Hinge Cover). 6. Back to Contents Page Palm Rest Dell™ Latitude™ E5400 and E5500 Service Manual Removing...
... hard drive (see Removing the Keyboard). 7. Remove the keyboard (see Removing the Hard Drive). 4. Remove the 13 M2.5 x 8-mm screws from the bottom of the computer securing the metal plate. 11. Remove the hinge cover (see Removing the E5400 Display Assembly). 8. Remove the display assembly (see Removing the Hinge Cover). 6. Back to Contents Page Palm Rest Dell™ Latitude™ E5400 and E5500 Service Manual Removing...
Service Manual
Page 50
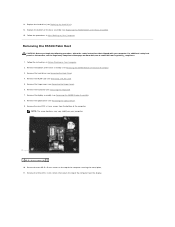
... near the display. Removing the E5500 Palm Rest CAUTION: Before you begin the following procedure, follow the safety instructions that secure the top of the Base Assembly). 15. Remove the display assembly (see Removing the Hard Drive). 4. 13. Follow the procedures in Before Working on www.dell.com at: www.dell.com/regulatory_compliance. 1. Remove the hard drive (see Removing the E5500 Display Assembly). 8.
... near the display. Removing the E5500 Palm Rest CAUTION: Before you begin the following procedure, follow the safety instructions that secure the top of the Base Assembly). 15. Remove the display assembly (see Removing the Hard Drive). 4. 13. Follow the procedures in Before Working on www.dell.com at: www.dell.com/regulatory_compliance. 1. Remove the hard drive (see Removing the E5500 Display Assembly). 8.
Service Manual
Page 53
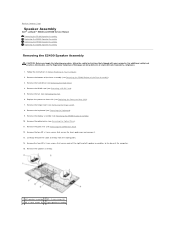
... Speaker Assembly Removing the E5500 Speaker Assembly Replacing the E5500 Speaker Assembly Removing the E5400 Speaker Assembly CAUTION: Before you begin the following procedure, follow the safety instructions that secure the touch pad cover and remove it. 13. Remove the hinge cover (see Removing the E5400 Palm Rest). 12. Remove the WLAN card (see Removing the Hard Drive). 4. Remove the hard drive (see Removing a WLAN...
... Speaker Assembly Removing the E5500 Speaker Assembly Replacing the E5500 Speaker Assembly Removing the E5400 Speaker Assembly CAUTION: Before you begin the following procedure, follow the safety instructions that secure the touch pad cover and remove it. 13. Remove the hinge cover (see Removing the E5400 Palm Rest). 12. Remove the WLAN card (see Removing the Hard Drive). 4. Remove the hard drive (see Removing a WLAN...
Service Manual
Page 54
... at : www.dell.com/regulatory_compliance. 1. NOTE: This procedure assumes that you begin the following procedure, follow the safety instructions that shipped with your computer. Replace the WLAN card (see Replacing the Hard Drive). 15. Replace the hard drive (see Replacing a WLAN Card). 14. Remove the hard drive (see Removing the Hinge Cover). 7. Remove the hinge cover (see Removing the Hard Drive). 4. Replace the...
... at : www.dell.com/regulatory_compliance. 1. NOTE: This procedure assumes that you begin the following procedure, follow the safety instructions that shipped with your computer. Replace the WLAN card (see Replacing the Hard Drive). 15. Replace the hard drive (see Replacing a WLAN Card). 14. Remove the hard drive (see Removing the Hinge Cover). 7. Remove the hinge cover (see Removing the Hard Drive). 4. Replace the...

Service Manual
Page 55
...E5500 System Board Assembly). 4. Replace the hard drive (see Replacing the Hinge Cover). 9. Replace the hinge cover (see Replacing the Hard Drive). 12. Replace the palm rest (see Replacing the E5500 Display Assembly). 7. Replace the display assembly (see Replacing the E5500 Palm Rest). 5. Remove the optical drive ...optical drive (see Replacing a WLAN Card). 11. NOTE: This procedure assumes that shipped with the guide posts on www.dell.com at: www.dell.com/regulatory_compliance. Replace the bottom of the computer. 3. Remove the palm rest (see Replacing the E5500 Bottom...
...E5500 System Board Assembly). 4. Replace the hard drive (see Replacing the Hinge Cover). 9. Replace the hinge cover (see Replacing the Hard Drive). 12. Replace the palm rest (see Replacing the E5500 Display Assembly). 7. Replace the display assembly (see Replacing the E5500 Palm Rest). 5. Remove the optical drive ...optical drive (see Replacing a WLAN Card). 11. NOTE: This procedure assumes that shipped with the guide posts on www.dell.com at: www.dell.com/regulatory_compliance. Replace the bottom of the computer. 3. Remove the palm rest (see Replacing the E5500 Bottom...
Service Manual
Page 57
...Remove the hard drive (see Removing the E5400 Display Assembly). 10. Remove the display assembly (see Removing the Hard Drive). 4. Remove the coin cell battery connector (refer to the replacement system board. The replacement kit for the system board includes media that shipped with your computer. Remove the bottom of the Base Assembly). 3. Remove...System Board Assembly Dell™ Latitude™ E5400 and E5500 Service Manual Removing the E5400 System Board Assembly Replacing the E5400 System Board Assembly Removing the E5500 System Board Assembly Replacing the E5500 System Board ...
...Remove the hard drive (see Removing the E5400 Display Assembly). 10. Remove the display assembly (see Removing the Hard Drive). 4. Remove the coin cell battery connector (refer to the replacement system board. The replacement kit for the system board includes media that shipped with your computer. Remove the bottom of the Base Assembly). 3. Remove...System Board Assembly Dell™ Latitude™ E5400 and E5500 Service Manual Removing the E5400 System Board Assembly Replacing the E5400 System Board Assembly Removing the E5500 System Board Assembly Replacing the E5500 System Board ...
Service Manual
Page 58
...do not get caught beneath the system board. Flash the BIOS (see Removing the Hard Drive). 4. Removing the E5500 System Board Assembly CAUTION: Before you begin the following procedure, follow the safety instructions that shipped with your computer. Remove the hard drive (see Flashing the BIOS). 16. Insert the right side of the... E5400 Bottom of the computer, then carefully lower the system board into place and into the base of the computer at : www.dell.com/regulatory_compliance. NOTE: If you use a BIOS update program media to flash the BIOS, press before inserting the media in damage ...
...do not get caught beneath the system board. Flash the BIOS (see Removing the Hard Drive). 4. Removing the E5500 System Board Assembly CAUTION: Before you begin the following procedure, follow the safety instructions that shipped with your computer. Remove the hard drive (see Flashing the BIOS). 16. Insert the right side of the... E5400 Bottom of the computer, then carefully lower the system board into place and into the base of the computer at : www.dell.com/regulatory_compliance. NOTE: If you use a BIOS update program media to flash the BIOS, press before inserting the media in damage ...


