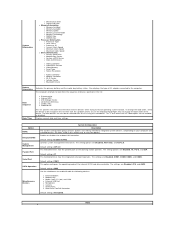
Setup and Features Information Tech Sheet
Page 2
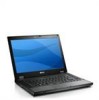
... the fan when the computer gets hot. Do not store your Dell computer in the air vents. Restricting the airflow can damage the computer or cause a fire. Fan noise is running. Back View 1 2 3 11 10 7 89 6 5 4 1 docking alignment mark 2 power and battery status indicators 3 cooling vent 4 security cable slot 5 AC adapter connector... to accumulate in a low-airflow environment, such as a closed briefcase, while it is normal and does not indicate a problem with the fan or the computer. Latitude E5410 -
... the fan when the computer gets hot. Do not store your Dell computer in the air vents. Restricting the airflow can damage the computer or cause a fire. Fan noise is running. Back View 1 2 3 11 10 7 89 6 5 4 1 docking alignment mark 2 power and battery status indicators 3 cooling vent 4 security cable slot 5 AC adapter connector... to accumulate in a low-airflow environment, such as a closed briefcase, while it is normal and does not indicate a problem with the fan or the computer. Latitude E5410 -
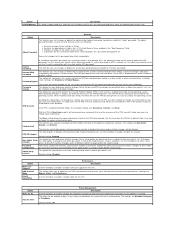
Setup and Features Information Tech Sheet
Page 4
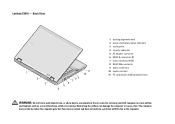
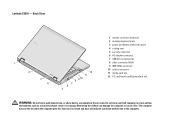
Back View 1 2 3 4 12 11 8 9 10 7 6 5 1 modem connector (optional) 2 docking alignment mark 3 power and battery status indicators 4 cooling vent 5 security cable slot 6 AC adapter connector 7 USB 2.0 connectors (2) 8 video connector (VGA) 9 IEEE 1394a connector 10 audio connectors 11 ...airflow environment, such as a closed briefcase, while it is normal and does not indicate a problem with the fan or the computer. Latitude E5510 - Do not store your Dell computer in the air vents. The computer turns on the fan when the computer gets hot. Restricting the airflow can damage the computer...
Back View 1 2 3 4 12 11 8 9 10 7 6 5 1 modem connector (optional) 2 docking alignment mark 3 power and battery status indicators 4 cooling vent 5 security cable slot 6 AC adapter connector 7 USB 2.0 connectors (2) 8 video connector (VGA) 9 IEEE 1394a connector 10 audio connectors 11 ...airflow environment, such as a closed briefcase, while it is normal and does not indicate a problem with the fan or the computer. Latitude E5510 - Do not store your Dell computer in the air vents. The computer turns on the fan when the computer gets hot. Restricting the airflow can damage the computer...
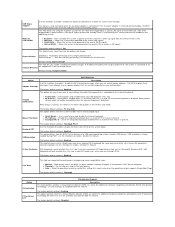
Setup and Features Information Tech Sheet
Page 6
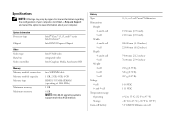
For more than 4 GB memory Battery Type Dimensions Height 4- System Information Processor type Chipset Intel® Core™ i3, i5, and i7 series Intel Celeron™ Intel HM55 Express Chipset Video ... Weight 4-cell 6-cell 9-cell Voltage 4-cell 6- and 6-cell 9-cell Width 4- Specifications NOTE: Offerings may vary by region. and 9-cell Temperature range Operating Storage Coin-cell battery 4-, 6-, or 9-cell "smart" lithium ion 19.80 mm (0.78 inch) 21.10 mm (0.83 inch) 206.00 mm (8.11 inches) 224.00 mm (8.82 inches...
For more than 4 GB memory Battery Type Dimensions Height 4- System Information Processor type Chipset Intel® Core™ i3, i5, and i7 series Intel Celeron™ Intel HM55 Express Chipset Video ... Weight 4-cell 6-cell 9-cell Voltage 4-cell 6- and 6-cell 9-cell Width 4- Specifications NOTE: Offerings may vary by region. and 9-cell Temperature range Operating Storage Coin-cell battery 4-, 6-, or 9-cell "smart" lithium ion 19.80 mm (0.78 inch) 21.10 mm (0.83 inch) 206.00 mm (8.11 inches) 224.00 mm (8.82 inches...
Service Manual
Page 2
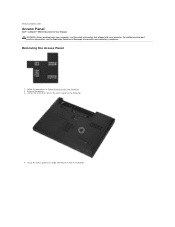
... Your Computer. 2. Loosen the screw that shipped with your computer, read the safety information that secures the access panel to Contents Page Access Panel Dell™ Latitude™ E5410 Discrete Service Manual WARNING: Before working inside your computer. For additional safety best practices information, see the Regulatory Compliance Homepage at an angle and...
... Your Computer. 2. Loosen the screw that shipped with your computer, read the safety information that secures the access panel to Contents Page Access Panel Dell™ Latitude™ E5410 Discrete Service Manual WARNING: Before working inside your computer. For additional safety best practices information, see the Regulatory Compliance Homepage at an angle and...
Service Manual
Page 4
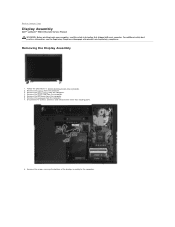
...from the computer. 4. Remove the battery from the computer. 6. Remove the LED cover from the computer. 3. Remove the keyboard from the computer. 5. For additional safety best practices information, see the Regulatory Compliance Homepage at www.dell.com/regulatory_compliance. Removing the Display ...card from the computer. 7. Remove the screws securing the bottom of the display assembly to Contents Page Display Assembly Dell™ Latitude™ E5410 Discrete Service Manual WARNING: Before working inside your computer, read the safety information that shipped with your computer. ...
...from the computer. 4. Remove the battery from the computer. 6. Remove the LED cover from the computer. 3. Remove the keyboard from the computer. 5. For additional safety best practices information, see the Regulatory Compliance Homepage at www.dell.com/regulatory_compliance. Removing the Display ...card from the computer. 7. Remove the screws securing the bottom of the display assembly to Contents Page Display Assembly Dell™ Latitude™ E5410 Discrete Service Manual WARNING: Before working inside your computer, read the safety information that shipped with your computer. ...

Service Manual
Page 9
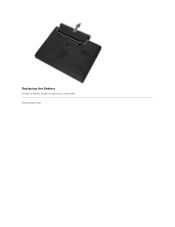
Slide the battery release latch into the unlocked position. 3. Remove the battery from the computer. Follow the procedures in Before Working Inside Your Computer. 2. Removing the Battery 1. For additional safety best practices information, see the Regulatory Compliance Homepage at www.dell.com/regulatory_compliance. Back to Contents Page Battery Dell™ Latitude™ E5410 Discrete Service Manual WARNING: Before working inside your computer, read the safety information that shipped with your computer.
Slide the battery release latch into the unlocked position. 3. Remove the battery from the computer. Follow the procedures in Before Working Inside Your Computer. 2. Removing the Battery 1. For additional safety best practices information, see the Regulatory Compliance Homepage at www.dell.com/regulatory_compliance. Back to Contents Page Battery Dell™ Latitude™ E5410 Discrete Service Manual WARNING: Before working inside your computer, read the safety information that shipped with your computer.
Service Manual
Page 10
Back to Contents Page Replacing the Battery To replace the battery, perform the above steps in reverse order.
Back to Contents Page Replacing the Battery To replace the battery, perform the above steps in reverse order.
Service Manual
Page 11
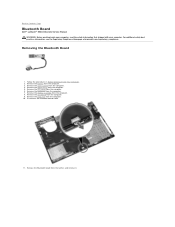
... procedures in Before Working Inside Your Computer. 2. Remove the battery from the computer. 4. Remove the access panel from the ...from the computer. 9. For additional safety best practices information, see the Regulatory Compliance Homepage at www.dell.com/regulatory_compliance. Removing the Bluetooth Board 1. Remove the keyboard from the computer. 6. Remove the LED... board cable. 11. Back to Contents Page Bluetooth Board Dell™ Latitude™ E5410 Discrete Service Manual WARNING: Before working inside your computer, read the safety information that shipped with ...
... procedures in Before Working Inside Your Computer. 2. Remove the battery from the computer. 4. Remove the access panel from the ...from the computer. 9. For additional safety best practices information, see the Regulatory Compliance Homepage at www.dell.com/regulatory_compliance. Removing the Bluetooth Board 1. Remove the keyboard from the computer. 6. Remove the LED... board cable. 11. Back to Contents Page Bluetooth Board Dell™ Latitude™ E5410 Discrete Service Manual WARNING: Before working inside your computer, read the safety information that shipped with ...
Service Manual
Page 14
...; Panel Type ¡ Native Resolution ¡ Audio Controller ¡ Modem Controller ¡ Wi-Fi Device ¡ Cellular Device ¡ Bluetooth Device Battery Information Indicates the primary battery and the media bay battery status. The setting options are Disabled, COM1, COM2, COM3, and COM4. Also displays the type of the internal SATA hard drive...
...; Panel Type ¡ Native Resolution ¡ Audio Controller ¡ Modem Controller ¡ Wi-Fi Device ¡ Cellular Device ¡ Bluetooth Device Battery Information Indicates the primary battery and the media bay battery status. The setting options are Disabled, COM1, COM2, COM3, and COM4. Also displays the type of the internal SATA hard drive...
Service Manual
Page 15
... during POST so it was disabled. Once TPM is set . Password Configuration These fields control the minimum and maximum number of characters allowed for On Battery and On AC) sets the panel brightness when the ambient light sensor is off state (cold boot). Option Description LCD Brightness This option (represented by...
... during POST so it was disabled. Once TPM is set . Password Configuration These fields control the minimum and maximum number of characters allowed for On Battery and On AC) sets the panel brightness when the ambient light sensor is off state (cold boot). Option Description LCD Brightness This option (represented by...
Service Manual
Page 16
... the additional hardware capabilities provided by Intel® Virtualization Technology. The factory default setting is attached. ExpressCharge™ = Dell fast charging technology (not available for USB devices to enable/disable this feature. When Setup is unaffected by a special wireless...Warnings The factory default setting is Disabled. Numlock LED USB Emulation The factory default setting is connected. ExpressCharge Standard = The battery will charge. Default setting: ExpressCharge This field lets you attempt to enable / disable the Num Lock LED when the ...
... the additional hardware capabilities provided by Intel® Virtualization Technology. The factory default setting is attached. ExpressCharge™ = Dell fast charging technology (not available for USB devices to enable/disable this feature. When Setup is unaffected by a special wireless...Warnings The factory default setting is Disabled. Numlock LED USB Emulation The factory default setting is connected. ExpressCharge Standard = The battery will charge. Default setting: ExpressCharge This field lets you attempt to enable / disable the Num Lock LED when the ...
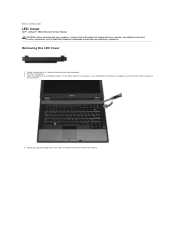
Service Manual
Page 18
...practices information, see the Regulatory Compliance Homepage at an 180 degree angle. Open the display at www.dell.com/regulatory_compliance. Remove the battery. 3. Follow the procedures in Before Working Inside Your Computer. 2. On the right side of the ...LED cover to release it from the latches and remove. Gently pry along the edge of the computer, use a flat-bladed screwdriver or spudger (inserted into the notch) to Contents Page LED Cover Dell™ Latitude™ E5410...
...practices information, see the Regulatory Compliance Homepage at an 180 degree angle. Open the display at www.dell.com/regulatory_compliance. Remove the battery. 3. Follow the procedures in Before Working Inside Your Computer. 2. On the right side of the ...LED cover to release it from the latches and remove. Gently pry along the edge of the computer, use a flat-bladed screwdriver or spudger (inserted into the notch) to Contents Page LED Cover Dell™ Latitude™ E5410...
Service Manual
Page 20
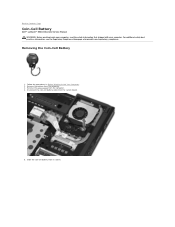
... its socket. For additional safety best practices information, see the Regulatory Compliance Homepage at www.dell.com/regulatory_compliance. Slide the coin-cell battery from the computer. 3. Back to Contents Page Coin-Cell Battery Dell™ Latitude™ E5410 Discrete Service Manual WARNING: Before working inside your computer, read the safety information that shipped with your computer...
... its socket. For additional safety best practices information, see the Regulatory Compliance Homepage at www.dell.com/regulatory_compliance. Slide the coin-cell battery from the computer. 3. Back to Contents Page Coin-Cell Battery Dell™ Latitude™ E5410 Discrete Service Manual WARNING: Before working inside your computer, read the safety information that shipped with your computer...
Service Manual
Page 21
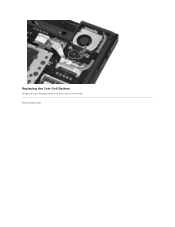
Back to Contents Page Replacing the Coin-Cell Battery To replace the coin-cell battery, perform the above steps in reverse order.
Back to Contents Page Replacing the Coin-Cell Battery To replace the coin-cell battery, perform the above steps in reverse order.
Service Manual
Page 22
... is in the system tray and select Disable Bluetooth Radio. Battery Status Lights If the computer is connected to Contents Page Diagnostics Dell™ Latitude™ E5410 Discrete Service Manual Device Status Lights Battery Status Lights Keyboard Status Lights LED Error Codes Device Status Lights...FLASH LCD panel error 1. OFF-FLASH-OFF 1. Turns on when the Scroll Lock function is attached to indicate battery charge status. An unauthenticated or unsupported non-Dell AC adapter is enabled. Replace the processor. Replace the video card/system board. Reseat the LCD cable. 2. ...
... is in the system tray and select Disable Bluetooth Radio. Battery Status Lights If the computer is connected to Contents Page Diagnostics Dell™ Latitude™ E5410 Discrete Service Manual Device Status Lights Battery Status Lights Keyboard Status Lights LED Error Codes Device Status Lights...FLASH LCD panel error 1. OFF-FLASH-OFF 1. Turns on when the Scroll Lock function is attached to indicate battery charge status. An unauthenticated or unsupported non-Dell AC adapter is enabled. Replace the processor. Replace the video card/system board. Reseat the LCD cable. 2. ...
Service Manual
Page 24
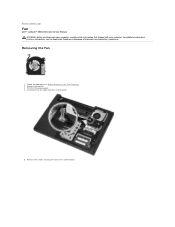
Follow the procedures in Before Working Inside Your Computer. 2. Remove the screws securing the fan to Contents Page Fan Dell™ Latitude™ E5410 Discrete Service Manual WARNING: Before working inside your computer, read the safety information that shipped with your computer. Disconnect the fan cable from the system board. 5. For additional safety best practices information, see the Regulatory Compliance Homepage at www.dell.com/regulatory_compliance. Remove the battery. 3. Remove the access panel. 4. Back to the system board. Removing the Fan 1.
Follow the procedures in Before Working Inside Your Computer. 2. Remove the screws securing the fan to Contents Page Fan Dell™ Latitude™ E5410 Discrete Service Manual WARNING: Before working inside your computer, read the safety information that shipped with your computer. Disconnect the fan cable from the system board. 5. For additional safety best practices information, see the Regulatory Compliance Homepage at www.dell.com/regulatory_compliance. Remove the battery. 3. Remove the access panel. 4. Back to the system board. Removing the Fan 1.
Service Manual
Page 26
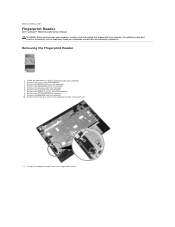
...best practices information, see the Regulatory Compliance Homepage at an angle and remove. Remove the battery from the computer. 10. Lift up the fingerprint reader cover at www.dell.com/regulatory_compliance. Follow the procedures in Before Working Inside Your Computer. 2. Remove the ... access panel from the computer. 6. Remove the LED board from the computer. 8. Back to Contents Page Fingerprint Reader Dell™ Latitude™ E5410 Discrete Service Manual WARNING: Before working inside your computer, read the safety information that secures the fingerprint reader to the palm...
...best practices information, see the Regulatory Compliance Homepage at an angle and remove. Remove the battery from the computer. 10. Lift up the fingerprint reader cover at www.dell.com/regulatory_compliance. Follow the procedures in Before Working Inside Your Computer. 2. Remove the ... access panel from the computer. 6. Remove the LED board from the computer. 8. Back to Contents Page Fingerprint Reader Dell™ Latitude™ E5410 Discrete Service Manual WARNING: Before working inside your computer, read the safety information that secures the fingerprint reader to the palm...
Service Manual
Page 29
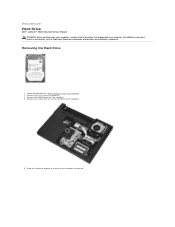
...battery from the computer. 4. Slide the hard drive towards the center of the computer and remove. Remove the access panel from the computer. 3. Remove the screws that shipped with your computer, read the safety information that secure the hard drive to Contents Page Hard Drive Dell™ Latitude™ E5410... Discrete Service Manual WARNING: Before working inside your computer. For additional safety best practices information, see the Regulatory Compliance Homepage at www.dell.com/regulatory_compliance.
...battery from the computer. 4. Slide the hard drive towards the center of the computer and remove. Remove the access panel from the computer. 3. Remove the screws that shipped with your computer, read the safety information that secure the hard drive to Contents Page Hard Drive Dell™ Latitude™ E5410... Discrete Service Manual WARNING: Before working inside your computer. For additional safety best practices information, see the Regulatory Compliance Homepage at www.dell.com/regulatory_compliance.
Service Manual
Page 32
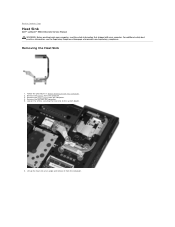
... in Before Working Inside Your Computer. 2. Remove the fan from the computer. 4. Lift up the heat sink at www.dell.com/regulatory_compliance. Remove the access panel from the computer. 5. For additional safety best practices information, see the Regulatory Compliance Homepage...and remove it from the computer. 3. Remove the battery from the computer. Back to the system board. 6. Removing the Heat Sink 1. Loosen the screws securing the heat sink to Contents Page Heat Sink Dell™ Latitude™ E5410 Discrete Service Manual WARNING: Before working inside your computer...
... in Before Working Inside Your Computer. 2. Remove the fan from the computer. 4. Lift up the heat sink at www.dell.com/regulatory_compliance. Remove the access panel from the computer. 5. For additional safety best practices information, see the Regulatory Compliance Homepage...and remove it from the computer. 3. Remove the battery from the computer. Back to the system board. 6. Removing the Heat Sink 1. Loosen the screws securing the heat sink to Contents Page Heat Sink Dell™ Latitude™ E5410 Discrete Service Manual WARNING: Before working inside your computer...
Service Manual
Page 34
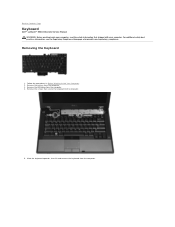
Removing the Keyboard 1. Remove the screws that secure the keyboard to Contents Page Keyboard Dell™ Latitude™ E5410 Discrete Service Manual WARNING: Before working inside your computer, read the safety information that shipped with your computer. ...Remove the LED cover from the computer. 3. For additional safety best practices information, see the Regulatory Compliance Homepage at www.dell.com/regulatory_compliance. Back to the computer. 5. Remove the battery from the computer. 4. Slide the keyboard upwards, then lift and remove the keyboard from the computer.
Removing the Keyboard 1. Remove the screws that secure the keyboard to Contents Page Keyboard Dell™ Latitude™ E5410 Discrete Service Manual WARNING: Before working inside your computer, read the safety information that shipped with your computer. ...Remove the LED cover from the computer. 3. For additional safety best practices information, see the Regulatory Compliance Homepage at www.dell.com/regulatory_compliance. Back to the computer. 5. Remove the battery from the computer. 4. Slide the keyboard upwards, then lift and remove the keyboard from the computer.


