

Quick Reference Guide
Page 20
Bottom View 1 2 3 7 4 6 5 1 memory module/modem/WLAN 2 Mini-Card/coin-cell battery cover 3 battery charge gauge/health 4 gauge 5 docking-device connector 6 7 hard drive battery-bay latch release battery air vents 20 Quick Reference Guide
Bottom View 1 2 3 7 4 6 5 1 memory module/modem/WLAN 2 Mini-Card/coin-cell battery cover 3 battery charge gauge/health 4 gauge 5 docking-device connector 6 7 hard drive battery-bay latch release battery air vents 20 Quick Reference Guide
Quick Reference Guide
Page 27
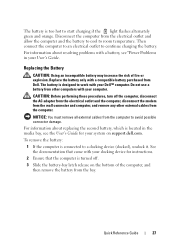
... (docked), undock it. Quick Reference Guide 27 CAUTION: Before performing these procedures, turn off . 3 Slide the battery-bay latch release on support.dell.com. NOTICE: You must remove all external cables from Dell. Do not use a battery from other external cables from the computer. Disconnect the ...modem from the wall connector and computer, and remove any other computers with a battery, see the User's Guide for your docking device for instructions. 2 Ensure that came with your Dell™ computer. For information about resolving problems with your User's Guide.
... (docked), undock it. Quick Reference Guide 27 CAUTION: Before performing these procedures, turn off . 3 Slide the battery-bay latch release on support.dell.com. NOTICE: You must remove all external cables from Dell. Do not use a battery from other external cables from the computer. Disconnect the ...modem from the wall connector and computer, and remove any other computers with a battery, see the User's Guide for your docking device for instructions. 2 Ensure that came with your Dell™ computer. For information about resolving problems with your User's Guide.
Quick Reference Guide
Page 31
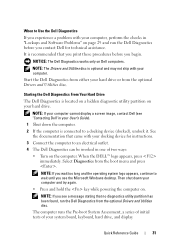
... before you begin. Then shut down the computer. 2 If the computer is recommended that came with your docking device for technical assistance. It is connected to a docking device (docked), undock it. When the DELL™ logo appears, press immediately. Quick Reference Guide 31 See the documentation that you print these procedures before you contact...
... before you begin. Then shut down the computer. 2 If the computer is recommended that came with your docking device for technical assistance. It is connected to a docking device (docked), undock it. When the DELL™ logo appears, press immediately. Quick Reference Guide 31 See the documentation that you print these procedures before you contact...

User's Guide
Page 31
About Your Computer 31 Covers the compartment that contains one memory module, the modem, the WLAN Mini-Card, and the coin-cell battery. Bottom View 1 2 3 7 4 6 5 1 memory 2 module/modem/WLAN Mini-Card/coin-cell battery cover 3 battery charge 4 gauge/health gauge 5 docking-device connector 6 7 hard drive battery-bay latch release battery air vents MEMORY MODULE/MODEM/WLAN MINI-CARD/COIN-CELL BATTERY COVER -
About Your Computer 31 Covers the compartment that contains one memory module, the modem, the WLAN Mini-Card, and the coin-cell battery. Bottom View 1 2 3 7 4 6 5 1 memory 2 module/modem/WLAN Mini-Card/coin-cell battery cover 3 battery charge 4 gauge/health gauge 5 docking-device connector 6 7 hard drive battery-bay latch release battery air vents MEMORY MODULE/MODEM/WLAN MINI-CARD/COIN-CELL BATTERY COVER -

User's Guide
Page 32
...from going into , or allow dust to overheat. Stores software and data. 32 About Your Computer Release the battery. See the Dell documentation that allows you greatly increase the chances of causing your battery to wear down quickly or causing your computer without connecting the ... damage the computer or cause a fire. Restricting the airflow can use the computer without going into standby mode when it is installed, you attach your docking device for more information. Provides information on the battery charge (see "Using a Battery" on page 39). B A T T E RY - Do not ...
...from going into , or allow dust to overheat. Stores software and data. 32 About Your Computer Release the battery. See the Dell documentation that allows you greatly increase the chances of causing your battery to wear down quickly or causing your computer without connecting the ... damage the computer or cause a fire. Restricting the airflow can use the computer without going into standby mode when it is installed, you attach your docking device for more information. Provides information on the battery charge (see "Using a Battery" on page 39). B A T T E RY - Do not ...
User's Guide
Page 46
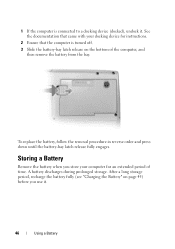
... removal procedure in reverse order and press down until the battery-bay latch release fully engages. See the documentation that the computer is connected to a docking device (docked), undock it . 46 Using a Battery After a long storage period, recharge the battery fully (see "Charging the Battery" on the bottom of time. Storing a ...computer is turned off. 3 Slide the battery-bay latch release on page 45) before you store your computer for instructions. 2 Ensure that came with your docking device for an extended period of the computer, and then remove the battery from the bay.
... removal procedure in reverse order and press down until the battery-bay latch release fully engages. See the documentation that the computer is connected to a docking device (docked), undock it . 46 Using a Battery After a long storage period, recharge the battery fully (see "Charging the Battery" on the bottom of time. Storing a ...computer is turned off. 3 Slide the battery-bay latch release on page 45) before you store your computer for instructions. 2 Ensure that came with your docking device for an extended period of the computer, and then remove the battery from the bay.

User's Guide
Page 53
6 Using the Display Adjusting Brightness When a Dell™ computer is connected to an external monitor and you need to. or down -arrow key to decrease brightness on the integrated display only (not ... integrated display only (not on an external monitor). • Press and the down -arrow key on an external monitor). Press to your portable computer or docking device. If your computer is running on battery power, you change the resolution to one not supported by pressing and the up -arrow key to...
6 Using the Display Adjusting Brightness When a Dell™ computer is connected to an external monitor and you need to. or down -arrow key to decrease brightness on the integrated display only (not ... integrated display only (not on an external monitor). • Press and the down -arrow key on an external monitor). Press to your portable computer or docking device. If your computer is running on battery power, you change the resolution to one not supported by pressing and the up -arrow key to...
User's Guide
Page 56
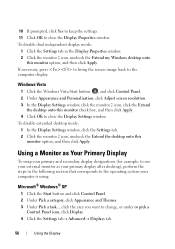
... a Monitor as Your Primary Display To swap your primary and secondary display designations (for example, to use your external monitor as your primary display after docking), perform the steps in the Display Properties window. 2 Click the monitor 2 icon, uncheck the Extend my Windows desktop onto this monitor option, and then click...
... a Monitor as Your Primary Display To swap your primary and secondary display designations (for example, to use your external monitor as your primary display after docking), perform the steps in the Display Properties window. 2 Click the monitor 2 icon, uncheck the Extend my Windows desktop onto this monitor option, and then click...

User's Guide
Page 104
...are detected during the Pre-boot System Assessment, write down the error code(s) and contact Dell (see the Microsoft® Windows® desktop. to a docking device (docked), undock it. Starting the Dell Diagnostics From the Optional Drivers and Utilities Media 1 Insert the Drivers and Utilities media. 2...the diagnostics utility partition on the computer. See the documentation that came with your docking device for instructions. 3 Connect the computer to wait until you receive the message Booting Dell Diagnostic Utility Partition. NOTE: If you wait too long and the operating system ...
...are detected during the Pre-boot System Assessment, write down the error code(s) and contact Dell (see the Microsoft® Windows® desktop. to a docking device (docked), undock it. Starting the Dell Diagnostics From the Optional Drivers and Utilities Media 1 Insert the Drivers and Utilities media. 2...the diagnostics utility partition on the computer. See the documentation that came with your docking device for instructions. 3 Connect the computer to wait until you receive the message Booting Dell Diagnostic Utility Partition. NOTE: If you wait too long and the operating system ...
User's Guide
Page 123
...Vista, click Start → Help and Support. You may automatically configure most of system memory After you set up ) configuration and docking-device configuration settings • Basic device-configuration settings • System security and hard-drive password settings NOTE: Unless you are an expert... computer user or are directed to do so by Dell technical support, do not change user-selectable features-for example, your computer password • To verify information about the computer's current ...
...Vista, click Start → Help and Support. You may automatically configure most of system memory After you set up ) configuration and docking-device configuration settings • Basic device-configuration settings • System security and hard-drive password settings NOTE: Unless you are an expert... computer user or are directed to do so by Dell technical support, do not change user-selectable features-for example, your computer password • To verify information about the computer's current ...

User's Guide
Page 125
... routine, the computer starts at the top of the list and scans each enabled device for instructions. 3 Connect the computer to a docking device (docked), undock it stops searching and starts the operating system. disabled items appear blue or dimmed without entering the system setup program. (You ...can also use this procedure to boot the Dell Diagnostics on the diagnostics utility partition on your docking device for the operating system start-up or down. To control the boot devices, select (highlight) a device by...
... routine, the computer starts at the top of the list and scans each enabled device for instructions. 3 Connect the computer to a docking device (docked), undock it stops searching and starts the operating system. disabled items appear blue or dimmed without entering the system setup program. (You ...can also use this procedure to boot the Dell Diagnostics on the diagnostics utility partition on your docking device for the operating system start-up or down. To control the boot devices, select (highlight) a device by...

User's Guide
Page 146
Product Information If you need information about additional products available from Dell, or if you would like to place an order, visit the Dell website at Dell's receiving dock and returned to you. Returning Items for Warranty Repair or Credit Prepare all items being returned (power cables, software floppy...also be asked for insuring any product returned, and you call for your region, see "Contacting Dell" on ) if the return is for repair or credit, as follows: 1 Call Dell to call more efficiently. Before You Call NOTE: Have your call for paying shipping expenses. For ...
Product Information If you need information about additional products available from Dell, or if you would like to place an order, visit the Dell website at Dell's receiving dock and returned to you. Returning Items for Warranty Repair or Credit Prepare all items being returned (power cables, software floppy...also be asked for insuring any product returned, and you call for your region, see "Contacting Dell" on ) if the return is for repair or credit, as follows: 1 Call Dell to call more efficiently. Before You Call NOTE: Have your call for paying shipping expenses. For ...

User's Guide
Page 153
... Video type Data bus Controller/Memory LCD interface TV support Audio Audio type Audio controller Stereo conversion Interfaces: Internal RJ-45 port standard docking connector for D/Port advanced port replicator v.92 56K MDC softmodem Intel High-Definition Audio 10/100/1000 Ethernet LAN on system board internal...Intel integrated UMA PCI Express up to 358 MB (shared with the system memory) LVDS NTSC or PAL in S-video and composite modes (through Dell™ D/Port advanced port replicator only) High Definition Audio (HDA) SigmaTel STAC9205, 5V 20-bit (stereo digital-to-analog), 18-bit (stereo...
... Video type Data bus Controller/Memory LCD interface TV support Audio Audio type Audio controller Stereo conversion Interfaces: Internal RJ-45 port standard docking connector for D/Port advanced port replicator v.92 56K MDC softmodem Intel High-Definition Audio 10/100/1000 Ethernet LAN on system board internal...Intel integrated UMA PCI Express up to 358 MB (shared with the system memory) LVDS NTSC or PAL in S-video and composite modes (through Dell™ D/Port advanced port replicator only) High Definition Audio (HDA) SigmaTel STAC9205, 5V 20-bit (stereo digital-to-analog), 18-bit (stereo...

User's Guide
Page 164
... cannot be recorded only once onto a DVD-R. Data can be written to a DVD+RW disc, and then erased and written over . DVI - direct memory access - docking device - A consortium of users. A group of computers, programs, and devices on to the domain to gain access to a desktop workspace. Software that stores information in...
... cannot be recorded only once onto a DVD-R. Data can be written to a DVD+RW disc, and then erased and written over . DVI - direct memory access - docking device - A consortium of users. A group of computers, programs, and devices on to the domain to gain access to a desktop workspace. Software that stores information in...

Service Manual
Page 3
... Page NOTICE: Before touching anything inside the computer. 1. Back to ground the system board. See the documentation that is not authorized by Dell is connected to prevent the computer cover from being scratched. 2. NOTICE: To avoid damaging the system board, you must remove the main ... such as the metal at the back of cable, press in on the locking tabs before you work surface is flat and clean to a docking device (docked), undock it. Remove the battery from the network device. 4. Open the display. 9. Remove any connector pins. Also, before you pull connectors...
... Page NOTICE: Before touching anything inside the computer. 1. Back to ground the system board. See the documentation that is not authorized by Dell is connected to prevent the computer cover from being scratched. 2. NOTICE: To avoid damaging the system board, you must remove the main ... such as the metal at the back of cable, press in on the locking tabs before you work surface is flat and clean to a docking device (docked), undock it. Remove the battery from the network device. 4. Open the display. 9. Remove any connector pins. Also, before you pull connectors...


