
Quick Reference Guide
Page 10
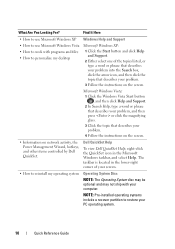
... and then press or click the magnifying glass. 3 Click the topic that describes your problem. 4 Follow the instructions on the screen. • Information on the screen. Find It Here • How to use Microsoft Windows XP Windows Help and Support • How to use Microsoft Windows Vista... • How to work with your PC operating system. 10 Quick Reference Guide The taskbar is located in the Microsoft Windows taskbar, and select Help. Dell...
... and then press or click the magnifying glass. 3 Click the topic that describes your problem. 4 Follow the instructions on the screen. • Information on the screen. Find It Here • How to use Microsoft Windows XP Windows Help and Support • How to use Microsoft Windows Vista... • How to work with your PC operating system. 10 Quick Reference Guide The taskbar is located in the Microsoft Windows taskbar, and select Help. Dell...
Quick Reference Guide
Page 12
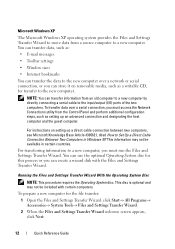
... Wizard: click Start→ All Programs→ Accessories→ System Tools→ Files and Settings Transfer Wizard. 2 When the Files and Settings Transfer Wizard welcome screen appears, click Next. 12 Quick Reference Guide Microsoft Windows XP The Microsoft Windows XP operating system provides the Files and Settings Transfer Wizard to move...
... Wizard: click Start→ All Programs→ Accessories→ System Tools→ Files and Settings Transfer Wizard. 2 When the Files and Settings Transfer Wizard welcome screen appears, click Next. 12 Quick Reference Guide Microsoft Windows XP The Microsoft Windows XP operating system provides the Files and Settings Transfer Wizard to move...
Quick Reference Guide
Page 13
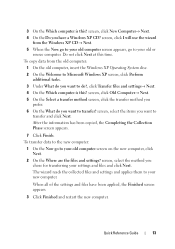
...additional tasks. 3 Under What do you want to do you want to transfer and click Next. screen, select the items you want to transfer? screen, click Old Computer→ Next. 5 On the Select a transfer method screen, click the transfer method you chose for transferring your new computer. When all of the settings ...and files have a Windows XP CD? Do not click Next at this ? After the information has been copied, the Completing the Collection Phase screen appears. 7 Click Finish. To copy data from the Windows XP CD→ Next. 5 When the Now go to your old computer...
...additional tasks. 3 Under What do you want to do you want to transfer and click Next. screen, select the items you want to transfer? screen, click Old Computer→ Next. 5 On the Select a transfer method screen, click the transfer method you chose for transferring your new computer. When all of the settings ...and files have a Windows XP CD? Do not click Next at this ? After the information has been copied, the Completing the Collection Phase screen appears. 7 Click Finish. To copy data from the Windows XP CD→ Next. 5 When the Now go to your old computer...
Quick Reference Guide
Page 14
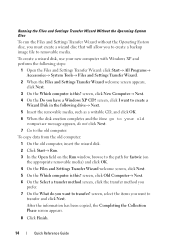
...; Accessories→ System Tools→ Files and Settings Transfer Wizard. 2 When the Files and Settings Transfer Wizard welcome screen appears, click Next. 3 On the Which computer is this ? screen, select the items you want to the old computer. To copy data from the old computer: 1 On the old... Start→ Run. 3 In the Open field on the appropriate removable media) and click OK. 4 On the Files and Settings Transfer Wizard welcome screen, click Next. 5 On the Which computer is this ? Running the Files and Settings Transfer Wizard Without the Operating System Disc To run the Files ...
...; Accessories→ System Tools→ Files and Settings Transfer Wizard. 2 When the Files and Settings Transfer Wizard welcome screen appears, click Next. 3 On the Which computer is this ? screen, select the items you want to the old computer. To copy data from the old computer: 1 On the old... Start→ Run. 3 In the Open field on the appropriate removable media) and click OK. 4 On the Files and Settings Transfer Wizard welcome screen, click Next. 5 On the Which computer is this ? Running the Files and Settings Transfer Wizard Without the Operating System Disc To run the Files ...
Quick Reference Guide
Page 15
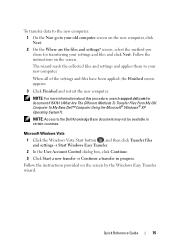
... computer, click Next. 2 On the Where are the files and settings? Follow the instructions provided on the screen. Follow the instructions on the screen by the Windows Easy Transfer wizard. NOTE: Access to the Dell Knowledge Base document may not be available in progress. Microsoft Windows Vista 1 Click the Windows Vista Start button...
... computer, click Next. 2 On the Where are the files and settings? Follow the instructions provided on the screen. Follow the instructions on the screen by the Windows Easy Transfer wizard. NOTE: Access to the Dell Knowledge Base document may not be available in progress. Microsoft Windows Vista 1 Click the Windows Vista Start button...
Quick Reference Guide
Page 21
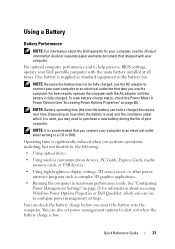
... Using wireless communications devices, PC Cards, Express Cards, media memory cards, or USB devices. • Using high-brightness display settings, 3D screen savers, or other powerintensive programs such as standard equipment in Power Options (see the Product Information Guide or separate paper warranty document that you connect... 21 To view battery charge status, check the Power Meter in the battery bay. NOTE: It is recommended that shipped with your Dell portable computer with the AC adapter until the battery is low. You can check the battery charge before you can hold a charge)...
... Using wireless communications devices, PC Cards, Express Cards, media memory cards, or USB devices. • Using high-brightness display settings, 3D screen savers, or other powerintensive programs such as standard equipment in Power Options (see the Product Information Guide or separate paper warranty document that you connect... 21 To view battery charge status, check the Power Meter in the battery bay. NOTE: It is recommended that shipped with your Dell portable computer with the AC adapter until the battery is low. You can check the battery charge before you can hold a charge)...
Quick Reference Guide
Page 28
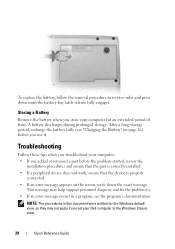
... message appears on page 26) before you use it. To replace the battery, follow the removal procedure in a program, see "Charging the Battery" on the screen, write down until the battery-bay latch release fully engages. Troubleshooting Follow these tips when you store your computer for the Windows default view, so... extended period of time. After a long storage period, recharge the battery fully (see the program's documentation. Storing a Battery Remove the battery when you troubleshoot your Dell computer to the Windows Classic view. 28 Quick Reference Guide
... message appears on page 26) before you use it. To replace the battery, follow the removal procedure in a program, see "Charging the Battery" on the screen, write down until the battery-bay latch release fully engages. Troubleshooting Follow these tips when you store your computer for the Windows default view, so... extended period of time. After a long storage period, recharge the battery fully (see the program's documentation. Storing a Battery Remove the battery when you troubleshoot your Dell computer to the Windows Classic view. 28 Quick Reference Guide
Quick Reference Guide
Page 29
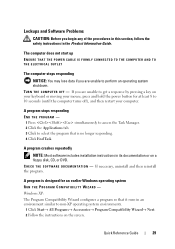
... Program Compatibility Wizard configures a program so that is designed for at least 8 to select the program that it runs in its documentation or on the screen. A program stops responding END THE PROGRAM - 1 Press simultaneously to access the Task Manager. 2 Click the Applications tab. 3 Click to 10 seconds (until the computer turns...
... Program Compatibility Wizard configures a program so that is designed for at least 8 to select the program that it runs in its documentation or on the screen. A program stops responding END THE PROGRAM - 1 Press simultaneously to access the Task Manager. 2 Click the Applications tab. 3 Click to 10 seconds (until the computer turns...
Quick Reference Guide
Page 30
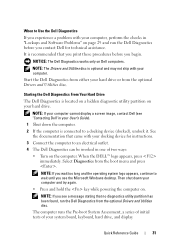
.... • If necessary, uninstall and then reinstall the program. A solid blue screen appears TURN THE COMPUTER OFF - If you begin any of Windows. 2 In the welcome screen, click Next. 3 Follow the instructions on the screen. BACK UP YOUR FILES IMMEDIATELY USE A VIRUS-SCANNING PROGRAM TO CHECK THE HARD ...DRIVE, FLOPPY DISKS, CDS, OR DVDS SAVE AND CLOSE ANY OPEN FILES OR PROGRAMS AND SHUT DOWN YOUR COMPUTER THROUGH THE START MENU Dell Diagnostics CAUTION: Before you are...
.... • If necessary, uninstall and then reinstall the program. A solid blue screen appears TURN THE COMPUTER OFF - If you begin any of Windows. 2 In the welcome screen, click Next. 3 Follow the instructions on the screen. BACK UP YOUR FILES IMMEDIATELY USE A VIRUS-SCANNING PROGRAM TO CHECK THE HARD ...DRIVE, FLOPPY DISKS, CDS, OR DVDS SAVE AND CLOSE ANY OPEN FILES OR PROGRAMS AND SHUT DOWN YOUR COMPUTER THROUGH THE START MENU Dell Diagnostics CAUTION: Before you are...
Quick Reference Guide
Page 31
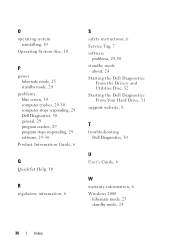
...utility partition on your hard drive. NOTE: If your computer cannot display a screen image, contact Dell (see "Contacting Dell" in your computer. See the documentation that no diagnostics utility partition has been found, run the Dell Diagnostics before you wait too long and the operating system logo appears, continue...you print these procedures before you see the Microsoft Windows desktop. Quick Reference Guide 31 When to an electrical outlet. 4 The Dell Diagnostics can be invoked in one of your computer and try again. • Press and hold the key while powering the computer...
...utility partition on your hard drive. NOTE: If your computer cannot display a screen image, contact Dell (see "Contacting Dell" in your computer. See the documentation that no diagnostics utility partition has been found, run the Dell Diagnostics before you wait too long and the operating system logo appears, continue...you print these procedures before you see the Microsoft Windows desktop. Quick Reference Guide 31 When to an electrical outlet. 4 The Dell Diagnostics can be invoked in one of your computer and try again. • Press and hold the key while powering the computer...

Quick Reference Guide
Page 33
...no interaction on the screen. Displays error conditions encountered, error codes, and the problem description. The test typically takes 1 hour or more information. You can customize the tests you want . If you cannot resolve the error condition, contact Dell (see "Contacting Dell" in the following ...table for more and requires you to answer questions periodically Tests a specific device. Dell Diagnostics Main Menu 1 After the Dell Diagnostics loads and the Main Menu screen appears, click the button for the option you want to run a test from the Custom Test or...
...no interaction on the screen. Displays error conditions encountered, error codes, and the problem description. The test typically takes 1 hour or more information. You can customize the tests you want . If you cannot resolve the error condition, contact Dell (see "Contacting Dell" in the following ...table for more and requires you to answer questions periodically Tests a specific device. Dell Diagnostics Main Menu 1 After the Dell Diagnostics loads and the Main Menu screen appears, click the button for the option you want to run a test from the Custom Test or...

Quick Reference Guide
Page 34
...Dell Diagnostics and restart the computer, close the test screen to return to the Main Menu screen. The device list may not display the names of the screen. Allows you to customize the test by changing the test settings. 4 When the tests are completed, if you are complete, close the Main Menu screen.... 34 Quick Reference Guide Tab Configuration Parameters Function Displays your hardware configuration for all devices attached to your computer or all devices from the Drivers and Utilities disc, remove the disc. 5 When the tests are running the Dell Diagnostics from...
...Dell Diagnostics and restart the computer, close the test screen to return to the Main Menu screen. The device list may not display the names of the screen. Allows you to customize the test by changing the test settings. 4 When the tests are completed, if you are complete, close the Main Menu screen.... 34 Quick Reference Guide Tab Configuration Parameters Function Displays your hardware configuration for all devices attached to your computer or all devices from the Drivers and Utilities disc, remove the disc. 5 When the tests are running the Dell Diagnostics from...
Quick Reference Guide
Page 36
... system reinstalling, 10 Operating System disc, 10 P power hibernate mode, 25 standby mode, 24 problems blue screen, 30 computer crashes, 29-30 computer stops responding, 29 Dell Diagnostics, 30 general, 29 program crashes, 29 program stops responding, 29 software, 29-30 Product Information Guide...Service Tag, 7 software problems, 29-30 standby mode about, 24 Starting the Dell Diagnostics From the Drivers and Utilities Disc, 32 Starting the Dell Diagnostics From Your Hard Drive, 31 support website, 8 T troubleshooting Dell Diagnostics, 30 U User's Guide, 6 W warranty information, 6 Windows 2000...
... system reinstalling, 10 Operating System disc, 10 P power hibernate mode, 25 standby mode, 24 problems blue screen, 30 computer crashes, 29-30 computer stops responding, 29 Dell Diagnostics, 30 general, 29 program crashes, 29 program stops responding, 29 software, 29-30 Product Information Guide...Service Tag, 7 software problems, 29-30 standby mode about, 24 Starting the Dell Diagnostics From the Drivers and Utilities Disc, 32 Starting the Dell Diagnostics From Your Hard Drive, 31 support website, 8 T troubleshooting Dell Diagnostics, 30 U User's Guide, 6 W warranty information, 6 Windows 2000...

User's Guide
Page 8
When to Use the Dell Diagnostics 103 Starting the Dell Diagnostics From Your Hard Drive 103 Starting the Dell Diagnostics From the Optional Drivers and Utilities Media 104 Dell Diagnostics Main Menu 105 Dell Support Utility 107 Accessing the Dell Support Utility 107 Clicking the Dell Support Icon 107 Double-Clicking the Dell Support Icon 108 Solving Problems 108... is difficult to read 121 If only part of the display is readable 121 13 System Setup Program 123 Overview 123 Viewing the System Setup Screens 124 8 Contents
When to Use the Dell Diagnostics 103 Starting the Dell Diagnostics From Your Hard Drive 103 Starting the Dell Diagnostics From the Optional Drivers and Utilities Media 104 Dell Diagnostics Main Menu 105 Dell Support Utility 107 Accessing the Dell Support Utility 107 Clicking the Dell Support Icon 107 Double-Clicking the Dell Support Icon 108 Solving Problems 108... is difficult to read 121 If only part of the display is readable 121 13 System Setup Program 123 Overview 123 Viewing the System Setup Screens 124 8 Contents

User's Guide
Page 9
System Setup Screens 124 Commonly Used Options 124 Changing the Boot Sequence 124 Changing COM Ports 126 Enabling the Infrared Sensor 126 14 Reinstalling Software 127 Drivers 127 ... Vista® Operating Systems 131 Restoring Your Operating System 131 Using Microsoft Windows System Restore . . . . 132 Using Dell™ PC Restore and Dell Factory Image Restore 134 Using the Operating System Media 137 15 Dell™ QuickSet 139 16 Traveling With Your Computer 141 Identifying Your Computer 141 Packing the Computer 141 Travel...
System Setup Screens 124 Commonly Used Options 124 Changing the Boot Sequence 124 Changing COM Ports 126 Enabling the Infrared Sensor 126 14 Reinstalling Software 127 Drivers 127 ... Vista® Operating Systems 131 Restoring Your Operating System 131 Using Microsoft Windows System Restore . . . . 132 Using Dell™ PC Restore and Dell Factory Image Restore 134 Using the Operating System Media 137 15 Dell™ QuickSet 139 16 Traveling With Your Computer 141 Identifying Your Computer 141 Packing the Computer 141 Travel...

User's Guide
Page 18
... and Support Microsoft Windows XP: 1 Click the Start button and click Help and Support. 2 Either select one of your screen. 18 Finding Information Dell QuickSet Help To view Dell QuickSet Help, right-click the QuickSet icon in the lower-right corner of the topics listed, or type a word or ...8226; How to use Microsoft Windows Vista • How to work with programs and files • How to personalize my desktop • Information on the screen. Microsoft Windows Vista: 1 Click the Windows Vista Start button , and then click Help and Support. 2 In Search Help, type a word or phrase ...
... and Support Microsoft Windows XP: 1 Click the Start button and click Help and Support. 2 Either select one of your screen. 18 Finding Information Dell QuickSet Help To view Dell QuickSet Help, right-click the QuickSet icon in the lower-right corner of the topics listed, or type a word or ...8226; How to use Microsoft Windows Vista • How to work with programs and files • How to personalize my desktop • Information on the screen. Microsoft Windows Vista: 1 Click the Windows Vista Start button , and then click Help and Support. 2 In Search Help, type a word or phrase ...

User's Guide
Page 34
... can create a wizard disk with certain computers. This media is this ? Do not click Next at this process or you want to transfer? screen, select the items you can use the wizard from the old computer: 1 On the old computer, insert the Windows XP Operating System media. ...transfer and click Next. Running the Files and Settings Transfer Wizard With the Operating System Media NOTE: This procedure requires the Operating System media. screen, click I will use the optional Operating System media for the file transfer: 1 Open the Files and Settings Transfer Wizard: click Start→...
... can create a wizard disk with certain computers. This media is this ? Do not click Next at this process or you want to transfer? screen, select the items you can use the wizard from the old computer: 1 On the old computer, insert the Windows XP Operating System media. ...transfer and click Next. Running the Files and Settings Transfer Wizard With the Operating System Media NOTE: This procedure requires the Operating System media. screen, click I will use the optional Operating System media for the file transfer: 1 Open the Files and Settings Transfer Wizard: click Start→...

User's Guide
Page 35
...→ All Programs→ Accessories→ System Tools→ Files and Settings Transfer Wizard. 2 When the Files and Settings Transfer Wizard welcome screen appears, click Next. 3 On the Which computer is this? The wizard reads the collected files and settings and applies them to the old ...8594; Next. 4 On the Do you chose for fastwiz (on the Run window, browse to removable media. screen, select the method you have been applied, the Finished screen appears. 3 Click Finished and restart the new computer. Running the Files and Settings Transfer Wizard Without the Operating ...
...→ All Programs→ Accessories→ System Tools→ Files and Settings Transfer Wizard. 2 When the Files and Settings Transfer Wizard welcome screen appears, click Next. 3 On the Which computer is this? The wizard reads the collected files and settings and applies them to the old ...8594; Next. 4 On the Do you chose for fastwiz (on the Run window, browse to removable media. screen, select the method you have been applied, the Finished screen appears. 3 Click Finished and restart the new computer. Running the Files and Settings Transfer Wizard Without the Operating ...

User's Guide
Page 36
... the collected files and settings and applies them to the Dell™ Knowledge Base document may not be available in progress. 36 Setting Up Your Computer After the information has been copied, the Completing the Collection Phase screen appears. 8 Click Finish. To transfer data to the new... 2 On the Where are the files and settings? 4 On the Files and Settings Transfer Wizard welcome screen, click Next. 5 On the Which computer is this procedure, search support.dell.com for transferring your settings and files and click Next. Microsoft Windows Vista® 1 Click the Windows...
... the collected files and settings and applies them to the Dell™ Knowledge Base document may not be available in progress. 36 Setting Up Your Computer After the information has been copied, the Completing the Collection Phase screen appears. 8 Click Finish. To transfer data to the new... 2 On the Where are the files and settings? 4 On the Files and Settings Transfer Wizard welcome screen, click Next. 5 On the Which computer is this procedure, search support.dell.com for transferring your settings and files and click Next. Microsoft Windows Vista® 1 Click the Windows...

User's Guide
Page 37
Follow the instructions provided on the screen by the Windows Easy Transfer wizard. Turning Off Your Computer NOTICE: To avoid losing data, save and close all open files and exit all open ...
Follow the instructions provided on the screen by the Windows Easy Transfer wizard. Turning Off Your Computer NOTICE: To avoid losing data, save and close all open files and exit all open ...

