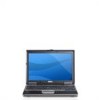
User's Guide
Page 8
... Restoring Your Operating System 98 Using Microsoft® Windows® System Restore 99 Using the Operating System CD 101 14 Adding and Replacing Parts Before You Begin 103 Recommended Tools 103 Turning Off Your Computer 103 Before Working Inside Your Computer 104 Hard Drive 105 Removing the Hard Drive 106 Replacing the Hard Drive 108 Memory 108 8 Contents
... Restoring Your Operating System 98 Using Microsoft® Windows® System Restore 99 Using the Operating System CD 101 14 Adding and Replacing Parts Before You Begin 103 Recommended Tools 103 Turning Off Your Computer 103 Before Working Inside Your Computer 104 Hard Drive 105 Removing the Hard Drive 106 Replacing the Hard Drive 108 Memory 108 8 Contents
User's Guide
Page 31
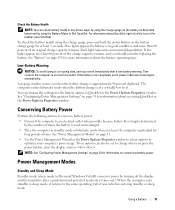
... hibernate mode when you should consider replacing the battery. Check the Battery Health NOTE: You can check battery health in one of two ways: by using the charge gauge on the battery as described below and by turning off the display and the hard drive after a low-battery warning. If...is in good condition, and more information about the battery operating time. Power Management Modes Standby and Sleep Mode Standby mode (sleep mode in Dell QuickSet. To check the battery health using the Battery Meter in Microsoft Windows Vista®) conserves power by using the charge gauge, press ...
... hibernate mode when you should consider replacing the battery. Check the Battery Health NOTE: You can check battery health in one of two ways: by using the charge gauge on the battery as described below and by turning off the display and the hard drive after a low-battery warning. If...is in good condition, and more information about the battery operating time. Power Management Modes Standby and Sleep Mode Standby mode (sleep mode in Dell QuickSet. To check the battery health using the Battery Meter in Microsoft Windows Vista®) conserves power by using the charge gauge, press ...

User's Guide
Page 78
... C D D R I V E C O N T R O L L E R F A I Z E H A S C H A N G E D - Reinstall the memory modules and, if necessary, replace them (see "Hard Drive" on page 128 ). E X T E N D E D M E M O R Y S I L U R E - A memory module may be faulty. Ensure that you complete these characters in the Product ...drive does not respond to fit on page 74). A U XI L I A R Y D E V I C E F A I V E - Contact Dell (see "Contacting Dell" on page 108). The operation requires a hard drive in the hard drive bay (see "Memory" on page 128 ). Install a hard drive...
... C D D R I V E C O N T R O L L E R F A I Z E H A S C H A N G E D - Reinstall the memory modules and, if necessary, replace them (see "Hard Drive" on page 128 ). E X T E N D E D M E M O R Y S I L U R E - A memory module may be faulty. Ensure that you complete these characters in the Product ...drive does not respond to fit on page 74). A U XI L I A R Y D E V I C E F A I V E - Contact Dell (see "Contacting Dell" on page 108). The operation requires a hard drive in the hard drive bay (see "Memory" on page 128 ). Install a hard drive...
User's Guide
Page 79
... avoid touching the keyboard or keys during the boot routine. Run the Stuck Key test in the Dell Diagnostics (see "Dell Diagnostics" on page 108) and, if necessary, replace them. Shut down the computer, reinstall the hard drive, and restart the computer. Try to occur after a memory module is installed. M E M O R Y D A T A L I N E F A I L U R E A T A D D R E S S , R E A D V A L U E E X P E C T I L U R E - Reinstall the memory modules (see...
... avoid touching the keyboard or keys during the boot routine. Run the Stuck Key test in the Dell Diagnostics (see "Dell Diagnostics" on page 108) and, if necessary, replace them. Shut down the computer, reinstall the hard drive, and restart the computer. Try to occur after a memory module is installed. M E M O R Y D A T A L I N E F A I L U R E A T A D D R E S S , R E A D V A L U E E X P E C T I L U R E - Reinstall the memory modules (see...
User's Guide
Page 80
... ROM apparently failed. You may require recharging. SE E K E RR O R - If the message reappears, contact Dell (see "Contacting Dell" on page 128). A required. D A Y N O T S E T - TI ME R C H I P C O U N T E R 2 F A I L U R E - Reinstall the memory modules (see "Hard Drive" on page 108) and, if necessary, replace them . Reinstall the hard drive (see "Memory" on page 105). The reserve battery that you want to charge the...
... ROM apparently failed. You may require recharging. SE E K E RR O R - If the message reappears, contact Dell (see "Contacting Dell" on page 128). A required. D A Y N O T S E T - TI ME R C H I P C O U N T E R 2 F A I L U R E - Reinstall the memory modules (see "Hard Drive" on page 108) and, if necessary, replace them . Reinstall the hard drive (see "Memory" on page 105). The reserve battery that you want to charge the...

User's Guide
Page 105
... Remove any installed PC Cards from sources other than Dell. Hard Drive CAUTION: If you remove the hard drive from the computer when the drive is on, in standby mode, or in the Product Information Guide. NOTICE: Hard drives are extremely fragile; even a slight bump can damage the drive. Adding and Replacing Parts 105 b Remove the battery from the battery...
... Remove any installed PC Cards from sources other than Dell. Hard Drive CAUTION: If you remove the hard drive from the computer when the drive is on, in standby mode, or in the Product Information Guide. NOTICE: Hard drives are extremely fragile; even a slight bump can damage the drive. Adding and Replacing Parts 105 b Remove the battery from the battery...

User's Guide
Page 106
... Discharge" in protective antistatic packaging. NOTE: Before you remove the hard drive, ensure that you may damage the connector. 5 Slide the hard drive into place. To replace the hard drive in the hard drive bay: 1 Follow the procedures in "Before You Begin" on page 103. Removing the Hard Drive To remove the hard drive: 1 Follow the procedures in "Before You Begin" on page...
... Discharge" in protective antistatic packaging. NOTE: Before you remove the hard drive, ensure that you may damage the connector. 5 Slide the hard drive into place. To replace the hard drive in the hard drive bay: 1 Follow the procedures in "Before You Begin" on page 103. Removing the Hard Drive To remove the hard drive: 1 Follow the procedures in "Before You Begin" on page...

User's Guide
Page 107
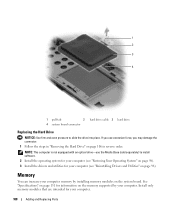
Adding and Replacing Parts 107 1 4 2 3 1 captive screws (2) 2 4 metal clips (2) metal bracket 3 hard drive NOTICE: When the hard drive is not in the computer, store it in the Product Information Guide. 5 Use the pull-tab to disconnect the hard drive cable from the system board connector and remove the hard drive from the computer. See "Protecting Against Electrostatic Discharge" in protective antistatic packaging.
Adding and Replacing Parts 107 1 4 2 3 1 captive screws (2) 2 4 metal clips (2) metal bracket 3 hard drive NOTICE: When the hard drive is not in the computer, store it in the Product Information Guide. 5 Use the pull-tab to disconnect the hard drive cable from the system board connector and remove the hard drive from the computer. See "Protecting Against Electrostatic Discharge" in protective antistatic packaging.
User's Guide
Page 108
...). See "Specifications" on page 131 for information on the memory supported by installing memory modules on the system board. 1 2 3 4 1 pull-tab 2 4 system board connector hard drive cable 3 hard drive Replacing the Hard Drive NOTICE: Use firm and even pressure to install software. 2 Install the operating system for your computer (see "Restoring Your Operating System" on page 98...
...). See "Specifications" on page 131 for information on the memory supported by installing memory modules on the system board. 1 2 3 4 1 pull-tab 2 4 system board connector hard drive cable 3 hard drive Replacing the Hard Drive NOTICE: Use firm and even pressure to install software. 2 Install the operating system for your computer (see "Restoring Your Operating System" on page 98...

User's Guide
Page 123
...Use the Service Tag if you need to report a loss or theft to law enforcement officials and to Dell. • Create a file on . • Protect the computer, the batteries, and the hard drive from hazards such as your name, address, and phone number in this file. • Contact your Service... computer and its accessories together safely. • Avoid packing the computer with items such as possible, replace any devices installed in the module bay with you plan to carry with the Dell TravelLite™ module. • Fully charge the main battery and any external devices attached to room...
...Use the Service Tag if you need to report a loss or theft to law enforcement officials and to Dell. • Create a file on . • Protect the computer, the batteries, and the hard drive from hazards such as your name, address, and phone number in this file. • Contact your Service... computer and its accessories together safely. • Avoid packing the computer with items such as possible, replace any devices installed in the module bay with you plan to carry with the Dell TravelLite™ module. • Fully charge the main battery and any external devices attached to room...
Quick Reference Guide
Page 3
... Settings . . . . . 17 Charging the Battery 18 Replacing the Battery 18 Storing a Battery 20 Troubleshooting 20 Lockups and Software Problems 20 Dell Diagnostics 22 When to Use the Dell Diagnostics 22 Starting the Dell Diagnostics From Your Hard Drive 22 Starting the Dell Diagnostics From the Drivers and Utilities Media 23 Dell Diagnostics Main Menu 24 Index 27 Contents 3
... Settings . . . . . 17 Charging the Battery 18 Replacing the Battery 18 Storing a Battery 20 Troubleshooting 20 Lockups and Software Problems 20 Dell Diagnostics 22 When to Use the Dell Diagnostics 22 Starting the Dell Diagnostics From Your Hard Drive 22 Starting the Dell Diagnostics From the Drivers and Utilities Media 23 Dell Diagnostics Main Menu 24 Index 27 Contents 3

Service Manual
Page 21
... the procedures in this section, follow the safety instructions in hibernate mode. Back to Contents Page Hard Drive Dell™ Latitude™ D430 Removing the Hard Drive Dismantling the Hard Drive Replacing the Hard Drive CAUTION: If you remove the hard drive from the computer when the drive is not in the computer, store it toward the back of the computer to dislodge the bracket...
... the procedures in this section, follow the safety instructions in hibernate mode. Back to Contents Page Hard Drive Dell™ Latitude™ D430 Removing the Hard Drive Dismantling the Hard Drive Replacing the Hard Drive CAUTION: If you remove the hard drive from the computer when the drive is not in the computer, store it toward the back of the computer to dislodge the bracket...

Service Manual
Page 22
... Dell is not covered by your warranty. 1. 1 pull-tab 4 system board connector 2 hard drive cable 3 hard drive Dismantling the Hard Drive NOTICE: The replacement hard drive ships with the protective cover and the hard drive cable. Use a hard drive tool to carefully remove the protective cover from the hard drive. 1 protective cover 2 hard drive 2. Damage due to servicing that holds the hard drive cable, and remove the cable. 1 ZIF connector 2 hard drive...
... Dell is not covered by your warranty. 1. 1 pull-tab 4 system board connector 2 hard drive cable 3 hard drive Dismantling the Hard Drive NOTICE: The replacement hard drive ships with the protective cover and the hard drive cable. Use a hard drive tool to carefully remove the protective cover from the hard drive. 1 protective cover 2 hard drive 2. Damage due to servicing that holds the hard drive cable, and remove the cable. 1 ZIF connector 2 hard drive...

Service Manual
Page 23
... User's Guide). Back to slide the drive into place. Install the drivers and utilities for your computer (see "Reinstalling Drivers and Utilities" in your computer (see "Restoring Your Operating System" in reverse order. If you use the Media Base (sold separately) to install software. 2. Replacing the Hard Drive NOTICE: Use firm and even pressure...
... User's Guide). Back to slide the drive into place. Install the drivers and utilities for your computer (see "Reinstalling Drivers and Utilities" in your computer (see "Restoring Your Operating System" in reverse order. If you use the Media Base (sold separately) to install software. 2. Replacing the Hard Drive NOTICE: Use firm and even pressure...
Service Manual
Page 26
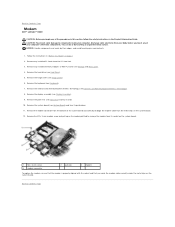
... Display Assembly). 9. Remove the display assembly (see Hard Drive). 5. Back to components inside your computer's electronic... Hinge Cover). 6. Remove the system board (see Memory and Mini-Cards). 4. Back to Contents Page Modem Dell™ Latitude™ D430 CAUTION: Before you begin any of the procedures in this section, follow the safety instructions in "Before You... clips on the system board. 1 M2 x 3-mm screw 4 modem connector 2 pull-tab 3 modem To replace the modem, ensure that the modem is properly aligned with Bluetooth® wireless technology (see Palm Rest) and lay...
... Display Assembly). 9. Remove the display assembly (see Hard Drive). 5. Back to components inside your computer's electronic... Hinge Cover). 6. Remove the system board (see Memory and Mini-Cards). 4. Back to Contents Page Modem Dell™ Latitude™ D430 CAUTION: Before you begin any of the procedures in this section, follow the safety instructions in "Before You... clips on the system board. 1 M2 x 3-mm screw 4 modem connector 2 pull-tab 3 modem To replace the modem, ensure that the modem is properly aligned with Bluetooth® wireless technology (see Palm Rest) and lay...
Service Manual
Page 27
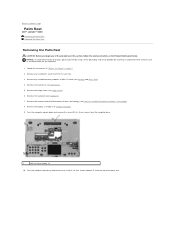
... screws (7) 10. Remove any installed memory modules or Mini PCI cards (see Hard Drive). 5. Remove the hinge cover (see Display Assembly). 9. Remove the display assembly (see Hinge Cover). 6. Back to Contents Page Palm Rest Dell™ Latitude™ D430 Removing the Palm Rest Replacing the Palm Rest Removing the Palm Rest CAUTION: Before you begin any...
... screws (7) 10. Remove any installed memory modules or Mini PCI cards (see Hard Drive). 5. Remove the hinge cover (see Display Assembly). 9. Remove the display assembly (see Hinge Cover). 6. Back to Contents Page Palm Rest Dell™ Latitude™ D430 Removing the Palm Rest Replacing the Palm Rest Removing the Palm Rest CAUTION: Before you begin any...
Service Manual
Page 32
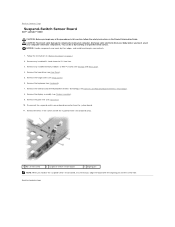
...pin NOTE: When you replace the suspend-switch sensor board, ensure that you begin any of the procedures in this section, follow the safety instructions in "Before You Begin" on page 7. 2. Back to Contents Page Suspend-Switch Sensor Board Dell™ Latitude™ D430 CAUTION: Before you align...by their edges, and avoid touching pins and contacts. 1. Remove the palm rest (see Hinge Cover). 6. Remove the hard drive (see Hard Drive). 5. Back to components inside your computer, discharge static electricity from your body before you touch any of your computer's electronic components.
...pin NOTE: When you replace the suspend-switch sensor board, ensure that you begin any of the procedures in this section, follow the safety instructions in "Before You Begin" on page 7. 2. Back to Contents Page Suspend-Switch Sensor Board Dell™ Latitude™ D430 CAUTION: Before you align...by their edges, and avoid touching pins and contacts. 1. Remove the palm rest (see Hinge Cover). 6. Remove the hard drive (see Hard Drive). 5. Back to components inside your computer, discharge static electricity from your body before you touch any of your computer's electronic components.
Service Manual
Page 35
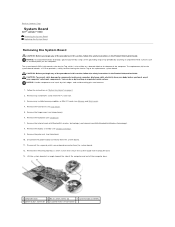
... that provides a utility for the system board includes a CD that secure the system board to Contents Page System Board Dell™ Latitude™ D430 Removing the System Board Replacing the System Board Removing the System Board CAUTION: Before you begin any installed memory modules or Mini PCI cards (see... (such as the back panel) on page 7. 2. CAUTION: To prevent static damage to the replacement system board. Remove the internal card with Bluetooth® wireless technology (see Hard Drive). 5. Lift the system board at an angle toward the side of the computer and out of the...
... that provides a utility for the system board includes a CD that secure the system board to Contents Page System Board Dell™ Latitude™ D430 Removing the System Board Replacing the System Board Removing the System Board CAUTION: Before you begin any installed memory modules or Mini PCI cards (see... (such as the back panel) on page 7. 2. CAUTION: To prevent static damage to the replacement system board. Remove the internal card with Bluetooth® wireless technology (see Hard Drive). 5. Lift the system board at an angle toward the side of the computer and out of the...


