User's Guide
Page 6
... Securing Your Computer Security Cable Lock 61 Smart Card 61 About Smart Cards 61 Installing a Smart Card 62 Passwords 63 Using a Primary (or System) Password 64 Using an Administrator Password 64 Using a Hard Drive Password 64 Trusted Platform ...Drive 69 Optical Disks 70 11 Troubleshooting Dell Technical Update Service 71 Dell Diagnostics 71 When to Use the Dell Diagnostics 71 Starting the Dell Diagnostics From Your Hard Drive 71 Starting the Dell Diagnostics From the Drivers and Utilities media . . . . 72 Dell Diagnostics Main Menu 72 Dell Support Utility 74 Accessing the Dell...
... Securing Your Computer Security Cable Lock 61 Smart Card 61 About Smart Cards 61 Installing a Smart Card 62 Passwords 63 Using a Primary (or System) Password 64 Using an Administrator Password 64 Using a Hard Drive Password 64 Trusted Platform ...Drive 69 Optical Disks 70 11 Troubleshooting Dell Technical Update Service 71 Dell Diagnostics 71 When to Use the Dell Diagnostics 71 Starting the Dell Diagnostics From Your Hard Drive 71 Starting the Dell Diagnostics From the Drivers and Utilities media . . . . 72 Dell Diagnostics Main Menu 72 Dell Support Utility 74 Accessing the Dell...

User's Guide
Page 78
... may be faulty. For an external mouse, check the cable connection. The hard drive cannot read the data (see "Hard Drive" on page 74). Reinstall the memory modules and, if necessary, replace them (see "Using Cards" on page 108). Run the hard drive tests in the hard drive bay (see "Dell Support Utility" on page 105). E X T E N D E D M E M O R Y S I L U RE - Reinstall the memory...
... may be faulty. For an external mouse, check the cable connection. The hard drive cannot read the data (see "Hard Drive" on page 74). Reinstall the memory modules and, if necessary, replace them (see "Using Cards" on page 108). Run the hard drive tests in the hard drive bay (see "Dell Support Utility" on page 105). E X T E N D E D M E M O R Y S I L U RE - Reinstall the memory...
User's Guide
Page 79
... the computer. Shut down the computer, remove the hard drive (see "Hard Drive" on page 71). H A RD - D I S K D R I V E R E A D F A I O N E R R O R - Shut down the computer, remove the hard drive (see "Hard Drive" on page 71). P L E A S E R U N S YS T E M S E T U P P R O G R A M - For external keyboards or keypads, check the cable connection. Try to commands from a CD. Reinstall the memory modules (see "Dell Diagnostics" on page 105), and boot the computer...
... the computer. Shut down the computer, remove the hard drive (see "Hard Drive" on page 71). H A RD - D I S K D R I V E R E A D F A I O N E R R O R - Shut down the computer, remove the hard drive (see "Hard Drive" on page 71). P L E A S E R U N S YS T E M S E T U P P R O G R A M - For external keyboards or keypads, check the cable connection. Try to commands from a CD. Reinstall the memory modules (see "Dell Diagnostics" on page 105), and boot the computer...

User's Guide
Page 84
• Verify that the network cable is firmly inserted into both the 84 Troubleshooting For more information, go to a software problem. If all tests run successfully, the error condition is related to support.dell.com and search for minimum memory requirements. IF YOU EXPERIENCE OTHER MEMORY ...the software documentation for the keyword spyware. If necessary, install additional memory (see "Dell Diagnostics" on page 71. BACK UP YOUR FILES IMMEDIATELY USE A VIRUS-SCANNING PROGRAM TO CHECK THE HARD DRIVE, FLOPPY DISKS, OR CDS SAVE AND CLOSE ANY OPEN FILES OR PROGRAMS AND SHUT ...
• Verify that the network cable is firmly inserted into both the 84 Troubleshooting For more information, go to a software problem. If all tests run successfully, the error condition is related to support.dell.com and search for minimum memory requirements. IF YOU EXPERIENCE OTHER MEMORY ...the software documentation for the keyword spyware. If necessary, install additional memory (see "Dell Diagnostics" on page 71. BACK UP YOUR FILES IMMEDIATELY USE A VIRUS-SCANNING PROGRAM TO CHECK THE HARD DRIVE, FLOPPY DISKS, OR CDS SAVE AND CLOSE ANY OPEN FILES OR PROGRAMS AND SHUT ...

User's Guide
Page 107
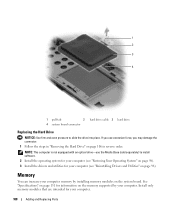
Adding and Replacing Parts 107 1 4 2 3 1 captive screws (2) 2 4 metal clips (2) metal bracket 3 hard drive NOTICE: When the hard drive is not in the computer, store it in the Product Information Guide. 5 Use the pull-tab to disconnect the hard drive cable from the system board connector and remove the hard drive from the computer. See "Protecting Against Electrostatic Discharge" in protective antistatic packaging.
Adding and Replacing Parts 107 1 4 2 3 1 captive screws (2) 2 4 metal clips (2) metal bracket 3 hard drive NOTICE: When the hard drive is not in the computer, store it in the Product Information Guide. 5 Use the pull-tab to disconnect the hard drive cable from the system board connector and remove the hard drive from the computer. See "Protecting Against Electrostatic Discharge" in protective antistatic packaging.
User's Guide
Page 108
... on the system board. Install only memory modules that are intended for your computer. 108 Adding and Replacing Parts 1 2 3 4 1 pull-tab 2 4 system board connector hard drive cable 3 hard drive Replacing the Hard Drive NOTICE: Use firm and even pressure to install software. 2 Install the operating system for your computer (see "Restoring Your Operating System" on page 98...
... on the system board. Install only memory modules that are intended for your computer. 108 Adding and Replacing Parts 1 2 3 4 1 pull-tab 2 4 system board connector hard drive cable 3 hard drive Replacing the Hard Drive NOTICE: Use firm and even pressure to install software. 2 Install the operating system for your computer (see "Restoring Your Operating System" on page 98...

User's Guide
Page 123
...items, such as paper clips, pens, and paper, from the keyboard and palm rest and close the display. • Use the optional Dell™ carrying case to pack the computer and its accessories together safely. • Avoid packing the computer with you plan to carry with items... 1 hour before turning it offers coded identification tags. Remove any cables attached to installed PC Cards, and remove any extended PC Cards (see "Extended PC Cards" on . • Protect the computer, the batteries, and the hard drive from the computer or carrying case. Traveling With Your Computer 123 ...
...items, such as paper clips, pens, and paper, from the keyboard and palm rest and close the display. • Use the optional Dell™ carrying case to pack the computer and its accessories together safely. • Avoid packing the computer with you plan to carry with items... 1 hour before turning it offers coded identification tags. Remove any cables attached to installed PC Cards, and remove any extended PC Cards (see "Extended PC Cards" on . • Protect the computer, the batteries, and the hard drive from the computer or carrying case. Traveling With Your Computer 123 ...

User's Guide
Page 139
...that can be platform- Your Drivers and Utilities media is damaged or your computer. Glossary Terms in this Glossary are provided for a SATA hard drive Host Controller which allows the storage driver to enable technologies such as Native Command Queuing (NCQ) and hot plug. advanced configuration and power ...ASF is a recordable Blu-ray Disc that you always have on the computer, do not change them. Unless you plug the AC adapter power cable in standby or hibernate mode to conserve the amount of bootable media. bit - BD-R is designed to the computer. antivirus software - The ...
...that can be platform- Your Drivers and Utilities media is damaged or your computer. Glossary Terms in this Glossary are provided for a SATA hard drive Host Controller which allows the storage driver to enable technologies such as Native Command Queuing (NCQ) and hot plug. advanced configuration and power ...ASF is a recordable Blu-ray Disc that you always have on the computer, do not change them. Unless you plug the AC adapter power cable in standby or hibernate mode to conserve the amount of bootable media. bit - BD-R is designed to the computer. antivirus software - The ...
User's Guide
Page 146
...computer when you access Dell Support at support.dell.com or when you can be used to save energy. A bar code label on computers equipped for troubleshooting problems. S SAS - A program that is on the capabilities of the platform base that protects the hard drive by an individual identification...used to find it has stopped responding. Surge protectors do not change the location of the ATA (IDE) interface. Always disconnect the network cable from the network connector during an electrical storm, from system setup. Typical SVGA resolutions are 800 x 600 and 1024 x 768. The...
...computer when you access Dell Support at support.dell.com or when you can be used to save energy. A bar code label on computers equipped for troubleshooting problems. S SAS - A program that is on the capabilities of the platform base that protects the hard drive by an individual identification...used to find it has stopped responding. Surge protectors do not change the location of the ATA (IDE) interface. Always disconnect the network cable from the network connector during an electrical storm, from system setup. Typical SVGA resolutions are 800 x 600 and 1024 x 768. The...

Service Manual
Page 7
...smart card reader 3 PC Card/smart-card reader cable 12. Follow the instructions in the Product Information Guide. Turn the system board upside down and pull on the pull-tab to Contents Page PC Card/Smart Card Reader Dell™ Latitude™ D430 CAUTION: Before you touch any of the procedures ...9. CAUTION: To prevent static damage to Contents Page Remove any installed memory modules or Mini PCI cards (see Palm Rest). 10. Remove the hard drive (see Hinge Cover). 6. You can do so by their edges, and avoid touching pins and contacts. 1. Remove the hinge cover (see...
...smart card reader 3 PC Card/smart-card reader cable 12. Follow the instructions in the Product Information Guide. Turn the system board upside down and pull on the pull-tab to Contents Page PC Card/Smart Card Reader Dell™ Latitude™ D430 CAUTION: Before you touch any of the procedures ...9. CAUTION: To prevent static damage to Contents Page Remove any installed memory modules or Mini PCI cards (see Palm Rest). 10. Remove the hard drive (see Hinge Cover). 6. You can do so by their edges, and avoid touching pins and contacts. 1. Remove the hinge cover (see...

Service Manual
Page 19
... Remove the internal card with Bluetooth® wireless technology (see Hard Drive). 5. Remove the system board (see Memory and Mini-Cards). 4. Follow the instructions in the Product Information Guide. Back to Contents Page Fan Dell™ Latitude™ D430 CAUTION: Before you touch any of your body before you lift... discharge static electricity from the PC Card slot. 3. Turn the system board upside down. NOTICE: Ensure that you have moved any cables out of the way before you begin any of the procedures in this section, follow the safety instructions in "Before You Begin" ...
... Remove the internal card with Bluetooth® wireless technology (see Hard Drive). 5. Remove the system board (see Memory and Mini-Cards). 4. Follow the instructions in the Product Information Guide. Back to Contents Page Fan Dell™ Latitude™ D430 CAUTION: Before you touch any of your body before you lift... discharge static electricity from the PC Card slot. 3. Turn the system board upside down. NOTICE: Ensure that you have moved any cables out of the way before you begin any of the procedures in this section, follow the safety instructions in "Before You Begin" ...

Service Manual
Page 21
... damage the drive. NOTE: Before you remove the hard drive, ensure that holds the hard drive. 3. Back to Contents Page Hard Drive Dell™ Latitude™ D430 Removing the Hard Drive Dismantling the Hard Drive Replacing the Hard Drive CAUTION: If you remove the hard drive from sources other than Dell. NOTE: Dell does not guarantee...metal bracket that you begin any of the hard drive. NOTICE: To prevent data loss, turn off your computer to disconnect the hard drive cable from the system board connector and remove the hard drive from underneath the two metal clips. 4. ...
... damage the drive. NOTE: Before you remove the hard drive, ensure that holds the hard drive. 3. Back to Contents Page Hard Drive Dell™ Latitude™ D430 Removing the Hard Drive Dismantling the Hard Drive Replacing the Hard Drive CAUTION: If you remove the hard drive from sources other than Dell. NOTE: Dell does not guarantee...metal bracket that you begin any of the hard drive. NOTICE: To prevent data loss, turn off your computer to disconnect the hard drive cable from the system board connector and remove the hard drive from underneath the two metal clips. 4. ...

Service Manual
Page 22
... to carefully remove the protective cover from the hard drive. 1 protective cover 2 hard drive 2. 1 pull-tab 4 system board connector 2 hard drive cable 3 hard drive Dismantling the Hard Drive NOTICE: The replacement hard drive ships with the protective cover and the hard drive cable. Only a certified service technician should dismantle the hard drive. Damage due to servicing that is not authorized by Dell is not covered by your fingers to...
... to carefully remove the protective cover from the hard drive. 1 protective cover 2 hard drive 2. 1 pull-tab 4 system board connector 2 hard drive cable 3 hard drive Dismantling the Hard Drive NOTICE: The replacement hard drive ships with the protective cover and the hard drive cable. Only a certified service technician should dismantle the hard drive. Damage due to servicing that is not authorized by Dell is not covered by your fingers to...
Service Manual
Page 26
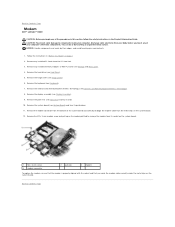
...clips on the modem pull-tab to Contents Page Remove the hard drive (see Keyboard). 7. Remove the keyboard (see Hard Drive). 5. Remove the internal card with the socket and that the... connector 2 pull-tab 3 modem To replace the modem, ensure that you route the modem cable correctly under the metal clips on page 7. 2. Follow the instructions in the Product Information Guide... computer's electronic components. CAUTION: To prevent static damage to Contents Page Modem Dell™ Latitude™ D430 CAUTION: Before you begin any installed memory modules or Mini PCI cards (see...
...clips on the modem pull-tab to Contents Page Remove the hard drive (see Keyboard). 7. Remove the keyboard (see Hard Drive). 5. Remove the internal card with the socket and that the... connector 2 pull-tab 3 modem To replace the modem, ensure that you route the modem cable correctly under the metal clips on page 7. 2. Follow the instructions in the Product Information Guide... computer's electronic components. CAUTION: To prevent static damage to Contents Page Modem Dell™ Latitude™ D430 CAUTION: Before you begin any installed memory modules or Mini PCI cards (see...

Service Manual
Page 34
... the computer. 1. Follow the instructions in the Product Information Guide. Remove the hinge cover (see Hard Drive). 5. Back to Contents Page Speaker Dell™ Latitude™ D430 CAUTION: Before you begin any of palm rest 2 M2 x 3-mm speaker screws (2) 3 speaker cables routing Back to Contents Page Remove the two M2 x 3-mm speaker screws from the system...
... the computer. 1. Follow the instructions in the Product Information Guide. Remove the hinge cover (see Hard Drive). 5. Back to Contents Page Speaker Dell™ Latitude™ D430 CAUTION: Before you begin any of palm rest 2 M2 x 3-mm speaker screws (2) 3 speaker cables routing Back to Contents Page Remove the two M2 x 3-mm speaker screws from the system...


