Media Base Setup Guide
Page 7
... requirements and are classified as a carrying case or a closed -in wall unit or on . These ODDs contain no user adjustments or serviceable or replaceable parts. Do not use your media base during an electrical storm unless all cables have been disconnected and the computer is operating on... battery power. • If your device, disconnect the device from potential damage. Doing so can cause fire or electric shock by Dell. To prevent any objects into air vents or openings of the base will rise...
... requirements and are classified as a carrying case or a closed -in wall unit or on . These ODDs contain no user adjustments or serviceable or replaceable parts. Do not use your media base during an electrical storm unless all cables have been disconnected and the computer is operating on... battery power. • If your device, disconnect the device from potential damage. Doing so can cause fire or electric shock by Dell. To prevent any objects into air vents or openings of the base will rise...
User's Guide
Page 4
Charging the Battery 33 Replacing the Battery 33 Storing a Battery 34 5 Using the Keyboard and Touch Pad Numeric Keypad 35 Key Combinations 35 System Functions 35 Battery 36 Optical Drive Tray 36 Display Functions 36 Power Management 36 Speaker Functions 36 Microsoft® Windows® Logo Key Functions 37 Touch Pad 37 ...
Charging the Battery 33 Replacing the Battery 33 Storing a Battery 34 5 Using the Keyboard and Touch Pad Numeric Keypad 35 Key Combinations 35 System Functions 35 Battery 36 Optical Drive Tray 36 Display Functions 36 Power Management 36 Speaker Functions 36 Microsoft® Windows® Logo Key Functions 37 Touch Pad 37 ...
User's Guide
Page 23
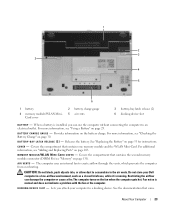
...your Dell computer in the air vents. B A T T E R Y C H A RG E G A U G E - CO VE R - M E MO R Y M O D U L E / W L A N M I N I C E S L O T - The computer uses an internal fan to a docking device. D O C K I N G D E V I - Covers the compartment that contains the second memory module connector (DIMM B) (see "Using a Battery"... For more information, see "Adding and Replacing Parts" on page 33 for instructions. See "Replacing the Battery" on page 103. B A Y L A T CH R EL E A SE (2 ) - For additional information, see "Checking the Battery Charge" on page 131). Do not ...
...your Dell computer in the air vents. B A T T E R Y C H A RG E G A U G E - CO VE R - M E MO R Y M O D U L E / W L A N M I N I C E S L O T - The computer uses an internal fan to a docking device. D O C K I N G D E V I - Covers the compartment that contains the second memory module connector (DIMM B) (see "Using a Battery"... For more information, see "Adding and Replacing Parts" on page 33 for instructions. See "Replacing the Battery" on page 103. B A Y L A T CH R EL E A SE (2 ) - For additional information, see "Checking the Battery Charge" on page 131). Do not ...

User's Guide
Page 29
...Replace the battery only with your computer. For best results, operate the computer with the AC adapter until the battery is supplied as complex 3D graphics applications. • Running the computer in maximum performance mode. You can also set power management options to purchase a new battery... use a battery from another computer with a compatible battery purchased from Dell. Operating time is recommended that shipped with your computer. CAUTION: Using an incompatible battery may increase the risk of your Dell™ portable computer with the main battery installed at all...
...Replace the battery only with your computer. For best results, operate the computer with the AC adapter until the battery is supplied as complex 3D graphics applications. • Running the computer in maximum performance mode. You can also set power management options to purchase a new battery... use a battery from another computer with a compatible battery purchased from Dell. Operating time is recommended that shipped with your computer. CAUTION: Using an incompatible battery may increase the risk of your Dell™ portable computer with the main battery installed at all...
User's Guide
Page 31
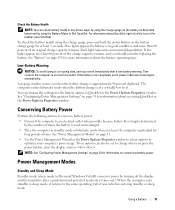
...the status button on page 135 for more than 60 percent of time. See "Battery" on the battery charge gauge for at a critically low level. A pop-up window warns you should consider replacing the battery. You can change when you leave the computer unattended for long periods of the charge... Standby mode (sleep mode in Microsoft Windows Vista®) conserves power by using the Battery Meter in Dell QuickSet. These options can check battery health in one of power, hibernate mode begins automatically. Check the Battery Health NOTE: You can also be set to change the settings for the...
...the status button on page 135 for more than 60 percent of time. See "Battery" on the battery charge gauge for at a critically low level. A pop-up window warns you should consider replacing the battery. You can change when you leave the computer unattended for long periods of the charge... Standby mode (sleep mode in Microsoft Windows Vista®) conserves power by using the Battery Meter in Dell QuickSet. These options can check battery health in one of power, hibernate mode begins automatically. Check the Battery Health NOTE: You can also be set to change the settings for the...
User's Guide
Page 33
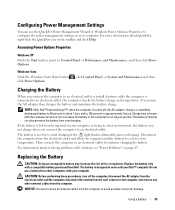
... computer to continue charging the battery. Replacing the Battery CAUTION: Using an incompatible battery may not charge when you like. If necessary, the AC adapter then charges the battery and maintains the battery charge. You can use a battery from other external cables from the computer. The battery's internal circuitry prevents the battery from Dell. If the battery is turned off the...
... computer to continue charging the battery. Replacing the Battery CAUTION: Using an incompatible battery may not charge when you like. If necessary, the AC adapter then charges the battery and maintains the battery charge. You can use a battery from other external cables from the computer. The battery's internal circuitry prevents the battery from Dell. If the battery is turned off the...
User's Guide
Page 34
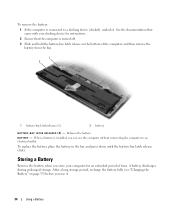
...computer for instructions. 2 Ensure that the computer is connected to an electrical outlet. To remove the battery: 1 If the computer is turned off. 3 Slide and hold the battery-bay latch release on page 33) before you use the computer without connecting the computer to a... docking device (docked), undock it . 34 Using a Battery After a long storage period, recharge the battery fully (see "Charging the Battery" on the bottom of time. A battery discharges during prolonged storage. To replace the battery, place the battery in the bay and press down until the...
...computer for instructions. 2 Ensure that the computer is connected to an electrical outlet. To remove the battery: 1 If the computer is turned off. 3 Slide and hold the battery-bay latch release on page 33) before you use the computer without connecting the computer to a... docking device (docked), undock it . 34 Using a Battery After a long storage period, recharge the battery fully (see "Charging the Battery" on the bottom of time. A battery discharges during prolonged storage. To replace the battery, place the battery in the bay and press down until the...
User's Guide
Page 69
...between the touch pad and the surrounding palm rest. Do not allow water from their electrical outlets. 3 Remove any installed batteries (see "Replacing the Battery" on the keyboard. Do not use products specifically designed for cleaning displays, and follow the safety instructions in this section,...rest. 10 Cleaning Your Computer CAUTION: Before you clean your computer, disconnect the computer from the electrical outlet and remove any installed batteries. Floppy Drive NOTICE: Do not attempt to remove contaminants that are included with the product. • Moisten a soft, lint-...
...between the touch pad and the surrounding palm rest. Do not allow water from their electrical outlets. 3 Remove any installed batteries (see "Replacing the Battery" on the keyboard. Do not use products specifically designed for cleaning displays, and follow the safety instructions in this section,...rest. 10 Cleaning Your Computer CAUTION: Before you clean your computer, disconnect the computer from the electrical outlet and remove any installed batteries. Floppy Drive NOTICE: Do not attempt to remove contaminants that are included with the product. • Moisten a soft, lint-...
User's Guide
Page 80
...Dell (see "Contacting Dell" on page 108) and, if necessary, replace them . N O T I M E R T I C K I N - If the problem persists, contact Dell (see "Contacting Dell" on page 71). Contact Dell (see "Dell Diagnostics" on page 128 ). Run the Windows error-checking utility to charge the battery. SE E K E RR O R - The reserve battery... all windows and open the program that the drive is missing an essential file. Reinstall the hard drive (see "Contacting Dell" on page 91). If the problem persists, try to charge the battery. N O B O O T S E C T O R O N H A R D D R I L E ...
...Dell (see "Contacting Dell" on page 108) and, if necessary, replace them . N O T I M E R T I C K I N - If the problem persists, contact Dell (see "Contacting Dell" on page 71). Contact Dell (see "Dell Diagnostics" on page 128 ). Run the Windows error-checking utility to charge the battery. SE E K E RR O R - The reserve battery... all windows and open the program that the drive is missing an essential file. Reinstall the hard drive (see "Contacting Dell" on page 91). If the problem persists, try to charge the battery. N O B O O T S E C T O R O N H A R D D R I L E ...
User's Guide
Page 81
... the safety instructions in the Product Information Guide. When you are an administrator on the computer, click Continue; The keyboard controller may be loose. The battery is listed, Windows recognizes the device. X : \ I S N O T A C C E S S I C A L L Y L O W - IEEE 1394 Device...may be malfunctioning, or a memory module may appear. If the device was provided by Dell, contact Dell (see "Dell Diagnostics" on page 71). T H E D E V I C E I N P R O T E C T E D M O D E - Replace the battery, or connect the computer to continue the desired action. Insert a disk into the drive...
... the safety instructions in the Product Information Guide. When you are an administrator on the computer, click Continue; The keyboard controller may be loose. The battery is listed, Windows recognizes the device. X : \ I S N O T A C C E S S I C A L L Y L O W - IEEE 1394 Device...may be malfunctioning, or a memory module may appear. If the device was provided by Dell, contact Dell (see "Dell Diagnostics" on page 71). T H E D E V I C E I N P R O T E C T E D M O D E - Replace the battery, or connect the computer to continue the desired action. Insert a disk into the drive...

User's Guide
Page 85
... into the connector. Ensure that the card is listed. Power Problems Fill out the Diagnostics Checklist (see "Contacting Dell" on page 128). If the battery status light flashes orange or is a steady orange the battery charge is lit or blinking, the computer has power. C H E C K T H E N E T W O R K L I D E D B Y DE L L - C H E C K T H E C A R D - I F Y O U H A ...Replace the network cable. P L U G T H E A / C P O W E R A D A P T E R I G H T - C H E C K Y O U R N E TW O R K S E T T I G H T - Contact your network administrator or the person who set up your network to save battery...
... into the connector. Ensure that the card is listed. Power Problems Fill out the Diagnostics Checklist (see "Contacting Dell" on page 128). If the battery status light flashes orange or is a steady orange the battery charge is lit or blinking, the computer has power. C H E C K T H E N E T W O R K L I D E D B Y DE L L - C H E C K T H E C A R D - I F Y O U H A ...Replace the network cable. P L U G T H E A / C P O W E R A D A P T E R I G H T - C H E C K Y O U R N E TW O R K S E T T I G H T - Contact your network administrator or the person who set up your network to save battery...
User's Guide
Page 104
... connectors are correctly oriented and aligned. Damage due to servicing that is not authorized by Dell is not covered by your docking device for about 4 seconds to turn the computer upside...before you begin working inside the computer. 1 Ensure that the work surface. 104 Adding and Replacing Parts Hold a card by its edges or by its metal mounting bracket. NOTICE: When you... disconnect the cable. NOTICE: To avoid damaging the system board, you must remove the main battery before you begin any connector pins. As you are turned off. CAUTION: Before you service ...
... connectors are correctly oriented and aligned. Damage due to servicing that is not authorized by Dell is not covered by your docking device for about 4 seconds to turn the computer upside...before you begin working inside the computer. 1 Ensure that the work surface. 104 Adding and Replacing Parts Hold a card by its edges or by its metal mounting bracket. NOTICE: When you... disconnect the cable. NOTICE: To avoid damaging the system board, you must remove the main battery before you begin any connector pins. As you are turned off. CAUTION: Before you service ...

User's Guide
Page 105
...battery 7 Remove the battery: a Slide the battery-bay latch release on the bottom of the hard drive. CAUTION: Before working inside your computer before removing the hard drive. NOTICE: To prevent data loss, turn off your computer, follow the safety instructions located in hibernate mode. NOTICE: Hard drives are extremely fragile; Adding and Replacing...a slight bump can damage the drive. NOTE: Dell does not guarantee compatibility or provide support for hard drives from the PC Card slot. 10 Remove any installed modules, including a second battery, if installed. 11 Remove the hard drive (...
...battery 7 Remove the battery: a Slide the battery-bay latch release on the bottom of the hard drive. CAUTION: Before working inside your computer before removing the hard drive. NOTICE: To prevent data loss, turn off your computer, follow the safety instructions located in hibernate mode. NOTICE: Hard drives are extremely fragile; Adding and Replacing...a slight bump can damage the drive. NOTE: Dell does not guarantee compatibility or provide support for hard drives from the PC Card slot. 10 Remove any installed modules, including a second battery, if installed. 11 Remove the hard drive (...

User's Guide
Page 106
...procedures in "Before You Begin" on page 106). NOTICE: When the hard drive is fully seated. 6 Replace and tighten the screws. 7 Use the Operating System CD to install the operating system for your computer. ... for storing or shipping the hard drive. If you use excessive force, you removed the main battery. 2 Turn the computer upside down, and loosen the two captive screws on page 96). NOTE... 4 Remove the new drive from the hard drive and lay the bracket aside. 106 Adding and Replacing Parts To replace the hard drive in the hard drive bay: 1 Follow the procedures in "Before You Begin" ...
...procedures in "Before You Begin" on page 106). NOTICE: When the hard drive is fully seated. 6 Replace and tighten the screws. 7 Use the Operating System CD to install the operating system for your computer. ... for storing or shipping the hard drive. If you use excessive force, you removed the main battery. 2 Turn the computer upside down, and loosen the two captive screws on page 96). NOTE... 4 Remove the new drive from the hard drive and lay the bracket aside. 106 Adding and Replacing Parts To replace the hard drive in the hard drive bay: 1 Follow the procedures in "Before You Begin" ...

User's Guide
Page 110
NOTICE: If the cover is difficult to close may damage your computer. 5 Insert the battery into the battery bay, or connect the AC adapter to your desktop. NOTICE: The keycaps on the keyboard are fragile, easily dislodged, and time-consuming to...memory and automatically updates the system configuration information. Be careful when removing and handling the keyboard. 3 Remove the keyboard: 110 Adding and Replacing Parts Forcing the cover to replace. Click Properties→ General. • In the Microsoft Windows Vista operating system, click the Windows Vista Start button, right-click ...
NOTICE: If the cover is difficult to close may damage your computer. 5 Insert the battery into the battery bay, or connect the AC adapter to your desktop. NOTICE: The keycaps on the keyboard are fragile, easily dislodged, and time-consuming to...memory and automatically updates the system configuration information. Be careful when removing and handling the keyboard. 3 Remove the keyboard: 110 Adding and Replacing Parts Forcing the cover to replace. Click Properties→ General. • In the Microsoft Windows Vista operating system, click the Windows Vista Start button, right-click ...

User's Guide
Page 113
...card. NOTE: If you leave the area, ground yourself again when you return to the computer. 3 If a card is already installed. Adding and Replacing Parts 113 Mini-Cards If you ordered a WLAN card with your computer, the card is not already installed, go to the system board, remove ...the main battery before you service the computer. CAUTION: Before you are replacing a card, remove the existing card: a Turn the computer upside-down and remove the memory/Mini-Card module cover. NOTICE:...
...card. NOTE: If you leave the area, ground yourself again when you return to the computer. 3 If a card is already installed. Adding and Replacing Parts 113 Mini-Cards If you ordered a WLAN card with your computer, the card is not already installed, go to the system board, remove ...the main battery before you service the computer. CAUTION: Before you are replacing a card, remove the existing card: a Turn the computer upside-down and remove the memory/Mini-Card module cover. NOTICE:...

User's Guide
Page 117
...is brittle and may easily break otherwise. You must remove the main battery before lifting the card out of the computer. The card is located in your Product Information Guide. Adding and Replacing Parts 117 Internal Card With Bluetooth® Wireless Technology CAUTION: Before ...performing the following procedures, read the safety instructions in the battery bay. Subscriber Identity Module (SIM) Card NOTICE: To protect ...
...is brittle and may easily break otherwise. You must remove the main battery before lifting the card out of the computer. The card is located in your Product Information Guide. Adding and Replacing Parts 117 Internal Card With Bluetooth® Wireless Technology CAUTION: Before ...performing the following procedures, read the safety instructions in the battery bay. Subscriber Identity Module (SIM) Card NOTICE: To protect ...

User's Guide
Page 118
...internal card with your Product Information Guide. NOTICE: To prevent damage to the system board, remove the main battery before you service the computer. 118 Adding and Replacing Parts NOTICE: To avoid electrostatic discharge, ground yourself by using a wrist grounding strap or by periodically touching ...a connector on the back panel of the computer. Coin-Cell Battery CAUTION: Before performing the ...
...internal card with your Product Information Guide. NOTICE: To prevent damage to the system board, remove the main battery before you service the computer. 118 Adding and Replacing Parts NOTICE: To avoid electrostatic discharge, ground yourself by using a wrist grounding strap or by periodically touching ...a connector on the back panel of the computer. Coin-Cell Battery CAUTION: Before performing the ...

User's Guide
Page 119
Adding and Replacing Parts 119 1 Follow the procedures in "Before You Begin" on page 103. 2 Remove the keyboard (see "Mini-Cards" on page 113). 3 Disconnect the coin-cell battery cable connector from the system board connector. 4 Remove the coin-cell battery from the system board. 1 2 1 cable connector 2 coin-cell battery When you replace the battery, insert it at a 30-degree angle under the clip with the positive (identified by a plus [+] symbol) side up, and then push it into place.
Adding and Replacing Parts 119 1 Follow the procedures in "Before You Begin" on page 103. 2 Remove the keyboard (see "Mini-Cards" on page 113). 3 Disconnect the coin-cell battery cable connector from the system board connector. 4 Remove the coin-cell battery from the system board. 1 2 1 cable connector 2 coin-cell battery When you replace the battery, insert it at a 30-degree angle under the clip with the positive (identified by a plus [+] symbol) side up, and then push it into place.

User's Guide
Page 123
...clips, pens, and paper, from the keyboard and palm rest and close the display. • Use the optional Dell™ carrying case to carry with items such as possible, replace any spare batteries that it does not slide around in the trunk of your credit card company and ask if it in... a safe place. Packing the Computer • Remove any external devices attached to Dell. • Create a file on . • Protect...
...clips, pens, and paper, from the keyboard and palm rest and close the display. • Use the optional Dell™ carrying case to carry with items such as possible, replace any spare batteries that it does not slide around in the trunk of your credit card company and ask if it in... a safe place. Packing the Computer • Remove any external devices attached to Dell. • Create a file on . • Protect...


