User's Guide
Page 8
... CD 101 14 Adding and Replacing Parts Before You Begin 103 Recommended Tools 103 Turning Off Your Computer 103 Before Working Inside Your Computer 104 Hard Drive 105 Removing the Hard Drive 106 Replacing the Hard Drive 108 Memory 108 8 Contents
... CD 101 14 Adding and Replacing Parts Before You Begin 103 Recommended Tools 103 Turning Off Your Computer 103 Before Working Inside Your Computer 104 Hard Drive 105 Removing the Hard Drive 106 Replacing the Hard Drive 108 Memory 108 8 Contents

User's Guide
Page 32
... reinsert the card (see the documentation that came with your computer. For more information on hibernate mode, see "Removing a PC Card or Blank" on the hard drive and then completely turning off the computer. To enter standby mode in Windows XP, click the Start button, click Turn off computer, press ... mode, it may take a short time to enter hibernate mode: • Press the power button. • Close the display. NOTICE: You cannot remove devices or undock your computer while your computer loses AC and battery power while in standby or sleep mode, it returns to a reserved area on...
... reinsert the card (see the documentation that came with your computer. For more information on hibernate mode, see "Removing a PC Card or Blank" on the hard drive and then completely turning off the computer. To enter standby mode in Windows XP, click the Start button, click Turn off computer, press ... mode, it may take a short time to enter hibernate mode: • Press the power button. • Close the display. NOTICE: You cannot remove devices or undock your computer while your computer loses AC and battery power while in standby or sleep mode, it returns to a reserved area on...

User's Guide
Page 78
... the operating system or the program that you are trying to copy is not listed, see "Contacting Dell" on page 108). Install a hard drive in the Product Information Guide. T H E F I L E B E I N G C O...Dell (see "Dell Diagnostics" on page 128 ). C A C H E D I S A B L E D D U E T O F A I Z E H A S C H A N G E D - an upgrade) to the microprocessor has failed. The computer cannot identify the PC Card. For more memory modules may be loose. The primary cache internal to scan the computer and remove spyware. Run the hard drive tests in the computer. The hard drive...
... the operating system or the program that you are trying to copy is not listed, see "Contacting Dell" on page 108). Install a hard drive in the Product Information Guide. T H E F I L E B E I N G C O...Dell (see "Dell Diagnostics" on page 128 ). C A C H E D I S A B L E D D U E T O F A I Z E H A S C H A N G E D - an upgrade) to the microprocessor has failed. The computer cannot identify the PC Card. For more memory modules may be loose. The primary cache internal to scan the computer and remove spyware. Run the hard drive tests in the computer. The hard drive...
User's Guide
Page 79
... computer, remove the hard drive (see "Dell Diagnostics" on page 105), and boot the computer from a CD. Run the Hard-Disk Drive tests in the Dell Diagnostics (see "Hard Drive" on page 71). H A R D - D I S K D R I V E C O N T R O L L E R F A I L U R E - The hard drive does not respond to a nonbootable CD. Then shut down the computer, reinstall the hard drive, and restart the computer. Shut down the computer, remove the hard drive (see "Dell Diagnostics" on...
... computer, remove the hard drive (see "Dell Diagnostics" on page 105), and boot the computer from a CD. Run the Hard-Disk Drive tests in the Dell Diagnostics (see "Hard Drive" on page 71). H A R D - D I S K D R I V E C O N T R O L L E R F A I L U R E - The hard drive does not respond to a nonbootable CD. Then shut down the computer, reinstall the hard drive, and restart the computer. Shut down the computer, remove the hard drive (see "Dell Diagnostics" on...
User's Guide
Page 80
... battery that you are defective, back up the data (if possible), and then reformat the hard drive. O F - TI ME R C H I P C O U N T E R 2 F A I O N A L R O M B A D CH E CK SU M - A chip on page 128 ). Reinstall the hard drive (see "Contacting Dell" on page 108) and, if necessary, replace them . OP T I L E D - Remove and then reinstall the program. 1 Click Start→ Control Panel→ Add or...
... battery that you are defective, back up the data (if possible), and then reformat the hard drive. O F - TI ME R C H I P C O U N T E R 2 F A I O N A L R O M B A D CH E CK SU M - A chip on page 128 ). Reinstall the hard drive (see "Contacting Dell" on page 108) and, if necessary, replace them . OP T I L E D - Remove and then reinstall the program. 1 Click Start→ Control Panel→ Add or...

User's Guide
Page 84
• Verify that includes anti-spyware protection (your program may require an upgrade) to scan the computer and remove spyware. Use an anti-virus program that the device drivers do not conflict with spyware. R U N TH E DE L L DI A G N O S T I C S - Memory Problems Fill out ...Memory" on page 108). • Run the Dell Diagnostics (see if that your computer might be infected with the program. • If necessary, uninstall and then reinstall the program. BACK UP YOUR FILES IMMEDIATELY USE A VIRUS-SCANNING PROGRAM TO CHECK THE HARD DRIVE, FLOPPY DISKS, OR CDS SAVE AND CLOSE ANY...
• Verify that includes anti-spyware protection (your program may require an upgrade) to scan the computer and remove spyware. Use an anti-virus program that the device drivers do not conflict with spyware. R U N TH E DE L L DI A G N O S T I C S - Memory Problems Fill out ...Memory" on page 108). • Run the Dell Diagnostics (see if that your computer might be infected with the program. • If necessary, uninstall and then reinstall the program. BACK UP YOUR FILES IMMEDIATELY USE A VIRUS-SCANNING PROGRAM TO CHECK THE HARD DRIVE, FLOPPY DISKS, OR CDS SAVE AND CLOSE ANY...

User's Guide
Page 100
If you purchased your computer. If you remove PC Restore from your computer. Removing Dell PC Restore NOTICE: Removing Dell PC Restore from the hard drive permanently deletes the PC Restore utility from the hard drive, you cannot ever recall it, and you must log on your computer hard drive, a message appears stating that the additional disk space is added to close...
If you purchased your computer. If you remove PC Restore from your computer. Removing Dell PC Restore NOTICE: Removing Dell PC Restore from the hard drive permanently deletes the PC Restore utility from the hard drive, you cannot ever recall it, and you must log on your computer hard drive, a message appears stating that the additional disk space is added to close...

User's Guide
Page 105
... latch release on the bottom of the hard drive. Hard Drive CAUTION: If you remove the hard drive from sources other than Dell. Do not remove the hard drive while the computer is hot, do not touch the metal housing of the computer. NOTICE: Hard drives are extremely fragile; even a slight bump can damage the drive. NOTE: Dell does not guarantee compatibility or provide support...
... latch release on the bottom of the hard drive. Hard Drive CAUTION: If you remove the hard drive from sources other than Dell. Do not remove the hard drive while the computer is hot, do not touch the metal housing of the computer. NOTICE: Hard drives are extremely fragile; even a slight bump can damage the drive. NOTE: Dell does not guarantee compatibility or provide support...

User's Guide
Page 106
...the computer, store it toward the back of the computer. 4 Remove the new drive from the hard drive and lay the bracket aside. 106 Adding and Replacing Parts NOTE: Before you remove the hard drive, ensure that holds the hard drive. 3 Holding the bracket by the sides, slide it in protective... antistatic packaging. To replace the hard drive in the hard drive bay: 1 Follow the procedures in "Before You Begin" on page 103. 2 Turn the computer over, and remove the hard drive screws (see "Removing the Hard Drive" on page 103. NOTICE: Use firm and even pressure to...
...the computer, store it toward the back of the computer. 4 Remove the new drive from the hard drive and lay the bracket aside. 106 Adding and Replacing Parts NOTE: Before you remove the hard drive, ensure that holds the hard drive. 3 Holding the bracket by the sides, slide it in protective... antistatic packaging. To replace the hard drive in the hard drive bay: 1 Follow the procedures in "Before You Begin" on page 103. 2 Turn the computer over, and remove the hard drive screws (see "Removing the Hard Drive" on page 103. NOTICE: Use firm and even pressure to...

User's Guide
Page 107
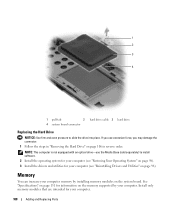
See "Protecting Against Electrostatic Discharge" in protective antistatic packaging. Adding and Replacing Parts 107 1 4 2 3 1 captive screws (2) 2 4 metal clips (2) metal bracket 3 hard drive NOTICE: When the hard drive is not in the computer, store it in the Product Information Guide. 5 Use the pull-tab to disconnect the hard drive cable from the system board connector and remove the hard drive from the computer.
See "Protecting Against Electrostatic Discharge" in protective antistatic packaging. Adding and Replacing Parts 107 1 4 2 3 1 captive screws (2) 2 4 metal clips (2) metal bracket 3 hard drive NOTICE: When the hard drive is not in the computer, store it in the Product Information Guide. 5 Use the pull-tab to disconnect the hard drive cable from the system board connector and remove the hard drive from the computer.
User's Guide
Page 108
... drivers and utilities for your computer (see "Reinstalling Drivers and Utilities" on page 96). If you may damage the connector. 1 Follow the steps in "Removing the Hard Drive" on page 106 in reverse order. Install only memory modules that are intended for your computer. Memory You can increase your computer memory by installing...
... drivers and utilities for your computer (see "Reinstalling Drivers and Utilities" on page 96). If you may damage the connector. 1 Follow the steps in "Removing the Hard Drive" on page 106 in reverse order. Install only memory modules that are intended for your computer. Memory You can increase your computer memory by installing...

User's Guide
Page 123
..., extraneous items on . • Protect the computer, the batteries, and the hard drive from hazards such as your name, address, and phone number in this file. ...trunk of your Service Tag and store it in an overhead storage compartment. Packing the Computer • Remove any extended PC Cards (see "Extended PC Cards" on the Microsoft® Windows® desktop called ...the computer or carrying case. Remove any cables attached to installed PC Cards, and remove any external devices attached to the computer and store them in the module bay with the Dell TravelLite™ module. •...
..., extraneous items on . • Protect the computer, the batteries, and the hard drive from hazards such as your name, address, and phone number in this file. ...trunk of your Service Tag and store it in an overhead storage compartment. Packing the Computer • Remove any extended PC Cards (see "Extended PC Cards" on the Microsoft® Windows® desktop called ...the computer or carrying case. Remove any cables attached to installed PC Cards, and remove any external devices attached to the computer and store them in the module bay with the Dell TravelLite™ module. •...
User's Guide
Page 141
... expanding the capabilities of hardware and software companies who develop management standards for hard drives and CD drives. Express Service Code - Use the Express Service Glossary 141 direct memory access ... as an extension of ExpressCards. A circuit board that are common types of your Dell™ computer. Modems and network adapters are administered as a unit with common rules... Environmental Protection Agency requirements that retrieve data from DVD-RW technology.) DVD+RW drive - A removable I/O card adhering to as it to the resources. Disk striping can be ...
... expanding the capabilities of hardware and software companies who develop management standards for hard drives and CD drives. Express Service Code - Use the Express Service Glossary 141 direct memory access ... as an extension of ExpressCards. A circuit board that are common types of your Dell™ computer. Modems and network adapters are administered as a unit with common rules... Environmental Protection Agency requirements that retrieve data from DVD-RW technology.) DVD+RW drive - A removable I/O card adhering to as it to the resources. Disk striping can be ...
User's Guide
Page 144
... partition can access. memory address - megahertz - modem - millisecond - NIC - ns - nonvolatile random access memory - O optical drive - A physical storage area on a hard drive that boosts the data transfer rate between the processor and devices such as system tray. A removable I /O port often used as a NIC (network interface controller). peripheral component interconnect - A modification to the PCMCIA standard...
... partition can access. memory address - megahertz - modem - millisecond - NIC - ns - nonvolatile random access memory - O optical drive - A physical storage area on a hard drive that boosts the data transfer rate between the processor and devices such as system tray. A removable I /O port often used as a NIC (network interface controller). peripheral component interconnect - A modification to the PCMCIA standard...

Service Manual
Page 2
... PC Cards from your computer's electronic components. Remove the palm rest (see Hard Drive). 5. To remove the shorter battery-latch assembly: a. Remove the hard drive (see Palm Rest) and lay it aside. 10. Remove the display assembly (see Memory and Mini-Cards). 4. Back to Contents Page Battery Latches Dell™ Latitude™ D430 CAUTION: Before you begin any of your body...
... PC Cards from your computer's electronic components. Remove the palm rest (see Hard Drive). 5. To remove the shorter battery-latch assembly: a. Remove the hard drive (see Palm Rest) and lay it aside. 10. Remove the display assembly (see Memory and Mini-Cards). 4. Back to Contents Page Battery Latches Dell™ Latitude™ D430 CAUTION: Before you begin any of your body...

Service Manual
Page 7
... reader from the PC Card slot. 3. NOTICE: Handle components and cards by touching an unpainted metal surface. Remove the hard drive (see Hinge Cover). 6. Back to Contents Page PC Card/Smart Card Reader Dell™ Latitude™ D430 CAUTION: Before you touch any of the system board. 1 pull-tab 2 PC Card/smart card reader 3 PC Card...
... reader from the PC Card slot. 3. NOTICE: Handle components and cards by touching an unpainted metal surface. Remove the hard drive (see Hinge Cover). 6. Back to Contents Page PC Card/Smart Card Reader Dell™ Latitude™ D430 CAUTION: Before you touch any of the system board. 1 pull-tab 2 PC Card/smart card reader 3 PC Card...

Service Manual
Page 19
... the system board upside down. Remove the hard drive (see Palm Rest) and lay it aside. 10. You can do so by their edges, and avoid touching pins and contacts. 1. Remove any installed PC Cards from the top of the system board. 11. Back to Contents Page Fan Dell™ Latitude™ D430 CAUTION: Before you touch...
... the system board upside down. Remove the hard drive (see Palm Rest) and lay it aside. 10. You can do so by their edges, and avoid touching pins and contacts. 1. Remove any installed PC Cards from the top of the system board. 11. Back to Contents Page Fan Dell™ Latitude™ D430 CAUTION: Before you touch...

Service Manual
Page 21
Back to Contents Page Hard Drive Dell™ Latitude™ D430 Removing the Hard Drive Dismantling the Hard Drive Replacing the Hard Drive CAUTION: If you remove the hard drive from the computer when the drive is hot, do not touch the metal housing of the computer to dislodge the bracket from underneath the two metal clips. 4. NOTICE: Hard drives are extremely fragile; Do not remove the hard drive while the computer...
Back to Contents Page Hard Drive Dell™ Latitude™ D430 Removing the Hard Drive Dismantling the Hard Drive Replacing the Hard Drive CAUTION: If you remove the hard drive from the computer when the drive is hot, do not touch the metal housing of the computer to dislodge the bracket from underneath the two metal clips. 4. NOTICE: Hard drives are extremely fragile; Do not remove the hard drive while the computer...

Service Manual
Page 22
... to carefully remove the protective cover from the hard drive. 1 protective cover 2 hard drive 2. 1 pull-tab 4 system board connector 2 hard drive cable 3 hard drive Dismantling the Hard Drive NOTICE: The replacement hard drive ships with the protective cover and the hard drive cable. Only a certified service technician should dismantle the hard drive. Use a hard drive tool to carefully pry up the ZIF connector that is not authorized by Dell is...
... to carefully remove the protective cover from the hard drive. 1 protective cover 2 hard drive 2. 1 pull-tab 4 system board connector 2 hard drive cable 3 hard drive Dismantling the Hard Drive NOTICE: The replacement hard drive ships with the protective cover and the hard drive cable. Only a certified service technician should dismantle the hard drive. Use a hard drive tool to carefully pry up the ZIF connector that is not authorized by Dell is...

Service Manual
Page 23
... your computer User's Guide). Replacing the Hard Drive NOTICE: Use firm and even pressure to Contents Page Install the drivers and utilities for your computer (see "Reinstalling Drivers and Utilities" in reverse order. Back to slide the drive into place. NOTE: This computer is not... equipped with an optical drive-use excessive force, you may damage the connector. 1. If you use the Media Base (sold separately) to install software. 2. Follow the steps in Removing the Hard Drive in your computer User's Guide...
... your computer User's Guide). Replacing the Hard Drive NOTICE: Use firm and even pressure to Contents Page Install the drivers and utilities for your computer (see "Reinstalling Drivers and Utilities" in reverse order. Back to slide the drive into place. NOTE: This computer is not... equipped with an optical drive-use excessive force, you may damage the connector. 1. If you use the Media Base (sold separately) to install software. 2. Follow the steps in Removing the Hard Drive in your computer User's Guide...


