
Service Manual
Page 1
... and Cautions NOTE: A NOTE indicates important information that helps you how to change without the written permission of Dell Inc. under license. Bluetooth is used by Bluetooth SIG, Inc. Dell Inc. is subject to avoid the problem. NOTICE: A NOTICE indicates either the entities claiming the marks and... hardware or loss of data and tells you make better use of Dell Inc.; Other trademarks and trade names may be used in trademarks and trade names other than its own. Dell™ Latitude™ D430 Service Manual Before You Begin Hard Drive Hinge Cover Keyboard Coin-Cell ...
... and Cautions NOTE: A NOTE indicates important information that helps you how to change without the written permission of Dell Inc. under license. Bluetooth is used by Bluetooth SIG, Inc. Dell Inc. is subject to avoid the problem. NOTICE: A NOTICE indicates either the entities claiming the marks and... hardware or loss of data and tells you make better use of Dell Inc.; Other trademarks and trade names may be used in trademarks and trade names other than its own. Dell™ Latitude™ D430 Service Manual Before You Begin Hard Drive Hinge Cover Keyboard Coin-Cell ...

Service Manual
Page 2
... contacts. 1. Remove the keyboard (see Display Assembly). 9. Remove the display assembly (see Keyboard). 7. Use a screw driver or a plastic scribe to Contents Page Battery Latches Dell™ Latitude™ D430 CAUTION: Before you touch any installed memory modules or Mini PCI cards (see Palm Rest) and lay it aside. 10. To remove the shorter...
... contacts. 1. Remove the keyboard (see Display Assembly). 9. Remove the display assembly (see Keyboard). 7. Use a screw driver or a plastic scribe to Contents Page Battery Latches Dell™ Latitude™ D430 CAUTION: Before you touch any installed memory modules or Mini PCI cards (see Palm Rest) and lay it aside. 10. To remove the shorter...
Service Manual
Page 4
... hold the power button for about 4 seconds to prevent the computer cover from potential damage and to help to Contents Page Before You Begin Dell™ Latitude™ D430 Recommended Tools Turning Off Your Computer Before Working Inside Your Computer This chapter provides procedures for removing and installing the components in this type...
... hold the power button for about 4 seconds to prevent the computer cover from potential damage and to help to Contents Page Before You Begin Dell™ Latitude™ D430 Recommended Tools Turning Off Your Computer Before Working Inside Your Computer This chapter provides procedures for removing and installing the components in this type...

Service Manual
Page 6
... card cable connector from the card. 1 internal card with your Product Information Guide. Back to Contents Page Internal Card With Bluetooth® Wireless Technology Dell™ Latitude™ D430 CAUTION: Before performing the following procedures, read the safety instructions in "Before You Begin" on the back panel of the computer. Follow the procedures...
... card cable connector from the card. 1 internal card with your Product Information Guide. Back to Contents Page Internal Card With Bluetooth® Wireless Technology Dell™ Latitude™ D430 CAUTION: Before performing the following procedures, read the safety instructions in "Before You Begin" on the back panel of the computer. Follow the procedures...

Service Manual
Page 7
... and pull on page 7. 2. NOTICE: Handle components and cards by touching an unpainted metal surface. Back to Contents Page PC Card/Smart Card Reader Dell™ Latitude™ D430 CAUTION: Before you begin any of the procedures in this section, follow the safety instructions in "Before You Begin" on the pull-tab to...
... and pull on page 7. 2. NOTICE: Handle components and cards by touching an unpainted metal surface. Back to Contents Page PC Card/Smart Card Reader Dell™ Latitude™ D430 CAUTION: Before you begin any of the procedures in this section, follow the safety instructions in "Before You Begin" on the pull-tab to...

Service Manual
Page 8
... angle under the clip with the positive (identified by periodically touching a connector on page 7. 2. NOTICE: To prevent damage to Contents Page Coin-Cell Battery Dell™ Latitude™ D430 CAUTION: Before performing the following procedures, follow the safety instructions in "Before You Begin" on the back panel of the computer. Remove the coin...
... angle under the clip with the positive (identified by periodically touching a connector on page 7. 2. NOTICE: To prevent damage to Contents Page Coin-Cell Battery Dell™ Latitude™ D430 CAUTION: Before performing the following procedures, follow the safety instructions in "Before You Begin" on the back panel of the computer. Remove the coin...
Service Manual
Page 9
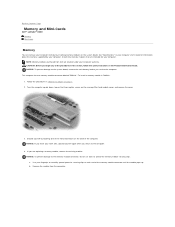
...User's Guide for your computer. Ground yourself by installing memory modules on the system board. Use your computer. Remove the module from Dell are intended for information about the memory supported by your fingertips to the computer. 4. CAUTION: Before you service the computer. a. ..." on the memory/Mini-Card module cover, and remove the cover. 3. b. Back to Contents Page Memory and Mini-Cards Dell™ Latitude™ D430 Memory Mini-Cards Memory You can increase your computer memory by touching one memory module connector labeled "DIMM A." Install only memory ...
...User's Guide for your computer. Ground yourself by installing memory modules on the system board. Use your computer. Remove the module from Dell are intended for information about the memory supported by your fingertips to the computer. 4. CAUTION: Before you service the computer. a. ..." on the memory/Mini-Card module cover, and remove the cover. 3. b. Back to Contents Page Memory and Mini-Cards Dell™ Latitude™ D430 Memory Mini-Cards Memory You can increase your computer memory by touching one memory module connector labeled "DIMM A." Install only memory ...

Service Manual
Page 15
NOTICE: You must remove the display assembly before you begin any plastic sleeves that any of the computer to Contents Page Display Assembly Dell™ Latitude™ D430 Removing the Display Assembly Removing the Display Bezel Removing the Display Panel Removing the Display-Panel Brackets Removing the Display Cable Removing the Display Latch ...
NOTICE: You must remove the display assembly before you begin any plastic sleeves that any of the computer to Contents Page Display Assembly Dell™ Latitude™ D430 Removing the Display Assembly Removing the Display Bezel Removing the Display Panel Removing the Display-Panel Brackets Removing the Display Cable Removing the Display Latch ...

Service Manual
Page 19
... safety instructions in "Before You Begin" on top of your computer's electronic components. Remove the keyboard (see Hinge Cover). 6. Back to Contents Page Fan Dell™ Latitude™ D430 CAUTION: Before you begin any of the way before you touch any installed PC Cards from the top of the system board. 11. NOTICE...
... safety instructions in "Before You Begin" on top of your computer's electronic components. Remove the keyboard (see Hinge Cover). 6. Back to Contents Page Fan Dell™ Latitude™ D430 CAUTION: Before you begin any of the way before you touch any installed PC Cards from the top of the system board. 11. NOTICE...

Service Manual
Page 20
Back to enter the system setup program. 4. Press during POST to Contents Page Flashing the BIOS Dell™ Latitude™ D430 1. Remove the flash BIOS update program CD from a CD before inserting the CD. 2. Ensure that the AC adapter is plugged in and that appear on ...
Back to enter the system setup program. 4. Press during POST to Contents Page Flashing the BIOS Dell™ Latitude™ D430 1. Remove the flash BIOS update program CD from a CD before inserting the CD. 2. Ensure that the AC adapter is plugged in and that appear on ...

Service Manual
Page 21
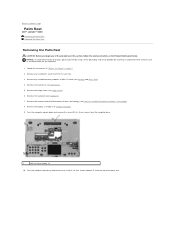
... need the Operating System CD to disconnect the hard drive cable from the system board connector and remove the hard drive from sources other than Dell. even a slight bump can damage the drive. Use the pull-tab to install the Microsoft® Windows® operating system. CAUTION: ...You Begin" on page 7. Removing the Hard Drive 1. NOTICE: To prevent data loss, turn off your computer to Contents Page Hard Drive Dell™ Latitude™ D430 Removing the Hard Drive Dismantling the Hard Drive Replacing the Hard Drive CAUTION: If you remove the hard drive from the hard drive and...
... need the Operating System CD to disconnect the hard drive cable from the system board connector and remove the hard drive from sources other than Dell. even a slight bump can damage the drive. Use the pull-tab to install the Microsoft® Windows® operating system. CAUTION: ...You Begin" on page 7. Removing the Hard Drive 1. NOTICE: To prevent data loss, turn off your computer to Contents Page Hard Drive Dell™ Latitude™ D430 Removing the Hard Drive Dismantling the Hard Drive Replacing the Hard Drive CAUTION: If you remove the hard drive from the hard drive and...
Service Manual
Page 24
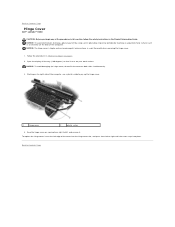
Be careful when removing the hinge cover. 1. Starting on the right side of the computer, use a plastic scribe to Contents Page Hinge Cover Dell™ Latitude™ D430 CAUTION: Before you begin any of the procedures in this section, follow the safety instructions in "Before You Begin" on both sides simultaneously. 3. Back to ...
Be careful when removing the hinge cover. 1. Starting on the right side of the computer, use a plastic scribe to Contents Page Hinge Cover Dell™ Latitude™ D430 CAUTION: Before you begin any of the procedures in this section, follow the safety instructions in "Before You Begin" on both sides simultaneously. 3. Back to ...

Service Manual
Page 25
... on the keyboard are fragile, easily dislodged, and time- NOTICE: Lift the keyboard carefully in the Product Information Guide. Back to Contents Page Keyboard Dell™ Latitude™ D430 CAUTION: Before you begin any of the procedures in this section, follow the safety instructions in step b to ensure that you do not pull...
... on the keyboard are fragile, easily dislodged, and time- NOTICE: Lift the keyboard carefully in the Product Information Guide. Back to Contents Page Keyboard Dell™ Latitude™ D430 CAUTION: Before you begin any of the procedures in this section, follow the safety instructions in step b to ensure that you do not pull...
Service Manual
Page 26
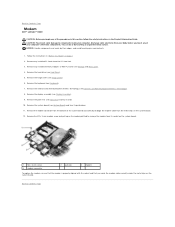
.... 11. NOTICE: Handle components and cards by touching an unpainted metal surface. Remove the hard drive (see Display Assembly). 9. Back to Contents Page Modem Dell™ Latitude™ D430 CAUTION: Before you route the modem cable correctly under the metal clips on the system board. Follow the instructions in the Product Information Guide...
.... 11. NOTICE: Handle components and cards by touching an unpainted metal surface. Remove the hard drive (see Display Assembly). 9. Back to Contents Page Modem Dell™ Latitude™ D430 CAUTION: Before you route the modem cable correctly under the metal clips on the system board. Follow the instructions in the Product Information Guide...
Service Manual
Page 27
... base. 1 M2.5 x 5-mm screws (7) 10. Remove the display assembly (see Hard Drive). 5. Remove any of the palm rest. Back to Contents Page Palm Rest Dell™ Latitude™ D430 Removing the Palm Rest Replacing the Palm Rest Removing the Palm Rest CAUTION: Before you begin any installed PC Cards from the PC Card...
... base. 1 M2.5 x 5-mm screws (7) 10. Remove the display assembly (see Hard Drive). 5. Remove any of the palm rest. Back to Contents Page Palm Rest Dell™ Latitude™ D430 Removing the Palm Rest Replacing the Palm Rest Removing the Palm Rest CAUTION: Before you begin any installed PC Cards from the PC Card...

Service Manual
Page 31
... With Bluetooth® Wireless Technology). 8. Remove the internal card with Bluetooth® wireless technology (see Hinge Cover). 6. Back to Contents Page Power Button Assembly Dell™ Latitude™ D430 CAUTION: Before you touch any installed memory modules or Mini PCI cards (see Memory and Mini-Cards). 4. Disconnect the power-button assembly connector from...
... With Bluetooth® Wireless Technology). 8. Remove the internal card with Bluetooth® wireless technology (see Hinge Cover). 6. Back to Contents Page Power Button Assembly Dell™ Latitude™ D430 CAUTION: Before you touch any installed memory modules or Mini PCI cards (see Memory and Mini-Cards). 4. Disconnect the power-button assembly connector from...
Service Manual
Page 32
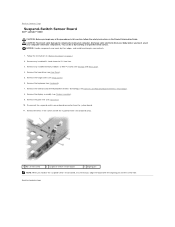
... and the screw hole. Disconnect the suspend-switch sensor board connector from your computer's electronic components. Back to Contents Page Suspend-Switch Sensor Board Dell™ Latitude™ D430 CAUTION: Before you begin any of the procedures in this section, follow the safety instructions in "Before You Begin" on page 7. 2. Follow the instructions...
... and the screw hole. Disconnect the suspend-switch sensor board connector from your computer's electronic components. Back to Contents Page Suspend-Switch Sensor Board Dell™ Latitude™ D430 CAUTION: Before you begin any of the procedures in this section, follow the safety instructions in "Before You Begin" on page 7. 2. Follow the instructions...

Service Manual
Page 33
... the wall of the procedures in this section, follow the safety instructions in "Before You Begin" on page 7. 2. Back to Contents Page Wireless Switch Dell™ Latitude™ D430 CAUTION: Before you touch any of your body before you begin any of the computer base. 1 computer base Back to Contents Page 2 wireless switch...
... the wall of the procedures in this section, follow the safety instructions in "Before You Begin" on page 7. 2. Back to Contents Page Wireless Switch Dell™ Latitude™ D430 CAUTION: Before you touch any of your body before you begin any of the computer base. 1 computer base Back to Contents Page 2 wireless switch...

Service Manual
Page 34
... the speaker connector from the computer base. 1 speaker 4 bottom of palm rest 2 M2 x 3-mm speaker screws (2) 3 speaker cables routing Back to Contents Page Speaker Dell™ Latitude™ D430 CAUTION: Before you begin any installed PC Cards from the PC Card slot. 3. Follow the instructions in the Product Information Guide. Remove the keyboard...
... the speaker connector from the computer base. 1 speaker 4 bottom of palm rest 2 M2 x 3-mm speaker screws (2) 3 speaker cables routing Back to Contents Page Speaker Dell™ Latitude™ D430 CAUTION: Before you begin any installed PC Cards from the PC Card slot. 3. Follow the instructions in the Product Information Guide. Remove the keyboard...
Service Manual
Page 35
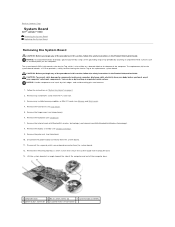
...: To prevent static damage to components inside your computer's electronic components. Remove the hinge cover (see Hinge Cover). 6. Back to Contents Page System Board Dell™ Latitude™ D430 Removing the System Board Replacing the System Board Removing the System Board CAUTION: Before you begin any of the procedures in this section, follow...
...: To prevent static damage to components inside your computer's electronic components. Remove the hinge cover (see Hinge Cover). 6. Back to Contents Page System Board Dell™ Latitude™ D430 Removing the System Board Replacing the System Board Removing the System Board CAUTION: Before you begin any of the procedures in this section, follow...


