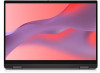
SIM/eSIM Setup Guide for Chromebook
Page 4
... enabled platforms. Install the SIM card CAUTION: Do not touch the SIM-card connectors to avoid damage to https://www.dell.com/support/ and enter the model number in -built eSIM always available and the Network menu screen shows both the SIM and the eSIM options. To view your computer's documentation for the first time NOTE: Your WWAN enabled computer does not include cellular service. To activate...
... enabled platforms. Install the SIM card CAUTION: Do not touch the SIM-card connectors to avoid damage to https://www.dell.com/support/ and enter the model number in -built eSIM always available and the Network menu screen shows both the SIM and the eSIM options. To view your computer's documentation for the first time NOTE: Your WWAN enabled computer does not include cellular service. To activate...
SIM/eSIM Setup Guide for Chromebook
Page 5
... mobile operator to connect to their cellular network. A Set up an eSIM. Scan a QR code using your device camera or enter the activation code provided by your device includes an option for both the SIM and the eSIM options. NOTE: Information in manually. 3. A message Activation code detected is only applicable to set up new network dialog box opens with dual SIM, there is selected. NOTE: In computers with single SIM, the Network menu screen...
... mobile operator to connect to their cellular network. A Set up an eSIM. Scan a QR code using your device camera or enter the activation code provided by your device includes an option for both the SIM and the eSIM options. NOTE: Information in manually. 3. A message Activation code detected is only applicable to set up new network dialog box opens with dual SIM, there is selected. NOTE: In computers with single SIM, the Network menu screen...
SIM/eSIM Setup Guide for Chromebook
Page 7
For more settings may help. However, if you connect to fix cellular connection problems, see Fix connection problems. Troubleshooting connectivity issues using cellular settings 7 4 Troubleshooting connectivity issues using cellular settings Chromebook devices have a SIM card or eSIM which allows you are having cellular connection issues, changing one or more information about how to a cellular data network by using a cellular signal. If your cellular data connection is working correctly, you need not change the cellular settings.
For more settings may help. However, if you connect to fix cellular connection problems, see Fix connection problems. Troubleshooting connectivity issues using cellular settings 7 4 Troubleshooting connectivity issues using cellular settings Chromebook devices have a SIM card or eSIM which allows you are having cellular connection issues, changing one or more information about how to a cellular data network by using a cellular signal. If your cellular data connection is working correctly, you need not change the cellular settings.
SIM/eSIM Setup Guide for Chromebook
Page 8
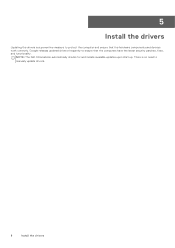
5 Install the drivers Updating the drivers is no need to manually update drivers. 8 Install the drivers There is a preventive measure to ensure that the hardware components and devices work correctly. NOTE: The Dell Chromebook automatically checks for and installs available updates upon start up. Google releases updated drivers frequently to protect the computer and ensure that the computers have the latest security patches, fixes, and functionality.
5 Install the drivers Updating the drivers is no need to manually update drivers. 8 Install the drivers There is a preventive measure to ensure that the hardware components and devices work correctly. NOTE: The Dell Chromebook automatically checks for and installs available updates upon start up. Google releases updated drivers frequently to protect the computer and ensure that the computers have the latest security patches, fixes, and functionality.

Service Manual
Page 3
... instructions...5 Before working inside your computer...5 Safety precautions...6 Electrostatic discharge-ESD protection...6 ESD field service kit ...7 Transporting sensitive components...8 After working inside your computer...8 Chapter 2: Removing and installing components 9 Recommended tools...9 Screw list...9 Major components of Latitude 5430 Chromebook...10 SIM card...12 Removing the SIM card...12 Installing the SIM card...13 Secure Digital (SD) Card...14 Removing the SD card...14 Installing the SD card...14 Base cover...15 Removing...
... instructions...5 Before working inside your computer...5 Safety precautions...6 Electrostatic discharge-ESD protection...6 ESD field service kit ...7 Transporting sensitive components...8 After working inside your computer...8 Chapter 2: Removing and installing components 9 Recommended tools...9 Screw list...9 Major components of Latitude 5430 Chromebook...10 SIM card...12 Removing the SIM card...12 Installing the SIM card...13 Secure Digital (SD) Card...14 Removing the SD card...14 Installing the SD card...14 Base cover...15 Removing...

Service Manual
Page 5
.... When connecting cables, ensure that you work surface is not covered by Dell is flat, dry, and clean. Shut down . Working inside your computer, read the safety information that you finish working inside your computer Safety instructions Use the following safety guidelines to protect your computer from the media-card reader. While you must disengage before disconnecting the cable. For Windows operating system, click Start > Power > Shut...
.... When connecting cables, ensure that you work surface is not covered by Dell is flat, dry, and clean. Shut down . Working inside your computer, read the safety information that you finish working inside your computer Safety instructions Use the following safety guidelines to protect your computer from the media-card reader. While you must disengage before disconnecting the cable. For Windows operating system, click Start > Power > Shut...

Service Manual
Page 6
... you remove all attached network devices and peripherals, such as intermittent problems or a shortened product life span. Observe the following safety precautions before you open the case. The internal power enables the system to be remotely turned on (wake on an anti-static mat. ● Wear shoes with standby power must be obvious, such as keyboard, mouse, and monitor from your operating system for connecting...
... you remove all attached network devices and peripherals, such as intermittent problems or a shortened product life span. Observe the following safety precautions before you open the case. The internal power enables the system to be remotely turned on (wake on an anti-static mat. ● Wear shoes with standby power must be obvious, such as keyboard, mouse, and monitor from your operating system for connecting...

Service Manual
Page 7
... charged. ● Working Environment - a red LED is being worked on top of the ESD bag because only the inside your wrist strap should be snug and the bonding wire should never be used service kit. The ESD bag should also be free of the bag is critical to keep ESD sensitive devices, such as replacement parts or parts to be removed from internal parts...
... charged. ● Working Environment - a red LED is being worked on top of the ESD bag because only the inside your wrist strap should be snug and the bonding wire should never be used service kit. The ESD bag should also be free of the bag is critical to keep ESD sensitive devices, such as replacement parts or parts to be removed from internal parts...

Service Manual
Page 8
... your computer and all times when servicing Dell products. Connect your computer. Connect any other parts that they use the traditional wired ESD grounding wrist strap and protective anti-static mat at all attached devices to their electrical outlets. 5. Turn on your computer. 4. Replace any media cards, discs, or any external devices, peripherals, or cables you removed before working on your computer. 8 Working inside your computer. 2. In addition...
... your computer and all times when servicing Dell products. Connect your computer. Connect any other parts that they use the traditional wired ESD grounding wrist strap and protective anti-static mat at all attached devices to their electrical outlets. 5. Turn on your computer. 4. Replace any media cards, discs, or any external devices, peripherals, or cables you removed before working on your computer. 8 Working inside your computer. 2. In addition...

Service Manual
Page 38
... this task The following image indicates the location of the volume-control board and provides a visual representation of the removal procedure. 38 Removing and installing components Connect the volume control cable to the palm-rest and keyboard assembly. 3. Install the battery. 2. Power-button board Removing the power-button board The power-button board is available in Latitude 5430 Chromebook 2-in before working inside your computer. Prerequisites 1. Replace the two screws (M1.6x1.5) that secure the volume control board to the connector on the...
... this task The following image indicates the location of the volume-control board and provides a visual representation of the removal procedure. 38 Removing and installing components Connect the volume control cable to the palm-rest and keyboard assembly. 3. Install the battery. 2. Power-button board Removing the power-button board The power-button board is available in Latitude 5430 Chromebook 2-in before working inside your computer. Prerequisites 1. Replace the two screws (M1.6x1.5) that secure the volume control board to the connector on the...

Service Manual
Page 48
... the latch. 8. NOTE: For models shipped with the display panel facing up. 2. Install the base cover. 2. Gently place the palm-rest and keyboard assembly under the display hinges. Replace the three screws (M2.5x4) that secure the right display hinge to the system board. Replace the two screws (M2x3) to secure the display-cable bracket to the palm-rest and keyboard assembly. 7. CAUTION: To...
... the latch. 8. NOTE: For models shipped with the display panel facing up. 2. Install the base cover. 2. Gently place the palm-rest and keyboard assembly under the display hinges. Replace the three screws (M2.5x4) that secure the right display hinge to the system board. Replace the two screws (M2x3) to secure the display-cable bracket to the palm-rest and keyboard assembly. 7. CAUTION: To...

Service Manual
Page 55
... keyboard cable to the system board. 10. Next steps 1. Install the speakers. 6. Install the power-button board 8. Install the battery. 12. Remove the SIM card. 3. Remove the base cover. 5. Remove the wireless card. 8. Remove the power-button board. 10. Remove the volume-control board. 11. Replace the five screws (M2x2) that secure the antenna cables to the system board and also adhere the black adhesive tape to the M.2 solid-state drive slot to the connector on the system board. 8. For 2-in -1 configurations, connect the volume-control cable...
... keyboard cable to the system board. 10. Next steps 1. Install the speakers. 6. Install the power-button board 8. Install the battery. 12. Remove the SIM card. 3. Remove the base cover. 5. Remove the wireless card. 8. Remove the power-button board. 10. Remove the volume-control board. 11. Replace the five screws (M2x2) that secure the antenna cables to the system board and also adhere the black adhesive tape to the M.2 solid-state drive slot to the connector on the system board. 8. For 2-in -1 configurations, connect the volume-control cable...
Service Manual
Page 58
... recognize most laptops, Dell laptops use of charge cycles, or exposure to malfunction, discontinue the use lithium-ion batteries. Chrome OS is the lithium-ion polymer battery. he most useful commands for various reasons such as follows: ● Exercise caution when handling Lithium-ion batteries. ● Discharge the battery before removing it by Dell)-this task The Latitude 5430 Chromebook does not support ePSA, Dell BIOS, the F12 boot menu, or...
... recognize most laptops, Dell laptops use of charge cycles, or exposure to malfunction, discontinue the use lithium-ion batteries. Chrome OS is the lithium-ion polymer battery. he most useful commands for various reasons such as follows: ● Exercise caution when handling Lithium-ion batteries. ● Discharge the battery before removing it by Dell)-this task The Latitude 5430 Chromebook does not support ePSA, Dell BIOS, the F12 boot menu, or...

Service Manual
Page 59
... conduct a WiFi power cycle: NOTE: Some ISPs (Internet Service Providers) provide a modem/router combo device. Turn off and the battery is the residual static electricity that remains in your computer. 2. The following are requested to recover your Chromebook's operating system, see Recover your computer. Type in your Chromebook at ttps://support.google.com/ chromebook WiFi power cycle About this task Flea power is removed. Drain residual flea power (perform hard reset) About...
... conduct a WiFi power cycle: NOTE: Some ISPs (Internet Service Providers) provide a modem/router combo device. Turn off and the battery is the residual static electricity that remains in your computer. 2. The following are requested to recover your Chromebook's operating system, see Recover your computer. Type in your Chromebook at ttps://support.google.com/ chromebook WiFi power cycle About this task Flea power is removed. Drain residual flea power (perform hard reset) About...
Setup and Specifications
Page 3
... of Latitude 5430 Chromebook 7 Right...7 Left...7 Top...8 Display...10 Bottom...13 Service Tag...13 Modes...15 Battery charge and status light ...18 Chapter 3: Specifications of Latitude 5430 Chromebook 19 Dimensions and weight...19 Processor...19 Chipset...20 Operating system...20 Memory...20 External ports...20 Internal slots...21 Wireless module...21 WWAN module...22 Audio...22 Storage...23 Media-card reader...23 Keyboard...23 Camera...24 Touchpad...24 Power adapter...25 Battery...25 Display...26 Fingerprint reader (optional)...27 Sensor ...27 GPU-Integrated...28 Multiple display support...
... of Latitude 5430 Chromebook 7 Right...7 Left...7 Top...8 Display...10 Bottom...13 Service Tag...13 Modes...15 Battery charge and status light ...18 Chapter 3: Specifications of Latitude 5430 Chromebook 19 Dimensions and weight...19 Processor...19 Chipset...20 Operating system...20 Memory...20 External ports...20 Internal slots...21 Wireless module...21 WWAN module...22 Audio...22 Storage...23 Media-card reader...23 Keyboard...23 Camera...24 Touchpad...24 Power adapter...25 Battery...25 Display...26 Fingerprint reader (optional)...27 Sensor ...27 GPU-Integrated...28 Multiple display support...
Setup and Specifications
Page 5
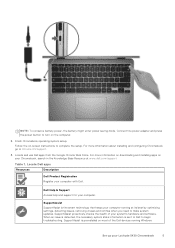
... notifies when you need to make system updates. For more information about installing and configuring Chromebook, go to begin troubleshooting. SupportAssist SupportAssist is the smart technology that keeps your computer running Windows Set up your computer with Dell. Connect the power adapter and press the power button to complete the setup. SupportAssist is sent to Dell to Chrome OS Support. 3. Finish Chromebook operating system setup. Follow the on-screen instructions to turn on most...
... notifies when you need to make system updates. For more information about installing and configuring Chromebook, go to begin troubleshooting. SupportAssist SupportAssist is the smart technology that keeps your computer running Windows Set up your computer with Dell. Connect the power adapter and press the power button to complete the setup. SupportAssist is sent to Dell to Chrome OS Support. 3. Finish Chromebook operating system setup. Follow the on-screen instructions to turn on most...
Setup and Specifications
Page 21
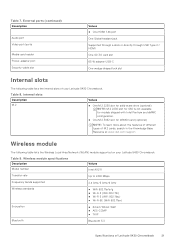
...and eMMC configuration. ● One M.2 3042 slot for WWAN card (optional) NOTE: To learn more about the features of different types of Latitude 5430 Chromebook 21 External ports (continued) Description Audio port Video port/ports Media-card reader Power-adapter port Security-cable slot Values ● One HDMI 1.4b port One Global headset jack Supported through a dock or directly through USB Type-C/ HDMI One SD 3.0 card slot 65 W adapter USB-C One wedge-shaped lock slot Internal slots The following table lists the Wireless Local Area Network (WLAN) module supported on your Latitude 5430...
...and eMMC configuration. ● One M.2 3042 slot for WWAN card (optional) NOTE: To learn more about the features of different types of Latitude 5430 Chromebook 21 External ports (continued) Description Audio port Video port/ports Media-card reader Power-adapter port Security-cable slot Values ● One HDMI 1.4b port One Global headset jack Supported through a dock or directly through USB Type-C/ HDMI One SD 3.0 card slot 65 W adapter USB-C One wedge-shaped lock slot Internal slots The following table lists the Wireless Local Area Network (WLAN) module supported on your Latitude 5430...

Setup and Specifications
Page 26
....65 mm 2560 x 1600 300 nits 26 Specifications of Latitude 5430 Chromebook CAUTION: Dell recommends that you charge the battery regularly for optimal power consumption. If your battery charge is completely depleted, connect the power adapter, turn on operating conditions and can significantly reduce under certain power-intensive conditions. Display specifications Description Option one Depth 82.0 mm Option two 82.0 mm Temperature range: Operating 0°C to 60°C (32°F to...
....65 mm 2560 x 1600 300 nits 26 Specifications of Latitude 5430 Chromebook CAUTION: Dell recommends that you charge the battery regularly for optimal power consumption. If your battery charge is completely depleted, connect the power adapter, turn on operating conditions and can significantly reduce under certain power-intensive conditions. Display specifications Description Option one Depth 82.0 mm Option two 82.0 mm Temperature range: Operating 0°C to 60°C (32°F to...

Statement of Volatality
Page 1
... system NA Power off state. List of data) Low level format System BIOS/EC Non-Volatile memory, Video BIOS for system configuration, security and Firmware ROM protection No Security Controller Serial Flash Combine on the memory (LPDDR5, 4800 MHz). Statement of data and tells you how to retain their data immediately after power is removed from the component. Dell Latitude 5430 Chromebook CAUTION: A CAUTION indicates either potential damage to hardware or loss...
... system NA Power off state. List of data) Low level format System BIOS/EC Non-Volatile memory, Video BIOS for system configuration, security and Firmware ROM protection No Security Controller Serial Flash Combine on the memory (LPDDR5, 4800 MHz). Statement of data and tells you how to retain their data immediately after power is removed from the component. Dell Latitude 5430 Chromebook CAUTION: A CAUTION indicates either potential damage to hardware or loss...
Statement of Volatality
Page 2
... on which clears all the states supported by Dell Latitude™ 5430 Chromebook: Model Number Dell Latitude™ 5430 Chromebook S0 S0iX S4 S5 v v v Copyright © 2023 Dell Inc. The system will remain in any context to disk" state or "hibernate" mode. All rights reserved. There is no power. Modern standby is a standby mode state that is coming out of S5 requires power on the system board, i.e. When the...
... on which clears all the states supported by Dell Latitude™ 5430 Chromebook: Model Number Dell Latitude™ 5430 Chromebook S0 S0iX S4 S5 v v v Copyright © 2023 Dell Inc. The system will remain in any context to disk" state or "hibernate" mode. All rights reserved. There is no power. Modern standby is a standby mode state that is coming out of S5 requires power on the system board, i.e. When the...


