Owners Manual
Page 3
......9 Service Tag...9 Battery charge and status light ...10 Chapter 2: Set up your Latitude 3445 Chromebook 11 Chapter 3: Specifications of Latitude 3445 Chromebook 12 Dimensions and weight...12 Processor...12 Chipset...13 Operating system...13 Memory...13 External ports...14 Internal slots...14 Wireless module...14 Audio...15 Storage...15 Media-card reader...16 Keyboard...16 Keyboard special keys...17 Camera...17 Touchpad...18 Power adapter...18 Battery...19 Display...20 Fingerprint reader (optional)...21 GPU-Integrated...21 External display support...21 Hardware security...21 Operating and...
......9 Service Tag...9 Battery charge and status light ...10 Chapter 2: Set up your Latitude 3445 Chromebook 11 Chapter 3: Specifications of Latitude 3445 Chromebook 12 Dimensions and weight...12 Processor...12 Chipset...13 Operating system...13 Memory...13 External ports...14 Internal slots...14 Wireless module...14 Audio...15 Storage...15 Media-card reader...16 Keyboard...16 Keyboard special keys...17 Camera...17 Touchpad...18 Power adapter...18 Battery...19 Display...20 Fingerprint reader (optional)...21 GPU-Integrated...21 External display support...21 Hardware security...21 Operating and...

Owners Manual
Page 4
... Latitude 3445 Chromebook 27 Chapter 5: Removing and installing Customer Replaceable Units (CRUs 30 Base cover...30 Removing the base cover...30 Installing the base cover...34 Solid-state drive...35 Removing the M.2 2230 solid-state drive...35 Installing the M.2 2230 solid-state drive...36 Wireless card...38 Removing the wireless card...38 Installing the wireless card...39 Fan...40 Removing the fan...40 Installing the fan...41 Chapter 6: Removing and installing Field Replaceable Units (FRUs 42 Battery...42 Rechargeable Li-ion battery precautions...42 Removing...
... Latitude 3445 Chromebook 27 Chapter 5: Removing and installing Customer Replaceable Units (CRUs 30 Base cover...30 Removing the base cover...30 Installing the base cover...34 Solid-state drive...35 Removing the M.2 2230 solid-state drive...35 Installing the M.2 2230 solid-state drive...36 Wireless card...38 Removing the wireless card...38 Installing the wireless card...39 Fan...40 Removing the fan...40 Installing the fan...41 Chapter 6: Removing and installing Field Replaceable Units (FRUs 42 Battery...42 Rechargeable Li-ion battery precautions...42 Removing...

Owners Manual
Page 5
... and keyboard assembly 78 Installing the palm-rest and keyboard assembly 79 Chapter 7: Software...81 Operating system...81 Operating system...81 ChromeOS...81 Verified Boot...82 Disk Partition Map...83 Developer and Recovery mode...84 Coreboot and U-boot Custom Firmware...84 Chrome vs Chromium operating system...84 View system information...85 Chapter 8: Troubleshooting...88 Handling swollen rechargeable Li-ion batteries...88 Chrome Shell (CROSH)...88 Recovering the operating...
... and keyboard assembly 78 Installing the palm-rest and keyboard assembly 79 Chapter 7: Software...81 Operating system...81 Operating system...81 ChromeOS...81 Verified Boot...82 Disk Partition Map...83 Developer and Recovery mode...84 Coreboot and U-boot Custom Firmware...84 Chrome vs Chromium operating system...84 View system information...85 Chapter 8: Troubleshooting...88 Handling swollen rechargeable Li-ion batteries...88 Chrome Shell (CROSH)...88 Recovering the operating...

Owners Manual
Page 6
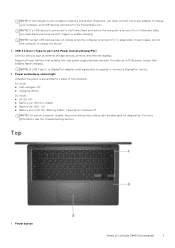
... devices such as external storage devices, printers, and external displays. Provides video and audio output. 2. NOTE: A USB Type-C to DisplayPort adapter (sold separately) is turned off. 6 Views of Latitude 3445 Chromebook PowerShare enables you to connect a DisplayPort device. 3. HDMI 2.0 port Connect to 15 W power output that enables two-way power supply between devices. Security-cable slot Connect a security cable to prevent unauthorized movement of Latitude 3445 Chromebook 1. Left 1. Universal audio jack Connect headphones or a headset (headphone and microphone...
... devices such as external storage devices, printers, and external displays. Provides video and audio output. 2. NOTE: A USB Type-C to DisplayPort adapter (sold separately) is turned off. 6 Views of Latitude 3445 Chromebook PowerShare enables you to connect a DisplayPort device. 3. HDMI 2.0 port Connect to 15 W power output that enables two-way power supply between devices. Security-cable slot Connect a security cable to prevent unauthorized movement of Latitude 3445 Chromebook 1. Left 1. Universal audio jack Connect headphones or a headset (headphone and microphone...
Owners Manual
Page 7
... the PowerShare port. NOTE: If a USB device is connected to 15 W power output that enables two-way power supply between devices. USB 3.2 Gen 1 (Type-C) port with Power Delivery/DisplayPort Connect devices such as external storage devices, printers, and external displays. Top 1. NOTE: Certain USB devices may not charge when the computer is turned off or in sleep state. Power and battery-status light Indicates the power state and battery state of Latitude 3445 Chromebook 7 AC mode: ● Fully charged: Off ● Charging: White DC mode: ●...
... the PowerShare port. NOTE: If a USB device is connected to 15 W power output that enables two-way power supply between devices. USB 3.2 Gen 1 (Type-C) port with Power Delivery/DisplayPort Connect devices such as external storage devices, printers, and external displays. Top 1. NOTE: Certain USB devices may not charge when the computer is turned off or in sleep state. Power and battery-status light Indicates the power state and battery state of Latitude 3445 Chromebook 7 AC mode: ● Fully charged: Off ● Charging: White DC mode: ●...

Owners Manual
Page 8
... on. 2. Camera Enables you to right-click. Fingerprint reader (optional) Press your finger on the touchpad to move the mouse pointer. Microphones (2) Provide digital sound input for 10 seconds to force shut-down the computer. 2. The fingerprint reader enables your computer to recognize your fingerprint and enable access. 3. Touchpad Move your finger on the fingerprint reader to log in use. 8 Views of Latitude 3445 Chromebook Press to turn on...
... on. 2. Camera Enables you to right-click. Fingerprint reader (optional) Press your finger on the touchpad to move the mouse pointer. Microphones (2) Provide digital sound input for 10 seconds to force shut-down the computer. 2. The fingerprint reader enables your computer to recognize your fingerprint and enable access. 3. Touchpad Move your finger on the fingerprint reader to log in use. 8 Views of Latitude 3445 Chromebook Press to turn on...
Owners Manual
Page 11
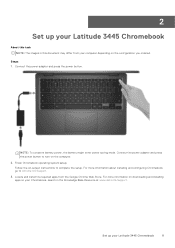
... enter power saving mode. For more information on downloading and installing apps on the configuration you ordered. Locate and install the required apps from your computer depending on your Latitude 3445 Chromebook 11 Follow the on the computer. 2. Connect the power adapter and press the power button. Connect the power adapter and press the power button to turn on -screen instructions to Chrome OS Support. 3. For more information about installing and configuring Chromebook, go to complete the setup. Set up your Latitude 3445 Chromebook...
... enter power saving mode. For more information on downloading and installing apps on the configuration you ordered. Locate and install the required apps from your computer depending on your Latitude 3445 Chromebook 11 Follow the on the computer. 2. Connect the power adapter and press the power button. Connect the power adapter and press the power button to turn on -screen instructions to Chrome OS Support. 3. For more information about installing and configuring Chromebook, go to complete the setup. Set up your Latitude 3445 Chromebook...
Owners Manual
Page 14
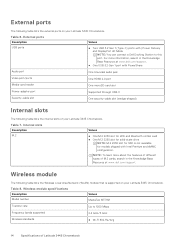
... can connect a Dell Docking Station to 1200 Mbps Frequency bands supported 2.4 GHz/5 GHz Wireless standards ● Wi-Fi 802.11a/b/g 14 Specifications of Latitude 3445 Chromebook External ports Description USB ports Values ● Two USB 3.2 Gen 1 (Type-C) ports with PowerShare Audio port One Universal audio jack Video port/ports One HDMI 2.0 port Media-card reader One microSD-card slot Power-adapter port Supported through USB-C Security-cable slot One security-cable slot (wedge-shaped) Internal slots The following table lists the external ports on your Latitude 3445...
... can connect a Dell Docking Station to 1200 Mbps Frequency bands supported 2.4 GHz/5 GHz Wireless standards ● Wi-Fi 802.11a/b/g 14 Specifications of Latitude 3445 Chromebook External ports Description USB ports Values ● Two USB 3.2 Gen 1 (Type-C) ports with PowerShare Audio port One Universal audio jack Video port/ports One HDMI 2.0 port Media-card reader One microSD-card slot Power-adapter port Supported through USB-C Security-cable slot One security-cable slot (wedge-shaped) Internal slots The following table lists the external ports on your Latitude 3445...
Owners Manual
Page 15
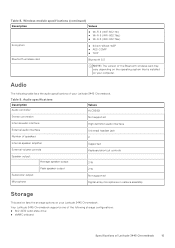
... wireless card Bluetooth 5.3 NOTE: The version of speakers 2 Internal-speaker amplifier Supported External volume controls Keyboard shortcut controls Speaker output: Average speaker output 2 W Peak speaker output 2 W Subwoofer output Not supported Microphone Digital-array microphones in camera assembly Storage This section lists the storage options on your Latitude 3445 Chromebook. Table 8. Table 9. Audio The following storage configurations: ● M.2 2230 solid-state drive ● eMMC onboard Specifications of your Latitude 3445 Chromebook. Your Latitude...
... wireless card Bluetooth 5.3 NOTE: The version of speakers 2 Internal-speaker amplifier Supported External volume controls Keyboard shortcut controls Speaker output: Average speaker output 2 W Peak speaker output 2 W Subwoofer output Not supported Microphone Digital-array microphones in camera assembly Storage This section lists the storage options on your Latitude 3445 Chromebook. Table 8. Table 9. Audio The following storage configurations: ● M.2 2230 solid-state drive ● eMMC onboard Specifications of your Latitude 3445 Chromebook. Your Latitude...

Owners Manual
Page 17
... keys Special keys Close the pop-up window or dialog box Go to the previous page in browser history Reload current page View the full screen Enter Overview mode to show all windows Take screenshot Decrease screen brightness Increase screen brightness Mute the speaker Decrease the speaker volume Increase the speaker volume Turn on the top row of the keyboard. The following table lists the camera specifications of Latitude 3445 Chromebook...
... keys Special keys Close the pop-up window or dialog box Go to the previous page in browser history Reload current page View the full screen Enter Overview mode to show all windows Take screenshot Decrease screen brightness Increase screen brightness Mute the speaker Decrease the speaker volume Increase the speaker volume Turn on the top row of the keyboard. The following table lists the camera specifications of Latitude 3445 Chromebook...
Owners Manual
Page 20
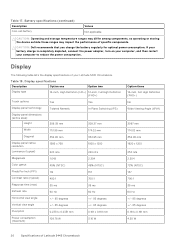
... W 20 Specifications of specific components. Display The following table lists the display specifications of your computer to reduce the power consumption. Table 18. If your battery charge is completely depleted, connect the power adapter, turn on your computer, and then restart your Latitude 3445 Chromebook. Table 17. CAUTION: Dell recommends that you charge the battery regularly for optimal power consumption. Battery specifications (continued) Description Coin-cell battery Values Not applicable CAUTION: Operating and storage...
... W 20 Specifications of specific components. Display The following table lists the display specifications of your computer to reduce the power consumption. Table 18. If your battery charge is completely depleted, connect the power adapter, turn on your computer, and then restart your Latitude 3445 Chromebook. Table 17. CAUTION: Dell recommends that you charge the battery regularly for optimal power consumption. Battery specifications (continued) Description Coin-cell battery Values Not applicable CAUTION: Operating and storage...

Owners Manual
Page 23
... touching the pins and the contacts. CAUTION: Press and eject any installed card from the media-card reader. Before working inside your computer, read the safety information that is shipped with the product or at www.dell.com/regulatory_compliance. CAUTION: When you disconnect a cable, pull it by your computer depending on the configuration you must disengage before opening the computer cover or panels...
... touching the pins and the contacts. CAUTION: Press and eject any installed card from the media-card reader. Before working inside your computer, read the safety information that is shipped with the product or at www.dell.com/regulatory_compliance. CAUTION: When you disconnect a cable, pull it by your computer depending on the configuration you must disengage before opening the computer cover or panels...

Owners Manual
Page 24
...network devices and peripherals, such as expansion cards, processors, memory DIMMs, and system boards. Remove any disassembly instructions. When connecting a bonding wire, ensure that it is not immediately recognizable. The wrist strap should discharge residual power in the system board. As the industry pushes for connecting... beep code emitted for shut-down instructions. 3. Observe the following safety precautions before performing any media card and optical disc from your computer and then unplug the cable from their electrical outlets. 4. The internal power enables the ...
...network devices and peripherals, such as expansion cards, processors, memory DIMMs, and system boards. Remove any disassembly instructions. When connecting a bonding wire, ensure that it is not immediately recognizable. The wrist strap should discharge residual power in the system board. As the industry pushes for connecting... beep code emitted for shut-down instructions. 3. Observe the following safety precautions before performing any media card and optical disc from your computer and then unplug the cable from their electrical outlets. 4. The internal power enables the ...

Owners Manual
Page 25
... system being repaired. On the work surface, and parts should be returned to Dell, it is critical to your computer 25 Use only Field Service kits with increased sensitivity to be folded over time. Once deployed properly, service parts can be either directly connected between your skin, the ESD mat, and the hardware is lit and an alarm sounds if the...
... system being repaired. On the work surface, and parts should be returned to Dell, it is critical to your computer 25 Use only Field Service kits with increased sensitivity to be folded over time. Once deployed properly, service parts can be either directly connected between your skin, the ESD mat, and the hardware is lit and an alarm sounds if the...

Owners Manual
Page 26
... screw type is restored when the component is replaced. Transporting sensitive components When transporting ESD sensitive components such as replacement parts or parts to be returned to Dell, it is critical to such surfaces when replacing a component. Replace all times when servicing Dell products. Replace any media cards, discs, or any external devices, peripherals, or cables you removed before working inside your computer Steps 1. NOTE: Some computers have magnetic surfaces. Turn...
... screw type is restored when the component is replaced. Transporting sensitive components When transporting ESD sensitive components such as replacement parts or parts to be returned to Dell, it is critical to such surfaces when replacing a component. Replace all times when servicing Dell products. Replace any media cards, discs, or any external devices, peripherals, or cables you removed before working inside your computer Steps 1. NOTE: Some computers have magnetic surfaces. Turn...

Owners Manual
Page 42
... and operate the computer solely on battery power-the battery is fully discharged when the computer no longer turns on how to be replaced and disposed properly. For guidelines on when the power button is pressed. ● Do not crush, drop, mutilate, or penetrate the battery with foreign objects. ● Do not expose the battery to high temperatures, or disassemble battery packs...
... and operate the computer solely on battery power-the battery is fully discharged when the computer no longer turns on how to be replaced and disposed properly. For guidelines on when the power button is pressed. ● Do not crush, drop, mutilate, or penetrate the battery with foreign objects. ● Do not expose the battery to high temperatures, or disassemble battery packs...
Owners Manual
Page 82
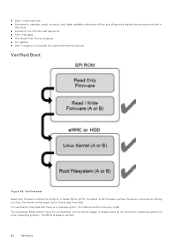
... read from disk. R/W firmware verifies the active Linux kernel. ● Easy to learn and use ● Documents, calendar, email, contacts, and tasks available online and offline, and all securely backed-up and synchronized in support for popular file types and external devices Verified Boot Figure 56. During run Chromium operating system (or other operating system). The BIOS is no backup option, the machine enters recovery mode. If...
... read from disk. R/W firmware verifies the active Linux kernel. ● Easy to learn and use ● Documents, calendar, email, contacts, and tasks available online and offline, and all securely backed-up and synchronized in support for popular file types and external devices Verified Boot Figure 56. During run Chromium operating system (or other operating system). The BIOS is no backup option, the machine enters recovery mode. If...

Owners Manual
Page 84
... as Windows or operating system X. U-Boot ● Performs verified boot ● Handles recovery and Developer Mode ● Open source code Normal boot is wiped during transitions. ● Used in , video codecs, and fonts 84 Software Coreboot and U-boot Custom Firmware Coreboot (x86 only) ● Memory and chipset initialization ● Open-source, except for MRC binary from a USB drive or SD card. ● Recovery mode is entered if verified boot fails. ● A user can force recovery mode using a key...
... as Windows or operating system X. U-Boot ● Performs verified boot ● Handles recovery and Developer Mode ● Open source code Normal boot is wiped during transitions. ● Used in , video codecs, and fonts 84 Software Coreboot and U-boot Custom Firmware Coreboot (x86 only) ● Memory and chipset initialization ● Open-source, except for MRC binary from a USB drive or SD card. ● Recovery mode is entered if verified boot fails. ● A user can force recovery mode using a key...
Owners Manual
Page 88
... or internal components leading to replace a swollen battery under the terms of the laptop. There are no longer power on or against the battery. ● If a battery gets stuck in CROSH. 88 Troubleshooting We recommend contacting Dell product support for assistance and further instructions. ● Using a non-Dell or incompatible battery may impact the performance of the applicable warranty or service contract, including options for troubleshooting are covered...
... or internal components leading to replace a swollen battery under the terms of the laptop. There are no longer power on or against the battery. ● If a battery gets stuck in CROSH. 88 Troubleshooting We recommend contacting Dell product support for assistance and further instructions. ● Using a non-Dell or incompatible battery may impact the performance of the applicable warranty or service contract, including options for troubleshooting are covered...

Owners Manual
Page 89
... replacing any components in your computer. 2. Draining residual flea power, also known as a performing a "hard reset", is removing and reinstalling the OS. Turn off your computer. The following procedure provides the instructions on how to conduct a Wi-Fi power cycle: NOTE: Some ISPs (Internet Service Providers) provide a modem/router combo device. Turn on your computer. 3. Steps 1. Press + + . 3. Turn on the wireless router. 6. Remove the base cover. 4. Type...
... replacing any components in your computer. 2. Draining residual flea power, also known as a performing a "hard reset", is removing and reinstalling the OS. Turn off your computer. The following procedure provides the instructions on how to conduct a Wi-Fi power cycle: NOTE: Some ISPs (Internet Service Providers) provide a modem/router combo device. Turn on your computer. 3. Steps 1. Press + + . 3. Turn on the wireless router. 6. Remove the base cover. 4. Type...


