

Service Manual
Page 1
... Trademarks used in the United States and/or other than its own. Dell Inc. CAUTION: A CAUTION indicates either trademarks or registered trademarks of data and tells you make better use of Dell Inc.; WARNING: A WARNING indicates a potential for property damage, personal injury...in this document is strictly forbidden. Dell™ Inspiron™ 410 Service Manual Technical Overview Before You Begin Top Cover Bottom Cover I/O Bezel Top Bracket I/O Bracket Optical Drive Drive Bay Power-Button Bracket Coin-Cell Battery Infrared Board Hard Drive Wireless Mini-Card Memory Module(s) ...
... Trademarks used in the United States and/or other than its own. Dell Inc. CAUTION: A CAUTION indicates either trademarks or registered trademarks of data and tells you make better use of Dell Inc.; WARNING: A WARNING indicates a potential for property damage, personal injury...in this document is strictly forbidden. Dell™ Inspiron™ 410 Service Manual Technical Overview Before You Begin Top Cover Bottom Cover I/O Bezel Top Bracket I/O Bracket Optical Drive Drive Bay Power-Button Bracket Coin-Cell Battery Infrared Board Hard Drive Wireless Mini-Card Memory Module(s) ...
Service Manual
Page 12
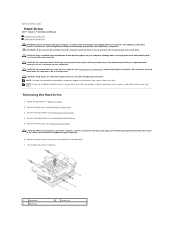
... the hard drive. Back to Contents Page Hard Drive Dell™ Inspiron™ 410 Service Manual Removing the Hard Drive Replacing the Hard Drive WARNING: Before working inside your computer, read the safety information that shipped with your warranty. NOTE: Dell does not guarantee compatibility or provide support for hard drives from a source other than Dell, you remove the hard drive from the computer when the drive is...
... the hard drive. Back to Contents Page Hard Drive Dell™ Inspiron™ 410 Service Manual Removing the Hard Drive Replacing the Hard Drive WARNING: Before working inside your computer, read the safety information that shipped with your warranty. NOTE: Dell does not guarantee compatibility or provide support for hard drives from a source other than Dell, you remove the hard drive from the computer when the drive is...
Service Manual
Page 13
...holes on the computer, replace all attached devices to the computer. 9. Replace the drive bay (see Replacing the Optical Drive). 7. Connect your computer and all screws and ensure that secure the hard drive to Contents Page See "Restoring Your Operating System" in Before You Begin. 2....Replacing the Top Bracket). 8. Install the operating system for your computer, as needed . Back to the drive bay. 5. Remove the new hard drive from its packaging. Replacing the Hard Drive 1. Save the original packaging for your computer, as needed . Replace the four screws that no stray ...
...holes on the computer, replace all attached devices to the computer. 9. Replace the drive bay (see Replacing the Optical Drive). 7. Connect your computer and all screws and ensure that secure the hard drive to Contents Page See "Restoring Your Operating System" in Before You Begin. 2....Replacing the Top Bracket). 8. Install the operating system for your computer, as needed . Back to the drive bay. 5. Remove the new hard drive from its packaging. Replacing the Hard Drive 1. Save the original packaging for your computer, as needed . Replace the four screws that no stray ...
Service Manual
Page 14
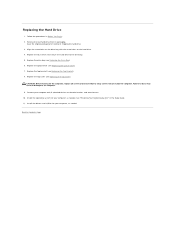
... towards the back of the computer and lift the drive bay to the drive bay. 1 screw 2 power-button bracket 6. Disconnect the hard-drive cable from the computer. Back to Contents Page Drive Bay Dell™ Inspiron™ 410 Service Manual Removing the Drive Bay Replacing the Drive Bay WARNING: Before working inside your computer, read the safety information that secures...
... towards the back of the computer and lift the drive bay to the drive bay. 1 screw 2 power-button bracket 6. Disconnect the hard-drive cable from the computer. Back to Contents Page Drive Bay Dell™ Inspiron™ 410 Service Manual Removing the Drive Bay Replacing the Drive Bay WARNING: Before working inside your computer, read the safety information that secures...

Service Manual
Page 15
...). 8. Replace the top bracket (see Replacing the Optical Drive). 7. Connect the hard-drive cable to align the screw holes on the drive bay with the slots on . Align the tabs on the drive bay with the screws holes on the hard drive. 3. Replace the two screws that no stray screws remain... inside the computer. CAUTION: Before turning on the computer, replace all attached devices to the chassis. 5. Connect your computer and all screws and ensure that secure the drive bay to electrical outlets,...
...). 8. Replace the top bracket (see Replacing the Optical Drive). 7. Connect the hard-drive cable to align the screw holes on the drive bay with the slots on . Align the tabs on the drive bay with the screws holes on the hard drive. 3. Replace the two screws that no stray screws remain... inside the computer. CAUTION: Before turning on the computer, replace all attached devices to the chassis. 5. Connect your computer and all screws and ensure that secure the drive bay to electrical outlets,...
Service Manual
Page 35
...may appear, or may not appear exactly as the user password l Read the current amount of memory or set the type of hard drive installed CAUTION: Unless you are changeable. Scroll up and down the list with the up -arrow and down your computer, including installed... The system setup screen displays current or changeable configuration information for your computer. 2. Back to Contents Page System Setup Utility Dell™ Inspiron™ 410 Service Manual Overview Clearing Forgotten Passwords and CMOS Settings Flashing the BIOS Overview Use the system setup utility to: l Change the...
...may appear, or may not appear exactly as the user password l Read the current amount of memory or set the type of hard drive installed CAUTION: Unless you are changeable. Scroll up and down the list with the up -arrow and down your computer, including installed... The system setup screen displays current or changeable configuration information for your computer. 2. Back to Contents Page System Setup Utility Dell™ Inspiron™ 410 Service Manual Overview Clearing Forgotten Passwords and CMOS Settings Flashing the BIOS Overview Use the system setup utility to: l Change the...
Service Manual
Page 36
...- On; Off (On by default) Enabled; The items displayed are dynamically updated according to the SATA 2 connector. Hard Drive; USB; Hard Drive; CD/DVD; Hard Drive; Hard Drive; CD/DVD; Network; Last Power State (Power Off by default) l Keyboard Errors - Always (Setup by default)... default) Onboard LAN Controller Enabled; ATA (ATA by default) l USB Operation Mode - Enabled; Removable Dev.; Network; Disabled (Hard Drive by default) Removable Dev.; Disabled (USB by default) Removable Dev.; Disabled (Removable Dev. Disabled (Enabled by default) Onboard LAN...
...- On; Off (On by default) Enabled; The items displayed are dynamically updated according to the SATA 2 connector. Hard Drive; USB; Hard Drive; CD/DVD; Hard Drive; Hard Drive; CD/DVD; Network; Last Power State (Power Off by default) l Keyboard Errors - Always (Setup by default)... default) Onboard LAN Controller Enabled; ATA (ATA by default) l USB Operation Mode - Enabled; Removable Dev.; Network; Disabled (Hard Drive by default) Removable Dev.; Disabled (USB by default) Removable Dev.; Disabled (Removable Dev. Disabled (Enabled by default) Onboard LAN...
Service Manual
Page 37
...down your warranty. CAUTION: Clearing the CMOS settings will also clear the passwords. 1. NOTE: To boot to run the Dell Diagnostics on the drive, the computer generates an error message. Changing Boot Sequence for the Current Boot You can use this section, follow the ...down -arrow keys to servicing that shipped with your computer). Remove the top cover (see the Microsoft Windows desktop. Boot Options l Hard Drive - l CD/DVD Drive - The computer attempts to boot from. If no operating system is restored. 1. On completion of devices. 4. If you want to...
...down your warranty. CAUTION: Clearing the CMOS settings will also clear the passwords. 1. NOTE: To boot to run the Dell Diagnostics on the drive, the computer generates an error message. Changing Boot Sequence for the Current Boot You can use this section, follow the ...down -arrow keys to servicing that shipped with your computer). Remove the top cover (see the Microsoft Windows desktop. Boot Options l Hard Drive - l CD/DVD Drive - The computer attempts to boot from. If no operating system is restored. 1. On completion of devices. 4. If you want to...

Setup Guide
Page 25
Opens the cover of data, never turn off the computer while the hard drive activity light is blinking. 3 Top cover release button - A blinking white light indicates hard drive activity. Connects your computer to headphones and speakers with the security cable slot on ...Using Your Inspiron Desktop 1 AC adapter connector - CAUTION: To avoid loss of the computer. 4 VGA connector - Connects video devices such as a monitor or projector. 5 Network connector and light - Connects to the computer. Connects to the AC adapter to power the computer. 2 Hard drive activity light...
Opens the cover of data, never turn off the computer while the hard drive activity light is blinking. 3 Top cover release button - A blinking white light indicates hard drive activity. Connects your computer to headphones and speakers with the security cable slot on ...Using Your Inspiron Desktop 1 AC adapter connector - CAUTION: To avoid loss of the computer. 4 VGA connector - Connects video devices such as a monitor or projector. 5 Network connector and light - Connects to the computer. Connects to the AC adapter to power the computer. 2 Hard drive activity light...

Setup Guide
Page 27
..., and Blu-ray Discs (if the option is selected at support.dell.com/manuals. Using Your Inspiron Desktop Software Features NOTE: For more information about the features described in this section, see the Dell Technology Guide available on your hard drive or on the Dell Support website at the time of purchase). Entertainment and Multimedia You...
..., and Blu-ray Discs (if the option is selected at support.dell.com/manuals. Using Your Inspiron Desktop Software Features NOTE: For more information about the features described in this section, see the Dell Technology Guide available on your hard drive or on the Dell Support website at the time of purchase). Entertainment and Multimedia You...
Setup Guide
Page 39
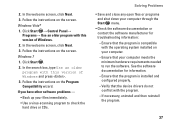
... the welcome screen, click Next. 3. If you have other software problems - • Back up your computer meets the minimum hardware requirements needed to check the hard drive or CDs. In the welcome screen, click Next. 3. Windows 7 1. Follow the instructions on the screen. Follow the instructions on your computer. --Ensure that the program...
... the welcome screen, click Next. 3. If you have other software problems - • Back up your computer meets the minimum hardware requirements needed to check the hard drive or CDs. In the welcome screen, click Next. 3. Windows 7 1. Follow the instructions on the screen. Follow the instructions on your computer. --Ensure that the program...
Setup Guide
Page 42
... Tools Keyboard failure - See the Service Manual on the Dell Support website at support.dell.com/manuals or contact Dell (see "Contacting Dell" on page 59) for assistance. See the Service Manual on hard drive, the hard drive cable is loose, or no bootable device exists. • If the hard drive is your data regularly. No bootable partition on the...
... Tools Keyboard failure - See the Service Manual on the Dell Support website at support.dell.com/manuals or contact Dell (see "Contacting Dell" on page 59) for assistance. See the Service Manual on hard drive, the hard drive cable is loose, or no bootable device exists. • If the hard drive is your data regularly. No bootable partition on the...
Setup Guide
Page 43
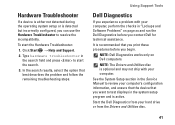
... resolve the incompatibility. Using Support Tools Dell Diagnostics If you contact Dell for technical assistance. Click Start → Help and Support. 2. It is recommended that you print these procedures before you experience a problem with your hard drive or from the Drivers and Utilities disc.... 41 Start the Dell Diagnostics from your computer. NOTE: Dell Diagnostics works only on page xx and run the Dell Diagnostics before you can use the Hardware Troubleshooter ...
... resolve the incompatibility. Using Support Tools Dell Diagnostics If you contact Dell for technical assistance. Click Start → Help and Support. 2. It is recommended that you print these procedures before you experience a problem with your hard drive or from the Drivers and Utilities disc.... 41 Start the Dell Diagnostics from your computer. NOTE: Dell Diagnostics works only on page xx and run the Dell Diagnostics before you can use the Hardware Troubleshooter ...

Setup Guide
Page 44
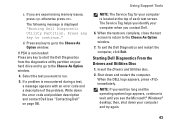
... have been found , run the remaining memory tests? NOTE: If your computer cannot display a screen image, contact Dell (see a message stating that is known to wait until you see "Contacting Dell" on (or restart) your computer. 3. Turn on page 59). 1. The PSA starts running tests. Do you...successfully, you wait too long and the operating system logo appears, continue to be working properly. 2. Using Support Tools Starting Dell Diagnostics From Your Hard Drive The Dell Diagnostics is located on a hidden diagnostic utility partition on your computer and try again. b. When the...
... have been found , run the remaining memory tests? NOTE: If your computer cannot display a screen image, contact Dell (see a message stating that is known to wait until you see "Contacting Dell" on (or restart) your computer. 3. Turn on page 59). 1. The PSA starts running tests. Do you...successfully, you wait too long and the operating system logo appears, continue to be working properly. 2. Using Support Tools Starting Dell Diagnostics From Your Hard Drive The Dell Diagnostics is located on a hidden diagnostic utility partition on your computer and try again. b. When the...
Setup Guide
Page 45
...An Option window. Select the test you see "Contacting Dell" on your computer is displayed "Booting Dell Diagnostic Utility Partition. NOTE: The Service Tag for your hard drive and to go to the Choose An Option window. 4. To exit the Dell Diagnostics and restart the computer, click Exit. Shut down... your computer when you are complete, close the test screen to return to start the Dell Diagnostics from the diagnostics utility...
...An Option window. Select the test you see "Contacting Dell" on your computer is displayed "Booting Dell Diagnostic Utility Partition. NOTE: The Service Tag for your hard drive and to go to the Choose An Option window. 4. To exit the Dell Diagnostics and restart the computer, click Exit. Shut down... your computer when you are complete, close the test screen to return to start the Dell Diagnostics from the diagnostics utility...

Setup Guide
Page 47
...INSPIRON Restoring Your Operating System You can use it was in when you can restore your operating system in the following ways: • System Restore returns your computer to restore your operating system. However, using the Operating System disc also deletes all data on the hard drive.... Use System Restore as the first solution for restoring your operating system and preserving data files. • Dell Factory Image Restore returns your hard drive to the operating state it to an earlier operating state ...
...INSPIRON Restoring Your Operating System You can use it was in when you can restore your operating system in the following ways: • System Restore returns your computer to restore your operating system. However, using the Operating System disc also deletes all data on the hard drive.... Use System Restore as the first solution for restoring your operating system and preserving data files. • Dell Factory Image Restore returns your hard drive to the operating state it to an earlier operating state ...
Setup Guide
Page 50
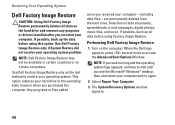
... in when you received your operating system problem. Use Dell Factory Image Restore only as the last method to restore your hard drive to the operating state it was in certain countries or on the hard drive and removes any programs or drivers installed after you see... did not resolve your computer-including data files-are permanently deleted from the hard drive. The System Recovery Options window appears. 48 Restoring Your Operating System Dell Factory Image Restore CAUTION: Using Dell Factory Image Restore permanently deletes all data before using Factory Image Restore. then...
... in when you received your operating system problem. Use Dell Factory Image Restore only as the last method to restore your hard drive to the operating state it was in certain countries or on the hard drive and removes any programs or drivers installed after you see... did not resolve your computer-including data files-are permanently deleted from the hard drive. The System Recovery Options window appears. 48 Restoring Your Operating System Dell Factory Image Restore CAUTION: Using Dell Factory Image Restore permanently deletes all data before using Factory Image Restore. then...

Setup Guide
Page 51
... the factory condition, then click Next. Click the check box to confirm that you do not want to continue reformatting the hard drive and restoring the system software to proceed with Factory Image Restore, click Cancel. The restore process begins and may take five or more... screen appears. Restoring Your Operating System 8. A message appears when the operating system and factory-installed applications have been restored to select Dell Factory Tools, then Dell Factory Image Restore. 7. To access the command prompt, type administrator in the User name field, then click OK. 6. Click Next...
... the factory condition, then click Next. Click the check box to confirm that you do not want to continue reformatting the hard drive and restoring the system software to proceed with Factory Image Restore, click Cancel. The restore process begins and may take five or more... screen appears. Restoring Your Operating System 8. A message appears when the operating system and factory-installed applications have been restored to select Dell Factory Tools, then Dell Factory Image Restore. 7. To access the command prompt, type administrator in the User name field, then click OK. 6. Click Next...

Setup Guide
Page 52
... new driver was in before you are considering reinstalling the Microsoft® Windows® operating system to return your primary hard drive. Restoring Your Operating System Operating System Reinstallation Before You Begin If you installed the new device driver. To roll back ...Windows Device Driver Rollback. CAUTION: Before performing the installation, back up all data files on page 46. For conventional hard drive configurations, the primary hard drive is the first drive detected by the computer. 50 Click the Drivers tab→ Roll Back Driver. Click Start . 2. See "...
... new driver was in before you are considering reinstalling the Microsoft® Windows® operating system to return your primary hard drive. Restoring Your Operating System Operating System Reinstallation Before You Begin If you installed the new device driver. To roll back ...Windows Device Driver Rollback. CAUTION: Before performing the installation, back up all data files on page 46. For conventional hard drive configurations, the primary hard drive is the first drive detected by the computer. 50 Click the Drivers tab→ Roll Back Driver. Click Start . 2. See "...

Setup Guide
Page 58
... and personal information, as well as removable media, such as follows: NOTE: Before you return the product to Dell, make sure to back up any data on the hard drive and on any other storage device in the original (or equivalent) packing materials. Include a copy of loss during... shipment to Dell. NOTE: Returns that belong with your confidential, proprietary or personal information; Remove any and all items being returned...
... and personal information, as well as removable media, such as follows: NOTE: Before you return the product to Dell, make sure to back up any data on the hard drive and on any other storage device in the original (or equivalent) packing materials. Include a copy of loss during... shipment to Dell. NOTE: Returns that belong with your confidential, proprietary or personal information; Remove any and all items being returned...


