Setup Guide
Page 5
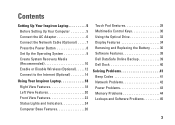
...Adapter 6 Connect the Network Cable (Optional 7 Press the Power Button 8 Set Up the Operating System 9 Create System Recovery Media (Recommended 10 Enable or Disable Wireless (Optional 12 Connect to the Internet (Optional 14 Using Your Inspiron Laptop 18 Right View Features 18 Left View Features 20...30 Using the Optical Drive 32 Display Features 34 Removing and Replacing the Battery 36 Software Features 38 Dell DataSafe Online Backup 39 Dell Dock 40 Solving Problems 41 Beep Codes 41 Network Problems 42 Power Problems 43 Memory Problems 44 Lockups and Software Problems 45 3
...Adapter 6 Connect the Network Cable (Optional 7 Press the Power Button 8 Set Up the Operating System 9 Create System Recovery Media (Recommended 10 Enable or Disable Wireless (Optional 12 Connect to the Internet (Optional 14 Using Your Inspiron Laptop 18 Right View Features 18 Left View Features 20...30 Using the Optical Drive 32 Display Features 34 Removing and Replacing the Battery 36 Software Features 38 Dell DataSafe Online Backup 39 Dell Dock 40 Solving Problems 41 Beep Codes 41 Network Problems 42 Power Problems 43 Memory Problems 44 Lockups and Software Problems 45 3
Setup Guide
Page 7
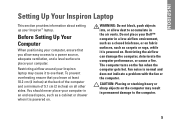
... setting up your computer, ensure that you allow dust to overheat. Restricting airflow around your Inspiron laptop may result in an enclosed space, such as a cabinet or drawer when it to...accumulate in the air vents. You should never place your computer in permanent damage to place your Dell™ computer in a low-airflow environment, such as a closed briefcase, or on fabric surfaces, such as ...carpets or rugs, while it is powered on the computer may cause it is normal and does not indicate a problem with the fan or ...
... setting up your computer, ensure that you allow dust to overheat. Restricting airflow around your Inspiron laptop may result in an enclosed space, such as a cabinet or drawer when it to...accumulate in the air vents. You should never place your computer in permanent damage to place your Dell™ computer in a low-airflow environment, such as a closed briefcase, or on fabric surfaces, such as ...carpets or rugs, while it is powered on the computer may cause it is normal and does not indicate a problem with the fan or ...
Setup Guide
Page 8
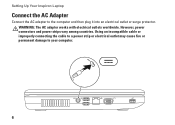
WARNING: The AC adapter works with electrical outlets worldwide. Using an incompatible cable or improperly connecting the cable to a power strip or electrical outlet may cause fire or permanent damage to the computer and then plug it into an electrical outlet or surge protector. However, power connectors and power strips vary among countries. Setting Up Your Inspiron Laptop Connect the AC Adapter Connect the AC adapter to your computer. 6
WARNING: The AC adapter works with electrical outlets worldwide. Using an incompatible cable or improperly connecting the cable to a power strip or electrical outlet may cause fire or permanent damage to the computer and then plug it into an electrical outlet or surge protector. However, power connectors and power strips vary among countries. Setting Up Your Inspiron Laptop Connect the AC Adapter Connect the AC adapter to your computer. 6
Setup Guide
Page 10
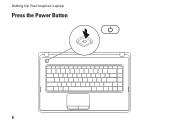
Setting Up Your Inspiron Laptop Press the Power Button 8
Setting Up Your Inspiron Laptop Press the Power Button 8
Setup Guide
Page 23
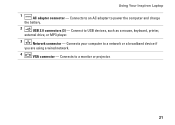
Connects your computer to a monitor or projector. 21 Connects to a network or a broadband device if you are using a wired network. 4 VGA connector - Connect to power the computer and charge the battery. 2 USB 2.0 connectors (3) - Connects to an AC adapter to USB devices, such as a mouse, keyboard, printer, external drive, or MP3 player. 3 Network connector - Using Your Inspiron Laptop 1 AC adapter connector -
Connects your computer to a monitor or projector. 21 Connects to a network or a broadband device if you are using a wired network. 4 VGA connector - Connect to power the computer and charge the battery. 2 USB 2.0 connectors (3) - Connects to an AC adapter to USB devices, such as a mouse, keyboard, printer, external drive, or MP3 player. 3 Network connector - Using Your Inspiron Laptop 1 AC adapter connector -
Setup Guide
Page 25
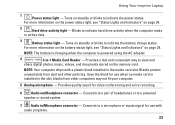
...conferencing and voice recording. 6 Audio out/Headphone connector - Connects to a pair of headphones or to indicate the power status. Turns on the memory card. For more information on the battery status light, see "Status Lights and...protect unused slots from other particles. Blinks to a microphone or inputs signal for use when no media card is powered using the AC adapter. 4 3-in /Microphone connector - NOTE: The battery is charging when the computer is ... use with a plastic blank installed in the slot; Using Your Inspiron Laptop 1 Power status light -
...conferencing and voice recording. 6 Audio out/Headphone connector - Connects to a pair of headphones or to indicate the power status. Turns on the memory card. For more information on the battery status light, see "Status Lights and...protect unused slots from other particles. Blinks to a microphone or inputs signal for use when no media card is powered using the AC adapter. 4 3-in /Microphone connector - NOTE: The battery is charging when the computer is ... use with a plastic blank installed in the slot; Using Your Inspiron Laptop 1 Power status light -

Setup Guide
Page 26
Using Your Inspiron Laptop Status Lights and Indicators Battery Status Light Indicator light status Computer state(s) AC adapter solid white on/standby/off/ hibernate off on/standby/off/ hibernate Battery solid amber on/standby off on/standby/off/ hibernate off/hibernate Battery charge level 98% 10%
Using Your Inspiron Laptop Status Lights and Indicators Battery Status Light Indicator light status Computer state(s) AC adapter solid white on/standby/off/ hibernate off on/standby/off/ hibernate Battery solid amber on/standby off on/standby/off/ hibernate off/hibernate Battery charge level 98% 10%
Setup Guide
Page 27
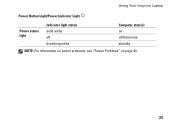
Using Your Inspiron Laptop Power Button Light/Power Indicator Light Power status light Indicator light status solid white off breathing white Computer state(s) on off/hibernate standby NOTE: For information on power problems, see "Power Problems" on page 43. 25
Using Your Inspiron Laptop Power Button Light/Power Indicator Light Power status light Indicator light status solid white off breathing white Computer state(s) on off/hibernate standby NOTE: For information on power problems, see "Power Problems" on page 43. 25
Setup Guide
Page 29
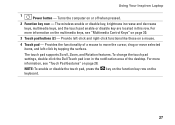
.... 27 Provides the functionality of the desktop. The touch pad supports Scroll, Zoom, and Rotation features. To change the touch pad settings, double-click the Dell Touch pad icon in this row. For more information, see "Multimedia Control Keys" on page 28. For more information on the multimedia keys, see "Touch..., press the key on the function key row on a mouse. 4 Touch pad - Turns the computer on or off when pressed. 2 Function key row - Using Your Inspiron Laptop 1 Power button -
.... 27 Provides the functionality of the desktop. The touch pad supports Scroll, Zoom, and Rotation features. To change the touch pad settings, double-click the Dell Touch pad icon in this row. For more information, see "Multimedia Control Keys" on page 28. For more information on the multimedia keys, see "Touch..., press the key on the function key row on a mouse. 4 Touch pad - Turns the computer on or off when pressed. 2 Function key row - Using Your Inspiron Laptop 1 Power button -
Setup Guide
Page 32
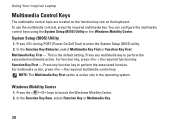
...The Multimedia Key First option is the default setting. Press the < > keys to enter the System Setup (BIOS) utility. 2. Press during POST (Power On Self Test) to launch the Windows Mobility Center. 2. Press any multimedia key to perform the associated function. For multimedia action, press + the...only in the operating system. Function Key First - In the Function Key Row, select Function Key or Multimedia Key. 30 Using Your Inspiron Laptop Multimedia Control Keys The multimedia control keys are located on the function key row on the keyboard. To use the multimedia controls,...
...The Multimedia Key First option is the default setting. Press the < > keys to enter the System Setup (BIOS) utility. 2. Press during POST (Power On Self Test) to launch the Windows Mobility Center. 2. Press any multimedia key to perform the associated function. For multimedia action, press + the...only in the operating system. Function Key First - In the Function Key Row, select Function Key or Multimedia Key. 30 Using Your Inspiron Laptop Multimedia Control Keys The multimedia control keys are located on the function key row on the keyboard. To use the multimedia controls,...

Setup Guide
Page 44
... (see "Setting Up a Wireless Connection" on page 15). • Interference may be blocking or interrupting your wireless connection. Check the cable to ensure it is powered on and connected to your data source (cable modem or network hub). • Ensure that wireless is enabled (see "Enable or Disable Wireless" on page...
... (see "Setting Up a Wireless Connection" on page 15). • Interference may be blocking or interrupting your wireless connection. Check the cable to ensure it is powered on and connected to your data source (cable modem or network hub). • Ensure that wireless is enabled (see "Enable or Disable Wireless" on page...
Setup Guide
Page 45
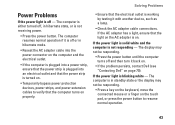
... • Check the AC adapter cable connections. The computer is in hibernate state, or is on . • Temporarily bypass power protection devices, power strips, and power extension cables to resume normal operation. 43 The computer resumes normal operation if it back on. • If the problem persists, ...contact Dell (see "Contacting Dell" on the AC adapter is not receiving power. • Press the power button. If the AC adapter has a light, ensure that the power strip is turned on . The display may not be responding. •...
... • Check the AC adapter cable connections. The computer is in hibernate state, or is on . • Temporarily bypass power protection devices, power strips, and power extension cables to resume normal operation. 43 The computer resumes normal operation if it back on. • If the problem persists, ...contact Dell (see "Contacting Dell" on the AC adapter is not receiving power. • Press the power button. If the AC adapter has a light, ensure that the power strip is turned on . The display may not be responding. •...
Setup Guide
Page 46
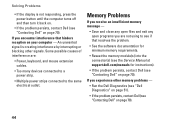
... creating interference by interrupting or blocking other memory problems - • Run the Dell Diagnostics (see "Dell Diagnostics" on page 51). • If the problem persists, contact Dell (see "Contacting Dell" on page 70). 44 An unwanted signal is not responding, press the power button until the computer turns off and then turn it back on...
... creating interference by interrupting or blocking other memory problems - • Run the Dell Diagnostics (see "Dell Diagnostics" on page 51). • If the problem persists, contact Dell (see "Contacting Dell" on page 70). 44 An unwanted signal is not responding, press the power button until the computer turns off and then turn it back on...

Setup Guide
Page 48
... on your computer. --Ensure that the device drivers do not conflict with the operating system installed on your keyboard or moving your mouse, press the power button until the computer turns off and then restart your computer meets the minimum hardware requirements needed to perform an operating system shutdown. See the...
... on your computer. --Ensure that the device drivers do not conflict with the operating system installed on your keyboard or moving your mouse, press the power button until the computer turns off and then restart your computer meets the minimum hardware requirements needed to perform an operating system shutdown. See the...
Setup Guide
Page 51
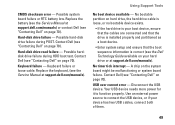
... Tools No boot device available - A chip on page 70). Possible system board failure or RTC battery low. Replace the battery (see the Dell Technology Guide available on page 70). Your USB device needs more power for it to connect the USB device, or if your hard drive or at support...partitioned as a boot device. • Enter system setup and ensure that the boot sequence information is correct (see the Service Manual at support.dell.com/manuals). Keyboard failure - Use an external power source to function properly. CMOS checksum error - Hard-disk drive read failure -
... Tools No boot device available - A chip on page 70). Possible system board failure or RTC battery low. Replace the battery (see the Dell Technology Guide available on page 70). Your USB device needs more power for it to connect the USB device, or if your hard drive or at support...partitioned as a boot device. • Enter system setup and ensure that the boot sequence information is correct (see the Service Manual at support.dell.com/manuals). Keyboard failure - Use an external power source to function properly. CMOS checksum error - Hard-disk drive read failure -
Setup Guide
Page 53
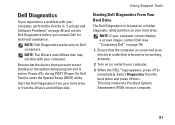
... in "Lockups and Software Problems" on Dell computers. Start the Dell Diagnostics from your hard drive or from the boot menu and press . Ensure that is active. When the DELL™ logo appears, press immediately. Press during POST (Power On Self Test) to an electrical outlet... that the computer is connected to enter the System Setup (BIOS) utility. Using Support Tools Starting Dell Diagnostics From Your Hard Drive The Dell Diagnostics is located on...
... in "Lockups and Software Problems" on Dell computers. Start the Dell Diagnostics from your hard drive or from the boot menu and press . Ensure that is active. When the DELL™ logo appears, press immediately. Press during POST (Power On Self Test) to an electrical outlet... that the computer is connected to enter the System Setup (BIOS) utility. Using Support Tools Starting Dell Diagnostics From Your Hard Drive The Dell Diagnostics is located on...
Setup Guide
Page 69
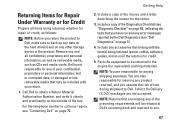
... included with the item(s) being returned, whether for repair or credit, as CDs and media cards. Pack the equipment to be refused at Dell's receiving dock and returned to call your confidential, proprietary or personal information; You are responsible for the return. 3. NOTE: You are also...page 69, indicating the tests that are not accepted. Include a copy of your region, see "Dell Diagnostics" on any product returned, and you have run and any and all items being returned (power cables, software, guides, and so on the outside of loss during shipment to obtain a Return ...
... included with the item(s) being returned, whether for repair or credit, as CDs and media cards. Pack the equipment to be refused at Dell's receiving dock and returned to call your confidential, proprietary or personal information; You are responsible for the return. 3. NOTE: You are also...page 69, indicating the tests that are not accepted. Include a copy of your region, see "Dell Diagnostics" on any product returned, and you have run and any and all items being returned (power cables, software, guides, and so on the outside of loss during shipment to obtain a Return ...
Setup Guide
Page 80
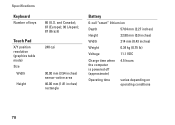
and Canada); 87 (Europe); 90 (Japan); 87 (Brazil) 240 cpi 90.00 mm (3.54 inches) sensor-active area 46.00 mm (1.81 inches) rectangle Battery 6-cell "smart" lithium ion Depth 57.64 mm (2.27 inches) Height 22.80 mm (0.9 inches) Width 214 mm (8.43 inches) Weight 0.34 kg (0.75 lb) Voltage 11.1 VDC Charge time when the computer is powered off (approximate) 4.5 hours Operating time varies depending on operating conditions 78 Specifications Keyboard Number of keys Touch Pad X/Y position resolution (graphics table mode) Size Width Height 86 (U.S.
and Canada); 87 (Europe); 90 (Japan); 87 (Brazil) 240 cpi 90.00 mm (3.54 inches) sensor-active area 46.00 mm (1.81 inches) rectangle Battery 6-cell "smart" lithium ion Depth 57.64 mm (2.27 inches) Height 22.80 mm (0.9 inches) Width 214 mm (8.43 inches) Weight 0.34 kg (0.75 lb) Voltage 11.1 VDC Charge time when the computer is powered off (approximate) 4.5 hours Operating time varies depending on operating conditions 78 Specifications Keyboard Number of keys Touch Pad X/Y position resolution (graphics table mode) Size Width Height 86 (U.S.
Setup Guide
Page 81
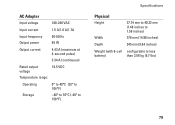
AC Adapter Input voltage 100-240 VAC Input current 1.5 A/1.6 A/1.7A Input frequency 50-60 Hz Output power 65 W Output current 4.43 A (maximum at 4-second pulse) 3.34 A (continuous) Rated output voltage 19.5 VDC Temperature range: Operating 0° to 40°C (32° to 104°F) Storage -40° to 70°C (-40° to 158°F) Specifications Physical Height Width Depth Weight (with 6-cell battery) 37.74 mm to 40.22 mm (1.48 inches to 1.58 inches) 378 mm (14.88 inches) 245 mm (9.64 inches) configurable to less than 2.58 kg (5.7 lbs) 79
AC Adapter Input voltage 100-240 VAC Input current 1.5 A/1.6 A/1.7A Input frequency 50-60 Hz Output power 65 W Output current 4.43 A (maximum at 4-second pulse) 3.34 A (continuous) Rated output voltage 19.5 VDC Temperature range: Operating 0° to 40°C (32° to 104°F) Storage -40° to 70°C (-40° to 158°F) Specifications Physical Height Width Depth Weight (with 6-cell battery) 37.74 mm to 40.22 mm (1.48 inches to 1.58 inches) 378 mm (14.88 inches) 245 mm (9.64 inches) configurable to less than 2.58 kg (5.7 lbs) 79
Setup Guide
Page 86
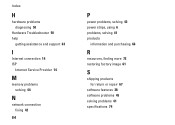
Index H hardware problems diagnosing 50 Hardware Troubleshooter 50 help getting assistance and support 63 I Internet connection 14 ISP Internet Service Provider 14 M memory problems solving 44 N network connection fixing 42 84 P power problems, solving 43 power strips, using 6 problems, solving 41 products information and purchasing 66 R resources, finding more 72 restoring factory image 61 S shipping products for return or repair 67 software features 38 software problems 45 solving problems 41 specifications 74
Index H hardware problems diagnosing 50 Hardware Troubleshooter 50 help getting assistance and support 63 I Internet connection 14 ISP Internet Service Provider 14 M memory problems solving 44 N network connection fixing 42 84 P power problems, solving 43 power strips, using 6 problems, solving 41 products information and purchasing 66 R resources, finding more 72 restoring factory image 61 S shipping products for return or repair 67 software features 38 software problems 45 solving problems 41 specifications 74


