
Owner's Manual
Page 4
... Using the Keyboard and Touch Pad 39 Numeric Keypad 39 Key Combinations 40 System Functions 40 Battery 40 CD or DVD Tray 40 Display Functions 40 Wireless Networking and Bluetooth® Wireless Technology Function 40 Power Management 40 Speaker Functions 41 Microsoft® Windows® Logo... Key Functions 41 Touch Pad 42 Customizing the Touch Pad 42 5 Using a Battery 43 Battery Performance 43 Checking the Battery Charge 44 Dell™ QuickSet Battery Meter 44 Microsoft® Windows® Power Meter 44 Charge Gauge 44 Low-Battery Warning 45 Conserving Battery Power 45...
... Using the Keyboard and Touch Pad 39 Numeric Keypad 39 Key Combinations 40 System Functions 40 Battery 40 CD or DVD Tray 40 Display Functions 40 Wireless Networking and Bluetooth® Wireless Technology Function 40 Power Management 40 Speaker Functions 41 Microsoft® Windows® Logo... Key Functions 41 Touch Pad 42 Customizing the Touch Pad 42 5 Using a Battery 43 Battery Performance 43 Checking the Battery Charge 44 Dell™ QuickSet Battery Meter 44 Microsoft® Windows® Power Meter 44 Charge Gauge 44 Low-Battery Warning 45 Conserving Battery Power 45...

Owner's Manual
Page 5
...the Picture 53 Copying CDs and DVDs 54 How to Copy a CD or DVD 54 Using Blank CDs and DVDs 54 Helpful Tips 55 Using Dell Media Experience and Dell MediaDirect 56 If the Computer Is On or in Standby Mode 56 If the Computer Is Off or in Hibernate Mode 56... Digital Audio 63 Component Video and Standard Audio 65 Component Video and S/PDIF Digital Audio 67 Setting Up the Cyberlink (CL) Headphones 69 Enabling the Display Settings for a TV in Microsoft® Windows® XP . . . 70 8 Using Cards 71 ExpressCards 71 ExpressCard Blanks 71 Installing an ExpressCard 71 Removing an ...
...the Picture 53 Copying CDs and DVDs 54 How to Copy a CD or DVD 54 Using Blank CDs and DVDs 54 Helpful Tips 55 Using Dell Media Experience and Dell MediaDirect 56 If the Computer Is On or in Standby Mode 56 If the Computer Is Off or in Hibernate Mode 56... Digital Audio 63 Component Video and Standard Audio 65 Component Video and S/PDIF Digital Audio 67 Setting Up the Cyberlink (CL) Headphones 69 Enabling the Display Settings for a TV in Microsoft® Windows® XP . . . 70 8 Using Cards 71 ExpressCards 71 ExpressCard Blanks 71 Installing an ExpressCard 71 Removing an ...

Owner's Manual
Page 8
...105 No Sound From Headphones 106 Touch Pad or Mouse Problems 106 Video and Display Problems 106 If the Display Is Blank 106 If the Display Is Difficult to Read 107 If Only Part of the Display is Readable 107 Drivers 108 What Is a Driver 108 Identifying Drivers 108 ...Reinstalling Drivers and Utilities 108 Resolving Software and Hardware Incompatibilities 110 Restoring Your Operating System 111 Using Microsoft Windows XP System Restore 111 Using Dell PC Restore by Symantec 112...
...105 No Sound From Headphones 106 Touch Pad or Mouse Problems 106 Video and Display Problems 106 If the Display Is Blank 106 If the Display Is Difficult to Read 107 If Only Part of the Display is Readable 107 Drivers 108 What Is a Driver 108 Identifying Drivers 108 ...Reinstalling Drivers and Utilities 108 Resolving Software and Hardware Incompatibilities 110 Restoring Your Operating System 111 Using Microsoft Windows XP System Restore 111 Using Dell PC Restore by Symantec 112...
Owner's Manual
Page 10
Only 152 FCC Class B 152 Macrovision Product Notice 153 Dell Technical Support Policy (U.S. Only 153 Definition of "Dell-Installed" Software and Peripherals 153 Definition of "Third-Party" Software and Peripherals 154 17 Contacting Dell 155 Glossary 173 Index 183 10 Contents 16 Appendix 149 Using the System Setup Program 149 Viewing the System Setup Screens 149 System Setup Screen 149 Commonly Used Options 150 Cleaning Your Computer 151 Computer, Keyboard, and Display 151 Touch Pad 151 CDs and DVDs 151 FCC Notices (U.S.
Only 152 FCC Class B 152 Macrovision Product Notice 153 Dell Technical Support Policy (U.S. Only 153 Definition of "Dell-Installed" Software and Peripherals 153 Definition of "Third-Party" Software and Peripherals 154 17 Contacting Dell 155 Glossary 173 Index 183 10 Contents 16 Appendix 149 Using the System Setup Program 149 Viewing the System Setup Screens 149 System Setup Screen 149 Commonly Used Options 150 Cleaning Your Computer 151 Computer, Keyboard, and Display 151 Touch Pad 151 CDs and DVDs 151 FCC Notices (U.S.
Owner's Manual
Page 16
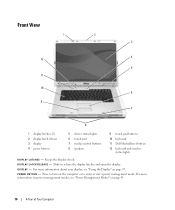
... more information on power management modes, see "Using the Display" on page 45. 16 A Tour of Your Computer Front View 1 2 3 4 12 5 11 10 6 9 7 8 1 display latches (2) 2 display latch release 3 display 4 power button 5 device status lights 6 touch pad 7 media control buttons 8 speakers 9 touch pad buttons 10 keyboard 11 Dell MediaDirect button 12 keyboard and wireless status lights...
... more information on power management modes, see "Using the Display" on page 45. 16 A Tour of Your Computer Front View 1 2 3 4 12 5 11 10 6 9 7 8 1 display latches (2) 2 display latch release 3 display 4 power button 5 device status lights 6 touch pad 7 media control buttons 8 speakers 9 touch pad buttons 10 keyboard 11 Dell MediaDirect button 12 keyboard and wireless status lights...

Owner's Manual
Page 26
... Computer NOTICE: When you disconnect the AC adapter cable from the computer, grasp the connector, not the cable itself, and pull firmly but gently to display a WARNING message or experience a degradation in your country. Using an incompatible cable or improperly connecting the cable to the power strip or electrical outlet may...
... Computer NOTICE: When you disconnect the AC adapter cable from the computer, grasp the connector, not the cable itself, and pull firmly but gently to display a WARNING message or experience a degradation in your country. Using an incompatible cable or improperly connecting the cable to the power strip or electrical outlet may...

Owner's Manual
Page 27
B A T T E R Y C H A R G E G A U G E - B A T T E R Y - For more information, see "Replacing the Battery" on page 44. B A T T E R Y - The size displayed for optional internal 9 memory module cover card with your hard drive in Windows Explorer is the capacity of Your Computer 27 H A R D D R I R E L E S S T E C H N O L O G Y - B A Y L A T C H R E L E A S E - When a battery is provided ...
B A T T E R Y C H A R G E G A U G E - B A T T E R Y - For more information, see "Replacing the Battery" on page 44. B A T T E R Y - The size displayed for optional internal 9 memory module cover card with your hard drive in Windows Explorer is the capacity of Your Computer 27 H A R D D R I R E L E S S T E C H N O L O G Y - B A Y L A T C H R E L E A S E - When a battery is provided ...

Owner's Manual
Page 37
...to change the brightness level, the Brightness Meter appears, but the brightness level on the monitor does not change. Using the Display Adjusting Brightness When a Dell™ computer is connected to an external monitor and you start the computer with an external device (such as an external... more information on an external monitor). Press to enable or disable the Brightness Meter on the keyboard.The Dell QuickSet Brightness Meter shows the current brightness setting for the display. You can click and drag the meter to the lowest comfortable setting by setting the brightness to a...
...to change the brightness level, the Brightness Meter appears, but the brightness level on the monitor does not change. Using the Display Adjusting Brightness When a Dell™ computer is connected to an external monitor and you start the computer with an external device (such as an external... more information on an external monitor). Press to enable or disable the Brightness Meter on the keyboard.The Dell QuickSet Brightness Meter shows the current brightness setting for the display. You can click and drag the meter to the lowest comfortable setting by setting the brightness to a...
Owner's Manual
Page 38
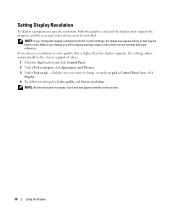
...support the program, and the necessary video drivers must be hard to read. If you choose a resolution or color palette that is higher than the display supports, the settings adjust automatically to the closest supported values. 1 Click the Start button and click Control Panel. 2 Under Pick a category, click... Appearance and Themes. 3 Under Pick a task..., click the area you change the display resolution from the current settings, the image may appear blurry or text may be installed. NOTE: If you change any of the...
...support the program, and the necessary video drivers must be hard to read. If you choose a resolution or color palette that is higher than the display supports, the settings adjust automatically to the closest supported values. 1 Click the Start button and click Control Panel. 2 Under Pick a category, click... Appearance and Themes. 3 Under Pick a task..., click the area you change the display resolution from the current settings, the image may appear blurry or text may be installed. NOTE: If you change any of the...
Owner's Manual
Page 40
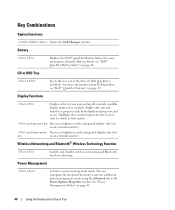
... more information about the Battery Meter, see "Dell™ QuickSet Features" on page 44. For more information about Dell QuickSet, see "Dell™ QuickSet Battery Meter" on page 49. and down-arrow Decreases brightness on the integrated display only (not key on an external monitor). ... tab in the Power Options Properties window. and up-arrow key Increases brightness on the integrated display only (not on an external monitor). Displays a list of the drive (if Dell QuickSet is installed). See "Power Management Modes" on ). Wireless Networking and Bluetooth® Wireless...
... more information about the Battery Meter, see "Dell™ QuickSet Features" on page 44. For more information about Dell QuickSet, see "Dell™ QuickSet Battery Meter" on page 49. and down-arrow Decreases brightness on the integrated display only (not key on an external monitor). ... tab in the Power Options Properties window. and up-arrow key Increases brightness on the integrated display only (not on an external monitor). Displays a list of the drive (if Dell QuickSet is installed). See "Power Management Modes" on ). Wireless Networking and Bluetooth® Wireless...
Owner's Manual
Page 42
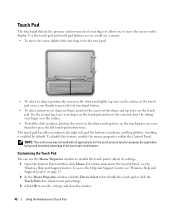
... the Control Panel and then click Mouse. NOTE: The scroll zones may not work with all applications. The touch pad has silk screening on the display. For information about the Control Panel, see "Windows Help and Support Center" on the touch pad or use the Mouse Properties window to function properly...
... the Control Panel and then click Mouse. NOTE: The scroll zones may not work with all applications. The touch pad has silk screening on the display. For information about the Control Panel, see "Windows Help and Support Center" on the touch pad or use the Mouse Properties window to function properly...

Owner's Manual
Page 43
...: • Using optical drives • Using wireless communications devices, ExpressCards, media memory cards, or USB devices • Using high-brightness display settings, 3D screen savers, or other computers with the battery installed at all times. Using a Battery 43 NOTE: Because the battery may ...electrical outlet the first time you connect your computer to an electrical outlet when writing to help preserve BIOS settings, operate your Dell™ portable computer with your computer. When your battery no longer holds a charge, call your local waste disposal or environmental ...
...: • Using optical drives • Using wireless communications devices, ExpressCards, media memory cards, or USB devices • Using high-brightness display settings, 3D screen savers, or other computers with the battery installed at all times. Using a Battery 43 NOTE: Because the battery may ...electrical outlet the first time you connect your computer to an electrical outlet when writing to help preserve BIOS settings, operate your Dell™ portable computer with your computer. When your battery no longer holds a charge, call your local waste disposal or environmental ...

Owner's Manual
Page 44
...number of "charged" but maintain a reduced charge capacity (health). That is connected to illuminate the charge-level lights. The Battery Meter window displays status, battery health, charge level, and charge completion time for the battery in your computer. Check the Battery Charge To check the battery...20 percent of charge and discharge cycles, batteries lose some charge capacity-or battery health. Keep the battery away from children. NOTE: Dell QuickSet may not be available on the taskbar. To check the Power Meter, doubleclick the icon on your computer. If no lights ...
...number of "charged" but maintain a reduced charge capacity (health). That is connected to illuminate the charge-level lights. The Battery Meter window displays status, battery health, charge level, and charge completion time for the battery in your computer. Check the Battery Charge To check the battery...20 percent of charge and discharge cycles, batteries lose some charge capacity-or battery health. Keep the battery away from children. NOTE: Dell QuickSet may not be available on the taskbar. To check the Power Meter, doubleclick the icon on your computer. If no lights ...

Owner's Manual
Page 45
..., the battery is largely determined by turning off the display and the hard drive after a low-battery warning. Low-Battery Warning NOTICE: To avoid losing or corrupting data, save your computer loses AC or battery power while in Dell QuickSet. Conserving Battery Power Perform the following actions to ...47 for more information on page 137 for more than 60 percent of the charge capacity remains, and you press the power button, close the display, or press . NOTE: See "Power Management Modes" on the battery charge gauge for the battery alarms in the taskbar, and click Help....
..., the battery is largely determined by turning off the display and the hard drive after a low-battery warning. Low-Battery Warning NOTICE: To avoid losing or corrupting data, save your computer loses AC or battery power while in Dell QuickSet. Conserving Battery Power Perform the following actions to ...47 for more information on page 137 for more than 60 percent of the charge capacity remains, and you press the power button, close the display, or press . NOTE: See "Power Management Modes" on the battery charge gauge for the battery alarms in the taskbar, and click Help....
Owner's Manual
Page 46
...on how you set the power management options. Press the power button. - To exit standby mode, press the power button or open the display depending on hibernate mode, see "Removing an ExpressCard or Blank" on how you set the power management options in the Power Options Properties ...by . To manually enter hibernate mode: • Click the Start button, click Turn off computer, press and hold , and then click Hibernate. Close the display. - or • Depending on the hard drive and then completely turning off the computer. Press . Press . To enter standby mode: • Click the...
...on how you set the power management options. Press the power button. - To exit standby mode, press the power button or open the display depending on hibernate mode, see "Removing an ExpressCard or Blank" on how you set the power management options in the Power Options Properties ...by . To manually enter hibernate mode: • Click the Start button, click Turn off computer, press and hold , and then click Hibernate. Close the display. - or • Depending on the hard drive and then completely turning off the computer. Press . Press . To enter standby mode: • Click the...
Owner's Manual
Page 49
... icon and select Help. The taskbar is located in the Microsoft® Windows® taskbar. Dell™ QuickSet Features 49 Dell™ QuickSet provides you with easy access to do in Dell™ QuickSet, you want to configure or view the following types of your computer.... Dell™ QuickSet Features NOTE: This feature may not be available on what you can start it by either clicking, doubleclicking, or right-clicking the QuickSet icon, , in the lower-right corner of settings: • Network connectivity • Power management • Display • ...
... icon and select Help. The taskbar is located in the Microsoft® Windows® taskbar. Dell™ QuickSet Features 49 Dell™ QuickSet provides you with easy access to do in Dell™ QuickSet, you want to configure or view the following types of your computer.... Dell™ QuickSet Features NOTE: This feature may not be available on what you can start it by either clicking, doubleclicking, or right-clicking the QuickSet icon, , in the lower-right corner of settings: • Network connectivity • Power management • Display • ...
Owner's Manual
Page 53
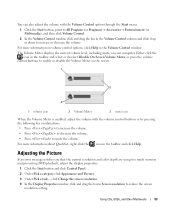
... Picture If an error message notifies you that the current resolution and color depth are using too much memory and preventing DVD playback, adjust the display properties. 1 Click the Start button and click Control Panel. 2 Under Pick a category, click Appearance and Themes. 3 Under Pick a task..., click ...Change the screen resolution. 4 In the Display Properties window, click and drag the bar in the Volume Control column and slide it up or down to increase or decrease the volume. Either...
... Picture If an error message notifies you that the current resolution and color depth are using too much memory and preventing DVD playback, adjust the display properties. 1 Click the Start button and click Control Panel. 2 Under Pick a category, click Appearance and Themes. 3 Under Pick a task..., click ...Change the screen resolution. 4 In the Display Properties window, click and drag the bar in the Volume Control column and slide it up or down to increase or decrease the volume. Either...
Owner's Manual
Page 58
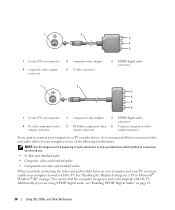
... TV-out connector 4 Pr (red) component videooutput connector 2 component video adapter 3 S/PDIF digital audio connector 5 Pb (blue) component video- 6 Y (green) component video- See "Enabling the Display Settings for a TV in one of each subsection to work with the TV.
... TV-out connector 4 Pr (red) component videooutput connector 2 component video adapter 3 S/PDIF digital audio connector 5 Pb (blue) component video- 6 Y (green) component video- See "Enabling the Display Settings for a TV in one of each subsection to work with the TV.
Owner's Manual
Page 59
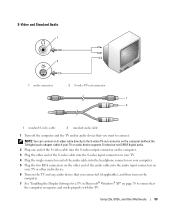
... 1 Turn off the computer and the TV and/or audio device that you connected (if applicable), and then turn on the computer. 7 See "Enabling the Display Settings for a TV in Microsoft® Windows® XP" on page 70 to ensure that you want to the S-video TV-out connector on the...
... 1 Turn off the computer and the TV and/or audio device that you connected (if applicable), and then turn on the computer. 7 See "Enabling the Display Settings for a TV in Microsoft® Windows® XP" on page 70 to ensure that you want to the S-video TV-out connector on the...

Owner's Manual
Page 61
... audio device. 7 Turn on the TV, turn on any audio device that you connected (if applicable), and then turn on the computer. 8 See "Enabling the Display Settings for a TV in Microsoft® Windows® XP" on page 70 to ensure that the computer recognizes and works properly with the TV. Using...
... audio device. 7 Turn on the TV, turn on any audio device that you connected (if applicable), and then turn on the computer. 8 See "Enabling the Display Settings for a TV in Microsoft® Windows® XP" on page 70 to ensure that the computer recognizes and works properly with the TV. Using...


