Owner's Manual
Page 4
... Customizing the Touch Pad 38 5 Using a Battery 39 Battery Performance 39 Checking the Battery Charge 40 Dell™ QuickSet Battery Meter 40 Microsoft® Windows® Power Meter 40 Charge Gauge 40 Low-Battery Warning 41 Conserving Battery Power 41 Power Management Modes 41 Configuring Power Management Settings 43 Charging the Battery 43 Replacing the Battery 43 Storing a Battery 44 4 Contents
... Customizing the Touch Pad 38 5 Using a Battery 39 Battery Performance 39 Checking the Battery Charge 40 Dell™ QuickSet Battery Meter 40 Microsoft® Windows® Power Meter 40 Charge Gauge 40 Low-Battery Warning 41 Conserving Battery Power 41 Power Management Modes 41 Configuring Power Management Settings 43 Charging the Battery 43 Replacing the Battery 43 Storing a Battery 44 4 Contents
Owner's Manual
Page 8
...Incompatibilities 102 Restoring Your Operating System 102 Using Microsoft Windows XP System Restore 103 Using Dell PC Restore by Symantec 104 Using the Operating System CD 106 11 Adding and Replacing Parts 109 Before You Begin 109 Recommended Tools 109 Turning Off Your Computer 109 ...Before Working Inside Your Computer 110 Optical Drive 111 Hard Drive 112 Returning a Hard Drive to Dell 114 Memory 114 Modem 117 Hinge Cover 118 Keyboard 119 Wireless Mini-Card 121 Coin-Cell Battery...
...Incompatibilities 102 Restoring Your Operating System 102 Using Microsoft Windows XP System Restore 103 Using Dell PC Restore by Symantec 104 Using the Operating System CD 106 11 Adding and Replacing Parts 109 Before You Begin 109 Recommended Tools 109 Turning Off Your Computer 109 ...Before Working Inside Your Computer 110 Optical Drive 111 Hard Drive 112 Returning a Hard Drive to Dell 114 Memory 114 Modem 117 Hinge Cover 118 Keyboard 119 Wireless Mini-Card 121 Coin-Cell Battery...

Owner's Manual
Page 24
... modem and the memory modules. The computer uses a fan to an electrical outlet. B A T T E R Y - M O D E M / M E M O R Y M O D U L E C O V E R - See "Replacing the Battery" on the battery charge status. Provides information on page 43. Secures the optical drive in the optical drive bay. See "Checking the Battery Charge" on page 84. O P T I C A L - For more information, see "Optical Drive" on page 111. Stores...
... modem and the memory modules. The computer uses a fan to an electrical outlet. B A T T E R Y - M O D E M / M E M O R Y M O D U L E C O V E R - See "Replacing the Battery" on the battery charge status. Provides information on page 43. Secures the optical drive in the optical drive bay. See "Checking the Battery Charge" on page 84. O P T I C A L - For more information, see "Optical Drive" on page 111. Stores...

Owner's Manual
Page 39
... first time you connect your computer. You can also set power management options to a CD or DVD. Replace the battery only with a compatible battery purchased from other power-intensive programs such as standard equipment in maximum performance mode (See "Configuring Power Management...For best results, operate the computer with your Dell computer. NOTE: Battery operating time (the time the battery can check the battery charge (see the Product Information Guide or separate paper warranty document that you use a battery from Dell. See "Configuring Power Management Settings" on ...
... first time you connect your computer. You can also set power management options to a CD or DVD. Replace the battery only with a compatible battery purchased from other power-intensive programs such as standard equipment in maximum performance mode (See "Configuring Power Management...For best results, operate the computer with your Dell computer. NOTE: Battery operating time (the time the battery can check the battery charge (see the Product Information Guide or separate paper warranty document that you use a battery from Dell. See "Configuring Power Management Settings" on ...
Owner's Manual
Page 41
...it may lose data. If the battery runs completely out of power, hibernate mode begins automatically. These options ...when the battery charge is used and recharged. • Place the computer in standby mode or hibernate mode when you should consider replacing the battery. See "... Conserving Battery Power Perform the following actions to conserve battery power: • Connect the computer to an electrical outlet when possible because battery life is... the status button on the battery charge gauge for at least 3 seconds. To check the battery health using the Battery Meter in the taskbar, and...
...it may lose data. If the battery runs completely out of power, hibernate mode begins automatically. These options ...when the battery charge is used and recharged. • Place the computer in standby mode or hibernate mode when you should consider replacing the battery. See "... Conserving Battery Power Perform the following actions to conserve battery power: • Connect the computer to an electrical outlet when possible because battery life is... the status button on the battery charge gauge for at least 3 seconds. To check the battery health using the Battery Meter in the taskbar, and...
Owner's Manual
Page 43
... the light flashes alternately green and orange. If the battery is hot from Dell. The battery is connected to complete the battery replacement before the computer shuts down and loses any unsaved data. CAUTION: Using an incompatible battery may not charge when you need. Charging the Battery NOTE: Without Dell™ ExpressCharge™, the AC adapter charges a completely...
... the light flashes alternately green and orange. If the battery is hot from Dell. The battery is connected to complete the battery replacement before the computer shuts down and loses any unsaved data. CAUTION: Using an incompatible battery may not charge when you need. Charging the Battery NOTE: Without Dell™ ExpressCharge™, the AC adapter charges a completely...
Owner's Manual
Page 44
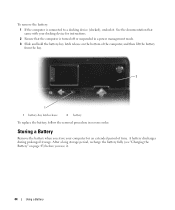
...is connected to a docking device (docked), undock it . 44 Using a Battery After a long storage period, recharge the battery fully (see "Charging the Battery" on the bottom of time. To remove the battery: 1 If the computer is turned off or suspended in a power management ...battery-bay latch release on page 43) before you store your docking device for an extended period of the computer, and then lift the battery from the bay. 2 1 1 battery-bay latch release 2 battery To replace the battery, follow the removal procedure in reverse order. Storing a Battery Remove the battery...
...is connected to a docking device (docked), undock it . 44 Using a Battery After a long storage period, recharge the battery fully (see "Charging the Battery" on the bottom of time. To remove the battery: 1 If the computer is turned off or suspended in a power management ...battery-bay latch release on page 43) before you store your docking device for an extended period of the computer, and then lift the battery from the bay. 2 1 1 battery-bay latch release 2 battery To replace the battery, follow the removal procedure in reverse order. Storing a Battery Remove the battery...
Owner's Manual
Page 88
... on page 114). The operating system cannot find the hard drive. SHUTDOWN FAILURE - A chip on page 114). If the message reappears, contact Dell. Reinstall the memory modules and, if necessary, replace them (see "Memory" on the system board may be faulty or improperly seated. E X I T S O M E P R O G R A M S A N D T R Y A G A I N G V A... . If a large number of sectors are corrupted. Connect your boot device, ensure that you want to charge the battery. Then immediately exit the program. A memory module may be corrupted. A chip on page 133. 88 Solving Problems Run ...
... on page 114). The operating system cannot find the hard drive. SHUTDOWN FAILURE - A chip on page 114). If the message reappears, contact Dell. Reinstall the memory modules and, if necessary, replace them (see "Memory" on the system board may be faulty or improperly seated. E X I T S O M E P R O G R A M S A N D T R Y A G A I N G V A... . If a large number of sectors are corrupted. Connect your boot device, ensure that you want to charge the battery. Then immediately exit the program. A memory module may be corrupted. A chip on page 133. 88 Solving Problems Run ...
Owner's Manual
Page 89
...). The keyboard controller may be malfunctioning, or a memory module may be loose. The battery is listed, Windows recognizes the device. Replace the battery, or connect the computer to charge the battery. Double-click the Safely Remove Hardware icon in the Dell Diagnostics (see "Dell Diagnostics" on page 93. I F Y O U H A V E P R O B L E M S W I S N O T R E A D Y - ENSURE THAT THE IEEE 1394 DEVICE IS RECOGNIZED...
...). The keyboard controller may be malfunctioning, or a memory module may be loose. The battery is listed, Windows recognizes the device. Replace the battery, or connect the computer to charge the battery. Double-click the Safely Remove Hardware icon in the Dell Diagnostics (see "Dell Diagnostics" on page 93. I F Y O U H A V E P R O B L E M S W I S N O T R E A D Y - ENSURE THAT THE IEEE 1394 DEVICE IS RECOGNIZED...
Owner's Manual
Page 110
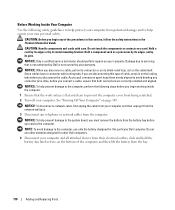
...to the system board, you must remove the battery from the battery bay before you service the computer. NOTE: To avoid damage to the computer, use other batteries designed for this particular Dell computer. Do not use only the battery designed for other Dell computers. 4 Disconnect your computer and then ... disconnect the cable. Hold a component such as a processor by its edges, not by Dell is flat and clean to prevent the computer cover from the bay. 110 Adding and Replacing Parts Before Working Inside Your Computer Use the following steps before you are correctly oriented and ...
...to the system board, you must remove the battery from the battery bay before you service the computer. NOTE: To avoid damage to the computer, use other batteries designed for this particular Dell computer. Do not use only the battery designed for other Dell computers. 4 Disconnect your computer and then ... disconnect the cable. Hold a component such as a processor by its edges, not by Dell is flat and clean to prevent the computer cover from the bay. 110 Adding and Replacing Parts Before Working Inside Your Computer Use the following steps before you are correctly oriented and ...

Owner's Manual
Page 111
... screw. 3 Insert a scribe into the notch and push it to the side to release the drive from the optical drive bay. Adding and Replacing Parts 111 1 2 1 battery-bay latch release 2 battery 5 Remove the optical drive, if installed, from the bay. 4 Slide the drive out of the procedures in this section, follow the safety...
... screw. 3 Insert a scribe into the notch and push it to the side to release the drive from the optical drive bay. Adding and Replacing Parts 111 1 2 1 battery-bay latch release 2 battery 5 Remove the optical drive, if installed, from the bay. 4 Slide the drive out of the procedures in this section, follow the safety...

Owner's Manual
Page 116
... reinstall it clicks into place. As the computer boots, it . 1 2 1 notch 2 tab 5 Replace the memory module cover. No error message indicates this failure. 4 Ground yourself and install the new memory ...in the computer, click the Start button, click Help and Support, and then click Dell System Information. 116 Adding and Replacing Parts See "Hard Drive" on page 112. 8 Turn on the computer. If you...is not installed properly, the computer may damage your computer. 6 Insert the battery into the slot at a 45-degree angle, and rotate the module down until it . b Slide ...
... reinstall it clicks into place. As the computer boots, it . 1 2 1 notch 2 tab 5 Replace the memory module cover. No error message indicates this failure. 4 Ground yourself and install the new memory ...in the computer, click the Start button, click Help and Support, and then click Dell System Information. 116 Adding and Replacing Parts See "Hard Drive" on page 112. 8 Turn on the computer. If you...is not installed properly, the computer may damage your computer. 6 Insert the battery into the slot at a 45-degree angle, and rotate the module down until it . b Slide ...

Owner's Manual
Page 119
... the computer). NOTICE: To help prevent damage to the system board, you must remove the battery from the battery bay before you begin working inside the computer. 1 Follow the procedures in the Product Information Guide. NOTE: When replacing the hinge cover, first insert the left edge and then press from left , and remove...
... the computer). NOTICE: To help prevent damage to the system board, you must remove the battery from the battery bay before you begin working inside the computer. 1 Follow the procedures in the Product Information Guide. NOTE: When replacing the hinge cover, first insert the left edge and then press from left , and remove...

Owner's Manual
Page 120
b Lift the keyboard only enough to hold it up and slightly forward to allow access to replace. NOTICE: The keycaps on the keyboard are fragile, easily dislodged, and time-consuming to the keyboard connector. NOTICE: To help prevent damage to the front ... from the keyboard connector on the system board, rotate the plastic bar on the keyboard connector to the system board, you must remove the battery from the battery bay before you begin working inside the computer. 1 Follow the procedures in "Before You Begin" on page 118. 4 Remove the keyboard: a Remove the two...
b Lift the keyboard only enough to hold it up and slightly forward to allow access to replace. NOTICE: The keycaps on the keyboard are fragile, easily dislodged, and time-consuming to the keyboard connector. NOTICE: To help prevent damage to the front ... from the keyboard connector on the system board, rotate the plastic bar on the keyboard connector to the system board, you must remove the battery from the battery bay before you begin working inside the computer. 1 Follow the procedures in "Before You Begin" on page 118. 4 Remove the keyboard: a Remove the two...

Owner's Manual
Page 121
... cables (2) 3 antenna cable connectors (2) Adding and Replacing Parts 121 See "Hinge Cover" on page 118. 3 Remove the keyboard. If you are replacing a Mini-Card, remove the existing card: a Disconnect the two antenna cables from the battery bay before replacing the two screws. NOTICE: To avoid scratching the palm... rest when replacing the keyboard, hook the tabs along the front...
... cables (2) 3 antenna cable connectors (2) Adding and Replacing Parts 121 See "Hinge Cover" on page 118. 3 Remove the keyboard. If you are replacing a Mini-Card, remove the existing card: a Disconnect the two antenna cables from the battery bay before replacing the two screws. NOTICE: To avoid scratching the palm... rest when replacing the keyboard, hook the tabs along the front...

Owner's Manual
Page 124
... coin-cell battery compartment, and pop the battery out. 124 Adding and Replacing Parts See "Keyboard" on page 119. 4 Insert a plastic scribe into the guide on page 118. 3 Remove the keyboard. 1 2 1 system board connector 3 2 antenna cables (2) 3 antenna cable connectors (2) Coin-Cell Battery CAUTION: Before... page 109. 2 Remove the hinge cover. NOTICE: To help prevent damage to the system board, you must remove the battery from the battery bay before you begin working inside the computer. 1 Follow the procedures in the Product Information Guide. NOTICE: To avoid electrostatic...
... coin-cell battery compartment, and pop the battery out. 124 Adding and Replacing Parts See "Keyboard" on page 119. 4 Insert a plastic scribe into the guide on page 118. 3 Remove the keyboard. 1 2 1 system board connector 3 2 antenna cables (2) 3 antenna cable connectors (2) Coin-Cell Battery CAUTION: Before... page 109. 2 Remove the hinge cover. NOTICE: To help prevent damage to the system board, you must remove the battery from the battery bay before you begin working inside the computer. 1 Follow the procedures in the Product Information Guide. NOTICE: To avoid electrostatic...

Owner's Manual
Page 125
... avoid electrostatic discharge, ground yourself by using the pull-tab. 7 Dislodge the display cable from the battery bay before you begin working inside the computer. 1 Follow the procedures in the Product Information Guide. When you replace the battery, insert it at a 30-degree angle under the clip with the positive (identified by periodically...
... avoid electrostatic discharge, ground yourself by using the pull-tab. 7 Dislodge the display cable from the battery bay before you begin working inside the computer. 1 Follow the procedures in the Product Information Guide. When you replace the battery, insert it at a 30-degree angle under the clip with the positive (identified by periodically...

Owner's Manual
Page 127
... inserting the small center tab into place. 3 2 1 1 card door 2 cable 3 card Adding and Replacing Parts 127 Slide and hold the battery-bay latch release on page 109. 2 If you have not already removed the battery, do so now. NOTICE: To help prevent damage to the system board, you must remove the... battery from the computer. 5 To replace the card, connect the card to the cable and then carefully insert it from the battery bay before you begin any of the procedures in this section, follow the safety instructions...
... inserting the small center tab into place. 3 2 1 1 card door 2 cable 3 card Adding and Replacing Parts 127 Slide and hold the battery-bay latch release on page 109. 2 If you have not already removed the battery, do so now. NOTICE: To help prevent damage to the system board, you must remove the... battery from the computer. 5 To replace the card, connect the card to the cable and then carefully insert it from the battery bay before you begin any of the procedures in this section, follow the safety instructions...

Owner's Manual
Page 131
...allow it to acclimate to room temperature for 1 hour before turning it on page 65. • To make the computer as light as possible, replace any devices installed in the module bay with items such as your name, address, and phone number in this file. • Contact your credit ... carrying case to pack the computer and its accessories together safely. • Avoid packing the computer with the Dell TravelLite™ module. • Fully charge the main battery and any spare batteries that it does not slide around in the trunk of your car or in an overhead storage compartment. Place ...
...allow it to acclimate to room temperature for 1 hour before turning it on page 65. • To make the computer as light as possible, replace any devices installed in the module bay with items such as your name, address, and phone number in this file. • Contact your credit ... carrying case to pack the computer and its accessories together safely. • Avoid packing the computer with the Dell TravelLite™ module. • Fully charge the main battery and any spare batteries that it does not slide around in the trunk of your car or in an overhead storage compartment. Place ...
Owner's Manual
Page 181
... problems, 83 CD-RW drive problems, 83 CDs, 46 operating system, 14 playing, 45 Check Disk, 84 cleaning touch pad, 165 coin-cell battery replacing, 124 computer crashes, 91 protecting, 78 restore to previous operating state, 103 slow performance, 85, 92 specifications, 155 stops responding, 91 conflicts software..., 46 helpful tips, 47 how to, 46 copying DVDs general information, 46 helpful tips, 47 how to, 46 D Dell contacting, 133, 168 support policy, 167 support site, 13 Dell Diagnostics about, 79 starting from the Drivers and Utilities CD, 80 starting from your hard drive, 79 Index 181
... problems, 83 CD-RW drive problems, 83 CDs, 46 operating system, 14 playing, 45 Check Disk, 84 cleaning touch pad, 165 coin-cell battery replacing, 124 computer crashes, 91 protecting, 78 restore to previous operating state, 103 slow performance, 85, 92 specifications, 155 stops responding, 91 conflicts software..., 46 helpful tips, 47 how to, 46 copying DVDs general information, 46 helpful tips, 47 how to, 46 D Dell contacting, 133, 168 support policy, 167 support site, 13 Dell Diagnostics about, 79 starting from the Drivers and Utilities CD, 80 starting from your hard drive, 79 Index 181


