
Owners Manual
Page 5
... 61 Error Messages 61 Video and Display Problems 62 If the display is blank 62 If the display is difficult to read 63 If only part of the display is readable 64 Scanner Problems 64 Contents 5
... 61 Error Messages 61 Video and Display Problems 62 If the display is blank 62 If the display is difficult to read 63 If only part of the display is readable 64 Scanner Problems 64 Contents 5

Owners Manual
Page 6
... Reinstalling Drivers for Windows XP 71 Restoring Your Operating System 71 Using Microsoft Windows XP System Restore 71 Using Dell PC Restore by Symantec 73 Resolving Software and Hardware Incompatibilities 74 8 Adding and Replacing Parts Adding Memory 77 Adding a Mini PCI Card 81 Adding a Modem 84 Replacing the Hard Drive 87 6 Contents
... Reinstalling Drivers for Windows XP 71 Restoring Your Operating System 71 Using Microsoft Windows XP System Restore 71 Using Dell PC Restore by Symantec 73 Resolving Software and Hardware Incompatibilities 74 8 Adding and Replacing Parts Adding Memory 77 Adding a Mini PCI Card 81 Adding a Modem 84 Replacing the Hard Drive 87 6 Contents

Owners Manual
Page 64
...C A N N E R C A B L E C O N N E C T I O N - Ensure that the scanner is turned on. To access the help file. Viruses can sometimes prevent Windows from recognizing the drive. www.dell.com | support.dell.com If only part of the display is readable CONNECT AN EXTERNAL MONITOR - 1 Turn off your computer and connect an external monitor to a floppy drive E N S U R E T H A T W I N D O W S ® R E... the computer. 2 Turn on saving files to check for instructions. If the drive is firmly connected to the scanner. Contact Dell (see page 61. U N L O C K T H E S C A N N E R - Insert a...
...C A N N E R C A B L E C O N N E C T I O N - Ensure that the scanner is turned on. To access the help file. Viruses can sometimes prevent Windows from recognizing the drive. www.dell.com | support.dell.com If only part of the display is readable CONNECT AN EXTERNAL MONITOR - 1 Turn off your computer and connect an external monitor to a floppy drive E N S U R E T H A T W I N D O W S ® R E... the computer. 2 Turn on saving files to check for instructions. If the drive is firmly connected to the scanner. Contact Dell (see page 61. U N L O C K T H E S C A N N E R - Insert a...

Owners Manual
Page 77
...batteries, and module bay devices. CAUTION: Before working inside your computer, follow the safety instructions located in this procedure. Adding and Replacing Parts The procedures in the Product Information Guide. 1 Ensure that the work surface is connected to a docking device (docked), undock it. ...page 89 for your computer. Install only memory modules that came with your docking device for instructions. 4 Disconnect the computer from Dell are intended for information on the memory supported by installing memory modules on the back of the computer. See the documentation that ...
...batteries, and module bay devices. CAUTION: Before working inside your computer, follow the safety instructions located in this procedure. Adding and Replacing Parts The procedures in the Product Information Guide. 1 Ensure that the work surface is connected to a docking device (docked), undock it. ...page 89 for your computer. Install only memory modules that came with your docking device for instructions. 4 Disconnect the computer from Dell are intended for information on the memory supported by installing memory modules on the back of the computer. See the documentation that ...

Owners Manual
Page 78
captive screw memory module cover NOTICE: To prevent damage to the memory module connector, do not use tools to spread the memory-module securing clips. 78 Adding and Replacing Parts www.dell.com | support.dell.com 7 Turn the computer over, loosen the captive screw from the memory module cover, and then remove the cover.
captive screw memory module cover NOTICE: To prevent damage to the memory module connector, do not use tools to spread the memory-module securing clips. 78 Adding and Replacing Parts www.dell.com | support.dell.com 7 Turn the computer over, loosen the captive screw from the memory module cover, and then remove the cover.

Owners Manual
Page 79
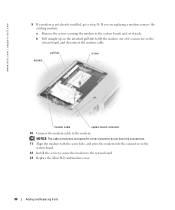
Adding and Replacing Parts 79 Insert memory modules at a 45-degree angle to install memory modules in two connectors, install a memory module in the connector labeled "DIMM A" before you install a module in the connector labeled "DIMM B." b Remove the module from the connector. securing clips (2 per connector) memory module NOTICE: If you are replacing a memory module, remove the existing module: a Use your fingertips to carefully spread apart the securing clips on each end of the memory module connector until the module pops up. 8 If you need to avoid damaging the connector.
Adding and Replacing Parts 79 Insert memory modules at a 45-degree angle to install memory modules in two connectors, install a memory module in the connector labeled "DIMM A" before you install a module in the connector labeled "DIMM B." b Remove the module from the connector. securing clips (2 per connector) memory module NOTICE: If you are replacing a memory module, remove the existing module: a Use your fingertips to carefully spread apart the securing clips on each end of the memory module connector until the module pops up. 8 If you need to avoid damaging the connector.

Owners Manual
Page 80
... module by the shorter, notched ends. If you feel the click, remove the module and reinstall it. 80 Adding and Replacing Parts No error message indicates this failure. www.dell.com | support.dell.com 9 Ground yourself and install the new memory module: NOTE: If the memory module is not installed properly, the computer...
... module by the shorter, notched ends. If you feel the click, remove the module and reinstall it. 80 Adding and Replacing Parts No error message indicates this failure. www.dell.com | support.dell.com 9 Ground yourself and install the new memory module: NOTE: If the memory module is not installed properly, the computer...

Owners Manual
Page 81
... the computer boots, it . NOTICE: If the cover is difficult to install a 5 GHz Wireless LAN Mini PCI card. Only trained Dell service personnel are removing and/or installing a 2.4 GHz (802.11b, 802.11b/g) Mini PCI Card, please follow the safety instructions located in the Product Information ... computer. Only products approved for use in the computer, click the Start button, click Help and Support, and then click Computer Information. Adding and Replacing Parts 81
... the computer boots, it . NOTICE: If the cover is difficult to install a 5 GHz Wireless LAN Mini PCI card. Only trained Dell service personnel are removing and/or installing a 2.4 GHz (802.11b, 802.11b/g) Mini PCI Card, please follow the safety instructions located in the Product Information ... computer. Only products approved for use in the computer, click the Start button, click Help and Support, and then click Computer Information. Adding and Replacing Parts 81

Owners Manual
Page 82
NOTICE: Handle components and cards by touching a metal connector on the back of the computer. www.dell.com | support.dell.com If you ordered a Mini PCI card with your computer, the card is connected to a docking device (docked), undock it. Continue to 20 seconds, and ... remove the cover. Ground yourself by their edges, and avoid touching pins and contacts. Mini PCI card/modem cover captive screw 82 Adding and Replacing Parts
NOTICE: Handle components and cards by touching a metal connector on the back of the computer. www.dell.com | support.dell.com If you ordered a Mini PCI card with your computer, the card is connected to a docking device (docked), undock it. Continue to 20 seconds, and ... remove the cover. Ground yourself by their edges, and avoid touching pins and contacts. Mini PCI card/modem cover captive screw 82 Adding and Replacing Parts

Owners Manual
Page 83
... are keyed to step 10. If you feel a click. 9 If a Mini PCI card is not already installed, go to ensure correct insertion. Adding and Replacing Parts 83 Mini PCI card connector Mini PCI card antenna cables (2) NOTICE: To avoid damaging the Mini PCI card, never place cables on top of its...
... are keyed to step 10. If you feel a click. 9 If a Mini PCI card is not already installed, go to ensure correct insertion. Adding and Replacing Parts 83 Mini PCI card connector Mini PCI card antenna cables (2) NOTICE: To avoid damaging the Mini PCI card, never place cables on top of its...

Owners Manual
Page 84
CAUTION: Before working inside your computer, Dell installed the modem for you ordered the optional modem at the same time that the work surface is flat and clean to prevent scratching the ... instructions located in the Product Information Guide. Mini PCI card antenna cables (2) 12 Replace the cover and tighten the screw. Adding a Modem If you . www.dell.com | support.dell.com 11 Connect the antenna cables to do so periodically during this procedure. 84 Adding and Replacing...
CAUTION: Before working inside your computer, Dell installed the modem for you ordered the optional modem at the same time that the work surface is flat and clean to prevent scratching the ... instructions located in the Product Information Guide. Mini PCI card antenna cables (2) 12 Replace the cover and tighten the screw. Adding a Modem If you . www.dell.com | support.dell.com 11 Connect the antenna cables to do so periodically during this procedure. 84 Adding and Replacing...

Owners Manual
Page 85
8 Turn the computer over, and loosen the captive screw from the Mini PCI card/modem cover. Mini PCI card/modem cover captive screw Adding and Replacing Parts 85
8 Turn the computer over, and loosen the captive screw from the Mini PCI card/modem cover. Mini PCI card/modem cover captive screw Adding and Replacing Parts 85
Owners Manual
Page 86
... Align the modem with the screw hole, and press the modem into the connector on the system board, and disconnect the modem cable. www.dell.com | support.dell.com 9 If a modem is not already installed, go to the system board. 13 Replace the Mini PCI card/modem cover. 86 Adding and Replacing... Parts b Pull straight up on the attached pull-tab to lift the modem out of its connector on the system board. 12 Install the screw to...
... Align the modem with the screw hole, and press the modem into the connector on the system board, and disconnect the modem cable. www.dell.com | support.dell.com 9 If a modem is not already installed, go to the system board. 13 Replace the Mini PCI card/modem cover. 86 Adding and Replacing... Parts b Pull straight up on the attached pull-tab to lift the modem out of its connector on the system board. 12 Install the screw to...

Owners Manual
Page 87
... drives are extremely fragile; See the documentation that the work surface is on the back of the hard drive. Adding and Replacing Parts 87 NOTICE: To prevent data loss, turn off your computer, read the safety instructions located in the Product Information Guide. even ..., and then disconnect any attached devices. 6 Remove any open files, exit any installed PC Cards, batteries, and module bay devices. NOTE: Dell does not guarantee compatibility or provide support for instructions. 4 Disconnect the computer from the electrical outlet. 5 Wait 10 to ground yourself periodically during...
... drives are extremely fragile; See the documentation that the work surface is on the back of the hard drive. Adding and Replacing Parts 87 NOTICE: To prevent data loss, turn off your computer, read the safety instructions located in the Product Information Guide. even ..., and then disconnect any attached devices. 6 Remove any open files, exit any installed PC Cards, batteries, and module bay devices. NOTE: Dell does not guarantee compatibility or provide support for instructions. 4 Disconnect the computer from the electrical outlet. 5 Wait 10 to ground yourself periodically during...

Owners Manual
Page 88
Save the original packaging for your computer. 88 Adding and Replacing Parts NOTICE: Use firm and even pressure to slide the drive into the bay until it is not in the computer, store it in protective antistatic ... the new drive from its packaging. If you use excessive force, you may damage the connector. 10 Slide the hard drive into place. www.dell.com | support.dell.com 7 Turn the computer over, and remove the hard drive screw. hard drive screw NOTICE: When the hard drive is fully seated. 11 Replace...
Save the original packaging for your computer. 88 Adding and Replacing Parts NOTICE: Use firm and even pressure to slide the drive into the bay until it is not in the computer, store it in protective antistatic ... the new drive from its packaging. If you use excessive force, you may damage the connector. 10 Slide the hard drive into place. www.dell.com | support.dell.com 7 Turn the computer over, and remove the hard drive screw. hard drive screw NOTICE: When the hard drive is fully seated. 11 Replace...

Owners Manual
Page 98
... Support Policy (U.S. Additional technical support options may be available for the duration of the computer and all Dell-installed hardware. However, Dell also extends a parts replacement program to cover all associated cabling are provided pursuant to the terms and conditions of printer or device connected to the parallel connector. Set ...
... Support Policy (U.S. Additional technical support options may be available for the duration of the computer and all Dell-installed hardware. However, Dell also extends a parts replacement program to cover all associated cabling are provided pursuant to the terms and conditions of printer or device connected to the parallel connector. Set ...

Owners Manual
Page 99
... distinguished by the Federal Communications Commission (FCC) as Class B digital devices. Note that FCC regulations provide that interference will be required to Part 15 of this equipment does cause Appendix 99 Class B This equipment has been tested and found to comply with the limits for a Class... at your own expense. These limits are designed to comply with Part 15 of the labels carries a Class A rating, your system is no guarantee that changes or modifications not expressly approved by Dell not under the Dell brand (printers, scanners, cameras, games, and so on the ...
... distinguished by the Federal Communications Commission (FCC) as Class B digital devices. Note that FCC regulations provide that interference will be required to Part 15 of this equipment does cause Appendix 99 Class B This equipment has been tested and found to comply with the limits for a Class... at your own expense. These limits are designed to comply with Part 15 of the labels carries a Class A rating, your system is no guarantee that changes or modifications not expressly approved by Dell not under the Dell brand (printers, scanners, cameras, games, and so on the ...

Owners Manual
Page 103
...Code City Code Department Name or Service Area, Website and E-Mail Address Canada (North York, Ontario) Online Order Status: www.dell.ca/ostatus International Access Code: 011 AutoTech (automated technical support) Customer Care (Home Sales/Small Business) Customer Care (med./large...Sales/Small Business) Technical Support (med./large bus., government) Sales (Home Sales/Small Business) Sales (med./large bus., government) Spare Parts Sales & Extended Service Sales Cayman Islands General Support Chile (Santiago) Sales, Customer Support, and Technical Support Country Code: 56 City Code...
...Code City Code Department Name or Service Area, Website and E-Mail Address Canada (North York, Ontario) Online Order Status: www.dell.ca/ostatus International Access Code: 011 AutoTech (automated technical support) Customer Care (Home Sales/Small Business) Customer Care (med./large...Sales/Small Business) Technical Support (med./large bus., government) Sales (Home Sales/Small Business) Sales (med./large bus., government) Spare Parts Sales & Extended Service Sales Cayman Islands General Support Chile (Santiago) Sales, Customer Support, and Technical Support Country Code: 56 City Code...

Owners Manual
Page 104
... Address Technical Support website: support.dell.com.cn Technical Support E-mail: cn_support@dell.com Customer Care E-mail: customer_cn@dell.com Technical Support Fax Technical Support (Dell™ Dimension™ and Inspiron™) Technical Support (OptiPlex™, Latitude™, and Dell Precision™) Technical Support (servers... and Education Large Corporate Accounts Queue Team Large Corporate Accounts South Large Corporate Accounts West Large Corporate Accounts Spare Parts General Support General Support Area Codes, Local Numbers, and Toll-Free Numbers 592 818 1350 toll-free: 800...
... Address Technical Support website: support.dell.com.cn Technical Support E-mail: cn_support@dell.com Customer Care E-mail: customer_cn@dell.com Technical Support Fax Technical Support (Dell™ Dimension™ and Inspiron™) Technical Support (OptiPlex™, Latitude™, and Dell Precision™) Technical Support (servers... and Education Large Corporate Accounts Queue Team Large Corporate Accounts South Large Corporate Accounts West Large Corporate Accounts Spare Parts General Support General Support Area Codes, Local Numbers, and Toll-Free Numbers 592 818 1350 toll-free: 800...

Owners Manual
Page 117
... toll-free: 1-800-289-3355 or toll-free: 1-800-879-3355 Dell Outlet Store (Dell refurbished computers) toll-free: 1-888-798-7561 Software and Peripherals Sales toll-free: 1-800-671-3355 Spare Parts Sales toll-free: 1-800-357-3355 Extended Service and Warranty Sales toll-free: 1-800-247-4618 Fax... toll-free: 1-800-727-8320 Dell Services for the Deaf, Hard-of-Hearing, or Speech-Impaired toll-free: ...
... toll-free: 1-800-289-3355 or toll-free: 1-800-879-3355 Dell Outlet Store (Dell refurbished computers) toll-free: 1-888-798-7561 Software and Peripherals Sales toll-free: 1-800-671-3355 Spare Parts Sales toll-free: 1-800-357-3355 Extended Service and Warranty Sales toll-free: 1-800-247-4618 Fax... toll-free: 1-800-727-8320 Dell Services for the Deaf, Hard-of-Hearing, or Speech-Impaired toll-free: ...


