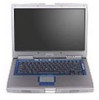

Owners Manual
Page 2
...written permission of data and tells you how to hardware or loss of Dell Inc. is a registered trademark of abbreviations and acronyms, see the Dell Inspiron Help File (see page 61) If you purchased a Dell™ n Series computer, any references in ... in this document is subject to Microsoft® Windows® operating systems are registered trademarks of Dell Inc.; Trademarks used in this text: Dell, the DELL logo, DellNet, Dell TravelLite, Inspiron, Dell Precision, Dimension, OptiPlex, PowerApp, PowerEdge, PowerConnect, PowerVault, Axim, and Latitude are registered trademarks...
...written permission of data and tells you how to hardware or loss of Dell Inc. is a registered trademark of abbreviations and acronyms, see the Dell Inspiron Help File (see page 61) If you purchased a Dell™ n Series computer, any references in ... in this document is subject to Microsoft® Windows® operating systems are registered trademarks of Dell Inc.; Trademarks used in this text: Dell, the DELL logo, DellNet, Dell TravelLite, Inspiron, Dell Precision, Dimension, OptiPlex, PowerApp, PowerEdge, PowerConnect, PowerVault, Axim, and Latitude are registered trademarks...

Owners Manual
Page 6
... 70 Manually Reinstalling Drivers for Windows XP 71 Restoring Your Operating System 71 Using Microsoft Windows XP System Restore 71 Using Dell PC Restore by Symantec 73 Resolving Software and Hardware Incompatibilities 74 8 Adding and Replacing Parts Adding Memory 77 Adding a Mini PCI Card 81 Adding a Modem 84 Replacing the Hard Drive...
... 70 Manually Reinstalling Drivers for Windows XP 71 Restoring Your Operating System 71 Using Microsoft Windows XP System Restore 71 Using Dell PC Restore by Symantec 73 Resolving Software and Hardware Incompatibilities 74 8 Adding and Replacing Parts Adding Memory 77 Adding a Mini PCI Card 81 Adding a Modem 84 Replacing the Hard Drive...

Owners Manual
Page 23
... compatible with Windows. VERIFY THAT THE MODEM IS COMMUNICATING WITH WINDOWS - 1 Click the Start button and click Control Panel. 2 Click Printers and Other Hardware and click Phone and Modem Options. 3 Click the Modems tab. 4 Click the COM port for instructions on . 1 Complete the operating system setup ...in your ISP. Then adjust the dial-up networking connection properties. 1 Click the Start button and click Control Panel. 2 Click Printers and Other Hardware, click Phone and Modem Options, click the Dialing Rules tab, and then click Edit. 3 In the Edit Location window, ensure that the ...
... compatible with Windows. VERIFY THAT THE MODEM IS COMMUNICATING WITH WINDOWS - 1 Click the Start button and click Control Panel. 2 Click Printers and Other Hardware and click Phone and Modem Options. 3 Click the Modems tab. 4 Click the COM port for instructions on . 1 Complete the operating system setup ...in your ISP. Then adjust the dial-up networking connection properties. 1 Click the Start button and click Control Panel. 2 Click Printers and Other Hardware, click Phone and Modem Options, click the Dialing Rules tab, and then click Edit. 3 In the Edit Location window, ensure that the ...

Owners Manual
Page 24
...E N S U R E T H A T T H E P R I N T E R I C A L O U T L E T - www.dell.com | support.dell.com 3 Attach the USB printer cable to the USB connectors on printer Printer Problems C H E C K T H E P R I N T E R C A ...B L E C O N N E C T I O N S - TE S T T H E E L E C T R I S T U R N E D O N - See page 70. 24 Setting Up Your Computer VERIFY THAT WINDOWS® RECOGNIZES THE PRINTER 1 Click the Start button. 2 Click Control Panel. 3 Click Printers and Other Hardware...
...E N S U R E T H A T T H E P R I N T E R I C A L O U T L E T - www.dell.com | support.dell.com 3 Attach the USB printer cable to the USB connectors on printer Printer Problems C H E C K T H E P R I N T E R C A ...B L E C O N N E C T I O N S - TE S T T H E E L E C T R I S T U R N E D O N - See page 70. 24 Setting Up Your Computer VERIFY THAT WINDOWS® RECOGNIZES THE PRINTER 1 Click the Start button. 2 Click Control Panel. 3 Click Printers and Other Hardware...

Owners Manual
Page 36
... recognizes the new device. 6 If necessary, enter your computer. 36 Using Batteries and Module Bay Devices www.dell.com | support.dell.com If the Device Screw Is Not Installed 1 Double-click the Safely Remove Hardware icon on top of the module bay. 5 Insert the new device into the bay, and push the device...
... recognizes the new device. 6 If necessary, enter your computer. 36 Using Batteries and Module Bay Devices www.dell.com | support.dell.com If the Device Screw Is Not Installed 1 Double-click the Safely Remove Hardware icon on top of the module bay. 5 Insert the new device into the bay, and push the device...

Owners Manual
Page 37
..., place them in a safe, dry place when they are not installed in the computer. If the Device Screw Is Installed 1 Double-click the Safely Remove Hardware icon on top of them. 4 Use a #1 Phillips screwdriver to remove the device screw from the bottom of the computer. 5 Press the device latch release. device...
..., place them in a safe, dry place when they are not installed in the computer. If the Device Screw Is Installed 1 Double-click the Safely Remove Hardware icon on top of them. 4 Use a #1 Phillips screwdriver to remove the device screw from the bottom of the computer. 5 Press the device latch release. device...

Owners Manual
Page 42
www.dell.com | support.dell.com To adjust keyboard operation, such as you to move the selected object by sliding your thumb to press the left touch-pad button twice. ... Keyboard and Touch Pad Use the touch pad and touch pad buttons as the character repeat rate, open the Control Panel, click Printers and Other Hardware, and then click Keyboard. On the second down on the touch pad. touch pad touch pad buttons • To move the cursor, lightly slide your...
www.dell.com | support.dell.com To adjust keyboard operation, such as you to move the selected object by sliding your thumb to press the left touch-pad button twice. ... Keyboard and Touch Pad Use the touch pad and touch pad buttons as the character repeat rate, open the Control Panel, click Printers and Other Hardware, and then click Keyboard. On the second down on the touch pad. touch pad touch pad buttons • To move the cursor, lightly slide your...

Owners Manual
Page 43
...you are using the Mouse Properties window. 1 Click the Start button, click Control Panel, and then click Printers and Other Hardware. Customizing the Touch Pad You can disable the touch pad or adjust their settings by using a keyboard extension cable, disconnect it... Pad 43 Touch Pad or Mouse Problems CHECK THE TOUCH PAD SETTINGS - 1 Click the Start button, click Control Panel, and then click Printers and Other Hardware. 2 Click Mouse. 3 Try adjusting the settings. If you may be defective. R E I N S T A L L T H E T O U C H P A D D R I V E R - Click Mouse. 2 On the Mouse ...
...you are using the Mouse Properties window. 1 Click the Start button, click Control Panel, and then click Printers and Other Hardware. Customizing the Touch Pad You can disable the touch pad or adjust their settings by using a keyboard extension cable, disconnect it... Pad 43 Touch Pad or Mouse Problems CHECK THE TOUCH PAD SETTINGS - 1 Click the Start button, click Control Panel, and then click Printers and Other Hardware. 2 Click Mouse. 3 Try adjusting the settings. If you may be defective. R E I N S T A L L T H E T O U C H P A D D R I V E R - Click Mouse. 2 On the Mouse ...

Owners Manual
Page 66
www.dell.com | support.dell.com CHECK THE DRIVE FOR ERRORS - 1 Click the Start button and click My Computer. 2 Right-click the drive letter (local disk) that the PC Card ...-checking, click Check Now. 5 Click Start. Double-click the Unplug or Safely Remove Hardware icon in its documentation or on a floppy disk or CD. Contact Dell (see page 100). P R O V I T H A D E L L - IF YOU HAVE PROBLEMS WITH A PC CARD NOT PROVIDED BY DELL - Many software manufacturers maintain websites with information that the card is properly inserted...
www.dell.com | support.dell.com CHECK THE DRIVE FOR ERRORS - 1 Click the Start button and click My Computer. 2 Right-click the drive letter (local disk) that the PC Card ...-checking, click Check Now. 5 Click Start. Double-click the Unplug or Safely Remove Hardware icon in its documentation or on a floppy disk or CD. Contact Dell (see page 100). P R O V I T H A D E L L - IF YOU HAVE PROBLEMS WITH A PC CARD NOT PROVIDED BY DELL - Many software manufacturers maintain websites with information that the card is properly inserted...

Owners Manual
Page 69
Go to support.dell.com for a description of the hardware and software support provided by Dell. If you are installing software appropriate for a description of the hardware and software support provided by Dell. See page 98 for technical assistance (see page 100... the programs that only its driver recognizes. Each device has its own set of the hardware and software support provided by Dell. See page 98 for your problem using the Dell™ Support website or e-mail service, call Dell for a description of specialized commands that use the device. M A I T E - C O N ...
Go to support.dell.com for a description of the hardware and software support provided by Dell. If you are installing software appropriate for a description of the hardware and software support provided by Dell. See page 98 for technical assistance (see page 100... the programs that only its driver recognizes. Each device has its own set of the hardware and software support provided by Dell. See page 98 for your problem using the Dell™ Support website or e-mail service, call Dell for a description of specialized commands that use the device. M A I T E - C O N ...
Owners Manual
Page 70
...Pick a Category, click Performance and Maintenance. 3 Click System. 4 In the System Properties window, click the Hardware tab. 5 Click Device Manager. 6 Right-click the device for Dell™ computers. If you install drivers obtained from other sources, your computer to the operating state that existed ...button and click Control Panel. 2 Under Pick a Category, click Performance and Maintenance. 3 Click System. 4 In the System Properties window, click the Hardware tab. 5 Click Device Manager. 6 Scroll down the list to see if any device has an exclamation point (a yellow circle with a [!]) on...
...Pick a Category, click Performance and Maintenance. 3 Click System. 4 In the System Properties window, click the Hardware tab. 5 Click Device Manager. 6 Right-click the device for Dell™ computers. If you install drivers obtained from other sources, your computer to the operating state that existed ...button and click Control Panel. 2 Under Pick a Category, click Performance and Maintenance. 3 Click System. 4 In the System Properties window, click the Hardware tab. 5 Click Device Manager. 6 Scroll down the list to see if any device has an exclamation point (a yellow circle with a [!]) on...
Owners Manual
Page 71
...: The Dell Support website at support.dell.com provides approved drivers for the Windows default view, so they may not work correctly. 1 After copying the correct driver files to your hard drive, click the Start button and right-click My Computer. 2 Click Properties. 3 Click the Hardware tab and...ways: • Microsoft Windows XP System Restore returns your computer to an earlier operating state without affecting data files) if changes to the hardware, software, or other sources, your computer might not work if you previously extracted the driver files. 9 When the name of the appropriate ...
...: The Dell Support website at support.dell.com provides approved drivers for the Windows default view, so they may not work correctly. 1 After copying the correct driver files to your hard drive, click the Start button and right-click My Computer. 2 Click Properties. 3 Click the Hardware tab and...ways: • Microsoft Windows XP System Restore returns your computer to an earlier operating state without affecting data files) if changes to the hardware, software, or other sources, your computer might not work if you previously extracted the driver files. 9 When the name of the appropriate ...

Owners Manual
Page 74
... be able to use PC Restore to remove the partition. 5 Click Yes when a confirmation message appears. To check for conflicts on to c:\dell\utilities\DSR. 3 Double-click the filename DSRIRRemv2.exe. Conflicts are indicated by a yellow exclamation point (!) beside the conflicting device or a red...a computer running Windows XP: 1 Click the Start button and click Control Panel. 2 Click Performance and Maintenance and click System. 3 Click the Hardware tab and click Device Manager. 4 In the Device Manager list, check for PC Restore does not exist, a message appears stating that you purchased...
... be able to use PC Restore to remove the partition. 5 Click Yes when a confirmation message appears. To check for conflicts on to c:\dell\utilities\DSR. 3 Double-click the filename DSRIRRemv2.exe. Conflicts are indicated by a yellow exclamation point (!) beside the conflicting device or a red...a computer running Windows XP: 1 Click the Start button and click Control Panel. 2 Click Performance and Maintenance and click System. 3 Click the Hardware tab and click Device Manager. 4 In the Device Manager list, check for PC Restore does not exist, a message appears stating that you purchased...

Owners Manual
Page 75
...area in the Search Results list. 4 In the Hardware Troubleshooter list, click I need to display the Properties window. 5 Double-click any conflict to resolve a hardware conflict on my computer, and click Next. To use the Windows XP Hardware Troubleshooter: 1 Click the Start button and click ...Help and Support. 2 Type hardware troubleshooter in the Search field and click the arrow to start the...
...area in the Search Results list. 4 In the Hardware Troubleshooter list, click I need to display the Properties window. 5 Double-click any conflict to resolve a hardware conflict on my computer, and click Next. To use the Windows XP Hardware Troubleshooter: 1 Click the Start button and click ...Help and Support. 2 Type hardware troubleshooter in the Search field and click the arrow to start the...

Owners Manual
Page 91
... type Stereo conversion Interfaces: Internal External Speaker Internal speaker amplifier Volume controls 32-bit hardware accelerated (NVIDIA GeForce FX Go 5200), 64-bit hardware accelerated (NVIDIA GeForce FX Go 5200 and ATI Mobility Radeon 9000) or, 128-bit hardware accelerated (NVIDIA GeForce4 4200 Go, NVIDIA GeForce FX Go5650, or ATI Mobility Radeon 9600...
... type Stereo conversion Interfaces: Internal External Speaker Internal speaker amplifier Volume controls 32-bit hardware accelerated (NVIDIA GeForce FX Go 5200), 64-bit hardware accelerated (NVIDIA GeForce FX Go 5200 and ATI Mobility Radeon 9000) or, 128-bit hardware accelerated (NVIDIA GeForce4 4200 Go, NVIDIA GeForce FX Go5650, or ATI Mobility Radeon 9600...

Owners Manual
Page 98
...and its address, freeing computer resources for restoration of the operating system, application software, and hardware drivers to the original default configuration as shipped from Dell, as well as the verification of appropriate functionality of the customer in a Custom Factory ... Only) Technician-assisted technical support requires the cooperation and participation of the computer and all nonstandard, third-party hardware components integrated through Dell Software and Peripherals, Readyware, and Custom Factory Integration2. 1 Repair services are covered by the original manufacturer, ...
...and its address, freeing computer resources for restoration of the operating system, application software, and hardware drivers to the original default configuration as shipped from Dell, as well as the verification of appropriate functionality of the customer in a Custom Factory ... Only) Technician-assisted technical support requires the cooperation and participation of the computer and all nonstandard, third-party hardware components integrated through Dell Software and Peripherals, Readyware, and Custom Factory Integration2. 1 Repair services are covered by the original manufacturer, ...

Owners Manual
Page 119
... C CDs, 45 characters unexpected, 44 computer crashes, 66 restore to previous state, 71 specifications, 89 conflicts drivers, 70 resolving software and hardware incompatibilities, 74 connecting audio device, 47 TV, 47 Connecting to a Wireless Local Area Network, 54 copying CDs general information, 45 helpful tips..., 46 how to copy a CD, 45 crashes, 66 D damaged computer testing, 68 Dell support site, 10 Dell support policy, 98 Device Driver Rollback, 70 device latch release description, 17 system view, 17 device status lights description, 12 ...
... C CDs, 45 characters unexpected, 44 computer crashes, 66 restore to previous state, 71 specifications, 89 conflicts drivers, 70 resolving software and hardware incompatibilities, 74 connecting audio device, 47 TV, 47 Connecting to a Wireless Local Area Network, 54 copying CDs general information, 45 helpful tips..., 46 how to copy a CD, 45 crashes, 66 D damaged computer testing, 68 Dell support site, 10 Dell support policy, 98 Device Driver Rollback, 70 device latch release description, 17 system view, 17 device status lights description, 12 ...

Owners Manual
Page 120
... system view, 20 Finding Information, 9 finding solutions, 59 floppy drive fixing problems, 64 H hard drive description, 16, 20 replacing, 87 system view, 16, 20 hardware drivers, 69 Hardware Troubleshooter, 74 Help and Support Center, 10 help file, 9 accessing, 61 I IEEE 1394 connector description, 15 system view, 15 Internet connection about, 21 options...
... system view, 20 Finding Information, 9 finding solutions, 59 floppy drive fixing problems, 64 H hard drive description, 16, 20 replacing, 87 system view, 16, 20 hardware drivers, 69 Hardware Troubleshooter, 74 Help and Support Center, 10 help file, 9 accessing, 61 I IEEE 1394 connector description, 15 system view, 15 Internet connection about, 21 options...

Owners Manual
Page 121
... save to floppy disk, 64 conflicts, 74 Device Driver Rollback, 70 drivers, 69 dropped or damaged computer, 68 e-mail problems, 67 external keyboard problems, 44 Hardware Troubleshooter, 74 Help and Support Center, 10 network problems, 54 PC Card problems, 66 power problems, 31 program crash, 66 program stopped responding, 67 restore...
... save to floppy disk, 64 conflicts, 74 Device Driver Rollback, 70 drivers, 69 dropped or damaged computer, 68 e-mail problems, 67 external keyboard problems, 44 Hardware Troubleshooter, 74 Help and Support Center, 10 network problems, 54 PC Card problems, 66 power problems, 31 program crash, 66 program stopped responding, 67 restore...

Owners Manual
Page 122
V video connector description, 19 system view, 19 W wet computer, 67 Windows XP Device Driver Rollback, 70 Hardware Troubleshooter, 74 help, 61 Help and Support Center, 10 reinstalling, 71 System Restore, 71 122 Index
V video connector description, 19 system view, 19 W wet computer, 67 Windows XP Device Driver Rollback, 70 Hardware Troubleshooter, 74 help, 61 Help and Support Center, 10 reinstalling, 71 System Restore, 71 122 Index


