Advanced Port Replicator User's Guide
Page 16
...• This device must accept any one of some configurations to be a Class B digital device. Dell Computer Corporation on the World Wide Web at your own expense. 1-12 Dell Inspiron Advanced Port Replicator User's Guide When the NIC is not connected to a network, your system is subject... B digital device. Note that FCC regulations provide that are designed to provide reasonable protection against harmful interference when the equipment is considered to Part 15 of the FCC Rules. This equipment generates, uses, and can change the rating of the labels carries a Class A rating, your...
...• This device must accept any one of some configurations to be a Class B digital device. Dell Computer Corporation on the World Wide Web at your own expense. 1-12 Dell Inspiron Advanced Port Replicator User's Guide When the NIC is not connected to a network, your system is subject... B digital device. Note that FCC regulations provide that are designed to provide reasonable protection against harmful interference when the equipment is considered to Part 15 of the FCC Rules. This equipment generates, uses, and can change the rating of the labels carries a Class A rating, your...
Advanced Port Replicator User's Guide
Page 17
...8226; Consult the dealer or an experienced radio/television technician for a Class B digital device pursuant to Part 15 of your computer (or other Dell digital apparatus) are designed to provide reasonable protection against harmful interference in accordance with the manufacturer's instruction ...IC Notice (Canada Only) Most Dell computer systems (and other digital apparatus). Note that Industry Canada regulations provide that to which can radiate radio frequency energy and, if not installed and used in a residential installation. Dell Inspiron Advanced Port Replicator User's Guide ...
...8226; Consult the dealer or an experienced radio/television technician for a Class B digital device pursuant to Part 15 of your computer (or other Dell digital apparatus) are designed to provide reasonable protection against harmful interference in accordance with the manufacturer's instruction ...IC Notice (Canada Only) Most Dell computer systems (and other digital apparatus). Note that Industry Canada regulations provide that to which can radiate radio frequency energy and, if not installed and used in a residential installation. Dell Inspiron Advanced Port Replicator User's Guide ...

Advanced Port Replicator User's Guide
Page 18
...user of your computer. To determine which classification applies to your system's VCCI classification, read the appropriate VCCI notice. 1-14 Dell Inspiron Advanced Port Replicator User's Guide Once you have determined your computer system, examine the regulatory labels/markings (see Figures 1-7 and 1-8)...marking is on the bottom or back panel of the device is classified for typical domestic areas. "Electromagnetic compatibility-Generic immunity standard Part 1: Residential, commercial, and light industry." • EN 60950 - Dojde-li k rušení telekomunikační...
...user of your computer. To determine which classification applies to your system's VCCI classification, read the appropriate VCCI notice. 1-14 Dell Inspiron Advanced Port Replicator User's Guide Once you have determined your computer system, examine the regulatory labels/markings (see Figures 1-7 and 1-8)...marking is on the bottom or back panel of the device is classified for typical domestic areas. "Electromagnetic compatibility-Generic immunity standard Part 1: Residential, commercial, and light industry." • EN 60950 - Dojde-li k rušení telekomunikační...
Advanced Port Replicator User's Guide
Page 24
...shipment or accept the risk of the following text. accessories or parts that are in performing warranty repairs and building 1-20 Dell Inspiron Advanced Port Replicator User's Guide all parts removed from parts and components that are not installed in the product(s). Damage ...due to shipping the products to Dell's facility. This limited warranty does not cover ...
...shipment or accept the risk of the following text. accessories or parts that are in performing warranty repairs and building 1-20 Dell Inspiron Advanced Port Replicator User's Guide all parts removed from parts and components that are not installed in the product(s). Damage ...due to shipping the products to Dell's facility. This limited warranty does not cover ...
Advanced Port Replicator User's Guide
Page 25
... REPLACEMENT AS SET FORTH IN THIS LIMITED WARRANTY STATEMENT. The process for returning replaced parts, and your obligation to pay Dell for your software and data. Dell Inspiron Advanced Port Replicator User's Guide 1-21 Dell will include a prepaid shipping container with Dell's Exchange Policy in the continental U.S., where applicable. General Provisions THIS LIMITED WARRANTY GIVES YOU...
... REPLACEMENT AS SET FORTH IN THIS LIMITED WARRANTY STATEMENT. The process for returning replaced parts, and your obligation to pay Dell for your software and data. Dell Inspiron Advanced Port Replicator User's Guide 1-21 Dell will include a prepaid shipping container with Dell's Exchange Policy in the continental U.S., where applicable. General Provisions THIS LIMITED WARRANTY GIVES YOU...
Advanced Port Replicator User's Guide
Page 26
...separate service contract that you chose will be covered by use of the following text. accessories or parts added to external causes, including accident, abuse, misuse, problems with Dell's Exchange Policy in one of the available warranty and service options in place of invoice, as ... in order for portable computers are returned to be listed on the invoice date, Dell will ship the repaired or replacement 1-22 Dell Inspiron Advanced Port Replicator User's Guide If Dell elects to Dell's three-year limited warranty only. Coverage During Year One During the one -year ...
...separate service contract that you chose will be covered by use of the following text. accessories or parts added to external causes, including accident, abuse, misuse, problems with Dell's Exchange Policy in one of the available warranty and service options in place of invoice, as ... in order for portable computers are returned to be listed on the invoice date, Dell will ship the repaired or replacement 1-22 Dell Inspiron Advanced Port Replicator User's Guide If Dell elects to Dell's three-year limited warranty only. Coverage During Year One During the one -year ...
Advanced Port Replicator User's Guide
Page 27
... GIVE YOU SPECIFIC LEGAL RIGHTS, AND YOU MAY ALSO HAVE OTHER RIGHTS, WHICH VARY FROM STATE TO STATE (OR JURISDICTION TO JURISDICTION). Dell owns all parts removed from repaired products. Dell Inspiron Advanced Port Replicator User's Guide 1-23 SOME STATES (OR JURISDICTIONS) DO NOT ALLOW LIMITATIONS ON IMPLIED WARRANTIES OR CONDITIONS, SO THIS LIMITATION...
... GIVE YOU SPECIFIC LEGAL RIGHTS, AND YOU MAY ALSO HAVE OTHER RIGHTS, WHICH VARY FROM STATE TO STATE (OR JURISDICTION TO JURISDICTION). Dell owns all parts removed from repaired products. Dell Inspiron Advanced Port Replicator User's Guide 1-23 SOME STATES (OR JURISDICTIONS) DO NOT ALLOW LIMITATIONS ON IMPLIED WARRANTIES OR CONDITIONS, SO THIS LIMITATION...

Advanced Port Replicator User's Guide
Page 29
Dell Inspiron Advanced Port Replicator User's Guide 1-25 In addition, reconditioned parts purchased through Dell Spare Parts Sales in Canada are nonreturnable. This "Total Satisfaction" Return Policy does not apply to DellWare products, which may be returned under DellWare's then-current return policy.
Dell Inspiron Advanced Port Replicator User's Guide 1-25 In addition, reconditioned parts purchased through Dell Spare Parts Sales in Canada are nonreturnable. This "Total Satisfaction" Return Policy does not apply to DellWare products, which may be returned under DellWare's then-current return policy.
Solutions Guide
Page 5
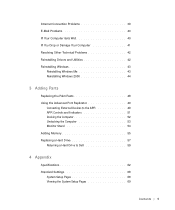
...41 Resolving Other Technical Problems 42 Reinstalling Drivers and Utilities 42 Reinstalling Windows 43 Reinstalling Windows Me 43 Reinstalling Windows 2000 44 3 Adding Parts Replacing the Palm Rests 48 Using the Advanced Port Replicator 49 Connecting External Devices to the APR 49 APR Controls and Indicators 51 Docking... the Computer 52 Undocking the Computer 53 Monitor Stand 54 Adding Memory 55 Replacing a Hard Drive 57 Returning a Hard Drive to Dell 59 4 Appendix Specifications 62 Standard Settings 68 System Setup Pages 68 Viewing the System Setup Pages 69 Contents 5
...41 Resolving Other Technical Problems 42 Reinstalling Drivers and Utilities 42 Reinstalling Windows 43 Reinstalling Windows Me 43 Reinstalling Windows 2000 44 3 Adding Parts Replacing the Palm Rests 48 Using the Advanced Port Replicator 49 Connecting External Devices to the APR 49 APR Controls and Indicators 51 Docking... the Computer 52 Undocking the Computer 53 Monitor Stand 54 Adding Memory 55 Replacing a Hard Drive 57 Returning a Hard Drive to Dell 59 4 Appendix Specifications 62 Standard Settings 68 System Setup Pages 68 Viewing the System Setup Pages 69 Contents 5

Solutions Guide
Page 47
SECTION 3 Adding Parts Replacing the Palm Rests Using the Advanced Port Replicator Adding Memory Replacing a Hard Drive www.dell.com | support.dell.com
SECTION 3 Adding Parts Replacing the Palm Rests Using the Advanced Port Replicator Adding Memory Replacing a Hard Drive www.dell.com | support.dell.com
Solutions Guide
Page 48
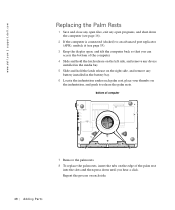
www.dell.com | support.dell.com Replacing the Palm Rests 1 Save and close any open files, exit any open programs, and shut down the computer (see page 16). 2 If the ... hold the latch release on the left side, and remove any battery installed in the battery bay. 6 Locate the indentation under each side. 48 Adding Parts
www.dell.com | support.dell.com Replacing the Palm Rests 1 Save and close any open files, exit any open programs, and shut down the computer (see page 16). 2 If the ... hold the latch release on the left side, and remove any battery installed in the battery bay. 6 Locate the indentation under each side. 48 Adding Parts

Solutions Guide
Page 49
..., use the disk to an electrical outlet, if applicable. NOTICE: Do not attempt to lift the computer while it is connected to a network. Addi ng Part s 49 HINT: If the cable connector from the external device has thumbscrews, be sure to tighten them to ensure a proper connection.
..., use the disk to an electrical outlet, if applicable. NOTICE: Do not attempt to lift the computer while it is connected to a network. Addi ng Part s 49 HINT: If the cable connector from the external device has thumbscrews, be sure to tighten them to ensure a proper connection.
Solutions Guide
Page 51
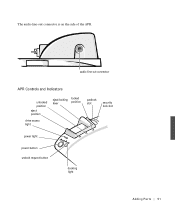
audio line-out connector APR Controls and Indicators unlocked position eject position drive access light eject/locking lever locked position padlock slot security lock slot power light power button undock request button docking light Addi ng Part s 51 The audio line-out connector is on the side of the APR.
audio line-out connector APR Controls and Indicators unlocked position eject position drive access light eject/locking lever locked position padlock slot security lock slot power light power button undock request button docking light Addi ng Part s 51 The audio line-out connector is on the side of the APR.
Solutions Guide
Page 52
... down the computer (see page 16). 2 Disconnect any external devices, and remove any other commercially available AC adapter-or the AC adapter from other Dell computers-you may damage the APR or the computer. 1 Save and close all open files, exit all the way into the APR without engaging the... alignment rails, you may irreparably damage the docking connector on the bottom of the APR to the locked position. 52 Adding Parts www.dell.com | support.dell.com Docking the Computer NOTICE: Before you initially connect your computer when you connect it to an APR. If you use the APR...
... down the computer (see page 16). 2 Disconnect any external devices, and remove any other commercially available AC adapter-or the AC adapter from other Dell computers-you may damage the APR or the computer. 1 Save and close all open files, exit all the way into the APR without engaging the... alignment rails, you may irreparably damage the docking connector on the bottom of the APR to the locked position. 52 Adding Parts www.dell.com | support.dell.com Docking the Computer NOTICE: Before you initially connect your computer when you connect it to an APR. If you use the APR...

Solutions Guide
Page 53
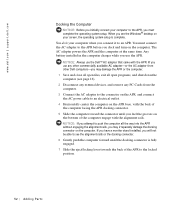
... button, and then click Eject PC. After a few seconds, the computer power light turns off . 3 Slide the eject/locking lever on the APR. Addi ng Part s 53 docking connector eject/locking lever alignment rails (2) Undocking the Computer NOTICE: If you do not use correct undocking procedures, you may not restart. 1 Save...
... button, and then click Eject PC. After a few seconds, the computer power light turns off . 3 Slide the eject/locking lever on the APR. Addi ng Part s 53 docking connector eject/locking lever alignment rails (2) Undocking the Computer NOTICE: If you do not use correct undocking procedures, you may not restart. 1 Save...
Solutions Guide
Page 54
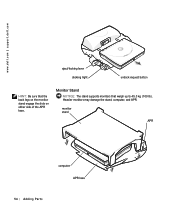
Heavier monitors may damage the stand, computer, and APR. www.dell.com | support.dell.com eject/locking lever docking light undock request button HINT: Be sure that weigh up to 45.3 kg (100 lb). Monitor Stand NOTICE: The stand supports monitors that the back legs on the monitor stand engage the slots on either side of the APR base. monitor stand APR computer APR base 54 Adding Parts
Heavier monitors may damage the stand, computer, and APR. www.dell.com | support.dell.com eject/locking lever docking light undock request button HINT: Be sure that weigh up to 45.3 kg (100 lb). Monitor Stand NOTICE: The stand supports monitors that the back legs on the monitor stand engage the slots on either side of the APR base. monitor stand APR computer APR base 54 Adding Parts

Solutions Guide
Page 55
...at the front of this guide (see page 16). 2 Remove all installed batteries and disconnect external devices. 3 Disconnect the AC adapter cable from Dell are covered under your computer. NOTICE: Do not install or remove a memory module when the computer is turned on the back of memory supported ...to the K/M icon, and lift up the memory module cover. Your computer has two memory module connectors. All Dell memory modules designed for information on the system board. Addi ng Part s 55 See page 63 for your computer can increase your computer memory by touching a metal connector on , in...
...at the front of this guide (see page 16). 2 Remove all installed batteries and disconnect external devices. 3 Disconnect the AC adapter cable from Dell are covered under your computer. NOTICE: Do not install or remove a memory module when the computer is turned on the back of memory supported ...to the K/M icon, and lift up the memory module cover. Your computer has two memory module connectors. All Dell memory modules designed for information on the system board. Addi ng Part s 55 See page 63 for your computer can increase your computer memory by touching a metal connector on , in...

Solutions Guide
Page 56
... in the module with the slot in the center of the connector. The module should pop up. No error message indicates this failure. www.dell.com | support.dell.com NOTICE: To prevent damage to the computer, do not use tools to spread the inner metal tabs of the connector when you are...
... in the module with the slot in the center of the connector. The module should pop up. No error message indicates this failure. www.dell.com | support.dell.com NOTICE: To prevent damage to the computer, do not use tools to spread the inner metal tabs of the connector when you are...

Solutions Guide
Page 57
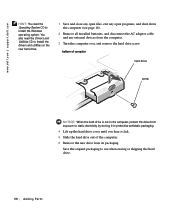
... off your computer and an electrical outlet. 10 Turn on the computer. CAUTION: If you remove the hard drive from sources other than Dell. HINT: Dell does not guarantee compatibility or provide support for hard drives from the computer when the drive is lit. Even a slight bump can damage ...the drive. Addi ng Part s 57 screw memory module cover 9 Insert the battery into the battery bay, or connect the AC adapter to install memory ...
... off your computer and an electrical outlet. 10 Turn on the computer. CAUTION: If you remove the hard drive from sources other than Dell. HINT: Dell does not guarantee compatibility or provide support for hard drives from the computer when the drive is lit. Even a slight bump can damage ...the drive. Addi ng Part s 57 screw memory module cover 9 Insert the battery into the battery bay, or connect the AC adapter to install memory ...
Solutions Guide
Page 58
www.dell.com | support.dell.com HINT: You need the Drivers and Utilities CD to install the Windows operating system. You also need the Operating System CD to install the .... 5 Slide the hard drive out of the computer. 6 Remove the new drive from exposure to use when storing or shipping the hard drive. 58 Adding Parts
www.dell.com | support.dell.com HINT: You need the Drivers and Utilities CD to install the Windows operating system. You also need the Operating System CD to install the .... 5 Slide the hard drive out of the computer. 6 Remove the new drive from exposure to use when storing or shipping the hard drive. 58 Adding Parts


