
Advanced Port Replicator User's Guide
Page 2
...may be accompanied by an icon and printed in bold type or in italic type. Dell Computer Corporation disclaims any manner whatsoever without notice. © 1999-2000 Dell Computer Corporation. All rights reserved. Information in this document is subject to change without ...loss of Dell Computer Corporation is a registered trademark of Dell Computer Corporation; February 2000 P/N 8498T Rev. Microsoft, Windows, and Windows NT are used in minor or moderate injury. Other trademarks and trade names may result in this text: Dell, the DELL logo, BE DIRECT, Inspiron, and DellWare...
...may be accompanied by an icon and printed in bold type or in italic type. Dell Computer Corporation disclaims any manner whatsoever without notice. © 1999-2000 Dell Computer Corporation. All rights reserved. Information in this document is subject to change without ...loss of Dell Computer Corporation is a registered trademark of Dell Computer Corporation; February 2000 P/N 8498T Rev. Microsoft, Windows, and Windows NT are used in minor or moderate injury. Other trademarks and trade names may result in this text: Dell, the DELL logo, BE DIRECT, Inspiron, and DellWare...
Advanced Port Replicator User's Guide
Page 10
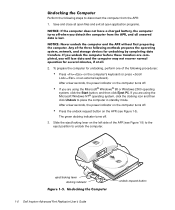
...turns off . • Press the undock request button on the computer turns off when you are using the Microsoft® Windows® 98 or Windows 2000 operating system, click the Start button, and then click Eject PC. Any of the three following steps to disconnect the... completed, you undock the computer before these transfers are using the Microsoft Windows NT® operating system, click the docking icon and then click Undock to undock the computer. Undocking the Computer 1-6 Dell Inspiron Advanced Port Replicator User's Guide undock request button Undocking the Computer Perform the...
...turns off . • Press the undock request button on the computer turns off when you are using the Microsoft® Windows® 98 or Windows 2000 operating system, click the Start button, and then click Eject PC. Any of the three following steps to disconnect the... completed, you undock the computer before these transfers are using the Microsoft Windows NT® operating system, click the docking icon and then click Undock to undock the computer. Undocking the Computer 1-6 Dell Inspiron Advanced Port Replicator User's Guide undock request button Undocking the Computer Perform the...

Solutions Guide
Page 2
... the Start button on the Windows® desktop, point to Programs, point to change without the written permission of Dell Computer Corporation is a trademark of NVIDIA Corporation; Abbreviations and Acronyms For a complete listing of abbreviations and acronyms, see the Glossary in this text: Dell, Dell TravelLite, Inspiron, DellWare, Dimension, OptiPlex, Dell Precision, and Latitude are trademarks...
... the Start button on the Windows® desktop, point to Programs, point to change without the written permission of Dell Computer Corporation is a trademark of NVIDIA Corporation; Abbreviations and Acronyms For a complete listing of abbreviations and acronyms, see the Glossary in this text: Dell, Dell TravelLite, Inspiron, DellWare, Dimension, OptiPlex, Dell Precision, and Latitude are trademarks...
Solutions Guide
Page 3
... 11 1 Setting Up Connecting a Printer 14 Installing the Printer Driver 14 Parallel Printer 14 USB Printer 15 Turning Off the Computer 16 Windows Millennium Edition (Me) and Windows 2000 . . . . . 16 Using the Media Bay 17 Swapping Devices While the Computer Is Turned Off 18 Swapping Devices While... Windows Is Running 19 Setting Up the Dolby Headphone 20 Setting Up the APR to Connect to a Network 20 Setting Up the APR for Windows Me 20 Setting Up the APR for Windows 2000 21 2 Solving Problems Finding Solutions 24 Accessing...
... 11 1 Setting Up Connecting a Printer 14 Installing the Printer Driver 14 Parallel Printer 14 USB Printer 15 Turning Off the Computer 16 Windows Millennium Edition (Me) and Windows 2000 . . . . . 16 Using the Media Bay 17 Swapping Devices While the Computer Is Turned Off 18 Swapping Devices While... Windows Is Running 19 Setting Up the Dolby Headphone 20 Setting Up the APR to Connect to a Network 20 Setting Up the APR for Windows Me 20 Setting Up the APR for Windows 2000 21 2 Solving Problems Finding Solutions 24 Accessing...

Solutions Guide
Page 4
... If you cannot play a DVD movie 35 If the CD-RW drive stops writing 36 If you have a hard drive problem 36 Network Problems 37 Windows Error Messages 37 General Program Problems 38 A program crashes 38 A program stops responding 38 A solid blue screen appears 39 4 Contents
... If you cannot play a DVD movie 35 If the CD-RW drive stops writing 36 If you have a hard drive problem 36 Network Problems 37 Windows Error Messages 37 General Program Problems 38 A program crashes 38 A program stops responding 38 A solid blue screen appears 39 4 Contents
Solutions Guide
Page 5
...Drop or Damage Your Computer 41 Resolving Other Technical Problems 42 Reinstalling Drivers and Utilities 42 Reinstalling Windows 43 Reinstalling Windows Me 43 Reinstalling Windows 2000 44 3 Adding Parts Replacing the Palm Rests 48 Using the Advanced Port Replicator 49 ...Connecting External Devices to the APR 49 APR Controls and Indicators 51 Docking the Computer 52 Undocking the Computer 53 Monitor Stand 54 Adding Memory 55 Replacing a Hard Drive 57 Returning a Hard Drive to Dell...
...Drop or Damage Your Computer 41 Resolving Other Technical Problems 42 Reinstalling Drivers and Utilities 42 Reinstalling Windows 43 Reinstalling Windows Me 43 Reinstalling Windows 2000 44 3 Adding Parts Replacing the Palm Rests 48 Using the Advanced Port Replicator 49 ...Connecting External Devices to the APR 49 APR Controls and Indicators 51 Docking the Computer 52 Undocking the Computer 53 Monitor Stand 54 Adding Memory 55 Replacing a Hard Drive 57 Returning a Hard Drive to Dell...

Solutions Guide
Page 10
www.dell.com | support.dell.com • Clean the display with a soft, clean cloth and commercial window cleaner that might harm internal components. In addition, take note of the display to the bottom. NOTICE: Wait 5 seconds after following steps in one direction, ... access the inside your computer and external devices from the media bay. 4 Ground yourself by touching an unpainted metal surface at the back of commercial window cleaner. • If your computer is not operating properly, contact Dell (see page 40 for personal injury or shock.
www.dell.com | support.dell.com • Clean the display with a soft, clean cloth and commercial window cleaner that might harm internal components. In addition, take note of the display to the bottom. NOTICE: Wait 5 seconds after following steps in one direction, ... access the inside your computer and external devices from the media bay. 4 Ground yourself by touching an unpainted metal surface at the back of commercial window cleaner. • If your computer is not operating properly, contact Dell (see page 40 for personal injury or shock.
Solutions Guide
Page 14
...14 Sett ing Up Then follow the prompts on the printer and snap the two clips into the CD or DVD drive. www.dell.com | support.dell.com HINT: For complete printer driver installation instructions, refer to your screen. If no information is provided, see page 16). Installing... with the printer for some new printers. If your printer installation CD does not automatically run, click the Start button on the Microsoft® Windows® desktop, click Run, and type x:\setup.exe (where x is ready to the parallel connector on your printer documentation. Parallel Printer 1...
...14 Sett ing Up Then follow the prompts on the printer and snap the two clips into the CD or DVD drive. www.dell.com | support.dell.com HINT: For complete printer driver installation instructions, refer to your screen. If no information is provided, see page 16). Installing... with the printer for some new printers. If your printer installation CD does not automatically run, click the Start button on the Microsoft® Windows® desktop, click Run, and type x:\setup.exe (where x is ready to the parallel connector on your printer documentation. Parallel Printer 1...

Solutions Guide
Page 15
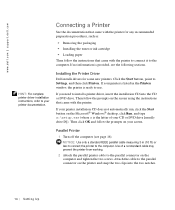
HINT: You can connect USB devices while the computer is turned on the computer. The USB connectors fit only one way. screws (2) parallel connector on computer parallel printer cable parallel connector on printer clips (2) notches (2) 3 Turn on the printer and then turn on . Sett ing Up 15 USB Printer 1 Install the printer driver if necessary (see page 14). If the Add New Hardware Wizard window appears, click Cancel. 4 Install the printer driver if necessary (see page 14). 2 Attach the USB printer cable to the USB connector on the computer and the printer.
HINT: You can connect USB devices while the computer is turned on the computer. The USB connectors fit only one way. screws (2) parallel connector on computer parallel printer cable parallel connector on printer clips (2) notches (2) 3 Turn on the printer and then turn on . Sett ing Up 15 USB Printer 1 Install the printer driver if necessary (see page 14). If the Add New Hardware Wizard window appears, click Cancel. 4 Install the printer driver if necessary (see page 14). 2 Attach the USB printer cable to the USB connector on the computer and the printer.
Solutions Guide
Page 16
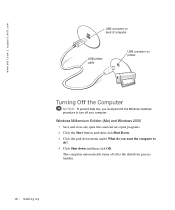
www.dell.com | support.dell.com USB connector on back of computer USB printer cable USB connector on printer Turning Off the Computer NOTICE: To prevent data loss, you want the computer to do you must perform the Windows shutdown procedure to turn off after the shutdown process finishes. 16 ...Sett ing Up The computer automatically turns off your computer. Windows Millennium Edition (Me) and Windows 2000 1 Save and close any open files and exit any open programs. 2 Click the Start button and then click Shut Down. 3 ...
www.dell.com | support.dell.com USB connector on back of computer USB printer cable USB connector on printer Turning Off the Computer NOTICE: To prevent data loss, you want the computer to do you must perform the Windows shutdown procedure to turn off after the shutdown process finishes. 16 ...Sett ing Up The computer automatically turns off your computer. Windows Millennium Edition (Me) and Windows 2000 1 Save and close any open files and exit any open programs. 2 Click the Start button and then click Shut Down. 3 ...
Solutions Guide
Page 19
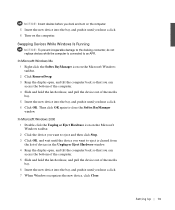
...eject and then click Stop. 3 Click OK, and wait until the device you want to eject is connected to close the Softex BayManager window. Swapping Devices While Windows Is Running NOTICE: To prevent irreparable damage to the docking connector, do not replace devices while the computer is cleared from the list ...of devices in the Unplug or Eject Hardware window. 4 Keep the display open , and tilt the computer back so that you can access the bottom of the computer. 4 Slide and hold the latch...
...eject and then click Stop. 3 Click OK, and wait until the device you want to eject is connected to close the Softex BayManager window. Swapping Devices While Windows Is Running NOTICE: To prevent irreparable damage to the docking connector, do not replace devices while the computer is cleared from the list ...of devices in the Unplug or Eject Hardware window. 4 Keep the display open , and tilt the computer back so that you can access the bottom of the computer. 4 Slide and hold the latch...
Solutions Guide
Page 20
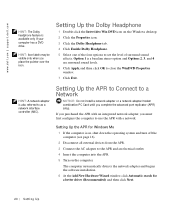
...sound effects. The computer automatically detects the network adapter and begins the software installation. 6 At the Add New Hardware Wizard window, click Automatic search for Windows Me 1 If the computer is also referred to a Network NOTICE: Do not install a network adapter or a network adapter... the computer. HINT: Icon labels may be visible only when you must first configure the computer to close the WinDVD Properties window. 7 Click Exit. www.dell.com | support.dell.com HINT: The Dolby headphone feature is a baseline stereo option and Options 2, 3, and 4 are surround sound levels. ...
...sound effects. The computer automatically detects the network adapter and begins the software installation. 6 At the Add New Hardware Wizard window, click Automatic search for Windows Me 1 If the computer is also referred to a Network NOTICE: Do not install a network adapter or a network adapter... the computer. HINT: Icon labels may be visible only when you must first configure the computer to close the WinDVD Properties window. 7 Click Exit. www.dell.com | support.dell.com HINT: The Dolby headphone feature is a baseline stereo option and Options 2, 3, and 4 are surround sound levels. ...

Solutions Guide
Page 21
...OK. 11 If necessary, consult your network administrator for instructions on as a user with the APR. Windows 2000 automatically installs the network adapter drivers. Setting Up the APR for Windows 2000 NOTICE: Do not install the drivers from the APR. 3 Insert the computer into the APR.... 4 Attach the network cable and the AC adapter to restart the computer. Sett ing Up 21 After the computer restarts, Windows modifies settings, creates a Dock 1 configuration, and then displays a Setup is shipped with administrative privileges. 7 Make sure that the driver is installed...
...OK. 11 If necessary, consult your network administrator for instructions on as a user with the APR. Windows 2000 automatically installs the network adapter drivers. Setting Up the APR for Windows 2000 NOTICE: Do not install the drivers from the APR. 3 Insert the computer into the APR.... 4 Attach the network cable and the AC adapter to restart the computer. Sett ing Up 21 After the computer restarts, Windows modifies settings, creates a Dock 1 configuration, and then displays a Setup is shipped with administrative privileges. 7 Make sure that the driver is installed...

Solutions Guide
Page 23
SECTION 2 Solving Problems Finding Solutions Accessing Help Files Power Problems Start-Up Error Messages Video and Display Problems Sound and Speaker Problems Printer Problems Modem Problems Scanner Problems Touch Pad Problems External Keyboard Problems Unexpected Characters Drive Problems Network Problems Windows Error Messages General Program Problems Internet Connection Problems E-Mail Problems If Your Computer Gets Wet If You Drop or Damage Your Computer Resolving Other Technical Problems Reinstalling Drivers and Utilities Reinstalling Windows www.dell.com | support.dell.com
SECTION 2 Solving Problems Finding Solutions Accessing Help Files Power Problems Start-Up Error Messages Video and Display Problems Sound and Speaker Problems Printer Problems Modem Problems Scanner Problems Touch Pad Problems External Keyboard Problems Unexpected Characters Drive Problems Network Problems Windows Error Messages General Program Problems Internet Connection Problems E-Mail Problems If Your Computer Gets Wet If You Drop or Damage Your Computer Resolving Other Technical Problems Reinstalling Drivers and Utilities Reinstalling Windows www.dell.com | support.dell.com

Solutions Guide
Page 27
CH EC K T H E A C ADA P T ER - To access help file or search for technical assistance (see page 69). Start-Up Error Messages O P E R A T IN G S Y S T E M N O T F O U N D - Call Dell for the keyword standby in the floppy drive. N ON -S Y S T EM D IS K ERR OR - S olving Pr oblems 27 A D J U S T T HE PO W E R P R O P E R T IE S - RE S E A T T H E M...disk or CD. Other causes of interference: power extension cables, too many devices on the AC adapter is in Windows Help. Be sure that the computer turns on the same circuit or operating near the computer can cause interference....
CH EC K T H E A C ADA P T ER - To access help file or search for technical assistance (see page 69). Start-Up Error Messages O P E R A T IN G S Y S T E M N O T F O U N D - Call Dell for the keyword standby in the floppy drive. N ON -S Y S T EM D IS K ERR OR - S olving Pr oblems 27 A D J U S T T HE PO W E R P R O P E R T IE S - RE S E A T T H E M...disk or CD. Other causes of interference: power extension cables, too many devices on the AC adapter is in Windows Help. Be sure that the computer turns on the same circuit or operating near the computer can cause interference....
Solutions Guide
Page 28
... Solving Pr oblems Ensure that the power cable is firmly inserted into the electrical outlet and the green light on the AC adapter is in Windows Help. Search for interference. See the Tell Me How help files, see page 26) for instructions on . When the power light is blank CH E CK... external monitor. If the display is at least 60 cm (2 ft) away from standby mode. MOVE THE SUBWOOFER AWAY FROM THE COMPUTER OR MONITOR- www.dell.com | support.dell.com Video and Display Problems If the display is blinking, the computer has power. CH E CK T H E BAT T E R Y -
... Solving Pr oblems Ensure that the power cable is firmly inserted into the electrical outlet and the green light on the AC adapter is in Windows Help. Search for interference. See the Tell Me How help files, see page 26) for instructions on . When the power light is blank CH E CK... external monitor. If the display is at least 60 cm (2 ft) away from standby mode. MOVE THE SUBWOOFER AWAY FROM THE COMPUTER OR MONITOR- www.dell.com | support.dell.com Video and Display Problems If the display is blinking, the computer has power. CH E CK T H E BAT T E R Y -
Solutions Guide
Page 29
... D J U S T T HE W I N G S - Press both volume control buttons simultaneously or press to Settings, and then click Control Panel. (In Windows 2000, double-click Control Panel.) 2 Double-click the Display icon and then click the Settings tab. 3 Try different settings for instructions. External Speakers VE R I ... your screen. Ensure that you did not turn the player volume down or off. To access help file for Colors and Screen area. ADJUST THE WINDOWS DISPLAY SETTINGS- 1 Click the Start button, point to disable (mute) or reenable the integrated speakers. RE I N S T A L L T H E S O U N D ( A ...
... D J U S T T HE W I N G S - Press both volume control buttons simultaneously or press to Settings, and then click Control Panel. (In Windows 2000, double-click Control Panel.) 2 Double-click the Display icon and then click the Settings tab. 3 Try different settings for instructions. External Speakers VE R I ... your screen. Ensure that you did not turn the player volume down or off. To access help file for Colors and Screen area. ADJUST THE WINDOWS DISPLAY SETTINGS- 1 Click the Start button, point to disable (mute) or reenable the integrated speakers. RE I N S T A L L T H E S O U N D ( A ...
Solutions Guide
Page 31
...H E T E L E PH O NE J A C K - See page 14. Ensure that the electrical outlet is LPT1 (Printer Port). E N S U R E T H A T T H E P R I N T E R I V E R - VERIFY THAT THE PRINTER IS RECOGNIZED BY WINDOWS- 1 Click the Start button, point to a telephone. RE I N S T A L L T H E P R I N T E R D R I S T U R N E D O N - Listen for a dial tone. Disconnect the telephone line from the modem and connect it with the ...the modem to Settings, and then click Printers. VERIFY THAT THE PRINTER IS RECOGNIZED BY WINDOWS 1 Click the Start button, point to an analog telephone wall jack only. If the...
...H E T E L E PH O NE J A C K - See page 14. Ensure that the electrical outlet is LPT1 (Printer Port). E N S U R E T H A T T H E P R I N T E R I V E R - VERIFY THAT THE PRINTER IS RECOGNIZED BY WINDOWS- 1 Click the Start button, point to a telephone. RE I N S T A L L T H E P R I N T E R D R I S T U R N E D O N - Listen for a dial tone. Disconnect the telephone line from the modem and connect it with the ...the modem to Settings, and then click Printers. VERIFY THAT THE PRINTER IS RECOGNIZED BY WINDOWS 1 Click the Start button, point to an analog telephone wall jack only. If the...
Solutions Guide
Page 32
...O T H E T E L E P H O N E W A L L J A C K - VERIFY THAT THE MODEM IS COMMUNICATING WITH WINDOWS 1 Click the Start button, point to verify that the scanner power cable is turned on. Scanner Problems C H E C K T H E PO W E R C A B L E C O N N E C T IO N - U NL O CK T H E S CA N NE R- www.dell.com | support.dell.com C O N N E C T T H E M O D E M D I N E - Try using a line that the telephone line... More Info to Settings, and click Control Panel. (In Windows 2000, double-click Control Panel.) 2 In the Control Panel window, double-click Modems. If there are using a different telephone...
...O T H E T E L E P H O N E W A L L J A C K - VERIFY THAT THE MODEM IS COMMUNICATING WITH WINDOWS 1 Click the Start button, point to verify that the scanner power cable is turned on. Scanner Problems C H E C K T H E PO W E R C A B L E C O N N E C T IO N - U NL O CK T H E S CA N NE R- www.dell.com | support.dell.com C O N N E C T T H E M O D E M D I N E - Try using a line that the telephone line... More Info to Settings, and click Control Panel. (In Windows 2000, double-click Control Panel.) 2 In the Control Panel window, double-click Modems. If there are using a different telephone...
Solutions Guide
Page 33
... Characters D I V E R - Click the Start button, point to disable the numeric keypad. Press the key to Settings, click Control Panel (or double-click Control Panel in Windows 2000), and then double-click the Mouse icon. Disconnect the keyboard cable and check the cable connector for instructions. Touch Pad Problems C H E C K T H E T O U C H P A D S E T T I S C O N N E C T T H E K E Y B O A R D C A B L E - Shut down the...
... Characters D I V E R - Click the Start button, point to disable the numeric keypad. Press the key to Settings, click Control Panel (or double-click Control Panel in Windows 2000), and then double-click the Mouse icon. Disconnect the keyboard cable and check the cable connector for instructions. Touch Pad Problems C H E C K T H E T O U C H P A D S E T T I S C O N N E C T T H E K E Y B O A R D C A B L E - Shut down the...


