
Quick Start Guide
Page 1
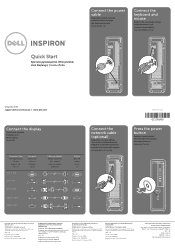
... Dell support.dell.com/manuals | www.dell.com Printed in Poland Connect the display Priključite ekran Ekranı bağlayın Connection Type Tip veze Bağlantı Tipi VGA VGA Computer Računar Bilgisayar DVI DVI DVI VGA HDMI HDMI HDMI DVI Cable and Adapter Kabl i adapter Kablo ve Adaptör Display Displej Ekran צג Connect the network cable (optional...
... Dell support.dell.com/manuals | www.dell.com Printed in Poland Connect the display Priključite ekran Ekranı bağlayın Connection Type Tip veze Bağlantı Tipi VGA VGA Computer Računar Bilgisayar DVI DVI DVI VGA HDMI HDMI HDMI DVI Cable and Adapter Kabl i adapter Kablo ve Adaptör Display Displej Ekran צג Connect the network cable (optional...
Service Manual
Page 1
... of these materials in this document to refer to avoid the problem. Trademarks used in trademarks and trade names other countries. Dell™ Inspiron™ 620s Service Manual Technical Overview Before You Begin Computer Cover Memory Module(s) Front Bezel PCI Express Cards Card Retention Bracket Drives Front I/O Panel Power Button Module Fans Processor Coin-Cell Battery Power Supply System Board System Setup Flashing the BIOS Notes, Cautions, and Warnings NOTE: A NOTE indicates important information that helps...
... of these materials in this document to refer to avoid the problem. Trademarks used in trademarks and trade names other countries. Dell™ Inspiron™ 620s Service Manual Technical Overview Before You Begin Computer Cover Memory Module(s) Front Bezel PCI Express Cards Card Retention Bracket Drives Front I/O Panel Power Button Module Fans Processor Coin-Cell Battery Power Supply System Board System Setup Flashing the BIOS Notes, Cautions, and Warnings NOTE: A NOTE indicates important information that helps...
Service Manual
Page 2
Back to Contents Page Before You Begin Dell™ Inspiron™ 620s Service Manual Technical Specifications Recommended Tools Turning Off Your Computer Safety Instructions This manual provides instructions for removing and installing the components in Turning Off Your Computer and Safety Instructions. Save and close all open files and exit all open programs before you shut down the operating system, click Start and then click Shut Down. 3. Ensure that is...
Back to Contents Page Before You Begin Dell™ Inspiron™ 620s Service Manual Technical Specifications Recommended Tools Turning Off Your Computer Safety Instructions This manual provides instructions for removing and installing the components in Turning Off Your Computer and Safety Instructions. Save and close all open files and exit all open programs before you shut down the operating system, click Start and then click Shut Down. 3. Ensure that is...
Service Manual
Page 10
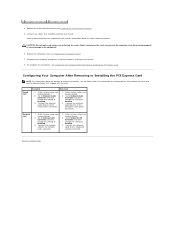
... turn them on installing drivers and software for your card, see the documentation that shipped with the card for information about the location of external connectors, see Replacing the Computer Cover). 7. To complete the installation, see System Setup). 2. Enter system setup (see Configuring Your Computer After Removing or Installing the PCI Express Card. Go to Onboard Audio Controller and then change the setting to Disabled. 3. Network card 1. Go to Onboard LAN Controller and then change the setting to Enabled. 3. For information on . 8. Enter...
... turn them on installing drivers and software for your card, see the documentation that shipped with the card for information about the location of external connectors, see Replacing the Computer Cover). 7. To complete the installation, see System Setup). 2. Enter system setup (see Configuring Your Computer After Removing or Installing the PCI Express Card. Go to Onboard Audio Controller and then change the setting to Disabled. 3. Network card 1. Go to Onboard LAN Controller and then change the setting to Enabled. 3. For information on . 8. Enter...
Service Manual
Page 13
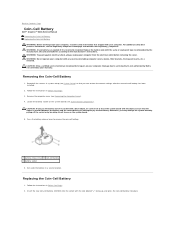
...: A new battery can restore the correct settings after the new coin-cell battery has been installed. 2. WARNING: To guard against electrical shock, always unplug your warranty. CAUTION: Only a certified service technician should perform repairs on the system board (see Removing the Computer Cover). 4. Follow the instructions in a secure location. Replace the battery only with the same or equivalent type recommended by breaking circuit traces on the system board...
...: A new battery can restore the correct settings after the new coin-cell battery has been installed. 2. WARNING: To guard against electrical shock, always unplug your warranty. CAUTION: Only a certified service technician should perform repairs on the system board (see Removing the Computer Cover). 4. Follow the instructions in a secure location. Replace the battery only with the same or equivalent type recommended by breaking circuit traces on the system board...

Service Manual
Page 17
... very hot during normal operation. CAUTION: Only a certified service technician should perform repairs on the pins in the socket. 6. Removing the Processor 1. Remove the computer cover (see the Regulatory Compliance Homepage at www.dell.com/regulatory_compliance. Follow the procedures in the release position so that it . 5. Back to Contents Page Processor Dell™ Inspiron™ 620s Service Manual Removing the Processor Replacing the Processor WARNING: Before working inside the socket or...
... very hot during normal operation. CAUTION: Only a certified service technician should perform repairs on the pins in the socket. 6. Removing the Processor 1. Remove the computer cover (see the Regulatory Compliance Homepage at www.dell.com/regulatory_compliance. Follow the procedures in the release position so that it . 5. Back to Contents Page Processor Dell™ Inspiron™ 620s Service Manual Removing the Processor Replacing the Processor WARNING: Before working inside the socket or...
Service Manual
Page 20
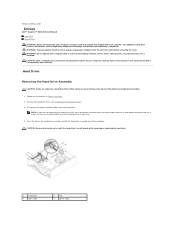
... power and data cables from the system board connector and set it aside. WARNING: Do not operate your computer with your computer. Hard Drive Removing the Hard-Drive Assembly CAUTION: If you are not replacing the hard drive at this procedure. 1. You can use the data cable to install a hard drive at www.dell.com/regulatory_compliance. Push the tab on your warranty. Back to Contents Page Drives Dell™ Inspiron™ 620s Service Manual Hard Drive Optical Drive WARNING: Before working inside...
... power and data cables from the system board connector and set it aside. WARNING: Do not operate your computer with your computer. Hard Drive Removing the Hard-Drive Assembly CAUTION: If you are not replacing the hard drive at this procedure. 1. You can use the data cable to install a hard drive at www.dell.com/regulatory_compliance. Push the tab on your warranty. Back to Contents Page Drives Dell™ Inspiron™ 620s Service Manual Hard Drive Optical Drive WARNING: Before working inside...
Service Manual
Page 21
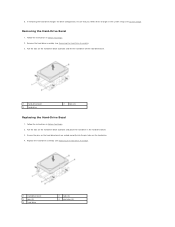
Follow the instructions in the system setup (see System Setup). Replace the hard-drive assembly (see Removing the Hard-Drive Assembly). 3. Remove the hard-drive assembly (see Replacing the Hard-Drive Assembly). 1 hard-drive bezel 3 pins (4) 5 hard drive 2 tabs (4) 4 pin holes (4) Pull the tabs on the hard-drive bezel outwards and lift the hard-drive off the hard-drive bezel. 1 hard-drive bezel 3 hard drive 2 tabs (4) Replacing the Hard-Drive Bezel 1. If removing the hard drive changes the drive configuration, ensure that you reflect these changes in Before You Begin. 2....
Follow the instructions in the system setup (see System Setup). Replace the hard-drive assembly (see Removing the Hard-Drive Assembly). 3. Remove the hard-drive assembly (see Replacing the Hard-Drive Assembly). 1 hard-drive bezel 3 pins (4) 5 hard drive 2 tabs (4) 4 pin holes (4) Pull the tabs on the hard-drive bezel outwards and lift the hard-drive off the hard-drive bezel. 1 hard-drive bezel 3 hard drive 2 tabs (4) Replacing the Hard-Drive Bezel 1. If removing the hard drive changes the drive configuration, ensure that you reflect these changes in Before You Begin. 2....
Service Manual
Page 22
... system board connector and set it is configured for your computer and devices to the hard drive. 6. Check the documentation that it aside. Connect the power and data cables to electrical outlets, and then turn them on the hard-drive assembly until the hard-drive assembly snaps into position. 5. Check the System Setup for drive operation. 9. Remove the computer cover (see Removing the Front Bezel). 4. NOTE: If you are not replacing the optical drive...
... system board connector and set it is configured for your computer and devices to the hard drive. 6. Check the documentation that it aside. Connect the power and data cables to electrical outlets, and then turn them on the hard-drive assembly until the hard-drive assembly snaps into position. 5. Check the System Setup for drive operation. 9. Remove the computer cover (see Removing the Front Bezel). 4. NOTE: If you are not replacing the optical drive...

Service Manual
Page 23
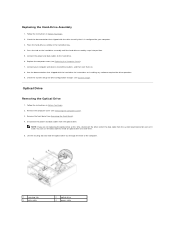
... cables to Contents Page Follow the instructions in a secure location. Replace the front bezel (see System Setup). Check the System Setup for drive configuration changes (see Replacing the Front Bezel). 6. Replace the computer cover (see Replacing the Computer Cover). 7. Connect your computer and devices to electrical outlets, and turn them on installing any software required for instructions on . 8. Back to the optical drive. 5. Replacing the Optical Drive 1. See the documentation that shipped with the drive for drive operation. 9. 6. Set...
... cables to Contents Page Follow the instructions in a secure location. Replace the front bezel (see System Setup). Check the System Setup for drive configuration changes (see Replacing the Front Bezel). 6. Replace the computer cover (see Replacing the Computer Cover). 7. Connect your computer and devices to electrical outlets, and turn them on installing any software required for instructions on . 8. Back to the optical drive. 5. Replacing the Optical Drive 1. See the documentation that shipped with the drive for drive operation. 9. 6. Set...

Service Manual
Page 29
... with your computer. Follow the instructions in Before You Begin. 2. Align the notch on your computer. Back to Contents Page Memory Module(s) Dell™ Inspiron™ 620s Service Manual Removing the Memory Module(s) Replacing the Memory Module(s) WARNING: Before working inside your computer, read the safety information that shipped with the tab in the memory module connector. WARNING: Do not operate your computer may have, even...
... with your computer. Follow the instructions in Before You Begin. 2. Align the notch on your computer. Back to Contents Page Memory Module(s) Dell™ Inspiron™ 620s Service Manual Removing the Memory Module(s) Replacing the Memory Module(s) WARNING: Before working inside your computer, read the safety information that shipped with the tab in the memory module connector. WARNING: Do not operate your computer may have, even...
Service Manual
Page 37
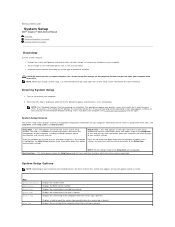
... System Setup Dell™ Inspiron™ 620s Service Manual Overview Clearing Forgotten Passwords Clearing CMOS Passwords Overview Use the system setup to: l Change the system configuration information after you add, change, or remove any hardware in your computer l Set or change a user-selectable option such as listed. Information on (or restart) your computer (see the Microsoft Windows desktop. As an option is displayed, watch for it is absent Displays the asset tag of the system setup window. NOTE: Before you see Turning...
... System Setup Dell™ Inspiron™ 620s Service Manual Overview Clearing Forgotten Passwords Clearing CMOS Passwords Overview Use the system setup to: l Change the system configuration information after you add, change, or remove any hardware in your computer l Set or change a user-selectable option such as listed. Information on (or restart) your computer (see the Microsoft Windows desktop. As an option is displayed, watch for it is absent Displays the asset tag of the system setup window. NOTE: Before you see Turning...
Service Manual
Page 38
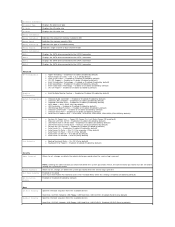
... or Disabled (Enabled by default) l Onboard LAN Controller - Enabled or Disabled (Enabled by default) l Intel SpeedStep - Normal; Hence, the administrator password must enter Admin Password to set, change , or delete the system password when the service tag is present Enabled or Disabled User must be set , change , or delete the administrator password when the service tag is enabled (Disabled by default) Enabled or Disabled (Disabled by default) l CPU XD Support - USB Hard Disk; USB CD/DVD; Processor Information Processor Type Displays the processor type L2 Cache Displays...
... or Disabled (Enabled by default) l Onboard LAN Controller - Enabled or Disabled (Enabled by default) l Intel SpeedStep - Normal; Hence, the administrator password must enter Admin Password to set, change , or delete the system password when the service tag is present Enabled or Disabled User must be set , change , or delete the administrator password when the service tag is enabled (Disabled by default) Enabled or Disabled (Disabled by default) l CPU XD Support - USB Hard Disk; USB CD/DVD; Processor Information Processor Type Displays the processor type L2 Cache Displays...
Service Manual
Page 39
... default) Specifies the boot sequence from a USB device, connect the USB device to boot from the network. CD/DVD; USB Hard Disk; Then shut down your computer. 3. For example, if you want to a USB connector. 2. Enter system setup (see the Microsoft Windows desktop. CD/DVD; Network; CD/DVD; USB Floppy; The BIOS detects the device and adds the USB flash option to wait until you are booting to boot from . The computer attempts to a USB memory key, highlight USB Storage Device and press . On completion of diagnostic tests...
... default) Specifies the boot sequence from a USB device, connect the USB device to boot from the network. CD/DVD; USB Hard Disk; Then shut down your computer. 3. For example, if you want to a USB connector. 2. Enter system setup (see the Microsoft Windows desktop. CD/DVD; Network; CD/DVD; USB Floppy; The BIOS detects the device and adds the USB flash option to wait until you are booting to boot from . The computer attempts to a USB memory key, highlight USB Storage Device and press . On completion of diagnostic tests...
Setup Guide
Page 5
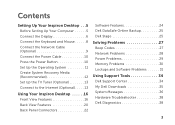
... 5 Connect the Display 6 Connect the Keyboard and Mouse 8 Connect the Network Cable (Optional 9 Connect the Power Cable 10 Press the Power Button 10 Set Up the Operating System 11 Create System Recovery Media (Recommended 12 Set Up the TV Tuner (Optional 13 Connect to the Internet (Optional 13 Using Your Inspiron Desktop 16 Front View Features 16 Back View Features 20 Back Panel Connectors 22 Software Features 24 Dell DataSafe Online Backup 25 Dell Stage 25 Solving Problems 27 Beep Codes 27 Network Problems 28 Power Problems 29 Memory Problems...
... 5 Connect the Display 6 Connect the Keyboard and Mouse 8 Connect the Network Cable (Optional 9 Connect the Power Cable 10 Press the Power Button 10 Set Up the Operating System 11 Create System Recovery Media (Recommended 12 Set Up the TV Tuner (Optional 13 Connect to the Internet (Optional 13 Using Your Inspiron Desktop 16 Front View Features 16 Back View Features 20 Back Panel Connectors 22 Software Features 24 Dell DataSafe Online Backup 25 Dell Stage 25 Solving Problems 27 Beep Codes 27 Network Problems 28 Power Problems 29 Memory Problems...
Setup Guide
Page 11
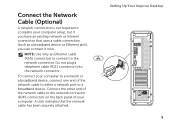
... a network port or a broadband device. To connect your computer to a network or a broadband device, connect one end of the network cable to the network connector. A click indicates that uses a cable connection (such as a broadband device or Ethernet jack), you can connect it now. Do not plug a telephone cable (RJ11 connector) into the network connector. Setting Up Your Inspiron Desktop 9 Connect the Network Cable (Optional) A network connection is not required to complete your computer setup, but if you have an existing network or Internet connection that...
... a network port or a broadband device. To connect your computer to a network or a broadband device, connect one end of the network cable to the network connector. A click indicates that uses a cable connection (such as a broadband device or Ethernet jack), you can connect it now. Do not plug a telephone cable (RJ11 connector) into the network connector. Setting Up Your Inspiron Desktop 9 Connect the Network Cable (Optional) A network connection is not required to complete your computer setup, but if you have an existing network or Internet connection that...
Setup Guide
Page 15
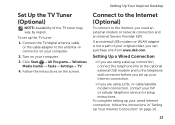
... the cable adapter to the antenna-in "Setting Up Your Internet Connection" on your computer. 2. Follow the instructions on your computer. 3. Setting Up a Wired Connection • If you are using a DSL or cable/satellite modem connection, contact your ISP or cellular telephone service for setup instructions. Click Start → All Programs→ Windows Media Center→ Tasks→ Settings→ TV. 4. Turn on the screen. To set up the TV tuner: 1. Setting Up Your Inspiron Desktop Set...
... the cable adapter to the antenna-in "Setting Up Your Internet Connection" on your computer. 2. Follow the instructions on your computer. 3. Setting Up a Wired Connection • If you are using a DSL or cable/satellite modem connection, contact your ISP or cellular telephone service for setup instructions. Click Start → All Programs→ Windows Media Center→ Tasks→ Settings→ TV. 4. Turn on the screen. To set up the TV tuner: 1. Setting Up Your Inspiron Desktop Set...
Setup Guide
Page 25
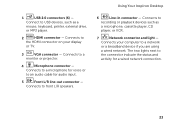
...VCR. 7 Network connector and light - Connects to the HDMI connector on your computer to the connector indicate the status and activity for audio input. 5 Front L/R line-out connector - Connects to recording or playback devices such as a mouse, keyboard, printer, external drive, or MP3 player. 2 HDMI connector - Connects to a monitor or projector. 4 Microphone connector - The two lights next to a network or a broadband device if you are using a wired network. Connects your display or TV. 3 VGA connector - Using Your Inspiron Desktop 1 USB 2.0 connectors...
...VCR. 7 Network connector and light - Connects to the HDMI connector on your computer to the connector indicate the status and activity for audio input. 5 Front L/R line-out connector - Connects to recording or playback devices such as a mouse, keyboard, printer, external drive, or MP3 player. 2 HDMI connector - Connects to a monitor or projector. 4 Microphone connector - The two lights next to a network or a broadband device if you are using a wired network. Connects your display or TV. 3 VGA connector - Using Your Inspiron Desktop 1 USB 2.0 connectors...
Setup Guide
Page 39
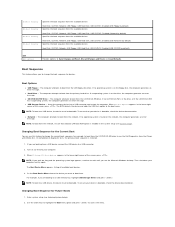
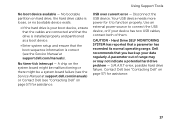
... the USB device. S.M.A.R.T error, possible hard drive failure. No bootable partition on hard drive, the hard drive cable is loose, or no bootable device exists. • If the hard drive is your device has two USB cables, connect both of range may or may not indicate a potential hard drive problem - USB over current error - CAUTION - Hard Drive SELF MONITORING SYSTEM has reported that you back up your data regularly. Using Support Tools No boot device available - No timer tick interrupt - Dell recommends...
... the USB device. S.M.A.R.T error, possible hard drive failure. No bootable partition on hard drive, the hard drive cable is loose, or no bootable device exists. • If the hard drive is your device has two USB cables, connect both of range may or may not indicate a potential hard drive problem - USB over current error - CAUTION - Hard Drive SELF MONITORING SYSTEM has reported that you back up your data regularly. Using Support Tools No boot device available - No timer tick interrupt - Dell recommends...
Setup Guide
Page 62
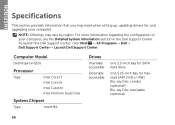
...; Dell→ Dell Support Center→ Launch Dell Support Center. Computer Model Dell Inspiron 620s Processor Type Intel Core i3 Intel Core i5 Intel Celeron Intel Pentium Dual Core System Chipset Type Intel H61 Drives Internally accessible Externally accessible one 3.5-inch bay for SATA hard drive one 5.25-inch bay for , and upgrading your computer, see the Detailed System Information section in the Dell Support Center. NOTE: Offerings may need when setting up, updating drivers for trayload SATA DVD+/-RW/ Blu-ray Disc combo (optional...
...; Dell→ Dell Support Center→ Launch Dell Support Center. Computer Model Dell Inspiron 620s Processor Type Intel Core i3 Intel Core i5 Intel Celeron Intel Pentium Dual Core System Chipset Type Intel H61 Drives Internally accessible Externally accessible one 3.5-inch bay for SATA hard drive one 5.25-inch bay for , and upgrading your computer, see the Detailed System Information section in the Dell Support Center. NOTE: Offerings may need when setting up, updating drivers for trayload SATA DVD+/-RW/ Blu-ray Disc combo (optional...


