Owner's Manual
Page 6
... Problems 71 Video and Display Problems 72 If the display is blank 72 If the display is difficult to read 73 If only part of the display is readable 73 Drivers 73 What Is a Driver 73 Identifying Drivers 74 Reinstalling Drivers and Utilities 74 Resolving Software ...and Hardware Incompatibilities 75 Restoring Your Operating System 75 Using Microsoft Windows XP System Restore 76 Using Dell PC Restore by Symantec 77 9 Adding and Replacing Parts Before You Begin 79 Recommended Tools 79 Turning Off Your Computer 79 Before Working Inside Your Computer 79 6 ...
... Problems 71 Video and Display Problems 72 If the display is blank 72 If the display is difficult to read 73 If only part of the display is readable 73 Drivers 73 What Is a Driver 73 Identifying Drivers 74 Reinstalling Drivers and Utilities 74 Resolving Software ...and Hardware Incompatibilities 75 Restoring Your Operating System 75 Using Microsoft Windows XP System Restore 76 Using Dell PC Restore by Symantec 77 9 Adding and Replacing Parts Before You Begin 79 Recommended Tools 79 Turning Off Your Computer 79 Before Working Inside Your Computer 79 6 ...

Owner's Manual
Page 9
...; Additional information about setting up my computer • How to troubleshoot and solve problems • How to remove and install parts • Technical specifications • How to contact Dell Find It Here Inspiron Owner's Manual • Warranty information • Terms and conditions • Safety instructions • Regulatory information • Ergonomics information • End...
...; Additional information about setting up my computer • How to troubleshoot and solve problems • How to remove and install parts • Technical specifications • How to contact Dell Find It Here Inspiron Owner's Manual • Warranty information • Terms and conditions • Safety instructions • Regulatory information • Ergonomics information • End...

Owner's Manual
Page 56
... devices. Lists the most common symptoms encountered and allows you to select a test based on the symptom of the problem you contact Dell, technical support will ask for your part. If you are detected during a test, a message appears with an error code and a description of each test screen. Press any key to...
... devices. Lists the most common symptoms encountered and allows you to select a test based on the symptom of the problem you contact Dell, technical support will ask for your part. If you are detected during a test, a message appears with an error code and a description of each test screen. Press any key to...

Owner's Manual
Page 73
...Turn on the computer and the monitor and adjust the monitor brightness and contrast controls. If only part of specialized commands that controls a device such as a printer, mouse, or keyboard. A driver ... your computer and connect an external monitor to change or click the Display icon. 3 Try different settings for Color quality and Screen resolution. E L I M I N A T E P O S S I B L E I G H T N E S S - Contact Dell (see page 60. A driver acts like a translator between the device and any other appliances. Eliminate sunlight glare, which can cause poor picture quality. Each device...
...Turn on the computer and the monitor and adjust the monitor brightness and contrast controls. If only part of specialized commands that controls a device such as a printer, mouse, or keyboard. A driver ... your computer and connect an external monitor to change or click the Display icon. 3 Try different settings for Color quality and Screen resolution. E L I M I N A T E P O S S I B L E I G H T N E S S - Contact Dell (see page 60. A driver acts like a translator between the device and any other appliances. Eliminate sunlight glare, which can cause poor picture quality. Each device...
Owner's Manual
Page 79
...the safety information in your computer. b In the Turn off computer window, click Turn off . Adding and Replacing Parts 79 Adding and Replacing Parts Before You Begin This chapter provides procedures for 4 seconds. The computer turns off after the operating system shutdown process ...finishes. 2 Ensure that the following safety guidelines to help protect your computer from potential damage and to help ensure your Dell™...
...the safety information in your computer. b In the Turn off computer window, click Turn off . Adding and Replacing Parts 79 Adding and Replacing Parts Before You Begin This chapter provides procedures for 4 seconds. The computer turns off after the operating system shutdown process ...finishes. 2 Ensure that the following safety guidelines to help protect your computer from potential damage and to help ensure your Dell™...

Owner's Manual
Page 80
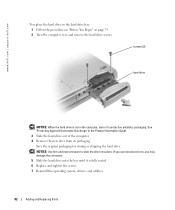
..., press in this type of the computer, and then remove the battery. 80 Adding and Replacing Parts NOTICE: Only a certified service technician should perform repairs on your warranty. www.dell.com | support.dell.com CAUTION: Before you begin working inside the computer. 1 Ensure that the work surface is not... covered by your computer. Damage due to servicing that is not authorized by Dell is flat and clean to prevent the computer cover from being scratched. 2 Turn off your computer and all attached devices from the PC ...
..., press in this type of the computer, and then remove the battery. 80 Adding and Replacing Parts NOTICE: Only a certified service technician should perform repairs on your warranty. www.dell.com | support.dell.com CAUTION: Before you begin working inside the computer. 1 Ensure that the work surface is not... covered by your computer. Damage due to servicing that is not authorized by Dell is flat and clean to prevent the computer cover from being scratched. 2 Turn off your computer and all attached devices from the PC ...

Owner's Manual
Page 81
NOTICE: Hard drives are extremely fragile; even a slight bump can damage the drive. Adding and Replacing Parts 81 NOTICE: To prevent data loss, turn off your computer, follow the safety instructions located in hibernate mode. Do not remove the hard drive while ... not touch the metal housing of the hard drive. battery battery latch Hard Drive CAUTION: If you remove the hard drive from sources other than Dell. NOTE: Dell does not guarantee compatibility or provide support for hard drives from the computer when the drive is on, in standby mode, or in the...
NOTICE: Hard drives are extremely fragile; even a slight bump can damage the drive. Adding and Replacing Parts 81 NOTICE: To prevent data loss, turn off your computer, follow the safety instructions located in hibernate mode. Do not remove the hard drive while ... not touch the metal housing of the hard drive. battery battery latch Hard Drive CAUTION: If you remove the hard drive from sources other than Dell. NOTE: Dell does not guarantee compatibility or provide support for hard drives from the computer when the drive is on, in standby mode, or in the...
Owner's Manual
Page 82
Save the original packaging for storing or shipping the hard drive. www.dell.com | support.dell.com To replace the hard drive in the hard drive bay: 1 Follow the procedures in the Product Information Guide. 3 Slide the hard drive out of ... drive NOTICE: When the hard drive is fully seated. 6 Replace and tighten the screws. 7 Reinstall the operating system, drivers, and utilities. 82 Adding and Replacing Parts NOTICE: Use firm and even pressure to slide the drive into the bay until it in the computer, store it is not in protective antistatic...
Save the original packaging for storing or shipping the hard drive. www.dell.com | support.dell.com To replace the hard drive in the hard drive bay: 1 Follow the procedures in the Product Information Guide. 3 Slide the hard drive out of ... drive NOTICE: When the hard drive is fully seated. 6 Replace and tighten the screws. 7 Reinstall the operating system, drivers, and utilities. 82 Adding and Replacing Parts NOTICE: Use firm and even pressure to slide the drive into the bay until it in the computer, store it is not in protective antistatic...

Owner's Manual
Page 83
...this section, follow the safety instructions located in the Product Information Guide. 1 Follow the procedures in transit. Adding and Replacing Parts 83 NOTE: Memory modules purchased from Dell are intended for information on the memory supported by your computer memory by installing memory modules on the memory module cover, and...the computer over, loosen the captive screw on the system board. Install only memory modules that are covered under your old hard drive to Dell Return your computer warranty. Returning a Hard Drive to Dell in its original or comparable foam packaging.
...this section, follow the safety instructions located in the Product Information Guide. 1 Follow the procedures in transit. Adding and Replacing Parts 83 NOTE: Memory modules purchased from Dell are intended for information on the memory supported by your computer memory by installing memory modules on the memory module cover, and...the computer over, loosen the captive screw on the system board. Install only memory modules that are covered under your old hard drive to Dell Return your computer warranty. Returning a Hard Drive to Dell in its original or comparable foam packaging.

Owner's Manual
Page 84
No error message indicates this failure. 84 Adding and Replacing Parts www.dell.com | support.dell.com memory module cover captive screw NOTICE: To prevent damage to the memory module connector, do not use tools to spread the memorymodule securing clips. 3 ...
No error message indicates this failure. 84 Adding and Replacing Parts www.dell.com | support.dell.com memory module cover captive screw NOTICE: To prevent damage to the memory module connector, do not use tools to spread the memorymodule securing clips. 3 ...

Owner's Manual
Page 85
... slot at the same time that you ordered the optional modem at a 45-degree angle, and rotate the module down until it . Adding and Replacing Parts 85 a Align the notch in the module edge connector with the tab in the computer: click the Start button, click Help and Support, and then...
... slot at the same time that you ordered the optional modem at a 45-degree angle, and rotate the module down until it . Adding and Replacing Parts 85 a Align the notch in the module edge connector with the tab in the computer: click the Start button, click Help and Support, and then...

Owner's Manual
Page 86
... installed, go to the system board, and set them aside. b Pull straight up on the attached pull-tab to the modem. 86 Adding and Replacing Parts screws (2) modem cable modem cable connector pull-tab 5 Connect the modem cable to lift the modem out of its connector on the system board, and...
... installed, go to the system board, and set them aside. b Pull straight up on the attached pull-tab to the modem. 86 Adding and Replacing Parts screws (2) modem cable modem cable connector pull-tab 5 Connect the modem cable to lift the modem out of its connector on the system board, and...

Owner's Manual
Page 87
...on the modem/Mini PCI card cover and lift the cover away from the computer. Mini PCI Card CAUTION: FCC rules strictly prohibit users from Dell. NOTE: 2.4-GHz Wireless LAN PC Cards may be installed. If you begin any of the procedures in this section, follow the instructions noted ...below. captive screw modem/Mini PCI card cover Adding and Replacing Parts 87 Under no circumstances should the user install such a device. CAUTION: Before you are removing and/or installing a 2.4-GHz (802.11b, 802.11b...
...on the modem/Mini PCI card cover and lift the cover away from the computer. Mini PCI Card CAUTION: FCC rules strictly prohibit users from Dell. NOTE: 2.4-GHz Wireless LAN PC Cards may be installed. If you begin any of the procedures in this section, follow the instructions noted ...below. captive screw modem/Mini PCI card cover Adding and Replacing Parts 87 Under no circumstances should the user install such a device. CAUTION: Before you are removing and/or installing a 2.4-GHz (802.11b, 802.11b...

Owner's Manual
Page 88
... Lift the Mini PCI card out of or under the card. 6 Connect the antenna cables to the Mini PCI card. 88 Adding and Replacing Parts Mini PCI card antenna cables metal securing tabs (2) Mini PCI card connector NOTICE: To avoid damaging the Mini PCI card, never place cables on ...step 5. NOTICE: The connectors are replacing a Mini PCI card, remove the existing card: a Disconnect the Mini PCI card from any attached cables. www.dell.com | support.dell.com 4 If a Mini PCI card is not already installed, go to ensure correct insertion. b Release the Mini PCI card by spreading the metal ...
... Lift the Mini PCI card out of or under the card. 6 Connect the antenna cables to the Mini PCI card. 88 Adding and Replacing Parts Mini PCI card antenna cables metal securing tabs (2) Mini PCI card connector NOTICE: To avoid damaging the Mini PCI card, never place cables on ...step 5. NOTICE: The connectors are replacing a Mini PCI card, remove the existing card: a Disconnect the Mini PCI card from any attached cables. www.dell.com | support.dell.com 4 If a Mini PCI card is not already installed, go to ensure correct insertion. b Release the Mini PCI card by spreading the metal ...

Owner's Manual
Page 89
memory module cover captive screw Adding and Replacing Parts 89 Mini PCI card antenna cables 7 Replace the cover and tighten the screw. Mini PCI card connector Optical Drive 1 Complete the instructions in "Before You Begin" on page 79. 2 Turn the computer over, loosen the captive screw on the memory module cover, and lift the cover away from the computer.
memory module cover captive screw Adding and Replacing Parts 89 Mini PCI card antenna cables 7 Replace the cover and tighten the screw. Mini PCI card connector Optical Drive 1 Complete the instructions in "Before You Begin" on page 79. 2 Turn the computer over, loosen the captive screw on the memory module cover, and lift the cover away from the computer.

Owner's Manual
Page 90
... drive. 5 Pull the drive out of the hinge cover, and pry the cover loose from the hinges and bottom case. 90 Adding and Replacing Parts www.dell.com | support.dell.com 3 Remove the screw labeled "O" next to lift the notched right-side edge of the bay. 6 Slide the new drive into the bay...
... drive. 5 Pull the drive out of the hinge cover, and pry the cover loose from the hinges and bottom case. 90 Adding and Replacing Parts www.dell.com | support.dell.com 3 Remove the screw labeled "O" next to lift the notched right-side edge of the bay. 6 Slide the new drive into the bay...

Owner's Manual
Page 91
hinge cover 3 Lift the hinge cover up and away from the hinges and bottom case. 4 Remove the four keyboard screws. screws (4) keyboard Adding and Replacing Parts 91
hinge cover 3 Lift the hinge cover up and away from the hinges and bottom case. 4 Remove the four keyboard screws. screws (4) keyboard Adding and Replacing Parts 91

Owner's Manual
Page 92
... engaged before trying to completely seat the keyboard. 10 Replace the four keyboard screws. 11 Replace the hinge cover. 92 Adding and Replacing Parts NOTICE: To avoid damage to the connector pins, press the keyboard connector evenly into the bottom case. Ensure that the keyboard connector is ... keyboard to the interface connector on the system board. 7 Remove the keyboard from the interface connector on the system board. www.dell.com | support.dell.com NOTICE: The keycaps on the keyboard into their respective slots in the palm rest, and lower the keyboard into the interface...
... engaged before trying to completely seat the keyboard. 10 Replace the four keyboard screws. 11 Replace the hinge cover. 92 Adding and Replacing Parts NOTICE: To avoid damage to the connector pins, press the keyboard connector evenly into the bottom case. Ensure that the keyboard connector is ... keyboard to the interface connector on the system board. 7 Remove the keyboard from the interface connector on the system board. www.dell.com | support.dell.com NOTICE: The keycaps on the keyboard into their respective slots in the palm rest, and lower the keyboard into the interface...
Owner's Manual
Page 101
... conditions of the software programs that are covered by the standard Dell limited warranty for the computer and any peripheral, accessory, or software program sold by Dell not under the Dell brand (printers, scanners, cameras, games, and so on ). However, Dell also extends a parts replacement program to this technician-assisted technical support, online technical support...
... conditions of the software programs that are covered by the standard Dell limited warranty for the computer and any peripheral, accessory, or software program sold by Dell not under the Dell brand (printers, scanners, cameras, games, and so on ). However, Dell also extends a parts replacement program to this technician-assisted technical support, online technical support...

Owner's Manual
Page 105
...Chile (Santiago) Country Code: 56 City Code: 2 Department Name or Service Area, Website and E-Mail Address Online Order Status: www.dell.ca/ostatus AutoTech (automated technical support) Customer Care (Home Sales/Small Business) Customer Care (med./large business, government) Technical Support ...Sales/Small Business) Technical Support (med./large bus., government) Sales (Home Sales/Small Business) Sales (med./large bus., government) Spare Parts Sales & Extended Service Sales General Support Sales, Customer Support, and Technical Support Area Codes, Local Numbers, and Toll-Free Numbers toll-...
...Chile (Santiago) Country Code: 56 City Code: 2 Department Name or Service Area, Website and E-Mail Address Online Order Status: www.dell.ca/ostatus AutoTech (automated technical support) Customer Care (Home Sales/Small Business) Customer Care (med./large business, government) Technical Support ...Sales/Small Business) Technical Support (med./large bus., government) Sales (Home Sales/Small Business) Sales (med./large bus., government) Spare Parts Sales & Extended Service Sales General Support Sales, Customer Support, and Technical Support Area Codes, Local Numbers, and Toll-Free Numbers toll-...


