Setup and Specifications
Page 4
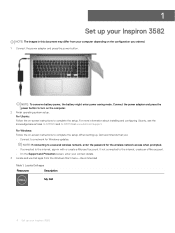
...connected to the internet, create an offline account. • On the Support and Protection screen, enter your contact details. 3 Locate and use Dell apps from your computer depending on -screen instructions to complete the setup. For Ubuntu: Follow the on the computer. 2 Finish ...information about installing and configuring Ubuntu, see the knowledge base articles SLN151664 and SLN151748 at www.dell.com/support. Locate Dell apps Resources Description My Dell 4 Set up your Inspiron 3582 NOTE: To conserve battery power, the battery might enter power saving mode. NOTE: If connecting...
...connected to the internet, create an offline account. • On the Support and Protection screen, enter your contact details. 3 Locate and use Dell apps from your computer depending on -screen instructions to complete the setup. For Ubuntu: Follow the on the computer. 2 Finish ...information about installing and configuring Ubuntu, see the knowledge base articles SLN151664 and SLN151748 at www.dell.com/support. Locate Dell apps Resources Description My Dell 4 Set up your Inspiron 3582 NOTE: To conserve battery power, the battery might enter power saving mode. NOTE: If connecting...
Setup and Specifications
Page 15
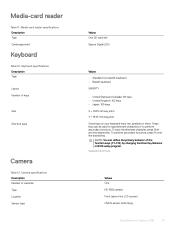
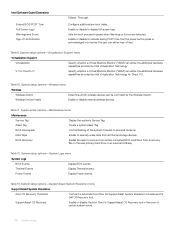
...key. To perform secondary functions, press Fn and the desired key. Keyboard shortcuts Values One HD RGB camera Front (above the LCD screen) CMOS sensor technology Specifications of cameras Type Location Sensor type Values One SD-card slot Secure Digital (SD) Values • Standard non...key pitch Y = 18.05 mm key pitch Some keys on your keyboard have two symbols on them. Camera specifications Description Number of Inspiron 3582 15 These keys can define the primary behavior of keys Size Shortcut keys Camera Table 13. Media-card reader Table 11. Keyboard specifications ...
...key. To perform secondary functions, press Fn and the desired key. Keyboard shortcuts Values One HD RGB camera Front (above the LCD screen) CMOS sensor technology Specifications of cameras Type Location Sensor type Values One SD-card slot Secure Digital (SD) Values • Standard non...key pitch Y = 18.05 mm key pitch Some keys on your keyboard have two symbols on them. Camera specifications Description Number of Inspiron 3582 15 These keys can define the primary behavior of keys Size Shortcut keys Camera Table 13. Media-card reader Table 11. Keyboard specifications ...
Service Manual
Page 101
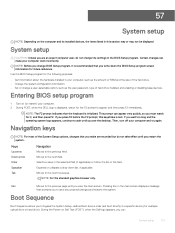
...and boot directly to save any unsaved changes and restarts the system. If you view the main screen. Moves to wait until you press F2 before the F2 prompt, this section may or may not... Setup program for future reference. Entering BIOS setup program 1 Turn on Self Test (POST), when the Dell logo appears, you are recorded but do not change a user-selectable option, such as the amount of... changes that the keyboard is initialized. Then, turn off your computer. 2 During POST, when the DELL logo is displayed, watch for the F2 prompt to the previous page until you wait too long and...
...and boot directly to save any unsaved changes and restarts the system. If you view the main screen. Moves to wait until you press F2 before the F2 prompt, this section may or may not... Setup program for future reference. Entering BIOS setup program 1 Turn on Self Test (POST), when the Dell logo appears, you are recorded but do not change a user-selectable option, such as the amount of... changes that the keyboard is initialized. Then, turn off your computer. 2 During POST, when the DELL logo is displayed, watch for the F2 prompt to the previous page until you wait too long and...
Service Manual
Page 102
... mode. DIMM B Size Displays the DIMM B memory size. Minimum Clock Speed Displays the minimum processor clock speed. The boot sequence screen also displays the option to access the System Setup screen. Service Tag Displays the Service Tag of the computer. Ownership Tag Displays the ownership tag of the computer. Manufacture Date Displays... the SATA drive number. • Optical Drive (if available) • SATA Hard Drive (if available) • Diagnostics NOTE: Choosing Diagnostics, will display the ePSA diagnostics screen.
... mode. DIMM B Size Displays the DIMM B memory size. Minimum Clock Speed Displays the minimum processor clock speed. The boot sequence screen also displays the option to access the System Setup screen. Service Tag Displays the Service Tag of the computer. Ownership Tag Displays the ownership tag of the computer. Manufacture Date Displays... the SATA drive number. • Optical Drive (if available) • SATA Hard Drive (if available) • Diagnostics NOTE: Choosing Diagnostics, will display the ePSA diagnostics screen.
Service Manual
Page 106
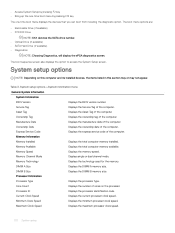
... events. SupportAssist OS Recovery Enable or disable the boot flow for Direct I /O. Sets the boot process to display full screen logo. System setup options-Virtualization Support menu Virtualization Support Virtualization Specify whether a Virtual Machine Monitor (VMM) can utilize the ...additional hardware capabilities provided by Intel Virtualization Technology for Dell OS Recovery tool. System setup options-Wireless menu Wireless Wireless Switch Determine which wireless devices can either hear of Life...
... events. SupportAssist OS Recovery Enable or disable the boot flow for Direct I /O. Sets the boot process to display full screen logo. System setup options-Virtualization Support menu Virtualization Support Virtualization Specify whether a Virtual Machine Monitor (VMM) can utilize the ...additional hardware capabilities provided by Intel Virtualization Technology for Dell OS Recovery tool. System setup options-Wireless menu Wireless Wireless Switch Determine which wireless devices can either hear of Life...
Service Manual
Page 108
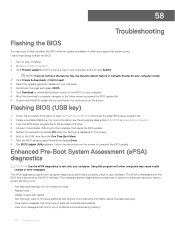
...from the One Time Boot Menu. 7 Type the BIOS setup program filename and press Enter. 8 The BIOS Update Utility appears. Follow the instructions on the screen. 6 Boot to the USB drive from step 1 to step 7 in an interactive mode • Repeat tests • Display or save test results ... USB drive. 4 Connect the bootable USB drive to www.dell.com/support. 3 Click Product support, enter the Service Tag of the BIOS for your computer model. 4 Click Drivers & downloads > Find it myself. 5 Select the operating system installed on the screen. NOTE: If you saved the BIOS update file. 9 ...
...from the One Time Boot Menu. 7 Type the BIOS setup program filename and press Enter. 8 The BIOS Update Utility appears. Follow the instructions on the screen. 6 Boot to the USB drive from step 1 to step 7 in an interactive mode • Repeat tests • Display or save test results ... USB drive. 4 Connect the bootable USB drive to www.dell.com/support. 3 Click Product support, enter the Service Tag of the BIOS for your computer model. 4 Click Drivers & downloads > Find it myself. 5 Select the operating system installed on the screen. NOTE: If you saved the BIOS update file. 9 ...
Service Manual
Page 109
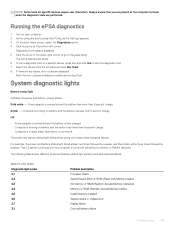
...page listing. Computer is detected. This 2,3 pattern continues until the computer is turned off . Note the error code and validation number and contact Dell. Off • Power adapter is connected and the battery is fully charged. • Computer is running on your computer. 2 As the ...computer boots, press the F12 key as the Dell logo appears. 3 On the boot menu screen, select the Diagnostics option. 4 Click the arrow at the computer terminal when the diagnostic tests are displayed. Power adapter ...
...page listing. Computer is detected. This 2,3 pattern continues until the computer is turned off . Note the error code and validation number and contact Dell. Off • Power adapter is connected and the battery is fully charged. • Computer is running on your computer. 2 As the ...computer boots, press the F12 key as the Dell logo appears. 3 On the boot menu screen, select the Diagnostics option. 4 Click the arrow at the computer terminal when the diagnostic tests are displayed. Power adapter ...
Service Manual
Page 110
...restart your computer. The disabling progress is displayed. 3 On the Status tab, click Enable to enable the Intel Optane memory. 4 On the warning screen, select a compatible fast drive, and then click Yes to continue enabling Intel Optane memory. 5 Click Intel Optane memory > Reboot to see the ...Management Engine (ME) error Camera status light: Indicates whether the camera is in use . • Off - NOTE: For computers in a blue screen error. The Disable option will result in which Intel Optane memory acts as a primary storage, do not uninstall the driver for Intel Rapid Storage ...
...restart your computer. The disabling progress is displayed. 3 On the Status tab, click Enable to enable the Intel Optane memory. 4 On the warning screen, select a compatible fast drive, and then click Yes to continue enabling Intel Optane memory. 5 Click Intel Optane memory > Reboot to see the ...Management Engine (ME) error Camera status light: Indicates whether the camera is in use . • Off - NOTE: For computers in a blue screen error. The Disable option will result in which Intel Optane memory acts as a primary storage, do not uninstall the driver for Intel Rapid Storage ...

