

Solutions Guide
Page 11
Power (Safety Instructions, continued) • Use only the Dell-provided AC adapter approved for use with three-prong plugs to provide an earth grounding connection. These power cables may be tripped over or stepped .... Incorrect insertion of the power plug could result in permanent damage to ensure that the ground prong of the power plug is not located where it off, remove the battery pack, and disconnect the AC adapter from the electrical outlet. • To help prevent electric shock, plug the AC adapter and peripheral...
Power (Safety Instructions, continued) • Use only the Dell-provided AC adapter approved for use with three-prong plugs to provide an earth grounding connection. These power cables may be tripped over or stepped .... Incorrect insertion of the power plug could result in permanent damage to ensure that the ground prong of the power plug is not located where it off, remove the battery pack, and disconnect the AC adapter from the electrical outlet. • To help prevent electric shock, plug the AC adapter and peripheral...
Solutions Guide
Page 68
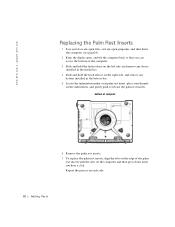
... the tabs on the edge of the computer. 3 Slide and hold the latch release on the left side, and remove any device installed in the battery bay. 5 Locate the indentation under each side. 68 Adding Parts de ll .c om | sup port .d ell.c om Replacing the Palm Rest Inserts 1 Save and close any... programs, and shut down until you can access the bottom of the palm rest inserts with the slots on the right side, and remove any battery installed in the media bay. 4 Slide and hold the latch release on the computer and then press down the computer (see page24) . 2 Keep the display...
... the tabs on the edge of the computer. 3 Slide and hold the latch release on the left side, and remove any device installed in the battery bay. 5 Locate the indentation under each side. 68 Adding Parts de ll .c om | sup port .d ell.c om Replacing the Palm Rest Inserts 1 Save and close any... programs, and shut down until you can access the bottom of the palm rest inserts with the slots on the right side, and remove any battery installed in the media bay. 4 Slide and hold the latch release on the computer and then press down the computer (see page24) . 2 Keep the display...
Solutions Guide
Page 69
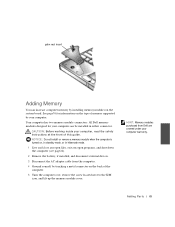
All Dell memory modules designed for information on the type of the computer. 5 Turn the computer over, remove the screw located next to the K/M icon, and lift up the memory module cover. NOTICE: Do not install or remove a memory module when the computer is ... 1 Save and close any open files, exit any open programs, and shut down the computer (see page24). 2 Remove the battery, if installed, and disconnect external devices. 3 Disconnect the AC adapter cable from Dell are covered under your computer, read the safety in either connector. Your computer has two memory module connectors.
All Dell memory modules designed for information on the type of the computer. 5 Turn the computer over, remove the screw located next to the K/M icon, and lift up the memory module cover. NOTICE: Do not install or remove a memory module when the computer is ... 1 Save and close any open files, exit any open programs, and shut down the computer (see page24). 2 Remove the battery, if installed, and disconnect external devices. 3 Disconnect the AC adapter cable from Dell are covered under your computer, read the safety in either connector. Your computer has two memory module connectors.
Solutions Guide
Page 78
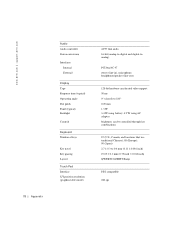
.../speaker (line-out) 128-bit hardware-accelerated video support 50 ms 0° (closed) to 180° 0.20 mm 1.3 W 3.4 W using battery; 4.9 W using AC adapter brightness can be controlled through key combinations 87 (U.S., Canada, and locations that use traditional Chinese); 88 (Europe); 90 (Japan) 2.7 ± 0.3 to 0.4 mm (0.11 ± 0.016 inch) 19.05 ±...
.../speaker (line-out) 128-bit hardware-accelerated video support 50 ms 0° (closed) to 180° 0.20 mm 1.3 W 3.4 W using battery; 4.9 W using AC adapter brightness can be controlled through key combinations 87 (U.S., Canada, and locations that use traditional Chinese); 88 (Europe); 90 (Japan) 2.7 ± 0.3 to 0.4 mm (0.11 ± 0.016 inch) 19.05 ±...


