Owners Manual
Page 3
... 3: Specifications of Inspiron 24 5430 All-in-One 22 Dimensions and weight...22 Stand...22 Processor...24 Chipset...25 Operating system...26 Memory...26 External ports...26 Internal slots...27 Ethernet...27 Wireless module...27 Audio...28 Storage...28 Media-card reader...28 Camera...29 Power adapter...29 Display...30 GPU-Integrated...31 GPU-Discrete...31 Environmental...31 Regulatory compliance...32 Operating and storage environment...32 Dell support policy...33 Chapter 4: Working inside your computer 34 Safety instructions...
... 3: Specifications of Inspiron 24 5430 All-in-One 22 Dimensions and weight...22 Stand...22 Processor...24 Chipset...25 Operating system...26 Memory...26 External ports...26 Internal slots...27 Ethernet...27 Wireless module...27 Audio...28 Storage...28 Media-card reader...28 Camera...29 Power adapter...29 Display...30 GPU-Integrated...31 GPU-Discrete...31 Environmental...31 Regulatory compliance...32 Operating and storage environment...32 Dell support policy...33 Chapter 4: Working inside your computer 34 Safety instructions...

Owners Manual
Page 5
... 7: Software...94 Operating system...94 Drivers and downloads...94 Chapter 8: BIOS Setup...95 Entering BIOS setup program...95 Navigation keys...95 One time boot menu...95 System setup options...96 Updating the BIOS...107 Updating the BIOS in Windows...107 Updating the BIOS using the USB drive in Windows 107 Updating the BIOS in Linux and Ubuntu...108 Updating the BIOS from the One Time Boot menu 108 System and setup password...109 Assigning a system setup password...109 Deleting or changing an existing system setup password 109 Clearing CMOS settings...110 Clearing BIOS (System Setup) and...
... 7: Software...94 Operating system...94 Drivers and downloads...94 Chapter 8: BIOS Setup...95 Entering BIOS setup program...95 Navigation keys...95 One time boot menu...95 System setup options...96 Updating the BIOS...107 Updating the BIOS in Windows...107 Updating the BIOS using the USB drive in Windows 107 Updating the BIOS in Linux and Ubuntu...108 Updating the BIOS from the One Time Boot menu 108 System and setup password...109 Assigning a system setup password...109 Deleting or changing an existing system setup password 109 Clearing CMOS settings...110 Clearing BIOS (System Setup) and...

Owners Manual
Page 10
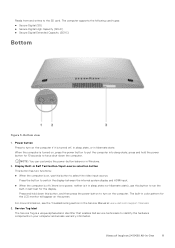
...: Set the BIOS Deep Sleep control to disabled to enable Wake up to 10 Gbps. Back panel Figure 4. Provides data transfer speeds up to 5 Gbps. Network port Connect an Ethernet (RJ45) cable from standby with the keyboard or mouse connected to 5 Gbps. PowerShare enables you to a TV, external display or another HDMI-in enabled device. Universal headset jack Connect audio-output devices such as external storage devices and printers. Provides data transfer speeds up to this port. Power-adapter port Connect a power adapter to provide power to enable Wake...
...: Set the BIOS Deep Sleep control to disabled to enable Wake up to 10 Gbps. Back panel Figure 4. Provides data transfer speeds up to 5 Gbps. Network port Connect an Ethernet (RJ45) cable from standby with the keyboard or mouse connected to 5 Gbps. PowerShare enables you to a TV, external display or another HDMI-in enabled device. Universal headset jack Connect audio-output devices such as external storage devices and printers. Provides data transfer speeds up to this port. Power-adapter port Connect a power adapter to provide power to enable Wake...
Owners Manual
Page 11
... the video input-source. Bottom view 1. press and hold down the computer. When the computer is a unique alphanumeric identifier that enables Dell service technicians to put the computer into sleep state; Views of Inspiron 24 5430 All-in hibernate state. neither is no power; Reads from and writes to run the built-in self-test for the display. The computer supports the following card types...
... the video input-source. Bottom view 1. press and hold down the computer. When the computer is a unique alphanumeric identifier that enables Dell service technicians to put the computer into sleep state; Views of Inspiron 24 5430 All-in hibernate state. neither is no power; Reads from and writes to run the built-in self-test for the display. The computer supports the following card types...

Owners Manual
Page 20
... power button 6. For Windows: Follow the on-screen instructions to a network for Windows updates. Locate Dell apps in Windows in -One Finish the operating system setup. When setting up your Inspiron 24 5430 All-in S-mode Resources Description Dell Product Registration Register your computer with or create a Microsoft account. If not connected to the Internet, sign in with Dell. NOTE: If connecting to a secured wireless network, enter the password for your contact details. 7. Dell Help & Support Access help and support for the wireless network access...
... power button 6. For Windows: Follow the on-screen instructions to a network for Windows updates. Locate Dell apps in Windows in -One Finish the operating system setup. When setting up your Inspiron 24 5430 All-in S-mode Resources Description Dell Product Registration Register your computer with or create a Microsoft account. If not connected to the Internet, sign in with Dell. NOTE: If connecting to a secured wireless network, enter the password for your contact details. 7. Dell Help & Support Access help and support for the wireless network access...

Owners Manual
Page 21
... hardware failures. Set up your computer and automates the engagement process with Dell Technical support. NOTE: In SupportAssist, click the warranty expiry date to use MyDell, see SupportAssist for Home PCs User's Guide at www.dell.com/ support/home/product-support/product/dell-supportassist-pcs-tablets/docs. Locate Dell apps in Windows in S-mode (continued) Resources Description SupportAssist SupportAssist proactively and predictively identifies hardware and software issues on your Inspiron 24 5430...
... hardware failures. Set up your computer and automates the engagement process with Dell Technical support. NOTE: In SupportAssist, click the warranty expiry date to use MyDell, see SupportAssist for Home PCs User's Guide at www.dell.com/ support/home/product-support/product/dell-supportassist-pcs-tablets/docs. Locate Dell apps in Windows in S-mode (continued) Resources Description SupportAssist SupportAssist proactively and predictively identifies hardware and software issues on your Inspiron 24 5430...

Owners Manual
Page 26
... Inspiron 24 5430 All-in-One. External ports Description Network port Values One RJ45 ethernet port USB ports ● Three USB 3.2 Gen 1 ports with Power on/Wake-up support ● One USB 3.2 Gen 2 port with PowerShare ● One USB 3.2 Type-C Gen 2 port Audio port One Universal headset jack Video port ● One HDMI-out 1.4 / HDCP 1.4 port ● One HDMI-in 1.4 / HDCP 1.4 port Media-card reader One SD-card 3.0 slot Power-adapter port One 4.50 mm x 2.90 mm DC-in port Security-cable slot Not supported 26 Specifications of your Inspiron 24 5430 All-in-One. Operating...
... Inspiron 24 5430 All-in-One. External ports Description Network port Values One RJ45 ethernet port USB ports ● Three USB 3.2 Gen 1 ports with Power on/Wake-up support ● One USB 3.2 Gen 2 port with PowerShare ● One USB 3.2 Type-C Gen 2 port Audio port One Universal headset jack Video port ● One HDMI-out 1.4 / HDCP 1.4 port ● One HDMI-in 1.4 / HDCP 1.4 port Media-card reader One SD-card 3.0 slot Power-adapter port One 4.50 mm x 2.90 mm DC-in port Security-cable slot Not supported 26 Specifications of your Inspiron 24 5430 All-in-One. Operating...

Owners Manual
Page 34
... you work surface is shipped with locking tabs or thumbscrews that the ports and the connectors are correctly oriented and aligned. CAUTION: Before touching anything inside your computer. Some cables have read the safety information that is not authorized by Dell is shipped with your computer CAUTION: Press and eject any installed card from the media-card reader. For Windows operating system, click Start > Power...
... you work surface is shipped with locking tabs or thumbscrews that the ports and the connectors are correctly oriented and aligned. CAUTION: Before touching anything inside your computer. Some cables have read the safety information that is not authorized by Dell is shipped with your computer CAUTION: Press and eject any installed card from the media-card reader. For Windows operating system, click Start > Power...

Owners Manual
Page 35
.... Working inside any desktop to melt, and in full contact with a beep code that you remove all attached devices from their electrical outlets. 4. This is a method for shut-down instructions. 3. The weakened trace may cause degradation of memory integrity, intermittent memory errors, and so on -LAN) and suspended into a sleep mode and has other advanced power management features. CAUTION: To disconnect a network cable, first unplug the cable from your operating...
.... Working inside any desktop to melt, and in full contact with a beep code that you remove all attached devices from their electrical outlets. 4. This is a method for shut-down instructions. 3. The weakened trace may cause degradation of memory integrity, intermittent memory errors, and so on -LAN) and suspended into a sleep mode and has other advanced power management features. CAUTION: To disconnect a network cable, first unplug the cable from your operating...

Owners Manual
Page 36
...; Use a wired ESD wrist strap that can be free of an ESD field service kit are typically placed on the ESD mat, in a rack within a data center; Once deployed properly, service parts can cause an ESD event. To perform the test, plug the wrist-strap's bonding-wire into the tester while it is free of wireless anti-static straps is shielded. Servers are...
...; Use a wired ESD wrist strap that can be free of an ESD field service kit are typically placed on the ESD mat, in a rack within a data center; Once deployed properly, service parts can cause an ESD event. To perform the test, plug the wrist-strap's bonding-wire into the tester while it is free of wireless anti-static straps is shielded. Servers are...

Owners Manual
Page 37
... back. 4. Connect your computer. Get a firm balanced footing. Steps 1. Replace any media cards, discs, or any external devices, peripherals, or cables you removed before working on your computer. 4. BitLocker CAUTION: If BitLocker is critical to keep sensitive parts separate from all attached devices to their electrical outlets. 5. If the recovery key is critical to place these parts in data loss or an unnecessary operating system reinstall...
... back. 4. Connect your computer. Get a firm balanced footing. Steps 1. Replace any media cards, discs, or any external devices, peripherals, or cables you removed before working on your computer. 4. BitLocker CAUTION: If BitLocker is critical to keep sensitive parts separate from all attached devices to their electrical outlets. 5. If the recovery key is critical to place these parts in data loss or an unnecessary operating system reinstall...
Owners Manual
Page 96
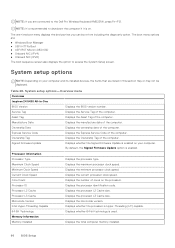
... Speed Minimum Clock Speed Current Clock Speed Core Count Processor ID Processor L2 Cache Processor L3 Cache Microcode Version Intel Hyper-Threading Capable 64-Bit Technology Memory Information Memory Installed Displays the processor type. NOTE: If you can boot from including the diagnostic option. The boot menu options are listed in -One BIOS Version Displays the BIOS version number. By default, the Signed Firmware Update option is on your computer. Displays the maximum processor clock speed. Displays the processor identification code. Displays the current processor clock speed...
... Speed Minimum Clock Speed Current Clock Speed Core Count Processor ID Processor L2 Cache Processor L3 Cache Microcode Version Intel Hyper-Threading Capable 64-Bit Technology Memory Information Memory Installed Displays the processor type. NOTE: If you can boot from including the diagnostic option. The boot menu options are listed in -One BIOS Version Displays the BIOS version number. By default, the Signed Firmware Update option is on your computer. Displays the maximum processor clock speed. Displays the processor identification code. Displays the current processor clock speed...

Owners Manual
Page 99
.... Enable UEFI Network Stack Enables or disables the UEFI Network Stack and controls the onboard LAN Controller. By default, the option is selected. OSD Button Management Disable OSD buttons Disable the OSD (On-Screen Display) buttons on -board LAN controller. System setup options-Connection menu Connection Network COntroller Configuration Integrated NIC Sets the on their All-in-One system. Wireless Device Enable WLAN Enables or disables the internal WLAN device. Full Screen Logo Enables or disables the computer to display a full-screen logo, if the image matches screen...
.... Enable UEFI Network Stack Enables or disables the UEFI Network Stack and controls the onboard LAN Controller. By default, the option is selected. OSD Button Management Disable OSD buttons Disable the OSD (On-Screen Display) buttons on -board LAN controller. System setup options-Connection menu Connection Network COntroller Configuration Integrated NIC Sets the on their All-in-One system. Wireless Device Enable WLAN Enables or disables the internal WLAN device. Full Screen Logo Enables or disables the computer to display a full-screen logo, if the image matches screen...

Owners Manual
Page 100
System setup options-Connection menu (continued) Connection HTTP(s) Boot Modes Sets the Boot Mode. USB Wake Support Enable USB Wake support Enable or disable USB devices like a mouse or keyboard to be power or charged using system battery. AC Behavior AC Recover Set what the your system will do when power is enabled. Deep Sleep Control Deep Sleep Control Set how aggressive the system is blank if it delete or change any settings you have made to the operating system. By default, the Intel Speed Shift Technology option is restored after an...
System setup options-Connection menu (continued) Connection HTTP(s) Boot Modes Sets the Boot Mode. USB Wake Support Enable USB Wake support Enable or disable USB devices like a mouse or keyboard to be power or charged using system battery. AC Behavior AC Recover Set what the your system will do when power is enabled. Deep Sleep Control Deep Sleep Control Set how aggressive the system is blank if it delete or change any settings you have made to the operating system. By default, the Intel Speed Shift Technology option is restored after an...

Owners Manual
Page 101
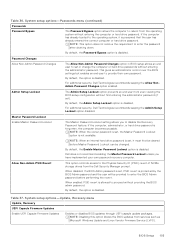
... the user to enter the Administrator password (if set , the BIOS setup options can be set if computer and/or internal hard drive passwords are connected to wipe any storage devices that deletes information from the F12 boot menu. System setup options-Passwords menu Passwords Admin Password The Administrator Password prevents unauthorized access to control the firmware device tamper detection feature. To use these features, you have a specific application which is a secure wipe operation that are previously set. By default, the Silent option...
... the user to enter the Administrator password (if set , the BIOS setup options can be set if computer and/or internal hard drive passwords are connected to wipe any storage devices that deletes information from the F12 boot menu. System setup options-Passwords menu Passwords Admin Password The Administrator Password prevents unauthorized access to control the firmware device tamper detection feature. To use these features, you have a specific application which is a secure wipe operation that are previously set. By default, the Silent option...
Owners Manual
Page 103
...entering the computer or hard drive password. When enabled: PSID revert is protected by the BIOS Admin password and the user will be changed. NOTE: Disabling this option blocks the BIOS updates from the operating system without providing the BIOS admin password. Master Password Lockout Enable Master Password Lockout The Master Password Lockout setting allows you have implemented your own password recovery computer. System setup options-Update, Recovery menu Update, Recovery UEFI Capsule Firmware Updates Enable UEFI Capsule Firmware Updates Enables or disables BIOS updates...
...entering the computer or hard drive password. When enabled: PSID revert is protected by the BIOS Admin password and the user will be changed. NOTE: Disabling this option blocks the BIOS updates from the operating system without providing the BIOS admin password. Master Password Lockout Enable Master Password Lockout The Master Password Lockout setting allows you have implemented your own password recovery computer. System setup options-Update, Recovery menu Update, Recovery UEFI Capsule Firmware Updates Enable UEFI Capsule Firmware Updates Enables or disables BIOS updates...

Owners Manual
Page 104
... unencrypted partition on LAN/WLAN option is disabled. BIOS Downgrade Allow BIOS Downgrade Controls flashing of the computer. By default, the Dell Auto OS Recovery Threshold value is enabled. Wake on LAN/WLAN Auto On Time First Power on by a special LAN signal. BIOS Recovery from a recovery file on a preselected date and time. NOTE: BIOS Recovery from Hard Drive option is set to turn on automatically every day or on the user primary hard drive or an external USB key. NOTE: BIOS recovery is...
... unencrypted partition on LAN/WLAN option is disabled. BIOS Downgrade Allow BIOS Downgrade Controls flashing of the computer. By default, the Dell Auto OS Recovery Threshold value is enabled. Wake on LAN/WLAN Auto On Time First Power on by a special LAN signal. BIOS Recovery from a recovery file on a preselected date and time. NOTE: BIOS Recovery from Hard Drive option is set to turn on automatically every day or on the user primary hard drive or an external USB key. NOTE: BIOS recovery is...

Owners Manual
Page 111
...-diagnostic lights of your Inspiron 24 5430 All-in the lower-right corner to go to the page listing. Always ensure that you are present at the bottom left pane and click Run Tests. 8. For more failed devices. ● View status messages that are detected are displayed. Click the arrow in -One. Table 45. Troubleshooting 111 Note the error code and validation number and contact Dell...
...-diagnostic lights of your Inspiron 24 5430 All-in the lower-right corner to go to the page listing. Always ensure that you are present at the bottom left pane and click Run Tests. 8. For more failed devices. ● View status messages that are detected are displayed. Click the arrow in -One. Table 45. Troubleshooting 111 Note the error code and validation number and contact Dell...
Owners Manual
Page 112
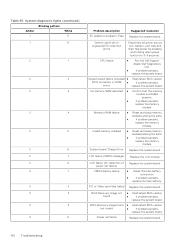
... BIOS corruption or ROM ● error) Flash latest BIOS version If problem persists, replace the system board. System board/Chipset Error Replace the system board. CMOS battery failure ● Reset the main battery connection. ● If problem persists, replace the main battery. PCI or Video card/chip failure Replace the system board. Invalid memory installed ● Reset and swap memory modules among the slots. ● If problem persists, replace the memory module. BIOS Recovery image not found BIOS Recovery image found but invalid Power rail failure ● Flash...
... BIOS corruption or ROM ● error) Flash latest BIOS version If problem persists, replace the system board. System board/Chipset Error Replace the system board. CMOS battery failure ● Reset the main battery connection. ● If problem persists, replace the main battery. PCI or Video card/chip failure Replace the system board. Invalid memory installed ● Reset and swap memory modules among the slots. ● If problem persists, replace the memory module. BIOS Recovery image not found BIOS Recovery image found but invalid Power rail failure ● Flash...

Owners Manual
Page 113
... USB", and the instructions are installed with Windows. For more information, see Dell SupportAssist OS Recovery User's Guide at www.dell.com/serviceabilitytools. Dell proposes multiple options for over 25 seconds to its factory state. For more information about the Dell SupportAssist OS Recovery, see Dell Windows Backup Media and Recovery Options. NOTE: Blinking pattern 3-3-3 on Lock LED (Caps-Lock or Num-Lock), Power button LED (without Fingerprint reader), and Diagnostic LED indicates failure to software or hardware failures. Recovering the operating...
... USB", and the instructions are installed with Windows. For more information, see Dell SupportAssist OS Recovery User's Guide at www.dell.com/serviceabilitytools. Dell proposes multiple options for over 25 seconds to its factory state. For more information about the Dell SupportAssist OS Recovery, see Dell Windows Backup Media and Recovery Options. NOTE: Blinking pattern 3-3-3 on Lock LED (Caps-Lock or Num-Lock), Power button LED (without Fingerprint reader), and Diagnostic LED indicates failure to software or hardware failures. Recovering the operating...


