
Specifications
Page 13
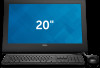
Views Storage Interface Hard drive Specifications SATA 3 Gbps One 2.5-inch drive Dimensions and Weight System Information Memory Ports and Connectors Communications Video Audio Media-Card Reader Display Camera Power Adapter Battery Computer Environment Storage
Views Storage Interface Hard drive Specifications SATA 3 Gbps One 2.5-inch drive Dimensions and Weight System Information Memory Ports and Connectors Communications Video Audio Media-Card Reader Display Camera Power Adapter Battery Computer Environment Storage

Specifications
Page 19
... ft) * Measured using a random vibration spectrum that simulates user environment. † Measured using a 2 ms half-sine pulse when the hard drive is in use. ‡ Measured using a 2 ms half-sine pulse when the hard-drive head is in parked position. Views Specifications Computer Environment Airborne contaminant level G1 as defined by ISA-S71.04...
... ft) * Measured using a random vibration spectrum that simulates user environment. † Measured using a 2 ms half-sine pulse when the hard drive is in use. ‡ Measured using a 2 ms half-sine pulse when the hard-drive head is in parked position. Views Specifications Computer Environment Airborne contaminant level G1 as defined by ISA-S71.04...

Service Manual
Page 3
Contents Before Working Inside Your Computer 7 Before You Begin 7 Safety Instructions 7 Recommended Tools 8 After Working Inside Your Computer 10 Technical Overview 11 Inside View of Your Computer 11 System Board Components 12 Removing the Hard Drive 14 Procedure...14 Replacing the Hard Drive 18 Procedure...18 Removing the Back Cover 19 Prerequisites...19 Procedure...20 Replacing the Back Cover 24 Procedure...24 Post-requisites 24 Removing the Control-Buttons Board 25 Prerequisites...25 Procedure...25
Contents Before Working Inside Your Computer 7 Before You Begin 7 Safety Instructions 7 Recommended Tools 8 After Working Inside Your Computer 10 Technical Overview 11 Inside View of Your Computer 11 System Board Components 12 Removing the Hard Drive 14 Procedure...14 Replacing the Hard Drive 18 Procedure...18 Removing the Back Cover 19 Prerequisites...19 Procedure...20 Replacing the Back Cover 24 Procedure...24 Post-requisites 24 Removing the Control-Buttons Board 25 Prerequisites...25 Procedure...25

Service Manual
Page 11
... instructions in Before Working Inside Your Computer. Inside View of Your Computer 1 back cover 3 display panel 5 power-status light board 7 wireless card 9 control-buttons board 2 hard-drive assembly 4 speakers (2) 6 system-board bracket 8 antenna modules (2) 11 For more safety best practices, see the Regulatory Compliance home page at...
... instructions in Before Working Inside Your Computer. Inside View of Your Computer 1 back cover 3 display panel 5 power-status light board 7 wireless card 9 control-buttons board 2 hard-drive assembly 4 speakers (2) 6 system-board bracket 8 antenna modules (2) 11 For more safety best practices, see the Regulatory Compliance home page at...

Service Manual
Page 12
System Board Components 1 memory-module slot (DDR3L) 2 hard-drive cable connector (HDD) 3 wireless-card slot (WLAN) 4 display-backlight cable connector 5 display-cable connector (LVDS) 6 speaker-cable connector (SPK) 7 power-status light board cable connector (LED) 12
System Board Components 1 memory-module slot (DDR3L) 2 hard-drive cable connector (HDD) 3 wireless-card slot (WLAN) 4 display-backlight cable connector 5 display-cable connector (LVDS) 6 speaker-cable connector (SPK) 7 power-status light board cable connector (LED) 12
Service Manual
Page 14
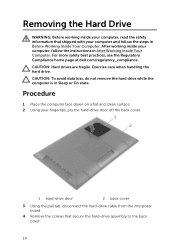
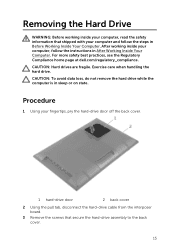
For more safety best practices, see the Regulatory Compliance home page at dell.com/regulatory_compliance. CAUTION: To avoid data loss, do not remove the hard drive while the computer is in After Working Inside Your Computer. Removing the Hard Drive WARNING: Before working inside your computer, read the safety information that shipped with your fingertips, pry...
For more safety best practices, see the Regulatory Compliance home page at dell.com/regulatory_compliance. CAUTION: To avoid data loss, do not remove the hard drive while the computer is in After Working Inside Your Computer. Removing the Hard Drive WARNING: Before working inside your computer, read the safety information that shipped with your fingertips, pry...

Service Manual
Page 15
5 Lift and slide the hard-drive assembly out of the slot on the back cover. 1 hard-drive assembly 3 pull tab 5 interposer board 6 Turn the hard-drive assembly over. 2 screws (4) 4 hard-drive cable 15
5 Lift and slide the hard-drive assembly out of the slot on the back cover. 1 hard-drive assembly 3 pull tab 5 interposer board 6 Turn the hard-drive assembly over. 2 screws (4) 4 hard-drive cable 15

Service Manual
Page 16
7 Peel off the tape that secures the interposer board to the hard-drive assembly. 1 hard-drive assembly 3 tape 2 interposer board 8 Turn the hard-drive assembly over. 9 Pull the interposer board to disconnect it from the hard-drive assembly. 10 Remove the screws that secure the hard-drive bracket to the hard drive. 16
7 Peel off the tape that secures the interposer board to the hard-drive assembly. 1 hard-drive assembly 3 tape 2 interposer board 8 Turn the hard-drive assembly over. 9 Pull the interposer board to disconnect it from the hard-drive assembly. 10 Remove the screws that secure the hard-drive bracket to the hard drive. 16

Service Manual
Page 17
11 Lift the hard-drive bracket off the hard drive. 1 interposer board 3 hard drive 2 screws (4) 4 hard-drive bracket 17
11 Lift the hard-drive bracket off the hard drive. 1 interposer board 3 hard drive 2 screws (4) 4 hard-drive bracket 17
Service Manual
Page 18
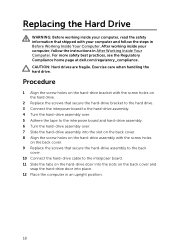
..., see the Regulatory Compliance home page at dell.com/regulatory_compliance. Replacing the Hard Drive WARNING: Before working inside your computer, read the safety information that secure the hard-drive assembly to the back cover. 10 Connect the hard-drive cable to the interposer board. 11 Slide the tabs on the hard-drive door into the slots on the back...
..., see the Regulatory Compliance home page at dell.com/regulatory_compliance. Replacing the Hard Drive WARNING: Before working inside your computer, read the safety information that secure the hard-drive assembly to the back cover. 10 Connect the hard-drive cable to the interposer board. 11 Slide the tabs on the hard-drive door into the slots on the back...
Service Manual
Page 19
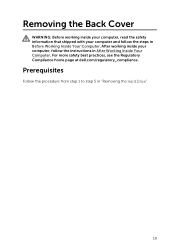
For more safety best practices, see the Regulatory Compliance home page at dell.com/regulatory_compliance. Prerequisites Follow the procedure from step 1 to step 5 in "Removing the Hard Drive". 19 After working inside your computer and follow the instructions in After Working Inside Your Computer. Removing the Back Cover WARNING: Before working inside your computer, read the safety information that shipped with your computer, follow the steps in Before Working Inside Your Computer.
For more safety best practices, see the Regulatory Compliance home page at dell.com/regulatory_compliance. Prerequisites Follow the procedure from step 1 to step 5 in "Removing the Hard Drive". 19 After working inside your computer and follow the instructions in After Working Inside Your Computer. Removing the Back Cover WARNING: Before working inside your computer, read the safety information that shipped with your computer, follow the steps in Before Working Inside Your Computer.

Service Manual
Page 20
Procedure 1 Slide the tabs on the hard-drive door into the slots on the back cover and snap the hard-drive door into place. 2 Remove the screws that secure the back cover to the display bezel. 1 screws (4) 3 notch 2 back cover 20
Procedure 1 Slide the tabs on the hard-drive door into the slots on the back cover and snap the hard-drive door into place. 2 Remove the screws that secure the back cover to the display bezel. 1 screws (4) 3 notch 2 back cover 20

Service Manual
Page 22
4 Carefully lift the back cover and turn it over. 1 back cover 2 display bezel 5 Follow the instructions from step 1 to step 4 in "Removing the ControlButtons Board". 6 Remove the hard-drive cable from the slot on the back cover. 1 back cover 3 display bezel 22 2 hard-drive cable
4 Carefully lift the back cover and turn it over. 1 back cover 2 display bezel 5 Follow the instructions from step 1 to step 4 in "Removing the ControlButtons Board". 6 Remove the hard-drive cable from the slot on the back cover. 1 back cover 3 display bezel 22 2 hard-drive cable

Service Manual
Page 24
For more safety best practices, see the Regulatory Compliance home page at dell.com/regulatory_compliance. Post-requisites Follow the procedure from step 1 to step 3 in "Replacing the Hard Drive". 24 Procedure 1 Slide the hard-drive cable into the slot on the display bezel. 4 Snap the back cover into place. 5 ...working inside your computer, read the safety information that secure the back cover to the display bezel. 6 Using your fingertips, pry the hard-drive door off the back cover. Buttons Board". 3 Carefully turn the back cover over and align the tabs on the back cover with ...
For more safety best practices, see the Regulatory Compliance home page at dell.com/regulatory_compliance. Post-requisites Follow the procedure from step 1 to step 3 in "Replacing the Hard Drive". 24 Procedure 1 Slide the hard-drive cable into the slot on the display bezel. 4 Snap the back cover into place. 5 ...working inside your computer, read the safety information that secure the back cover to the display bezel. 6 Using your fingertips, pry the hard-drive door off the back cover. Buttons Board". 3 Carefully turn the back cover over and align the tabs on the back cover with ...

Service Manual
Page 38
For more information, see "System Board Components". 1 hard-drive cable 3 speaker cable 5 connector latch 2 display cable 4 power-status light cable 6 display-backlight cable 3 Remove the screws that secure the system-board bracket to the display bezel. 38 Procedure 1 Lift the connector latch and disconnect the power-status light cable from the system board. 2 Disconnect the hard-drive cable, speaker cable, display cable, and display-backlight cable from the system board.
For more information, see "System Board Components". 1 hard-drive cable 3 speaker cable 5 connector latch 2 display cable 4 power-status light cable 6 display-backlight cable 3 Remove the screws that secure the system-board bracket to the display bezel. 38 Procedure 1 Lift the connector latch and disconnect the power-status light cable from the system board. 2 Disconnect the hard-drive cable, speaker cable, display cable, and display-backlight cable from the system board.
Service Manual
Page 42
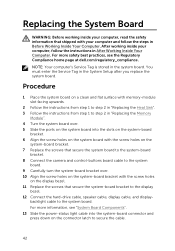
... Compliance home page at dell.com/regulatory_compliance. Replacing the System Board WARNING: Before working inside your computer, read the safety information that shipped with the screw holes on the system-board bracket. 7 Replace the screws that secure the system-board bracket to the display bezel. 12 Connect the hard-drive cable, speaker cable...
... Compliance home page at dell.com/regulatory_compliance. Replacing the System Board WARNING: Before working inside your computer, read the safety information that shipped with the screw holes on the system-board bracket. 7 Replace the screws that secure the system-board bracket to the display bezel. 12 Connect the hard-drive cable, speaker cable...

Service Manual Battery
Page 3
Contents Before Working Inside Your Computer 8 Before You Begin 8 Safety Instructions 8 Recommended Tools 9 After Working Inside Your Computer 11 Technical Overview 12 Inside View of Your Computer 12 System Board Components 13 Back View 13 Front View 14 Removing the Hard Drive 15 Procedure...15 Replacing the Hard Drive 18 Procedure...18 Removing the Back Cover 19 Prerequisites...19 Procedure...19 Replacing the Back Cover 24 Procedure...24 Post-requisites 24 Removing the Battery 25 Prerequisites...25 Procedure...25
Contents Before Working Inside Your Computer 8 Before You Begin 8 Safety Instructions 8 Recommended Tools 9 After Working Inside Your Computer 11 Technical Overview 12 Inside View of Your Computer 12 System Board Components 13 Back View 13 Front View 14 Removing the Hard Drive 15 Procedure...15 Replacing the Hard Drive 18 Procedure...18 Removing the Back Cover 19 Prerequisites...19 Procedure...19 Replacing the Back Cover 24 Procedure...24 Post-requisites 24 Removing the Battery 25 Prerequisites...25 Procedure...25

Service Manual Battery
Page 12
For more safety best practices, see the Regulatory Compliance home page at dell.com/regulatory_compliance. Technical Overview WARNING: Before working inside your computer, read the safety information that shipped with your computer, follow the steps in After Working ... and follow the instructions in Before Working Inside Your Computer. Inside View of Your Computer 1 back cover 3 display panel 5 speakers (2) 7 system-board bracket 9 antenna modules (2) 2 hard-drive assembly 4 battery 6 power-status light board 8 wireless card 10 control-buttons board 12
For more safety best practices, see the Regulatory Compliance home page at dell.com/regulatory_compliance. Technical Overview WARNING: Before working inside your computer, read the safety information that shipped with your computer, follow the steps in After Working ... and follow the instructions in Before Working Inside Your Computer. Inside View of Your Computer 1 back cover 3 display panel 5 speakers (2) 7 system-board bracket 9 antenna modules (2) 2 hard-drive assembly 4 battery 6 power-status light board 8 wireless card 10 control-buttons board 12

Service Manual Battery
Page 13
System Board Components Back View 1 memory-module slot (DDR3L) 2 hard-drive cable connector (HDD) 3 wireless-card slot (WLAN) 4 display-backlight cable connector 5 display-cable connector (LVDS) 6 speaker-cable connector (SPK) 7 power-status light board cable connector (LED) 13
System Board Components Back View 1 memory-module slot (DDR3L) 2 hard-drive cable connector (HDD) 3 wireless-card slot (WLAN) 4 display-backlight cable connector 5 display-cable connector (LVDS) 6 speaker-cable connector (SPK) 7 power-status light board cable connector (LED) 13
Service Manual Battery
Page 15
... the screws that shipped with your computer and follow the instructions in sleep or on state. Exercise care when handling the hard drive. For more safety best practices, see the Regulatory Compliance home page at dell.com/regulatory_compliance. Removing the Hard Drive WARNING: Before working inside your computer, read the safety information that secure the...
... the screws that shipped with your computer and follow the instructions in sleep or on state. Exercise care when handling the hard drive. For more safety best practices, see the Regulatory Compliance home page at dell.com/regulatory_compliance. Removing the Hard Drive WARNING: Before working inside your computer, read the safety information that secure the...


