
Service Manual
Page 5
11 Wireless Mini-Card(s 45 Removing the Mini-Card(s 45 Replacing the Mini-Card(s 47 12 Hard Drive 49 Removing the Hard Drive 49 Replacing the Hard Drive 51 A Subwoofer 53 Removing the Subwoofer 53 Replacing the Subwoofer 54 13 Status Light Board 57 Removing the Status Light Board 57 Replacing the Status Light Board 58 14 Speakers 61 Removing the Speakers 61 Replacing the Speakers 62 15 Thermal Fan 65 Removing the Thermal Fan 65 Contents 5
11 Wireless Mini-Card(s 45 Removing the Mini-Card(s 45 Replacing the Mini-Card(s 47 12 Hard Drive 49 Removing the Hard Drive 49 Replacing the Hard Drive 51 A Subwoofer 53 Removing the Subwoofer 53 Replacing the Subwoofer 54 13 Status Light Board 57 Removing the Status Light Board 57 Replacing the Status Light Board 58 14 Speakers 61 Removing the Speakers 61 Replacing the Speakers 62 15 Thermal Fan 65 Removing the Thermal Fan 65 Contents 5
Service Manual
Page 49
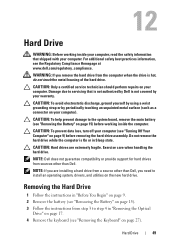
... page 9) before working inside the computer. Damage due to step 4 in Sleep state. CAUTION: Hard drives are installing a hard drive from a source other than Dell, you remove the hard drive from step 3 to servicing that shipped with your computer). WARNING: If you need to the system... a wrist grounding strap or by your computer. Exercise care when handling the hard drive. NOTE: Dell does not guarantee compatibility or provide support for hard drives from sources other than Dell. Hard Drive 49 CAUTION: To prevent data loss, turn off your computer (see the ...
... page 9) before working inside the computer. Damage due to step 4 in Sleep state. CAUTION: Hard drives are installing a hard drive from a source other than Dell, you remove the hard drive from step 3 to servicing that shipped with your computer). WARNING: If you need to the system... a wrist grounding strap or by your computer. Exercise care when handling the hard drive. NOTE: Dell does not guarantee compatibility or provide support for hard drives from sources other than Dell. Hard Drive 49 CAUTION: To prevent data loss, turn off your computer (see the ...

Service Manual
Page 50
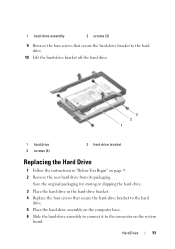
CAUTION: When the hard drive is not in the computer, store it from the connector on page 31). 6 Remove the three screws that secure the hard-drive assembly to the computer base. 7 Slide the hard-drive assembly to disconnect it in the safety instructions that shipped with your computer). 50 Hard Drive 2 1 5 Remove the palm-rest assembly (see "Protecting Against Electrostatic Discharge" in protective antistatic packaging (see "Removing the Palm-Rest Assembly" on the system board. 8 Lift the hard-drive assembly out of the computer base.
CAUTION: When the hard drive is not in the computer, store it from the connector on page 31). 6 Remove the three screws that secure the hard-drive assembly to the computer base. 7 Slide the hard-drive assembly to disconnect it in the safety instructions that shipped with your computer). 50 Hard Drive 2 1 5 Remove the palm-rest assembly (see "Protecting Against Electrostatic Discharge" in protective antistatic packaging (see "Removing the Palm-Rest Assembly" on the system board. 8 Lift the hard-drive assembly out of the computer base.
Service Manual
Page 51
... hard drive. 3 Place the hard drive in "Before You Begin" on the system board. 1 hard-drive assembly 2 screws (3) 9 Remove the four screws that secure the hard-drive bracket to the hard drive. 10 Lift the hard-drive bracket off the hard drive. 3 2 1 1 hard drive 3 screws (4) 2 hard-drive bracket Replacing the Hard Drive 1 Follow the instructions in the hard-drive bracket. 4 Replace the four screws that secure the hard-drive bracket to the hard drive. 5 Place the hard-drive...
... hard drive. 3 Place the hard drive in "Before You Begin" on the system board. 1 hard-drive assembly 2 screws (3) 9 Remove the four screws that secure the hard-drive bracket to the hard drive. 10 Lift the hard-drive bracket off the hard drive. 3 2 1 1 hard drive 3 screws (4) 2 hard-drive bracket Replacing the Hard Drive 1 Follow the instructions in the hard-drive bracket. 4 Replace the four screws that secure the hard-drive bracket to the hard drive. 5 Place the hard-drive...

Service Manual
Page 52
Failure to do so may result in damage to step 5 in "Replacing the Optical Drive" on page 19. 11 Replace the battery (see "Replacing the Keyboard" on page 29). 10 Follow the instructions from step 4 to the computer. 52 Hard Drive 7 Replace the three screws that no stray screws remain inside the computer. CAUTION: Before turning on the computer, replace all screws and ensure that secure the hard-drive assembly to the computer base. 8 Replace the palm-rest assembly (see "Replacing the Palm-Rest Assembly" on page 35). 9 Replace the keyboard (see "Replacing the Battery" on page 16).
Failure to do so may result in damage to step 5 in "Replacing the Optical Drive" on page 19. 11 Replace the battery (see "Replacing the Keyboard" on page 29). 10 Follow the instructions from step 4 to the computer. 52 Hard Drive 7 Replace the three screws that no stray screws remain inside the computer. CAUTION: Before turning on the computer, replace all screws and ensure that secure the hard-drive assembly to the computer base. 8 Replace the palm-rest assembly (see "Replacing the Palm-Rest Assembly" on page 35). 9 Replace the keyboard (see "Replacing the Battery" on page 16).

Service Manual
Page 70
9 Follow the instructions from step 6 to step 8 in "Removing the Hard Drive" on page 49. 10 Remove the thermal fan (see "Removing the Thermal Fan" on page 65). 11 Disconnect the speaker cable, subwoofer cable, status-light board cable, camera cable, and AC-adapter connector cable from the connectors on the system board. 12 Lift the connector latch that secures the display cable to the connector on the system board and disconnect the display cable. 13 Remove the six screws that secure the system board to the computer base. 7 6 1 5 2 3 4 70 System Board
9 Follow the instructions from step 6 to step 8 in "Removing the Hard Drive" on page 49. 10 Remove the thermal fan (see "Removing the Thermal Fan" on page 65). 11 Disconnect the speaker cable, subwoofer cable, status-light board cable, camera cable, and AC-adapter connector cable from the connectors on the system board. 12 Lift the connector latch that secures the display cable to the connector on the system board and disconnect the display cable. 13 Remove the six screws that secure the system board to the computer base. 7 6 1 5 2 3 4 70 System Board

Service Manual
Page 72
... board. 11 Replace the thermal fan (see "Replacing the Thermal Fan" on page 66). 12 Follow the instructions from step 5 to step 7 in "Replacing the Hard Drive" on page 51. 13 Replace the palm-rest assembly (see "Replacing the Palm-Rest Assembly" on page 35). 14 Replace the keyboard (see "Removing the...
... board. 11 Replace the thermal fan (see "Replacing the Thermal Fan" on page 66). 12 Follow the instructions from step 5 to step 7 in "Replacing the Hard Drive" on page 51. 13 Replace the palm-rest assembly (see "Replacing the Palm-Rest Assembly" on page 35). 14 Replace the keyboard (see "Removing the...

Setup Guide
Page 23
... devices (such as external hard drives or optical drives) or USB devices (such as a mouse, keyboard, printer, external drive, or MP3 player). NOTE: Certain USB devices may not charge when the computer is automatically shut off or in sleep state. Connects to a powered speaker or sound system. 21 Using Your Inspiron Laptop 1 eSATA/USB combo...
... devices (such as external hard drives or optical drives) or USB devices (such as a mouse, keyboard, printer, external drive, or MP3 player). NOTE: Certain USB devices may not charge when the computer is automatically shut off or in sleep state. Connects to a powered speaker or sound system. 21 Using Your Inspiron Laptop 1 eSATA/USB combo...
Setup Guide
Page 29
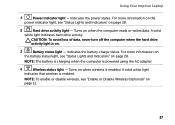
... To enable or disable wireless, see "Status Lights and Indicators" on . 3 Battery status light - A solid white light indicates hard drive activity. Using Your Inspiron Laptop 1 Power indicator light - Indicates the power states. Indicates the battery charge status. NOTE: The battery is charging when the computer... is on page 28. 2 Hard drive activity light - Turns on page 12. 27 Turns on page 28. For ...
... To enable or disable wireless, see "Status Lights and Indicators" on . 3 Battery status light - A solid white light indicates hard drive activity. Using Your Inspiron Laptop 1 Power indicator light - Indicates the power states. Indicates the battery charge status. NOTE: The battery is charging when the computer... is on page 28. 2 Hard drive activity light - Turns on page 12. 27 Turns on page 28. For ...
Setup Guide
Page 61
Ensure that your computer meets the minimum hardware requirements needed to help in troubleshooting when contacting Dell. 59 Solving Problems -- Write down your computer through the Start menu. • Check the software documentation or contact the software manufacturer for ... troubleshooting information: -- If you have other software problems - • Back up your files immediately. • Use a virus-scanning program to check the hard drive or CDs. • Save and close any open files or programs and shut down any error message that is displayed to run the software. Verify...
Ensure that your computer meets the minimum hardware requirements needed to help in troubleshooting when contacting Dell. 59 Solving Problems -- Write down your computer through the Start menu. • Check the software documentation or contact the software manufacturer for ... troubleshooting information: -- If you have other software problems - • Back up your files immediately. • Use a virus-scanning program to check the hard drive or CDs. • Save and close any open files or programs and shut down any error message that is displayed to run the software. Verify...

Setup Guide
Page 62
... space consumed by each day. This utility displays all hardware scans, tests, system changes, critical events and restoration points on improving the performance of your hard drive using a visual representation of file. • Performance and Configuration History - Manage your computer. INSPIRON Using Support Tools Dell Support Center All the support you need -
... space consumed by each day. This utility displays all hardware scans, tests, system changes, critical events and restoration points on improving the performance of your hard drive using a visual representation of file. • Performance and Configuration History - Manage your computer. INSPIRON Using Support Tools Dell Support Center All the support you need -

Setup Guide
Page 64
... detected but incorrectly configured, you contact Dell for devices such as the system board, keyboard, display, memory, hard drive, and so on page 57 and run Dell diagnostics, the computer invokes the Enhanced Pre-boot System Assessment (ePSA). Dell Diagnostics If you experience a problem with... your computer and press when the Dell logo appears. Ensure that best describes...
... detected but incorrectly configured, you contact Dell for devices such as the system board, keyboard, display, memory, hard drive, and so on page 57 and run Dell diagnostics, the computer invokes the Enhanced Pre-boot System Assessment (ePSA). Dell Diagnostics If you experience a problem with... your computer and press when the Dell logo appears. Ensure that best describes...
Setup Guide
Page 66
... not resolve your problem System recovery media when operating system failure prevents the use of the following options: CAUTION: Using Dell Factory Image Restore or the Operating System disc to reinstall only the operating system on your computer NOTE: The Operating System... INSPIRON Restoring Your Operating System You can restore the operating system on your computer using these options. If possible, backup your data files before using any of System Restore and Dell DataSafe Local Backup when installing the Dell factory-installed software on a newly installed hard drive Dell ...
... not resolve your problem System recovery media when operating system failure prevents the use of the following options: CAUTION: Using Dell Factory Image Restore or the Operating System disc to reinstall only the operating system on your computer NOTE: The Operating System... INSPIRON Restoring Your Operating System You can restore the operating system on your computer using these options. If possible, backup your data files before using any of System Restore and Dell DataSafe Local Backup when installing the Dell factory-installed software on a newly installed hard drive Dell ...
Setup Guide
Page 69
...; Create system recovery media Dell DataSafe Local Backup Basic To restore the Dell factory-installed software while preserving the data files: 1. Dell DataSafe Local Backup allows you to: • Backup and restore your computer, use Dell DataSafe Local Backup to restore your hard drive to the computer and remove... any newly added internal hardware. Turn on your operating system. NOTE: If Dell DataSafe Local Backup is not available on page 70) to wait...
...; Create system recovery media Dell DataSafe Local Backup Basic To restore the Dell factory-installed software while preserving the data files: 1. Dell DataSafe Local Backup allows you to: • Backup and restore your computer, use Dell DataSafe Local Backup to restore your hard drive to the computer and remove... any newly added internal hardware. Turn on your operating system. NOTE: If Dell DataSafe Local Backup is not available on page 70) to wait...
Setup Guide
Page 71
... system failure that prevents data from the list and press . 4. then, shut down your computer. • Hard drive failure that prevents the use the system recovery media, created using Dell DataSafe Local Backup, to return your hard drive to the operating state it is recommended that you see the Microsoft Windows desktop; You can use...
... system failure that prevents data from the list and press . 4. then, shut down your computer. • Hard drive failure that prevents the use the system recovery media, created using Dell DataSafe Local Backup, to return your hard drive to the operating state it is recommended that you see the Microsoft Windows desktop; You can use...
Setup Guide
Page 72
...try again. 70 When the DELL logo appears, press several times to wait until you received your computer-including data files-are permanently deleted from the hard drive. Restoring Your Operating System Dell Factory Image Restore CAUTION: Using Dell Factory Image Restore to restore your... operating system permanently deletes all data before using Dell Factory Image Restore. Any programs or files added...
...try again. 70 When the DELL logo appears, press several times to wait until you received your computer-including data files-are permanently deleted from the hard drive. Restoring Your Operating System Dell Factory Image Restore CAUTION: Using Dell Factory Image Restore to restore your... operating system permanently deletes all data before using Dell Factory Image Restore. Any programs or files added...
Setup Guide
Page 73
... options, log on as a local user. The Confirm Data Deletion screen appears. The System Recovery Options window appears. 4. The Dell Factory Image Restore welcome screen appears. Click Finish to factory condition. 9. Click Next. Restoring Your Operating System 8. Select Repair Your Computer. Click... Dell Factory Image Restore. Select the check box to confirm that you may take five or more minutes to the factory condition, then click Next. Select a keyboard layout and click Next. 5. NOTE: If you do not want to continue to reformat the hard drive and restore...
... options, log on as a local user. The Confirm Data Deletion screen appears. The System Recovery Options window appears. 4. The Dell Factory Image Restore welcome screen appears. Click Finish to factory condition. 9. Click Next. Restoring Your Operating System 8. Select Repair Your Computer. Click... Dell Factory Image Restore. Select the check box to confirm that you may take five or more minutes to the factory condition, then click Next. Select a keyboard layout and click Next. 5. NOTE: If you do not want to continue to reformat the hard drive and restore...

Setup Guide
Page 78
... or credit, as CDs and media cards. or damaged or lost or corrupted data; lost removable media that you back up any data on the hard drive(s) and on any and all items being returned (AC adapter cable, software, guides, and so on page 62). 4. Include a copy of the Diagnostics ...Checklist (see "Dell Diagnostics" on ) if the return is not responsible for any of the box. Getting Help Returning Items for Repair Under Warranty or for Credit Prepare ...
... or credit, as CDs and media cards. or damaged or lost or corrupted data; lost removable media that you back up any data on the hard drive(s) and on any and all items being returned (AC adapter cable, software, guides, and so on page 62). 4. Include a copy of the Diagnostics ...Checklist (see "Dell Diagnostics" on ) if the return is not responsible for any of the box. Getting Help Returning Items for Repair Under Warranty or for Credit Prepare ...

Setup Guide
Page 84
find your computer. INSPIRON Finding More Information and Resources If you need to contact technical support the bottom of your computer "Dell Support Center" on page 61 for your computer "Dell Diagnostics" on page 62 reinstall system software "My Dell Downloads" on page 60 82 ... information about the Microsoft Windows operating system and features support.dell.com upgrade your computer with new or additional components like a new hard drive reinstall or replace a worn or defective part the Service Manual at support.dell.com/manuals NOTE: In some countries, opening and replacing...
find your computer. INSPIRON Finding More Information and Resources If you need to contact technical support the bottom of your computer "Dell Support Center" on page 61 for your computer "Dell Diagnostics" on page 62 reinstall system software "My Dell Downloads" on page 60 82 ... information about the Microsoft Windows operating system and features support.dell.com upgrade your computer with new or additional components like a new hard drive reinstall or replace a worn or defective part the Service Manual at support.dell.com/manuals NOTE: In some countries, opening and replacing...

Setup Guide
Page 92
measured with the hard drive in head-parked position and a 2-ms half-sine pulse): Operating 110 G NonOperating 160 G Altitude (maximum): Operating -15.2 to 3048 m (-50 to 10,000 ft) ...): Operating 10% to 90% (noncondensing) Storage 5% to 35,000 ft) Airborne G2 or lower as defined contaminant level by ISA-S71.04-1985 measured with Dell Diagnostics running on the hard drive and a 2-ms half-sine pulse;
measured with the hard drive in head-parked position and a 2-ms half-sine pulse): Operating 110 G NonOperating 160 G Altitude (maximum): Operating -15.2 to 3048 m (-50 to 10,000 ft) ...): Operating 10% to 90% (noncondensing) Storage 5% to 35,000 ft) Airborne G2 or lower as defined contaminant level by ISA-S71.04-1985 measured with Dell Diagnostics running on the hard drive and a 2-ms half-sine pulse;


