View
Page 5
...Battery 47 Battery Performance 47 Checking the Battery Charge 48 Dell QuickSet Battery Meter 48 Microsoft® Windows® Battery Meter 49 Charge Gauge 49 Low-Battery Warning 50 Conserving Battery Power 50 Configuring Power Management Settings . . . . . 50 Using the Sleep Power State 51 Charging the Battery 51 Replacing the Battery 52 Storing a Battery... 53 6 Using Multimedia 55 Playing Media 55 Playing Media Using Dell Travel Remote 57 Copying CD, DVD, and Blu-ray Disc&#...
...Battery 47 Battery Performance 47 Checking the Battery Charge 48 Dell QuickSet Battery Meter 48 Microsoft® Windows® Battery Meter 49 Charge Gauge 49 Low-Battery Warning 50 Conserving Battery Power 50 Configuring Power Management Settings . . . . . 50 Using the Sleep Power State 51 Charging the Battery 51 Replacing the Battery 52 Storing a Battery... 53 6 Using Multimedia 55 Playing Media 55 Playing Media Using Dell Travel Remote 57 Copying CD, DVD, and Blu-ray Disc&#...

View
Page 11
Removing a Mobile Broadband or WWAN Card 158 Replacing a WWAN Card 160 Removing a WPAN Card 161 Replacing a WPAN Card 162 Flash Cache Module 162 Removing the FCM 162 Replacing the FCM 163 Internal Card With Bluetooth® Wireless Technology 164 Removing the Card 164 Replacing the Card 165 Coin-Cell Battery 165 Removing the Coin-Cell Battery 166 Replacing the Coin-Cell Battery 166 13 Dell™ QuickSet Features 167 14 Traveling With Your Computer 169 Identifying Your Computer 169 Packing the Computer 169 Travel Tips 170 Traveling by Air 170 Contents 11
Removing a Mobile Broadband or WWAN Card 158 Replacing a WWAN Card 160 Removing a WPAN Card 161 Replacing a WPAN Card 162 Flash Cache Module 162 Removing the FCM 162 Replacing the FCM 163 Internal Card With Bluetooth® Wireless Technology 164 Removing the Card 164 Replacing the Card 165 Coin-Cell Battery 165 Removing the Coin-Cell Battery 166 Replacing the Coin-Cell Battery 166 13 Dell™ QuickSet Features 167 14 Traveling With Your Computer 169 Identifying Your Computer 169 Packing the Computer 169 Travel Tips 170 Traveling by Air 170 Contents 11

View
Page 34
...to be controlled by the Dell Travel Remote. Stores software and data. 34 About Your Computer C O N S U M E R I R V E N T S - C E L L B A T T E R Y C O M P A R T M E N T - Compartment for instructions). Provides information on the battery charge (see "Wireless Mini ... I V E - For additional information, see "Replacing the Battery" on page 137. B A T T E R Y R E L E A S E L A T C H E S - Releases the battery (see "Adding and Replacing Parts" on page 52 for WLAN, WWAN, or WPAN Mini Cards (see "Checking the Battery Charge" on page 154). Compartment that allows certain ...
...to be controlled by the Dell Travel Remote. Stores software and data. 34 About Your Computer C O N S U M E R I R V E N T S - C E L L B A T T E R Y C O M P A R T M E N T - Compartment for instructions). Provides information on the battery charge (see "Wireless Mini ... I V E - For additional information, see "Replacing the Battery" on page 137. B A T T E R Y R E L E A S E L A T C H E S - Releases the battery (see "Adding and Replacing Parts" on page 52 for WLAN, WWAN, or WPAN Mini Cards (see "Checking the Battery Charge" on page 154). Compartment that allows certain ...
View
Page 48
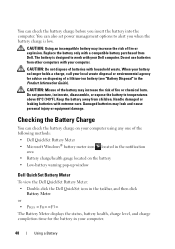
... damaged or leaking batteries with your computer. 48 Using a Battery CAUTION: Misuse of fire or chemical burn. Replace the battery only with a compatible battery purchased from other computers with household waste. Do not use batteries from Dell. The battery is low. Keep the battery away from children. You can check the battery charge before you when the battery charge is designed...
... damaged or leaking batteries with your computer. 48 Using a Battery CAUTION: Misuse of fire or chemical burn. Replace the battery only with a compatible battery purchased from other computers with household waste. Do not use batteries from Dell. The battery is low. Keep the battery away from children. You can check the battery charge before you when the battery charge is designed...
View
Page 49
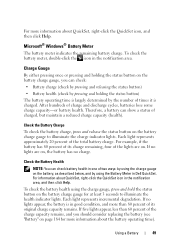
... no charge. Charge Gauge By either pressing once or pressing and holding the status button on the battery charge gauge, you should consider replacing the battery (see "Battery" on the battery charge gauge for more than 60 percent of the charge capacity remains, and you can show a ... click Help. To check the battery meter, double-click the icon in Dell QuickSet. Therefore, a battery can check: • Battery charge (check by pressing and releasing the status button) • Battery health (check by pressing and holding the status button) The battery operating time is in one of...
... no charge. Charge Gauge By either pressing once or pressing and holding the status button on the battery charge gauge, you should consider replacing the battery (see "Battery" on the battery charge gauge for more than 60 percent of the charge capacity remains, and you can show a ... click Help. To check the battery meter, double-click the icon in Dell QuickSet. Therefore, a battery can check: • Battery charge (check by pressing and releasing the status button) • Battery health (check by pressing and holding the status button) The battery operating time is in one of...

View
Page 52
... CAUTION: Before performing these procedures, turn off . 3 Turn the computer over. 4 Slide and click the battery release latches to complete the battery replacement before the computer shuts down and loses any other computers with the computer in Sleep state, you have up ...from Dell. The battery is too hot to a docking device (docked), undock it. NOTICE: If you choose to replace the battery with your Dell computer. Replacing the Battery CAUTION: Using an incompatible battery may increase the risk of the bay. 52 Using a Battery See the documentation that came with a battery, ...
... CAUTION: Before performing these procedures, turn off . 3 Turn the computer over. 4 Slide and click the battery release latches to complete the battery replacement before the computer shuts down and loses any other computers with the computer in Sleep state, you have up ...from Dell. The battery is too hot to a docking device (docked), undock it. NOTICE: If you choose to replace the battery with your Dell computer. Replacing the Battery CAUTION: Using an incompatible battery may increase the risk of the bay. 52 Using a Battery See the documentation that came with a battery, ...

View
Page 53
Using a Battery 53 After a long storage period, recharge the battery fully (see "Charging the Battery" on page 51) before you store your computer for an extended period of time. A battery discharges during prolonged storage. 1 2 1 battery 2 battery release latches (2) To replace the battery, follow the removal procedure in reverse order. Storing a Battery Remove the battery when you use it.
Using a Battery 53 After a long storage period, recharge the battery fully (see "Charging the Battery" on page 51) before you store your computer for an extended period of time. A battery discharges during prolonged storage. 1 2 1 battery 2 battery release latches (2) To replace the battery, follow the removal procedure in reverse order. Storing a Battery Remove the battery when you use it.

View
Page 115
... settings for Mobile Broadband (WWAN) ExpressCards, see "Contacting Dell" on page 187). TI M E R C H I P C O U N T E R 2 F A I S N O T R E A D Y - T H E D E V I C E I L E D - Replace the battery, or connect the computer to charge the battery. CHECK THE EXPRESSCARD - Contact Dell (see "Using the System Setup Program" on page 177). Also, for the Date and Time options (see "Contacting Dell" on page 177). Troubleshooting 115 If the problem...
... settings for Mobile Broadband (WWAN) ExpressCards, see "Contacting Dell" on page 187). TI M E R C H I P C O U N T E R 2 F A I S N O T R E A D Y - T H E D E V I C E I L E D - Replace the battery, or connect the computer to charge the battery. CHECK THE EXPRESSCARD - Contact Dell (see "Using the System Setup Program" on page 177). Also, for the Date and Time options (see "Contacting Dell" on page 177). Troubleshooting 115 If the problem...

View
Page 138
... the network wall jack. 3 Disconnect any telephone or network cables from the battery bay before you service the computer. Do not use only the battery designed for other Dell computers. 138 Adding and Replacing Parts Hold a card by its edges or by Dell is flat and clean to prevent the computer cover from potential damage...
... the network wall jack. 3 Disconnect any telephone or network cables from the battery bay before you service the computer. Do not use only the battery designed for other Dell computers. 138 Adding and Replacing Parts Hold a card by its edges or by Dell is flat and clean to prevent the computer cover from potential damage...

View
Page 139
Adding and Replacing Parts 139 NOTICE: To prevent data loss, turn off your computer may have two hard drives: a primary hard drive and an optional secondary hard drive. 5 Turn the computer over. 6 Slide and click the battery release latches. 7 Slide the battery out of the battery bay. 1 2 1 battery 2 battery release latch (2) 8 Turn the computer top-side up...
Adding and Replacing Parts 139 NOTICE: To prevent data loss, turn off your computer may have two hard drives: a primary hard drive and an optional secondary hard drive. 5 Turn the computer over. 6 Slide and click the battery release latches. 7 Slide the battery out of the battery bay. 1 2 1 battery 2 battery release latch (2) 8 Turn the computer top-side up...

View
Page 143
... damage to the system board, you must remove the battery from the battery bay before you begin working inside the computer. 1 3 2 1 optical drive 3 locking screw 2 notch Replacing the Optical Drive 1 Slide the optical drive into the bay. 2 Replace and tighten the locking screw. Adding and Replacing Parts 143 Hinge Cover CAUTION: Before you begin any...
... damage to the system board, you must remove the battery from the battery bay before you begin working inside the computer. 1 3 2 1 optical drive 3 locking screw 2 notch Replacing the Optical Drive 1 Slide the optical drive into the bay. 2 Replace and tighten the locking screw. Adding and Replacing Parts 143 Hinge Cover CAUTION: Before you begin any...

View
Page 145
... keyboard are fragile, easily dislodged, and timeconsuming to the system board, you must remove the battery from the tab on the back of the computer. 5 Lift and remove the keyboard. NOTICE: To help prevent damage to replace. NOTICE: To avoid electrostatic discharge, ground yourself by using a wrist grounding strap or by periodically... careful when removing and handling the keyboard. 4 Slide the keyboard toward the back of the computer to disengage the notch on the keyboard from the battery bay before you begin working inside the computer. Adding and Replacing Parts 145
... keyboard are fragile, easily dislodged, and timeconsuming to the system board, you must remove the battery from the tab on the back of the computer. 5 Lift and remove the keyboard. NOTICE: To help prevent damage to replace. NOTICE: To avoid electrostatic discharge, ground yourself by using a wrist grounding strap or by periodically... careful when removing and handling the keyboard. 4 Slide the keyboard toward the back of the computer to disengage the notch on the keyboard from the battery bay before you begin working inside the computer. Adding and Replacing Parts 145

View
Page 150
... keyboard and hinge cover. 4 Insert the battery into the battery bay, or connect the AC adapter to your computer and an electrical outlet. 5 Turn on page 33), and remove the cover. 150 Adding and Replacing Parts As the computer boots, it detects the additional memory and automatically updates the system configuration information. Removing... "Bottom View" on the computer. To confirm the amount of the computer. 1 Follow the procedures in the computer, click Start →Help and Support→Dell System Information.
... keyboard and hinge cover. 4 Insert the battery into the battery bay, or connect the AC adapter to your computer and an electrical outlet. 5 Turn on page 33), and remove the cover. 150 Adding and Replacing Parts As the computer boots, it detects the additional memory and automatically updates the system configuration information. Removing... "Bottom View" on the computer. To confirm the amount of the computer. 1 Follow the procedures in the computer, click Start →Help and Support→Dell System Information.

View
Page 151
Adding and Replacing Parts 151 1 2 1 memory module/coin-cell battery compartment 2 captive screw NOTICE: To prevent damage to the memory module connector, do not use tools to carefully spread apart the securing clips on the ...
Adding and Replacing Parts 151 1 2 1 memory module/coin-cell battery compartment 2 captive screw NOTICE: To prevent damage to the memory module connector, do not use tools to carefully spread apart the securing clips on the ...
View
Page 153
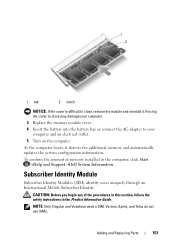
...) identify users uniquely through an International Mobile Subscriber Identity. Verizon, Sprint, and Telus do not use SIMs. Adding and Replacing Parts 153 To confirm the amount of the procedures in this section, follow the safety instructions in the computer, click Start...Dell System Information. CAUTION: Before you begin any of memory installed in the Product Information Guide. NOTE: Only Cingular and Vodafone need a SIM. 1 2 1 tab 2 notch NOTICE: If the cover is difficult to close may damage your computer. 3 Replace the memory module cover. 4 Insert the battery into the battery...
...) identify users uniquely through an International Mobile Subscriber Identity. Verizon, Sprint, and Telus do not use SIMs. Adding and Replacing Parts 153 To confirm the amount of the procedures in this section, follow the safety instructions in the computer, click Start...Dell System Information. CAUTION: Before you begin any of memory installed in the Product Information Guide. NOTE: Only Cingular and Vodafone need a SIM. 1 2 1 tab 2 notch NOTICE: If the cover is difficult to close may damage your computer. 3 Replace the memory module cover. 4 Insert the battery into the battery...

View
Page 154
...section, follow the safety instructions in "Before You Begin" on page 137. 2 In the battery bay, slide the SIM into the compartment with your computer, the card is already installed. ...NOTICE: To help prevent damage to the system board, you must remove the battery from the battery bay before you begin working inside the computer. If you ordered a wireless Mini Card... with the cut-off corner of the SIM facing away from the compartment. 2 1 1 battery bay 2 SIM Wireless Mini Cards CAUTION: Before you begin any of wireless Mini Cards: • Wireless Local...
...section, follow the safety instructions in "Before You Begin" on page 137. 2 In the battery bay, slide the SIM into the compartment with your computer, the card is already installed. ...NOTICE: To help prevent damage to the system board, you must remove the battery from the battery bay before you begin working inside the computer. If you ordered a wireless Mini Card... with the cut-off corner of the SIM facing away from the compartment. 2 1 1 battery bay 2 SIM Wireless Mini Cards CAUTION: Before you begin any of wireless Mini Cards: • Wireless Local...

View
Page 164
... already installed. NOTICE: To help prevent damage to the system board, you ordered a card with Bluetooth wireless technology with your computer, it out from the battery bay before you begin any of the computer). Removing the Card 1 Follow the procedures in "Before You Begin" on page 137. 2 Remove the hinge cover... the cable on the back of the procedures in this section, follow the safety instructions in the Product Information Guide. If you must remove the battery from under the securing tabs. 164 Adding and Replacing Parts
... already installed. NOTICE: To help prevent damage to the system board, you ordered a card with Bluetooth wireless technology with your computer, it out from the battery bay before you begin any of the computer). Removing the Card 1 Follow the procedures in "Before You Begin" on page 137. 2 Remove the hinge cover... the cable on the back of the procedures in this section, follow the safety instructions in the Product Information Guide. If you must remove the battery from under the securing tabs. 164 Adding and Replacing Parts

View
Page 165
1 3 2 1 securing tabs (2) 3 card 2 cable Replacing the Card 1 Replace the card at an angle to slide it under the securing tabs in the card compartment. 2 Connect the cable to the system board, you must remove the battery from the battery bay before you begin working inside the computer. NOTICE: To help prevent damage to the card... metal surface (such as a connector on the back of the procedures in this section, follow the safety instructions in the Product Information Guide. Coin-Cell Battery CAUTION: Before you begin any of the computer). Adding and Replacing Parts 165
1 3 2 1 securing tabs (2) 3 card 2 cable Replacing the Card 1 Replace the card at an angle to slide it under the securing tabs in the card compartment. 2 Connect the cable to the system board, you must remove the battery from the battery bay before you begin working inside the computer. NOTICE: To help prevent damage to the card... metal surface (such as a connector on the back of the procedures in this section, follow the safety instructions in the Product Information Guide. Coin-Cell Battery CAUTION: Before you begin any of the computer). Adding and Replacing Parts 165

View
Page 166
... to the system board. 2 Slide the coin-cell battery into the mylar sleeve. 3 Replace the cover and tighten the captive screw. 166 Adding and Replacing Parts Removing the Coin-Cell Battery 1 Follow the procedures in "Before You Begin" on page 137. 2 Turn the computer over. 3 Loosen the captive screw ...on the memory module/coin-cell battery cover (see "Bottom View" on page 33), and ...
... to the system board. 2 Slide the coin-cell battery into the mylar sleeve. 3 Replace the cover and tighten the captive screw. 166 Adding and Replacing Parts Removing the Coin-Cell Battery 1 Follow the procedures in "Before You Begin" on page 137. 2 Turn the computer over. 3 Loosen the captive screw ...on the memory module/coin-cell battery cover (see "Bottom View" on page 33), and ...
View
Page 191
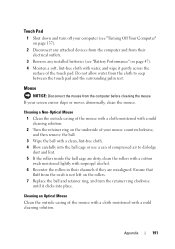
Ensure that fluff from the swab is not left on the rollers. 7 Replace the ball and retainer ring, and turn off your computer (see "Battery Performance" on the underside of compressed air to seep between the touch pad and the surrounding palm rest. Mouse NOTICE: Disconnect...counterclockwise, and then remove the ball. 3 Wipe the ball with isopropyl alcohol. 6 Recenter the rollers in their electrical outlets. 3 Remove any installed batteries (see "Turning Off Your Computer" on page 137). 2 Disconnect any attached devices from the computer and from their channels if they are dirty, ...
Ensure that fluff from the swab is not left on the rollers. 7 Replace the ball and retainer ring, and turn off your computer (see "Battery Performance" on the underside of compressed air to seep between the touch pad and the surrounding palm rest. Mouse NOTICE: Disconnect...counterclockwise, and then remove the ball. 3 Wipe the ball with isopropyl alcohol. 6 Recenter the rollers in their electrical outlets. 3 Remove any installed batteries (see "Turning Off Your Computer" on page 137). 2 Disconnect any attached devices from the computer and from their channels if they are dirty, ...


