Specifications
Page 5
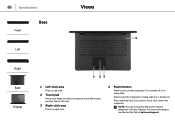
For more information, see Me and My Dell at dell.com/support. Tap to left click. 2 Touch pad Move your finger on . Press and hold for 10 seconds to force shut‑down the computer. ... pad to move the mouse pointer. NOTE: You can customize the power‑button behaviour in sleep state. Specifications Views Base Front 4 Left Right Base Display 1 23 1 Left-click area Press to left click. 3 Right-click area Press to right click. 4 Power button Press to turn on the computer if it is turned off...
For more information, see Me and My Dell at dell.com/support. Tap to left click. 2 Touch pad Move your finger on . Press and hold for 10 seconds to force shut‑down the computer. ... pad to move the mouse pointer. NOTE: You can customize the power‑button behaviour in sleep state. Specifications Views Base Front 4 Left Right Base Display 1 23 1 Left-click area Press to left click. 3 Right-click area Press to right click. 4 Power button Press to turn on the computer if it is turned off...
Service Manual
Page 7
Removing the power-adapter port 70 Prerequisites...70 Procedure...70 Replacing the power-adapter port 72 Procedure...72 Post-requisites 72 Removing the display assembly 73 Prerequisites...73 Procedure...73 Replacing the display assembly 76 Procedure...76 Post-requisites 76 Removing the power-button board 78 Prerequisites...78 Procedure...78 Replacing the power-button board 80 Procedure...80 Post-requisites 80 Removing the palm-rest assembly 82 Prerequisites...82 Procedure...82 Replacing the palm-rest assembly 84 Procedure...84 Post-requisites 84 7
Removing the power-adapter port 70 Prerequisites...70 Procedure...70 Replacing the power-adapter port 72 Procedure...72 Post-requisites 72 Removing the display assembly 73 Prerequisites...73 Procedure...73 Replacing the display assembly 76 Procedure...76 Post-requisites 76 Removing the power-button board 78 Prerequisites...78 Procedure...78 Replacing the power-button board 80 Procedure...80 Post-requisites 80 Removing the palm-rest assembly 82 Prerequisites...82 Procedure...82 Replacing the palm-rest assembly 84 Procedure...84 Post-requisites 84 7
Service Manual
Page 14
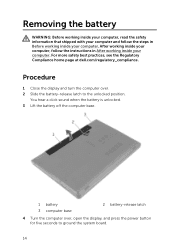
... computer, follow the steps in After working inside your computer. Procedure 1 Close the display and turn the computer over , open the display, and press the power button for five seconds to the unlocked position. Removing the battery WARNING: Before working inside your computer, read the safety information that shipped with your computer...
... computer, follow the steps in After working inside your computer. Procedure 1 Close the display and turn the computer over , open the display, and press the power button for five seconds to the unlocked position. Removing the battery WARNING: Before working inside your computer, read the safety information that shipped with your computer...
Service Manual
Page 61
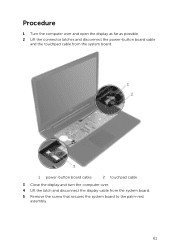
Procedure 1 Turn the computer over and open the display as far as possible. 2 Lift the connector latches and disconnect the power-button board cable and the touchpad cable from the system board. 1 power-button board cable 2 touchpad cable 3 Close the display and turn the computer over. 4 Lift the latch and disconnect the display cable from the system board. 5 Remove the screw that secures the system board to the palm-rest assembly. 61
Procedure 1 Turn the computer over and open the display as far as possible. 2 Lift the connector latches and disconnect the power-button board cable and the touchpad cable from the system board. 1 power-button board cable 2 touchpad cable 3 Close the display and turn the computer over. 4 Lift the latch and disconnect the display cable from the system board. 5 Remove the screw that secures the system board to the palm-rest assembly. 61
Service Manual
Page 65
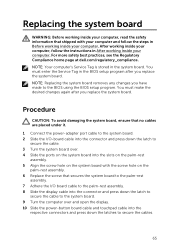
For more safety best practices, see the Regulatory Compliance home page at dell.com/regulatory_compliance. NOTE: Your computer's Service Tag is stored in After ...have made to secure the cable. 3 Turn the system board over and open the display. 10 Slide the power-button board cable and touchpad cable into the slots on the palm-rest assembly. 5 Align the screw hole on...board. Procedure CAUTION: To avoid damaging the system board, ensure that no cables are placed under it. 1 Connect the power-adapter port cable to the system board. 2 Slide the I /O board cable to the palm-rest assembly. 8 ...
For more safety best practices, see the Regulatory Compliance home page at dell.com/regulatory_compliance. NOTE: Your computer's Service Tag is stored in After ...have made to secure the cable. 3 Turn the system board over and open the display. 10 Slide the power-button board cable and touchpad cable into the slots on the palm-rest assembly. 5 Align the screw hole on...board. Procedure CAUTION: To avoid damaging the system board, ensure that no cables are placed under it. 1 Connect the power-adapter port cable to the system board. 2 Slide the I /O board cable to the palm-rest assembly. 8 ...
Service Manual
Page 78
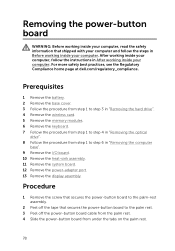
...power-button board to the palm-rest assembly. 2 Peel off the power-button board cable from the palm rest. 4 Slide the power-button board from step 1 to step 4 in After working inside your computer. Removing the power-button board WARNING: Before working inside your computer, read the safety information that secures the power-button...the steps in Before working inside your computer. For more safety best practices, see the Regulatory Compliance home page at dell.com/regulatory_compliance. Prerequisites 1 Remove the battery. 2 Remove the base cover. 3 Follow the procedure from step 1 to...
...power-button board to the palm-rest assembly. 2 Peel off the power-button board cable from the palm rest. 4 Slide the power-button board from step 1 to step 4 in After working inside your computer. Removing the power-button board WARNING: Before working inside your computer, read the safety information that secures the power-button...the steps in Before working inside your computer. For more safety best practices, see the Regulatory Compliance home page at dell.com/regulatory_compliance. Prerequisites 1 Remove the battery. 2 Remove the base cover. 3 Follow the procedure from step 1 to...
Service Manual
Page 79
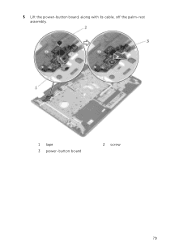
5 Lift the power-button board, along with its cable, off the palm-rest assembly. 1 tape 3 power-button board 2 screw 79
5 Lift the power-button board, along with its cable, off the palm-rest assembly. 1 tape 3 power-button board 2 screw 79
Service Manual
Page 80
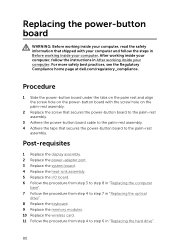
...the palm-rest assembly. 4 Adhere the tape that secures the power-button board to step 6 in Before working inside your computer. For more safety best practices, see the Regulatory Compliance home page at dell.com/regulatory_compliance. After working inside your computer, follow the steps ...in "Replacing the hard drive". 80 Replacing the power-button board WARNING: Before working inside your computer, read the safety information...
...the palm-rest assembly. 4 Adhere the tape that secures the power-button board to step 6 in Before working inside your computer. For more safety best practices, see the Regulatory Compliance home page at dell.com/regulatory_compliance. After working inside your computer, follow the steps ...in "Replacing the hard drive". 80 Replacing the power-button board WARNING: Before working inside your computer, read the safety information...
Service Manual
Page 82
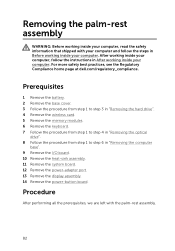
... dell.com/regulatory_compliance. Procedure After performing all the prerequisites, we are left with your computer and follow the instructions in "Removing the computer base". 9 Remove the I/O board. 10 Remove the heat-sink assembly. 11 Remove the system board. 12 Remove the power-adapter port. 13 Remove the display assembly. 14 Remove the power-button...
... dell.com/regulatory_compliance. Procedure After performing all the prerequisites, we are left with your computer and follow the instructions in "Removing the computer base". 9 Remove the I/O board. 10 Remove the heat-sink assembly. 11 Remove the system board. 12 Remove the power-adapter port. 13 Remove the display assembly. 14 Remove the power-button...
Service Manual
Page 84
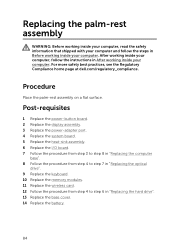
Post-requisites 1 Replace the power-button board. 2 Replace the display assembly. 3 Replace the power-adapter port. 4 Replace the system board. 5 Replace the heat-sink assembly. 6 Replace the I/O board. 7 Follow the procedure from step 3 to step 8 in "Replacing the computer ... working inside your computer, follow the steps in Before working inside your computer. For more safety best practices, see the Regulatory Compliance home page at dell.com/regulatory_compliance.
Post-requisites 1 Replace the power-button board. 2 Replace the display assembly. 3 Replace the power-adapter port. 4 Replace the system board. 5 Replace the heat-sink assembly. 6 Replace the I/O board. 7 Follow the procedure from step 3 to step 8 in "Replacing the computer ... working inside your computer, follow the steps in Before working inside your computer. For more safety best practices, see the Regulatory Compliance home page at dell.com/regulatory_compliance.


