
Owners Manual
Page 3
... of Inspiron 16 Plus 7640 7 Right...7 Left...7 Top...8 Front...9 Bottom...10 Service Tag...10 Battery charge and status light ...11 Chapter 2: Set up your Inspiron 16 Plus 7640 12 Chapter 3: Specifications of Inspiron 16 Plus 7640 14 Dimensions and weight...14 Processor...14 Chipset...15 Operating system...15 Memory...15 External ports...16 Internal slots...16 Wireless module...17 Audio...17 Storage...18 Media-card reader...18 Keyboard...18 Keyboard shortcuts of Inspiron 16 Plus 7640...19 Camera...20 Touchpad...20 Power adapter...21 Battery...21 Display...22 Fingerprint reader (optional...
... of Inspiron 16 Plus 7640 7 Right...7 Left...7 Top...8 Front...9 Bottom...10 Service Tag...10 Battery charge and status light ...11 Chapter 2: Set up your Inspiron 16 Plus 7640 12 Chapter 3: Specifications of Inspiron 16 Plus 7640 14 Dimensions and weight...14 Processor...14 Chipset...15 Operating system...15 Memory...15 External ports...16 Internal slots...16 Wireless module...17 Audio...17 Storage...18 Media-card reader...18 Keyboard...18 Keyboard shortcuts of Inspiron 16 Plus 7640...19 Camera...20 Touchpad...20 Power adapter...21 Battery...21 Display...22 Fingerprint reader (optional...
Owners Manual
Page 5
... keyboard assembly 83 Chapter 7: Software...85 Operating system...85 Drivers and downloads...85 Chapter 8: BIOS Setup...86 Entering BIOS setup program...86 Navigation keys...86 F12 One Time Boot menu...86 System setup options...87 Updating the BIOS...96 Updating the BIOS in Windows...96 Updating the BIOS using the USB drive in Windows 96 Updating the BIOS from the F12 One Time Boot menu 97 System and setup password...97 Assigning a System Setup password...98 Deleting or changing an existing system setup password 98 Clearing CMOS settings...99 Clearing BIOS (System Setup...
... keyboard assembly 83 Chapter 7: Software...85 Operating system...85 Drivers and downloads...85 Chapter 8: BIOS Setup...86 Entering BIOS setup program...86 Navigation keys...86 F12 One Time Boot menu...86 System setup options...87 Updating the BIOS...96 Updating the BIOS in Windows...96 Updating the BIOS using the USB drive in Windows 96 Updating the BIOS from the F12 One Time Boot menu 97 System and setup password...97 Assigning a System Setup password...98 Deleting or changing an existing system setup password 98 Clearing CMOS settings...99 Clearing BIOS (System Setup...
Owners Manual
Page 7
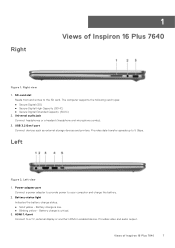
... 16 Plus 7640 Figure 1. Power-adapter port Connect a power adapter to provide power to a TV, external display or another HDMI-in enabled device. Battery charge is low. ● Blinking yellow - Provides data transfer speeds up to the SD card. Provides video and audio output. Universal audio jack Connect headphones or a headset (headphone and microphone combo). 3. Battery-status light Indicates the battery-charge status. ● Solid yellow - SD-card slot Reads from and writes to 5 Gbps. Battery charge is critical. 3. The computer supports the following card types...
... 16 Plus 7640 Figure 1. Power-adapter port Connect a power adapter to provide power to a TV, external display or another HDMI-in enabled device. Battery charge is low. ● Blinking yellow - Provides data transfer speeds up to the SD card. Provides video and audio output. Universal audio jack Connect headphones or a headset (headphone and microphone combo). 3. Battery-status light Indicates the battery-charge status. ● Solid yellow - SD-card slot Reads from and writes to 5 Gbps. Battery charge is critical. 3. The computer supports the following card types...
Owners Manual
Page 8
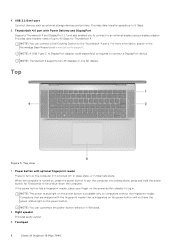
... can connect a Dell Docking Station to an external display using a display adapter. NOTE: A USB Type-C to put the computer into a sleep state; USB 3.2 Gen 1 port Connect devices such as external storage devices and printers. If the power button has a fingerprint reader, place your finger on , press the power button to DisplayPort adapter (sold separately) is integrated on the power button will not have the power-status light on the power button is turned off, in sleep state, or in Windows. 2. 4. Thunderbolt 4.0 port...
... can connect a Dell Docking Station to an external display using a display adapter. NOTE: A USB Type-C to put the computer into a sleep state; USB 3.2 Gen 1 port Connect devices such as external storage devices and printers. If the power button has a fingerprint reader, place your finger on , press the power button to DisplayPort adapter (sold separately) is integrated on the power button will not have the power-status light on the power button is turned off, in sleep state, or in Windows. 2. 4. Thunderbolt 4.0 port...
Owners Manual
Page 9
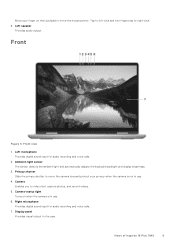
... the camera is not in use . 4. Views of Inspiron 16 Plus 7640 9 Ambient-light sensor The sensor detects the ambient light and automatically adjusts the keyboard backlight and display brightness. 3. Right microphone Provides digital sound input for audio recording and voice calls. 2. Left speaker Provides audio output. Left microphone Provides digital sound input for audio recording and voice calls. 7. Camera Enables you to move the mouse pointer. Camera-status light Turns on the touchpad to video chat...
... the camera is not in use . 4. Views of Inspiron 16 Plus 7640 9 Ambient-light sensor The sensor detects the ambient light and automatically adjusts the keyboard backlight and display brightness. 3. Right microphone Provides digital sound input for audio recording and voice calls. 2. Left speaker Provides audio output. Left microphone Provides digital sound input for audio recording and voice calls. 7. Camera Enables you to move the mouse pointer. Camera-status light Turns on the touchpad to video chat...
Owners Manual
Page 12
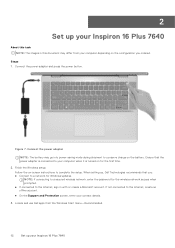
... on-screen instructions to the Internet, create an offline account. ● On the Support and Protection screen, enter your contact details. 3. Connect the power adapter and press the power button. Connect the power adapter NOTE: The battery may differ from the Windows Start menu-Recommended. 12 Set up your Inspiron 16 Plus 7640 If not connected to complete the setup. Steps 1. Figure 7. Locate and use Dell apps from your computer depending on the configuration you : ● Connect to a network for Windows updates. When setting up, Dell...
... on-screen instructions to the Internet, create an offline account. ● On the Support and Protection screen, enter your contact details. 3. Connect the power adapter and press the power button. Connect the power adapter NOTE: The battery may differ from the Windows Start menu-Recommended. 12 Set up your Inspiron 16 Plus 7640 If not connected to complete the setup. Steps 1. Figure 7. Locate and use Dell apps from your computer depending on the configuration you : ● Connect to a network for Windows updates. When setting up, Dell...
Owners Manual
Page 13
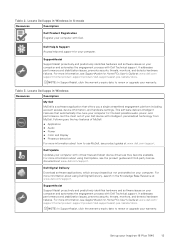
... PCs User's Guide at www.dell.com/ support/home/product-support/product/dell-supportassist-pcs-tablets/docs. Dell Help & Support Access help and support for Home PCs User's Guide at www.dell.com/support. SupportAssist SupportAssist proactively and predictively identifies hardware and software issues on your computer. Table 2. NOTE: In SupportAssist, click the warranty expiry date to renew or upgrade your Inspiron 16 Plus 7640 13 Set up your warranty. Locate Dell apps in Windows...
... PCs User's Guide at www.dell.com/ support/home/product-support/product/dell-supportassist-pcs-tablets/docs. Dell Help & Support Access help and support for Home PCs User's Guide at www.dell.com/support. SupportAssist SupportAssist proactively and predictively identifies hardware and software issues on your computer. Table 2. NOTE: In SupportAssist, click the warranty expiry date to renew or upgrade your Inspiron 16 Plus 7640 13 Set up your warranty. Locate Dell apps in Windows...
Owners Manual
Page 16
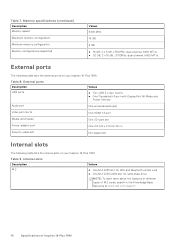
... different types of M.2 cards, search in Security-cable slot Not supported Internal slots The following table lists the external ports on your Inspiron 16 Plus 7640. Table 8. External ports Description USB ports Values ● Two USB 3.2 Gen 1 ports ● One Thunderbolt 4 port with DisplayPort Alt Mode and Power Delivery Audio port One universal audio jack Video port/ports One HDMI 1.4 port Media-card reader One SD-card slot Power-adapter port One 4.5 mm x 2.9 mm DC-in the Knowledge Base Resource at www.dell.com/support. 16 Specifications of your Inspiron 16 Plus 7640...
... different types of M.2 cards, search in Security-cable slot Not supported Internal slots The following table lists the external ports on your Inspiron 16 Plus 7640. Table 8. External ports Description USB ports Values ● Two USB 3.2 Gen 1 ports ● One Thunderbolt 4 port with DisplayPort Alt Mode and Power Delivery Audio port One universal audio jack Video port/ports One HDMI 1.4 port Media-card reader One SD-card slot Power-adapter port One 4.5 mm x 2.9 mm DC-in the Knowledge Base Resource at www.dell.com/support. 16 Specifications of your Inspiron 16 Plus 7640...
Owners Manual
Page 17
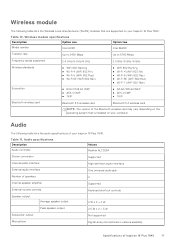
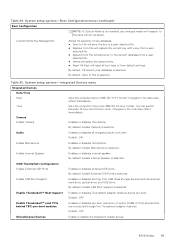
...Audio controller Values Realtek ALC3254 Stereo conversion Supported Internal audio interface High definition audio interface External audio interface One universal audio jack Number of speakers 2 Internal-speaker amplifier Supported External volume controls Keyboard shortcut controls Speaker output: Average speaker output 2 W x 2 = 4 W Peak speaker output 2.5 W x 2 = 5 W Subwoofer output Not supported Microphone Digital-array microphones in camera assembly Specifications of Inspiron 16 Plus 7640 17 Wireless module specifications Description Option one Model number...
...Audio controller Values Realtek ALC3254 Stereo conversion Supported Internal audio interface High definition audio interface External audio interface One universal audio jack Number of speakers 2 Internal-speaker amplifier Supported External volume controls Keyboard shortcut controls Speaker output: Average speaker output 2 W x 2 = 4 W Peak speaker output 2.5 W x 2 = 5 W Subwoofer output Not supported Microphone Digital-array microphones in camera assembly Specifications of Inspiron 16 Plus 7640 17 Wireless module specifications Description Option one Model number...
Owners Manual
Page 19
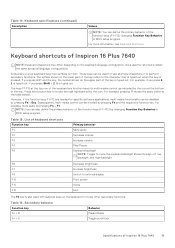
... indicated by the icon at the bottom of the function keys (F1-F12) by pressing Fn + Esc. NOTE: You can be disabled by changing Function Key Behavior in BIOS setup program. Press the function key to the character that is typed out when the key is also used with selected keys on the keyboard language configuration. Table 15. Secondary behavior Function key Fn + B Fn + S Behavior Pause/Break Toggle scroll lock Specifications of Inspiron 16 Plus 7640...
... indicated by the icon at the bottom of the function keys (F1-F12) by pressing Fn + Esc. NOTE: You can be disabled by changing Function Key Behavior in BIOS setup program. Press the function key to the character that is typed out when the key is also used with selected keys on the keyboard language configuration. Table 15. Secondary behavior Function key Fn + B Fn + S Behavior Pause/Break Toggle scroll lock Specifications of Inspiron 16 Plus 7640...
Owners Manual
Page 22
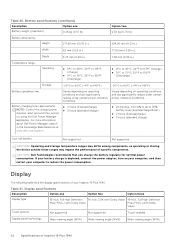
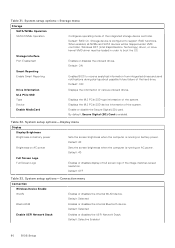
.... Battery specifications (continued) Description Option one Option two Option three Display type 16-inch, Full High Definition 16-inch, 2.5K with Dolby Vision 16-inch, Full High Definition Plus (FHD+) with Dolby Vision Plus (FHD+) with Dolby Vision Touch options Not supported Not supported Touch-enabled Display-panel technology Wide-viewing angle (WVA) Wide-viewing angle (WVA) Wide-viewing angle (WVA) 22 Specifications of Inspiron 16 Plus 7640 Display The following table lists the display specifications of specific components. Display specifications Description Option...
.... Battery specifications (continued) Description Option one Option two Option three Display type 16-inch, Full High Definition 16-inch, 2.5K with Dolby Vision 16-inch, Full High Definition Plus (FHD+) with Dolby Vision Plus (FHD+) with Dolby Vision Touch options Not supported Not supported Touch-enabled Display-panel technology Wide-viewing angle (WVA) Wide-viewing angle (WVA) Wide-viewing angle (WVA) 22 Specifications of Inspiron 16 Plus 7640 Display The following table lists the display specifications of specific components. Display specifications Description Option...
Owners Manual
Page 26
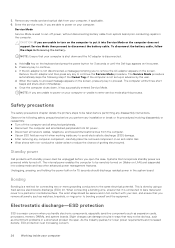
... and in Removing the battery. 5. b. Remove the AC adapter and then press any media card and optical disk from the computer. ● Use an ESD field service kit when working inside your computer or unable to remove the AC adapter appears on -LAN) and suspended into Service Mode or the computer does not support Service Mode then proceed to avoid electrostatic discharge (ESD) damage. ● After removing any disassembly instructions. The...
... and in Removing the battery. 5. b. Remove the AC adapter and then press any media card and optical disk from the computer. ● Use an ESD field service kit when working inside your computer or unable to remove the AC adapter appears on -LAN) and suspended into Service Mode or the computer does not support Service Mode then proceed to avoid electrostatic discharge (ESD) damage. ● After removing any disassembly instructions. The...
Owners Manual
Page 28
... . Replace any media cards, discs, or any external devices, peripherals, or cables you should be returned to Dell, it will automatically return to the power-adapter port on each reboot. Metal, static-shielded bags are preferred. ESD protection summary It is not known, this document may severely damage your hand, on your computer NOTE: To exit service mode, ensure to connect the AC adapter to normal functioning mode...
... . Replace any media cards, discs, or any external devices, peripherals, or cables you should be returned to Dell, it will automatically return to the power-adapter port on each reboot. Metal, static-shielded bags are preferred. ESD protection summary It is not known, this document may severely damage your hand, on your computer NOTE: To exit service mode, ensure to connect the AC adapter to normal functioning mode...
Owners Manual
Page 46
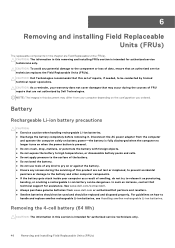
... an instance, contact Dell technical support for assistance. See www.dell.com/contactdell. ● Always purchase genuine batteries from your warranty does not cover damages that may differ from www.dell.com or authorized Dell partners and resellers. ● Swollen batteries should not be used and should be conducted by Dell Technologies. For guidelines on the configuration you ordered. CAUTION: The information...
... an instance, contact Dell technical support for assistance. See www.dell.com/contactdell. ● Always purchase genuine batteries from your warranty does not cover damages that may differ from www.dell.com or authorized Dell partners and resellers. ● Swollen batteries should not be used and should be conducted by Dell Technologies. For guidelines on the configuration you ordered. CAUTION: The information...
Owners Manual
Page 89
...; Replace from a user- Table 29. By default, Enable External USB Ports is selected. Enables or disables the camera. Enable Thunderbolt™ Boot Support Enables or disables Thunderbolt adapter features during pre-boot. Custom Mode Key Management Allows for selection of PCle devices that are connected through the Thunderbolt adapter features. By default, PK security key database is not enabled, any changes made with a key from USB mass storage devices such as external hard drive, optical drive, and USB drive. Default: ON Enable Microphone Enables or disables microphone...
...; Replace from a user- Table 29. By default, Enable External USB Ports is selected. Enables or disables the camera. Enable Thunderbolt™ Boot Support Enables or disables Thunderbolt adapter features during pre-boot. Custom Mode Key Management Allows for selection of PCle devices that are connected through the Thunderbolt adapter features. By default, PK security key database is not enabled, any changes made with a key from USB mass storage devices such as external hard drive, optical drive, and USB drive. Default: ON Enable Microphone Enables or disables microphone...
Owners Manual
Page 90
...® Enables or disables the internal Bluetooth device. Default: RAID On. When enabled, all NVMe and SATA devices will be loaded in order to boot the OS. Default: OFF Drive Information M.2 PCIe SSD Type Device Enable MediaCard Displays the information of the system. System setup options-Connection menu Connection Wireless Device Enable WLAN Enables or disables the internal WLAN device. Default: Selected Enable UEFI Network Stack Enables or disables the UEFI Network Stack. Default: Selective Enabled 90 BIOS Setup Windows RST (Intel Rapid Restore Technology) driver, or...
...® Enables or disables the internal Bluetooth device. Default: RAID On. When enabled, all NVMe and SATA devices will be loaded in order to boot the OS. Default: OFF Drive Information M.2 PCIe SSD Type Device Enable MediaCard Displays the information of the system. System setup options-Connection menu Connection Wireless Device Enable WLAN Enables or disables the internal WLAN device. Default: Selected Enable UEFI Network Stack Enables or disables the UEFI Network Stack. Default: Selective Enabled 90 BIOS Setup Windows RST (Intel Rapid Restore Technology) driver, or...
Owners Manual
Page 93
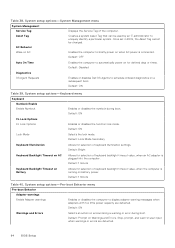
... control how the users can access the BIOS Setup. Default: ON Admin Setup Lockout Enable Admin Setup Lockout Enables administrators to earlier revisions. System setup options-Update,Recovery menu Update,Recovery UEFI Capsule Firmware Updates Enable UEFI Capsule Firmware Updates Enables or disables BIOS updates through BIOS recovery file on the primary hard drive or an external USB key. Default: 2. Default: OFF Master Password Lockout Enable Master Password Lockout Enables or disables master password support. Default: ON BIOS Recovery from the OFF state. Default: ON Dell...
... control how the users can access the BIOS Setup. Default: ON Admin Setup Lockout Enable Admin Setup Lockout Enables administrators to earlier revisions. System setup options-Update,Recovery menu Update,Recovery UEFI Capsule Firmware Updates Enable UEFI Capsule Firmware Updates Enables or disables BIOS updates through BIOS recovery file on the primary hard drive or an external USB key. Default: 2. Default: OFF Master Password Lockout Enable Master Password Lockout Enables or disables master password support. Default: ON BIOS Recovery from the OFF state. Default: ON Dell...
Owners Manual
Page 94
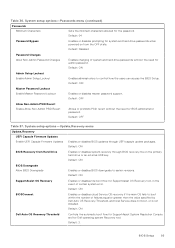
... Lock Mode Selects the lock mode. Default: Bright Keyboard Backlight Timeout on battery power. System setup options-Pre-boot Behavior menu Pre-boot Behavior Adapter warnings Enable Adapter warnings Enables or disables the computer to automatically power on AC Displays the Service Tag of keyboard backlight timeout value, when the computer is connected. System setup options-System Management menu System Management Service Tag Asset Tag AC Behavior Wake on for selection of keyboard illumination settings. Default: OFF Auto On Time Enables the computer to display adapter...
... Lock Mode Selects the lock mode. Default: Bright Keyboard Backlight Timeout on battery power. System setup options-Pre-boot Behavior menu Pre-boot Behavior Adapter warnings Enable Adapter warnings Enables or disables the computer to automatically power on AC Displays the Service Tag of keyboard backlight timeout value, when the computer is connected. System setup options-System Management menu System Management Service Tag Asset Tag AC Behavior Wake on for selection of keyboard illumination settings. Default: OFF Auto On Time Enables the computer to display adapter...
Owners Manual
Page 97
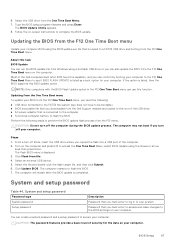
... Enter. The computer restarts to access the One Time Boot Menu, select BIOS Update using a bootable USB drive or you downloaded from the F12 One Time Boot menu on the computer and press F12 to flash the BIOS. 7. The computer may not boot if you copied the flash into a USB port of security for your system. Turn on the computer. System and setup password Password type System password Setup password Description Password that you can create a system password and a setup password...
... Enter. The computer restarts to access the One Time Boot Menu, select BIOS Update using a bootable USB drive or you downloaded from the F12 One Time Boot menu on the computer and press F12 to flash the BIOS. 7. The computer may not boot if you copied the flash into a USB port of security for your system. Turn on the computer. System and setup password Password type System password Setup password Description Password that you can create a system password and a setup password...
Owners Manual
Page 103
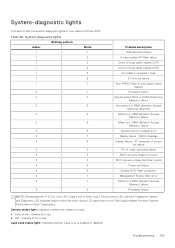
...-Camera is enabled or disabled. SBIOS message Display failure - Management Engine (ME) error Memory or RAM (Random-Access Memory) failure Processor failure NOTE: Blinking pattern 3-3-3 on Lock LED (Caps-Lock or Num-Lock), Power button LED (without Fingerprint reader), and Diagnostic LED indicates failure to program i-Fuse EC internal failure Non-RPMC Flash on the "Dell SupportAssist Pre-boot System Performance Check" diagnostics. Troubleshooting 103 System-diagnostic lights This section lists the system-diagnostic lights of video card/chip failure BIOS recovery image...
...-Camera is enabled or disabled. SBIOS message Display failure - Management Engine (ME) error Memory or RAM (Random-Access Memory) failure Processor failure NOTE: Blinking pattern 3-3-3 on Lock LED (Caps-Lock or Num-Lock), Power button LED (without Fingerprint reader), and Diagnostic LED indicates failure to program i-Fuse EC internal failure Non-RPMC Flash on the "Dell SupportAssist Pre-boot System Performance Check" diagnostics. Troubleshooting 103 System-diagnostic lights This section lists the system-diagnostic lights of video card/chip failure BIOS recovery image...


