Service Manual
Page 3
... field service kit ...8 Transporting sensitive components...9 After working inside your computer...9 BitLocker...9 Chapter 2: Removing and installing components 10 Recommended tools...10 Screw list...10 Major components of Inspiron 16 5630...11 Base cover...13 Removing the base cover...13 Installing the base cover...15 Battery...17 Lithium-ion battery precautions...17 Removing the battery...17 Installing the battery...18 Fan...19 Removing the fan...19 Installing the fan...20 Wireless card...21 Removing the wireless card...21 Installing the wireless card...22...
... field service kit ...8 Transporting sensitive components...9 After working inside your computer...9 BitLocker...9 Chapter 2: Removing and installing components 10 Recommended tools...10 Screw list...10 Major components of Inspiron 16 5630...11 Base cover...13 Removing the base cover...13 Installing the base cover...15 Battery...17 Lithium-ion battery precautions...17 Removing the battery...17 Installing the battery...18 Fan...19 Removing the fan...19 Installing the fan...20 Wireless card...21 Removing the wireless card...21 Installing the wireless card...22...
Service Manual
Page 4
... Updating the BIOS using the USB drive in Windows 66 Updating the BIOS from the F12 One-Time boot menu 66 System and setup password...67 Assigning a system setup password...67 Deleting or changing an existing system setup password 68 Clearing CMOS settings...68 Clearing BIOS (System Setup) and System passwords 69 Chapter 5: Troubleshooting...70 Handling swollen Lithium-ion batteries...70 Locate the Service Tag or Express Service Code of your Dell computer 70 System-diagnostic lights...71 SupportAssist diagnostics...72 Recovering the operating...
... Updating the BIOS using the USB drive in Windows 66 Updating the BIOS from the F12 One-Time boot menu 66 System and setup password...67 Assigning a system setup password...67 Deleting or changing an existing system setup password 68 Clearing CMOS settings...68 Clearing BIOS (System Setup) and System passwords 69 Chapter 5: Troubleshooting...70 Handling swollen Lithium-ion batteries...70 Locate the Service Tag or Express Service Code of your Dell computer 70 System-diagnostic lights...71 SupportAssist diagnostics...72 Recovering the operating...
Service Manual
Page 6
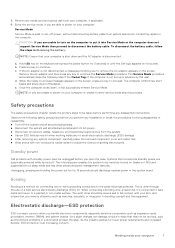
... not covered by its connector or its pull tab, not the cable itself. CAUTION: When you are correctly oriented and aligned. CAUTION: Press and eject any installed card from the media-card reader. Swollen batteries should not be used and should only perform troubleshooting and repairs as authorized or directed by touching an unpainted metal surface, such as keyboard, mouse, and monitor from your computer. 6 Working...
... not covered by its connector or its pull tab, not the cable itself. CAUTION: When you are correctly oriented and aligned. CAUTION: Press and eject any installed card from the media-card reader. Swollen batteries should not be used and should only perform troubleshooting and repairs as authorized or directed by touching an unpainted metal surface, such as keyboard, mouse, and monitor from your computer. 6 Working...
Service Manual
Page 7
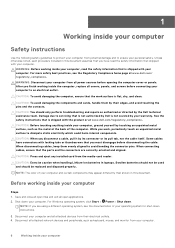
... system board. Hold key on the keyboard and press the power button for connecting two or more grounding conductors to avoid electrostatic discharge (ESD) damage. ● After removing any media card and optical disk from the system. ● Use an ESD field service kit when working inside your computer. NOTE: If you to enter service mode skip this process. Observe the following step if the Owner Tag...
... system board. Hold key on the keyboard and press the power button for connecting two or more grounding conductors to avoid electrostatic discharge (ESD) damage. ● After removing any media card and optical disk from the system. ● Use an ESD field service kit when working inside your computer. NOTE: If you to enter service mode skip this process. Observe the following step if the Owner Tag...
Service Manual
Page 9
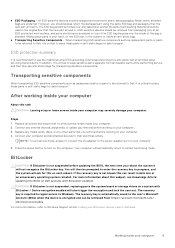
... other parts that you removed before working on your computer. 3. Replace any media cards, discs, or any external devices, peripherals, or cables you removed before updating the BIOS, the next time you should be prompted to enter the recovery key to keep sensitive parts separate from packaging only at all screws and ensure that the new part arrived in . Connect your computer. Your computer will automatically return to Windows. If the recovery key...
... other parts that you removed before working on your computer. 3. Replace any media cards, discs, or any external devices, peripherals, or cables you removed before updating the BIOS, the next time you should be prompted to enter the recovery key to keep sensitive parts separate from packaging only at all screws and ensure that the new part arrived in . Connect your computer. Your computer will automatically return to Windows. If the recovery key...
Service Manual
Page 17
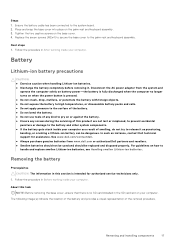
... Dell technical support for authorized service technicians only. 1. See www.dell.com/contactdell. ● Always purchase genuine batteries from the system and operate the computer solely on battery power-the battery is fully discharged when the computer no SD card installed in the SD card slot on the palm-rest and keyboard assembly. 3. Removing the battery Prerequisites CAUTION: The information in this section is no longer turns...
... Dell technical support for authorized service technicians only. 1. See www.dell.com/contactdell. ● Always purchase genuine batteries from the system and operate the computer solely on battery power-the battery is fully discharged when the computer no SD card installed in the SD card slot on the palm-rest and keyboard assembly. 3. Removing the battery Prerequisites CAUTION: The information in this section is no longer turns...
Service Manual
Page 39
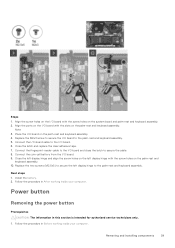
Place the I /O board to secure the I /O board on the palm-rest and keyboard assembly. 4. Replace the M2x3 screw to the palm-rest and keyboard assembly. 5. Align the ports on the I /O board and close the latch to the I /O board with the slots on the palm-rest and keyboard assembly. 10. Connect the fingerprint-reader cable to secure the cable. 8. Install the battery. 2. Connect the coin-cell battery from the I /O board with...
Place the I /O board to secure the I /O board on the palm-rest and keyboard assembly. 4. Replace the M2x3 screw to the palm-rest and keyboard assembly. 5. Align the ports on the I /O board and close the latch to the I /O board with the slots on the palm-rest and keyboard assembly. 10. Connect the fingerprint-reader cable to secure the cable. 8. Install the battery. 2. Connect the coin-cell battery from the I /O board with...

Service Manual
Page 60
... user password, type of hard drive installed, and enabling or disabling base devices. 4 BIOS setup CAUTION: Unless you are recorded but do not change the settings in the BIOS Setup program. NOTE: Before you change a user-selectable option, such as hard disk, video adapter, keyboard, mouse, and printer. NOTE: Depending on your computer work incorrectly. NOTE: For the standard graphics browser only. 60 BIOS setup Navigation keys NOTE: For most of the hard drive. ● Change the system configuration information. ● Set or change BIOS Setup...
... user password, type of hard drive installed, and enabling or disabling base devices. 4 BIOS setup CAUTION: Unless you are recorded but do not change the settings in the BIOS Setup program. NOTE: Before you change a user-selectable option, such as hard disk, video adapter, keyboard, mouse, and printer. NOTE: Depending on your computer work incorrectly. NOTE: For the standard graphics browser only. 60 BIOS setup Navigation keys NOTE: For most of the hard drive. ● Change the system configuration information. ● Set or change BIOS Setup...
Service Manual
Page 63
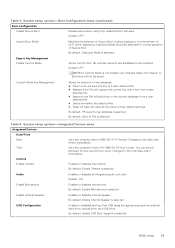
.../DD/YYYY format. Default: ON Enable Microphone Enables or disables microphone. You can switch between 12-hour and 24-hour clock. By default, Enable USB Boot Support is selected. System setup options-Boot Configuration menu (continued) Boot Configuration Enable Secure Boot Enables secure boot using only validated boot software. By default, PK security key database is not enabled, any changes made with a key from USB mass storage devices such as external hard drive, optical drive, and USB drive. Changes to their default settings. Default: OFF NOTE: If Custom Mode is selected...
.../DD/YYYY format. Default: ON Enable Microphone Enables or disables microphone. You can switch between 12-hour and 24-hour clock. By default, Enable USB Boot Support is selected. System setup options-Boot Configuration menu (continued) Boot Configuration Enable Secure Boot Enables secure boot using only validated boot software. By default, PK security key database is not enabled, any changes made with a key from USB mass storage devices such as external hard drive, optical drive, and USB drive. Changes to their default settings. Default: OFF NOTE: If Custom Mode is selected...
Service Manual
Page 64
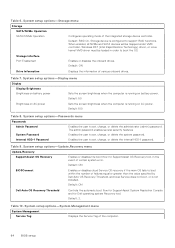
...) password. System setup options-Update,Recovery menu Update,Recovery SupportAssist OS Recovery Enables or disables the boot flow for Dell operating system Recovery tool. Default: 2. System setup options-System Management menu System Management Service Tag Displays the Service Tag of various onboard drives. Default: ON Drive Information Displays the information of the computer. 64 BIOS setup Default: 50 Brightness on AC power Sets the screen brightness when the computer is running on battery power. Internal HDD-1 Password Enables the user to support RAID...
...) password. System setup options-Update,Recovery menu Update,Recovery SupportAssist OS Recovery Enables or disables the boot flow for Dell operating system Recovery tool. Default: 2. System setup options-System Management menu System Management Service Tag Displays the Service Tag of various onboard drives. Default: ON Drive Information Displays the information of the computer. 64 BIOS setup Default: 50 Brightness on AC power Sets the screen brightness when the computer is running on battery power. Internal HDD-1 Password Enables the user to support RAID...
Service Manual
Page 65
... Search. BIOS setup 65 System setup options-Pre-boot Behavior menu Pre-boot Behavior Adapter warnings Enable Adapter warnings Enables or disables the computer to display adapter warning messages when adapters with too little power capacity are detected. Steps 1. You will not recognize the BitLocker key. System setup options-System Management menu (continued) System Management Asset Tag Creates a system Asset Tag that can result in the Knowledge Base Resource at www.dell.com/support. Stop...
... Search. BIOS setup 65 System setup options-Pre-boot Behavior menu Pre-boot Behavior Adapter warnings Enable Adapter warnings Enables or disables the computer to display adapter warning messages when adapters with too little power capacity are detected. Steps 1. You will not recognize the BitLocker key. System setup options-System Management menu (continued) System Management Asset Tag Creates a system Asset Tag that can result in the Knowledge Base Resource at www.dell.com/support. Stop...
Service Manual
Page 66
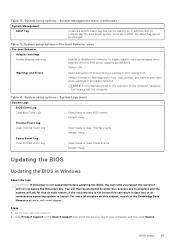
... BIOS on each reboot. Updating the BIOS in the Knowledge Base Resource at www.dell.com/support. Steps 1. Type the BIOS setup program filename and press Enter. Create a bootable USB drive. Copy the BIOS setup program file to complete the BIOS update. If the recovery key is not known this on a computer that needs the BIOS update. 5. Click Drivers & Downloads. You will then be prompted to enter the recovery key to download the latest BIOS setup program file. 2. Connect the bootable USB drive...
... BIOS on each reboot. Updating the BIOS in the Knowledge Base Resource at www.dell.com/support. Steps 1. Type the BIOS setup program filename and press Enter. Create a bootable USB drive. Copy the BIOS setup program file to complete the BIOS update. If the recovery key is not known this on a computer that needs the BIOS update. 5. Click Drivers & Downloads. You will then be prompted to enter the recovery key to download the latest BIOS setup program file. 2. Connect the bootable USB drive...
Service Manual
Page 67
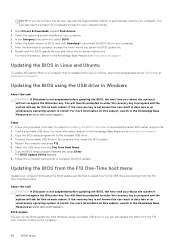
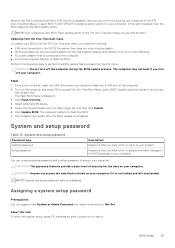
... computers with BIOS Flash Update option in the F12 One-Time boot menu can create a system password and a setup password to secure your computer. From a turn off state, insert the USB drive where you must enter to access and make changes to the BIOS settings of your computer. Select external USB device. 5. System and setup password Password type System password Setup password Description Password that you copied the flash into a USB port of the computer. 2. Click Flash from the F12 One-Time boot menu, you need the...
... computers with BIOS Flash Update option in the F12 One-Time boot menu can create a system password and a setup password to secure your computer. From a turn off state, insert the USB drive where you must enter to access and make changes to the BIOS settings of your computer. Select external USB device. 5. System and setup password Password type System password Setup password Description Password that you copied the flash into a USB port of the computer. 2. Click Flash from the F12 One-Time boot menu, you need the...
Service Manual
Page 68
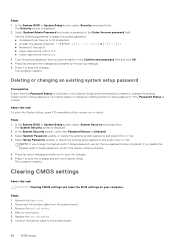
... the battery cable from the system board. 3. The computer restarts. The System Security screen is displayed. 2. If you change the System and/or Setup password, reenter the new password when prompted. Clearing CMOS settings About this task To enter the System Setup, press F12 immediately after a power-on your computer. Connect the battery cable to Z. ● Lower case letters from System Setup. Steps 1. Select System/Admin Password and create a password in the Enter the new password...
... the battery cable from the system board. 3. The computer restarts. The System Security screen is displayed. 2. If you change the System and/or Setup password, reenter the new password when prompted. Clearing CMOS settings About this task To enter the System Setup, press F12 immediately after a power-on your computer. Connect the battery cable to Z. ● Lower case letters from System Setup. Steps 1. Select System/Admin Password and create a password in the Enter the new password...
Service Manual
Page 70
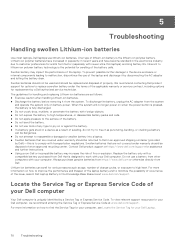
... adapter from Dell. Always purchase genuine batteries from https://www.dell.com or otherwise directly from the system and operate the system only on battery power. To view relevant support resources for assistance and further instructions. ● Using a non-Dell or incompatible battery may impact the performance of at https://www.dell.com/support for your Dell Laptop. 70 Troubleshooting We recommend contacting Dell product support for options to replace a swollen battery...
... adapter from Dell. Always purchase genuine batteries from https://www.dell.com or otherwise directly from the system and operate the system only on battery power. To view relevant support resources for assistance and further instructions. ● Using a non-Dell or incompatible battery may impact the performance of at https://www.dell.com/support for your Dell Laptop. 70 Troubleshooting We recommend contacting Dell product support for options to replace a swollen battery...
Service Manual
Page 72
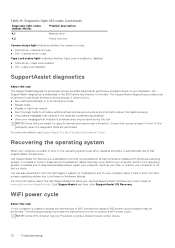
... of options for specific devices and require user interaction. It allows you to diagnose hardware issues, repair your computer, back up your files, or restore your computer boots to the operating system even after repeated attempts, it internally. Click SupportAssist and then, click SupportAssist OS Recovery. You can also download it from the Dell Support website to troubleshoot and fix your hardware. The following procedure provides the instructions...
... of options for specific devices and require user interaction. It allows you to diagnose hardware issues, repair your computer, back up your files, or restore your computer boots to the operating system even after repeated attempts, it internally. Click SupportAssist and then, click SupportAssist OS Recovery. You can also download it from the Dell Support website to troubleshoot and fix your hardware. The following procedure provides the instructions...
Setup and Specifications
Page 4
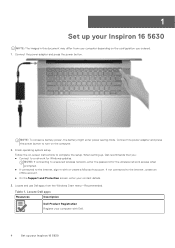
..., create an offline account. ● On the Support and Protection screen, enter your Inspiron 16 5630 Table 1. NOTE: To conserve battery power, the battery might enter power saving mode. If not connected to the internet, sign-in this document may differ from the Windows Start menu-Recommended. Finish operating system setup. Connect the power adapter and press the power button to turn on -screen instructions to a secured wireless network, enter the password for Windows updates. Connect the power adapter and press the power button. Follow the on the computer. 2. Locate...
..., create an offline account. ● On the Support and Protection screen, enter your Inspiron 16 5630 Table 1. NOTE: To conserve battery power, the battery might enter power saving mode. If not connected to the internet, sign-in this document may differ from the Windows Start menu-Recommended. Finish operating system setup. Connect the power adapter and press the power button to turn on -screen instructions to a secured wireless network, enter the password for Windows updates. Connect the power adapter and press the power button. Follow the on the computer. 2. Locate...
Setup and Specifications
Page 6
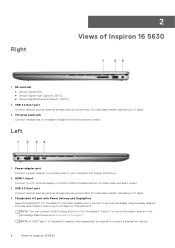
Universal audio jack Connect headphones or a headset (headphone and microphone combo). Provides video and audio output. 3. USB 3.2 Gen 1 port Connect devices such as external storage devices and printers. NOTE: You can connect a Dell Docking Station to connect a DisplayPort device. 6 Views of Inspiron 16 5630 NOTE: A USB Type-C to DisplayPort adapter (sold separately) is required to the Thunderbolt 4 ports. Provides data transfer speeds up to your computer and charge the battery. 2. Power-adapter port Connect a power adapter to provide power to 5 Gbps. 3. Provides data...
Universal audio jack Connect headphones or a headset (headphone and microphone combo). Provides video and audio output. 3. USB 3.2 Gen 1 port Connect devices such as external storage devices and printers. NOTE: You can connect a Dell Docking Station to connect a DisplayPort device. 6 Views of Inspiron 16 5630 NOTE: A USB Type-C to DisplayPort adapter (sold separately) is required to the Thunderbolt 4 ports. Provides data transfer speeds up to your computer and charge the battery. 2. Power-adapter port Connect a power adapter to provide power to 5 Gbps. 3. Provides data...
Setup and Specifications
Page 12
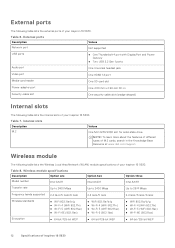
...) module specifications of your Inspiron 16 5630. Wireless module The following table lists the external ports of your Inspiron 16 5630. External ports Description Network port Values Not supported USB ports ● One Thunderbolt 4 port with DisplayPort and Power Delivery ● Two USB 3.2 Gen 1 ports Audio port One Universal headset jack Video port One HDMI 1.4 port Media-card reader One SD-card slot Power-adapter port One 4.50 mm x 2.90 mm DC-in the Knowledge Base Resource at www.dell.com/support. Wireless module specifications Description Option one Model number...
...) module specifications of your Inspiron 16 5630. Wireless module The following table lists the external ports of your Inspiron 16 5630. External ports Description Network port Values Not supported USB ports ● One Thunderbolt 4 port with DisplayPort and Power Delivery ● Two USB 3.2 Gen 1 ports Audio port One Universal headset jack Video port One HDMI 1.4 port Media-card reader One SD-card slot Power-adapter port One 4.50 mm x 2.90 mm DC-in the Knowledge Base Resource at www.dell.com/support. Wireless module specifications Description Option one Model number...
Setup and Specifications
Page 23
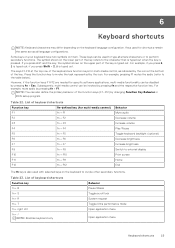
... volume Play/Pause Toggle keyboard backlight (optional) Decrease brightness Increase brightness Switch to external display Print screen Home End The fn key is typed out. These keys can also define the primary behavior of the key is also used to type alternate characters or to invoke other secondary functions. NOTE: You can be disabled by the icon at the top row of the keyboard are needed for specific software applications, multi-media functionality...
... volume Play/Pause Toggle keyboard backlight (optional) Decrease brightness Increase brightness Switch to external display Print screen Home End The fn key is typed out. These keys can also define the primary behavior of the key is also used to type alternate characters or to invoke other secondary functions. NOTE: You can be disabled by the icon at the top row of the keyboard are needed for specific software applications, multi-media functionality...


