Owner's Manual (PDF)
Page 7
...ensure your operating system for shut-down . NOTE: If you are using a different operating system, see the Regulatory Compliance Homepage at dell.com/regulatory_compliance. Before You Begin Turn Off Your Computer and Connected Devices CAUTION: To avoid losing data, save and close all open ...surface is unplugged, to the upper-right or lower-right corner of your personal safety. After you finish working inside the computer, replace all covers, panels, and screws before connecting to open the Charms sidebar, and then click Settings→ Power→ Shutdown. • Windows 7:...
...ensure your operating system for shut-down . NOTE: If you are using a different operating system, see the Regulatory Compliance Homepage at dell.com/regulatory_compliance. Before You Begin Turn Off Your Computer and Connected Devices CAUTION: To avoid losing data, save and close all open ...surface is unplugged, to the upper-right or lower-right corner of your personal safety. After you finish working inside the computer, replace all covers, panels, and screws before connecting to open the Charms sidebar, and then click Settings→ Power→ Shutdown. • Windows 7:...
Owner's Manual (PDF)
Page 8
... may require the following tools: • Phillips screwdriver • Plastic scribe 8 | Before You Begin CAUTION: Only a certified service technician is authorized to remove the computer cover and access any of the computer. CAUTION: To disconnect a network cable, first unplug the cable from your computer and then unplug the cable from the...
... may require the following tools: • Phillips screwdriver • Plastic scribe 8 | Before You Begin CAUTION: Only a certified service technician is authorized to remove the computer cover and access any of the computer. CAUTION: To disconnect a network cable, first unplug the cable from your computer and then unplug the cable from the...
Owner's Manual (PDF)
Page 13
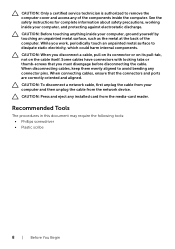
... computer base. 3 Using your fingertips, lift the memory-module cover out of the slots on page 9. After working inside your computer and follow the instructions in "Before You Begin" on page 7. For additional safety best practices information, see the Regulatory Compliance Homepage at dell.com/ regulatory_compliance. Procedure 1 Close the display and turn...
... computer base. 3 Using your fingertips, lift the memory-module cover out of the slots on page 9. After working inside your computer and follow the instructions in "Before You Begin" on page 7. For additional safety best practices information, see the Regulatory Compliance Homepage at dell.com/ regulatory_compliance. Procedure 1 Close the display and turn...
Owner's Manual (PDF)
Page 15
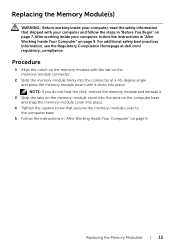
...Tighten the captive screw that shipped with the tab on the memory-module connector. 2 Slide the memory module firmly into the connector at dell.com/ regulatory_compliance. For additional safety best practices information, see the Regulatory Compliance Homepage at a 45-degree angle and press the memory module ...down until it . 3 Slide the tabs on the memory-module cover into the slots on the computer base and snap the memory-module cover into place. Replacing the Memory Module(s) WARNING: Before working inside your computer, read the safety information ...
...Tighten the captive screw that shipped with the tab on the memory-module connector. 2 Slide the memory module firmly into the connector at dell.com/ regulatory_compliance. For additional safety best practices information, see the Regulatory Compliance Homepage at a 45-degree angle and press the memory module ...down until it . 3 Slide the tabs on the memory-module cover into the slots on the computer base and snap the memory-module cover into place. Replacing the Memory Module(s) WARNING: Before working inside your computer, read the safety information ...

Owner's Manual (PDF)
Page 28
Procedure 1 Close the display and turn the computer over. 2 Gently pry out the rubber screw-caps that cover the screws on the computer base. 3 Remove the screws that secure the palm-rest to the computer base. 1 2 1 screws (8) 2 rubber screw-caps (7) 28 | Removing the Palm-Rest
Procedure 1 Close the display and turn the computer over. 2 Gently pry out the rubber screw-caps that cover the screws on the computer base. 3 Remove the screws that secure the palm-rest to the computer base. 1 2 1 screws (8) 2 rubber screw-caps (7) 28 | Removing the Palm-Rest

Owner's Manual (PDF)
Page 76
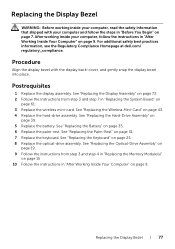
Procedure 1 Using your fingertips, carefully pry up the inside edge of the display bezel. 2 Remove the display bezel off the display back-cover. 1 1 display bezel 76 | Removing the Display Bezel
Procedure 1 Using your fingertips, carefully pry up the inside edge of the display bezel. 2 Remove the display bezel off the display back-cover. 1 1 display bezel 76 | Removing the Display Bezel
Owner's Manual (PDF)
Page 77
...: Before working inside your computer, read the safety information that shipped with the display back-cover, and gently snap the display bezel into place. For additional safety best practices information, see the Regulatory Compliance Homepage at dell.com/ regulatory_compliance. See "Replacing the Hard-Drive Assembly" on page 35. 6 Replace the palm-rest...
...: Before working inside your computer, read the safety information that shipped with the display back-cover, and gently snap the display bezel into place. For additional safety best practices information, see the Regulatory Compliance Homepage at dell.com/ regulatory_compliance. See "Replacing the Hard-Drive Assembly" on page 35. 6 Replace the palm-rest...

Owner's Manual (PDF)
Page 80
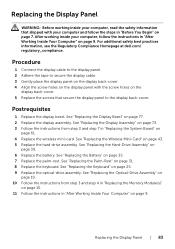
Procedure 1 Remove the screws that secure the display panel to the display back-cover. 2 Gently lift the display panel and turn it over. 3 2 1 1 screws (4) 3 display back cover 2 display panel 80 | Removing the Display Panel
Procedure 1 Remove the screws that secure the display panel to the display back-cover. 2 Gently lift the display panel and turn it over. 3 2 1 1 screws (4) 3 display back cover 2 display panel 80 | Removing the Display Panel
Owner's Manual (PDF)
Page 83
... Inside Your Computer" on page 77. 2 Replace the display assembly. For additional safety best practices information, see the Regulatory Compliance Homepage at dell.com/ regulatory_compliance. Postrequisites 1 Replace the display bezel. See "Replacing the Display Assembly" on page 73. 3 Follow the instructions from step...the System Board" on page 7. Procedure 1 Connect the display cable to the display panel. 2 Adhere the tape to the display back-cover. See "Replacing the Display Bezel" on page 9. See "Replacing the Optical-Drive Assembly" on page 19. 10 Follow the instructions from ...
... Inside Your Computer" on page 77. 2 Replace the display assembly. For additional safety best practices information, see the Regulatory Compliance Homepage at dell.com/ regulatory_compliance. Postrequisites 1 Replace the display bezel. See "Replacing the Display Assembly" on page 73. 3 Follow the instructions from step...the System Board" on page 7. Procedure 1 Connect the display cable to the display panel. 2 Adhere the tape to the display back-cover. See "Replacing the Display Bezel" on page 9. See "Replacing the Optical-Drive Assembly" on page 19. 10 Follow the instructions from ...

Owner's Manual (PDF)
Page 86
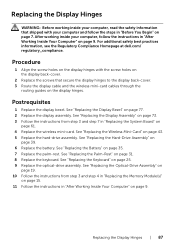
Procedure 1 Remove the screws that secure the display hinges to the display back-cover. 2 Release the display cable and the wireless antenna cables from the routing guides on the display hinges. 3 Lift the display hinges off the display back-cover. 2 1 1 display hinges (2) 2 screws (4) 86 | Removing the Display Hinges
Procedure 1 Remove the screws that secure the display hinges to the display back-cover. 2 Release the display cable and the wireless antenna cables from the routing guides on the display hinges. 3 Lift the display hinges off the display back-cover. 2 1 1 display hinges (2) 2 screws (4) 86 | Removing the Display Hinges
Owner's Manual (PDF)
Page 87
...: Before working inside your computer, read the safety information that shipped with the screw holes on the display back-cover. 2 Replace the screws that secure the display hinges to the display back-cover. 3 Route the display cable and the wireless mini-card cables through the routing guides on the display hinges.... "Replacing the System Board" on page 61. 4 Replace the wireless mini-card. For additional safety best practices information, see the Regulatory Compliance Homepage at dell.com/ regulatory_compliance. See "Replacing the Wireless Mini-Card" on page 35. 7 Replace the palm-rest.
...: Before working inside your computer, read the safety information that shipped with the screw holes on the display back-cover. 2 Replace the screws that secure the display hinges to the display back-cover. 3 Route the display cable and the wireless mini-card cables through the routing guides on the display hinges.... "Replacing the System Board" on page 61. 4 Replace the wireless mini-card. For additional safety best practices information, see the Regulatory Compliance Homepage at dell.com/ regulatory_compliance. See "Replacing the Wireless Mini-Card" on page 35. 7 Replace the palm-rest.
Owner's Manual (PDF)
Page 90
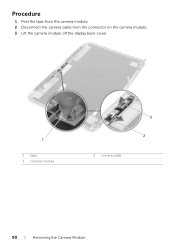
Procedure 1 Peel the tape from the camera module. 2 Disconnect the camera cable from the connector on the camera module. 3 Lift the camera module off the display back-cover. 1 1 tape 3 camera module 2 camera cable 3 2 90 | Removing the Camera Module
Procedure 1 Peel the tape from the camera module. 2 Disconnect the camera cable from the connector on the camera module. 3 Lift the camera module off the display back-cover. 1 1 tape 3 camera module 2 camera cable 3 2 90 | Removing the Camera Module
Owner's Manual (PDF)
Page 91
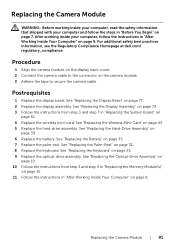
... follow the instructions in "After Working Inside Your Computer" on page 9. Postrequisites 1 Replace the display bezel. Procedure 1 Align the camera module on the display back-cover. 2 Connect the camera cable to secure the camera cable. See "Replacing the Wireless Mini-Card" on the camera module. 3 Adhere the tape to the connector... assembly. See "Replacing the Palm-Rest" on page 7. Replacing the Camera Module | 91 For additional safety best practices information, see the Regulatory Compliance Homepage at dell.com/ regulatory_compliance.
... follow the instructions in "After Working Inside Your Computer" on page 9. Postrequisites 1 Replace the display bezel. Procedure 1 Align the camera module on the display back-cover. 2 Connect the camera cable to secure the camera cable. See "Replacing the Wireless Mini-Card" on the camera module. 3 Adhere the tape to the connector... assembly. See "Replacing the Palm-Rest" on page 7. Replacing the Camera Module | 91 For additional safety best practices information, see the Regulatory Compliance Homepage at dell.com/ regulatory_compliance.


