Owner's Manual
Page 3
Contents Before You Begin 7 Turn Off Your Computer and Connected Devices . . . . . 7 Safety Instructions 8 Recommended Tools 8 After Working Inside Your Computer 9 Removing the Battery 10 Procedure 10 Replacing the Battery 11 ...
Contents Before You Begin 7 Turn Off Your Computer and Connected Devices . . . . . 7 Safety Instructions 8 Recommended Tools 8 After Working Inside Your Computer 9 Removing the Battery 10 Procedure 10 Replacing the Battery 11 ...

Owner's Manual
Page 7
Microsoft Windows shuts down . Before You Begin Turn Off Your Computer and Connected Devices CAUTION: To avoid losing data, save and close all open files and exit all telephone cables...pointer to the upper-right or lower-right corner of the screen to ground the system board. Before You Begin | 7 NOTE: If you turn off your computer. 1 Save and close all open files and exit all open programs. 2 Follow the instructions to shut down your computer based..., and then click Settings→ Power→ Shutdown. • Windows 7: Click Start and click Shut down and then the computer turns off.
Microsoft Windows shuts down . Before You Begin Turn Off Your Computer and Connected Devices CAUTION: To avoid losing data, save and close all open files and exit all telephone cables...pointer to the upper-right or lower-right corner of the screen to ground the system board. Before You Begin | 7 NOTE: If you turn off your computer. 1 Save and close all open files and exit all open programs. 2 Follow the instructions to shut down your computer based..., and then click Settings→ Power→ Shutdown. • Windows 7: Click Start and click Shut down and then the computer turns off.
Owner's Manual
Page 9
After Working Inside Your Computer | 9 CAUTION: Before turning on your computer, replace all screws and ensure that no stray screws remain inside the computer. After Working Inside Your Computer After you removed before ...
After Working Inside Your Computer | 9 CAUTION: Before turning on your computer, replace all screws and ensure that no stray screws remain inside the computer. After Working Inside Your Computer After you removed before ...
Owner's Manual
Page 10
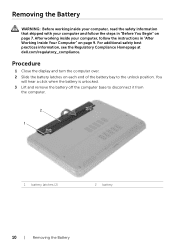
... information, see the Regulatory Compliance Homepage at dell.com/regulatory_compliance. Removing the Battery WARNING: Before working inside your computer, read the safety information that shipped with your computer, follow the steps in "After Working Inside Your Computer" on page 9. Procedure 1 Close the display and turn the computer over. 2 Slide the battery latches...
... information, see the Regulatory Compliance Homepage at dell.com/regulatory_compliance. Removing the Battery WARNING: Before working inside your computer, read the safety information that shipped with your computer, follow the steps in "After Working Inside Your Computer" on page 9. Procedure 1 Close the display and turn the computer over. 2 Slide the battery latches...

Owner's Manual
Page 21
...-rest assembly. 1 23 1 plastic scribe 3 keyboard 2 tabs (9) Removing the Keyboard | 21 For additional safety best practices information, see the Regulatory Compliance Homepage at dell.com/regulatory_compliance. Procedure 1 Turn the computer over and open the display as far as possible. 2 Using a plastic scribe, release the keyboard from the tabs on page 10. Removing...
...-rest assembly. 1 23 1 plastic scribe 3 keyboard 2 tabs (9) Removing the Keyboard | 21 For additional safety best practices information, see the Regulatory Compliance Homepage at dell.com/regulatory_compliance. Procedure 1 Turn the computer over and open the display as far as possible. 2 Using a plastic scribe, release the keyboard from the tabs on page 10. Removing...

Owner's Manual
Page 22
3 Lift and slide the keyboard towards the display to release the keyboard from the palm-rest assembly. 4 Turn the keyboard over and place it on the palm-rest assembly. 5 Lift the connector latch and disconnect the keyboard from the connector on the system board. 6 Lift the keyboard off the palm-rest assembly. 1 2 3 1 connector latch 3 keyboard 2 keyboard cable 22 | Removing the Keyboard
3 Lift and slide the keyboard towards the display to release the keyboard from the palm-rest assembly. 4 Turn the keyboard over and place it on the palm-rest assembly. 5 Lift the connector latch and disconnect the keyboard from the connector on the system board. 6 Lift the keyboard off the palm-rest assembly. 1 2 3 1 connector latch 3 keyboard 2 keyboard cable 22 | Removing the Keyboard
Owner's Manual
Page 24
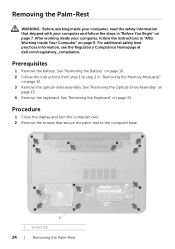
...computer base. 1 1 screws (12) 24 | Removing the Palm-Rest For additional safety best practices information, see the Regulatory Compliance Homepage at dell.com/regulatory_compliance. See "Removing the Optical-Drive Assembly" on page 21. After working inside your computer and follow the instructions in "After Working... the optical-drive assembly. See "Removing the Keyboard" on page 15. 4 Remove the keyboard. Procedure 1 Close the display and turn the computer over. 2 Remove the screws that shipped with your computer, follow the steps in "Removing the Memory Module(s)" on page 9.
...computer base. 1 1 screws (12) 24 | Removing the Palm-Rest For additional safety best practices information, see the Regulatory Compliance Homepage at dell.com/regulatory_compliance. See "Removing the Optical-Drive Assembly" on page 21. After working inside your computer and follow the instructions in "After Working... the optical-drive assembly. See "Removing the Keyboard" on page 15. 4 Remove the keyboard. Procedure 1 Close the display and turn the computer over. 2 Remove the screws that shipped with your computer, follow the steps in "Removing the Memory Module(s)" on page 9.

Owner's Manual
Page 25
3 Turn the computer over and open the display as far as possible. 4 Lift the connector latches and pull the pull-tab to disconnect the touchpad cable and the power-button cable from the system board. 1 1 touchpad cable 3 connector latches (2) 2 3 2 power-button cable Removing the Palm-Rest | 25
3 Turn the computer over and open the display as far as possible. 4 Lift the connector latches and pull the pull-tab to disconnect the touchpad cable and the power-button cable from the system board. 1 1 touchpad cable 3 connector latches (2) 2 3 2 power-button cable Removing the Palm-Rest | 25
Owner's Manual
Page 27
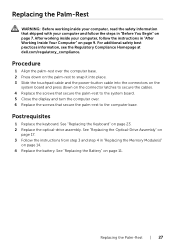
... working inside your computer, read the safety information that secure the palm-rest to the system board. 5 Close the display and turn the computer over. 6 Replace the screws that shipped with your computer, follow the steps in "Replacing the Memory Module(s)" on page... 7. For additional safety best practices information, see the Regulatory Compliance Homepage at dell.com/regulatory_compliance. After working inside your computer and follow the instructions in "After Working Inside Your Computer" on page 9. See "Replacing...
... working inside your computer, read the safety information that secure the palm-rest to the system board. 5 Close the display and turn the computer over. 6 Replace the screws that shipped with your computer, follow the steps in "Replacing the Memory Module(s)" on page... 7. For additional safety best practices information, see the Regulatory Compliance Homepage at dell.com/regulatory_compliance. After working inside your computer and follow the instructions in "After Working Inside Your Computer" on page 9. See "Replacing...
Owner's Manual
Page 37
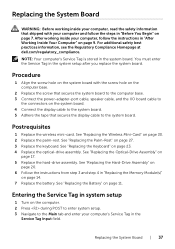
... wireless mini-card. See "Replacing the Wireless Mini-Card" on page 27. 3 Replace the keyboard. Entering the Service Tag in system setup 1 Turn on the computer. 2 Press during POST to enter system setup. 3 Navigate to the system board. Replacing the System Board | 37 You must ...the Battery" on page 17. 5 Replace the hard-drive assembly. For additional safety best practices information, see the Regulatory Compliance Homepage at dell.com/regulatory_compliance. NOTE: Your computer's Service Tag is stored in the system setup after you replace the system board. See "Replacing the...
... wireless mini-card. See "Replacing the Wireless Mini-Card" on page 27. 3 Replace the keyboard. Entering the Service Tag in system setup 1 Turn on the computer. 2 Press during POST to enter system setup. 3 Navigate to the system board. Replacing the System Board | 37 You must ...the Battery" on page 17. 5 Replace the hard-drive assembly. For additional safety best practices information, see the Regulatory Compliance Homepage at dell.com/regulatory_compliance. NOTE: Your computer's Service Tag is stored in the system setup after you replace the system board. See "Replacing the...

Owner's Manual
Page 39
Procedure 1 Turn the system board over and place it on a flat surface. 2 Using a plastic scribe, gently pry out the coin-cell battery out of the battery socket on the system board. 1 plastic scribe 1 2 2 coin-cell battery Removing the Coin-Cell Battery | 39
Procedure 1 Turn the system board over and place it on a flat surface. 2 Using a plastic scribe, gently pry out the coin-cell battery out of the battery socket on the system board. 1 plastic scribe 1 2 2 coin-cell battery Removing the Coin-Cell Battery | 39

Owner's Manual
Page 42
Procedure 1 Turn the system board over and place the system board on a flat surface. 2 In sequential order (indicated on the heat-sink), remove the screws that secure the heat-sink to the system board. 3 Lift the heat-sink off the system board. 2 1 1 screw (6) 2 fan 42 | Removing the Heat-Sink
Procedure 1 Turn the system board over and place the system board on a flat surface. 2 In sequential order (indicated on the heat-sink), remove the screws that secure the heat-sink to the system board. 3 Lift the heat-sink off the system board. 2 1 1 screw (6) 2 fan 42 | Removing the Heat-Sink

Owner's Manual
Page 45
Procedure 1 Turn the system board over and place the system board on a flat surface. 2 Disconnect the fan cable from the connector on the system board. 3 Remove the screw that secures the fan to the system board. 4 Lift the fan off the system board. 3 1 2 1 screw 3 fan cable 2 fan Removing the Fan | 45
Procedure 1 Turn the system board over and place the system board on a flat surface. 2 Disconnect the fan cable from the connector on the system board. 3 Remove the screw that secures the fan to the system board. 4 Lift the fan off the system board. 3 1 2 1 screw 3 fan cable 2 fan Removing the Fan | 45

Owner's Manual
Page 62
Procedure 1 Remove the screws that secure the display panel to the display back-cover. 2 Gently lift the display panel and turn it over. 2 1 3 1 display back-cover 3 screws (4) 2 display panel 62 | Removing the Display Panel
Procedure 1 Remove the screws that secure the display panel to the display back-cover. 2 Gently lift the display panel and turn it over. 2 1 3 1 display back-cover 3 screws (4) 2 display panel 62 | Removing the Display Panel
Owner's Manual
Page 68
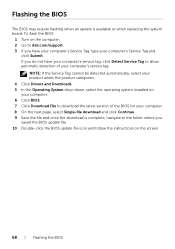
... product categories. 4 Click Drivers and Downloads. 5 In the Operating System drop-down, select the operating system installed on the computer. 2 Go to dell.com/support. 3 If you have your computer's service tag, click Detect Service Tag to the folder where you do not have your computer's Service...require flashing when an update is complete, navigate to allow automatic detection of your computer's Service Tag and click Submit. To flash the BIOS: 1 Turn on your computer. 6 Click BIOS. 7 Click Download File to download the latest version of the BIOS for your computer. 8 On the next page...
... product categories. 4 Click Drivers and Downloads. 5 In the Operating System drop-down, select the operating system installed on the computer. 2 Go to dell.com/support. 3 If you have your computer's service tag, click Detect Service Tag to the folder where you do not have your computer's Service...require flashing when an update is complete, navigate to allow automatic detection of your computer's Service Tag and click Submit. To flash the BIOS: 1 Turn on your computer. 6 Click BIOS. 7 Click Download File to download the latest version of the BIOS for your computer. 8 On the next page...


